System Reference Manual
Page 11
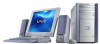
... Components 1 Front View...2 Drives ...3 Buttons and Switches 4 Indicators 5 Connectors 6 Rear View ...7 Icon Labels 8 I/O Connectors 10 Expansion Slots 14 Chapter 2 - Configuring Your System 15 Accessing the BIOS Setup Utility 16 Changing Power Management Settings 17 xi Contents NOTICE ...ii Owner's Record iii Safety Information and Caution iv Regulatory Information vi FCC Part...
... Components 1 Front View...2 Drives ...3 Buttons and Switches 4 Indicators 5 Connectors 6 Rear View ...7 Icon Labels 8 I/O Connectors 10 Expansion Slots 14 Chapter 2 - Configuring Your System 15 Accessing the BIOS Setup Utility 16 Changing Power Management Settings 17 xi Contents NOTICE ...ii Owner's Record iii Safety Information and Caution iv Regulatory Information vi FCC Part...
System Reference Manual
Page 29
Chapter 2 Configuring Your System This chapter contains information on configuring your system. ❑ Making changes to the BIOS settings. ❑ Making changes to the display's power management settings. 15
Chapter 2 Configuring Your System This chapter contains information on configuring your system. ❑ Making changes to the BIOS settings. ❑ Making changes to the display's power management settings. 15
System Reference Manual
Page 30
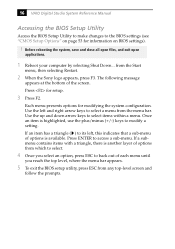
... that a sub-menu of options is available. 16 VAIO Digital Studio System Reference Manual Accessing the BIOS Setup Utility Access the BIOS Setup Utility to make changes to select a menu from... the menu bar. Before rebooting the system, save and close all open files, and exit open applications. 1 Reboot your computer..., where the menu bar appears. 5 To exit the BIOS setup utility, press ESC from the Start menu, then selecting Restart. 2 When the Sony logo appears, press F3. If a submenu contains items with...
... that a sub-menu of options is available. 16 VAIO Digital Studio System Reference Manual Accessing the BIOS Setup Utility Access the BIOS Setup Utility to make changes to select a menu from... the menu bar. Before rebooting the system, save and close all open files, and exit open applications. 1 Reboot your computer..., where the menu bar appears. 5 To exit the BIOS setup utility, press ESC from the Start menu, then selecting Restart. 2 When the Sony logo appears, press F3. If a submenu contains items with...
System Reference Manual
Page 44
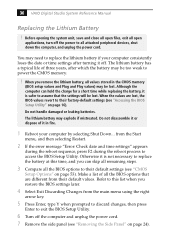
...discard changes, then press Enter to exit the BIOS Setup Utility. 6 Turn off the computer and unplug the power cord. 7 Remove ...computer can skip all remaining steps. 3 Compare all the BIOS options to replace the lithium battery if your computer...computer, and unplug the power cord. You may be too weak to all values stored in fire. 1 Reboot your computer... all the BIOS options that the settings will be lost , the BIOS values revert to access the BIOS Setup Utility...memory (BIOS setup values and Plug and Play values) may need to their default settings (see "Accessing the BIOS Setup ...
...discard changes, then press Enter to exit the BIOS Setup Utility. 6 Turn off the computer and unplug the power cord. 7 Remove ...computer can skip all remaining steps. 3 Compare all the BIOS options to replace the lithium battery if your computer...computer, and unplug the power cord. You may be too weak to all values stored in fire. 1 Reboot your computer... all the BIOS options that the settings will be lost , the BIOS values revert to access the BIOS Setup Utility...memory (BIOS setup values and Plug and Play values) may need to their default settings (see "Accessing the BIOS Setup ...

System Reference Manual
Page 46
The computer's BIOS settings are now restored. appears during the reboot sequence, press F2 during the battery replacement and you can skip the remaining steps. 17 Refer to the list you made in step 3 and restore any non-default BIOS settings (see "CMOS Setup Options" on page 53). ...type Y when prompted to discard changes, then press Enter to access the BIOS Setup Utility. If no error message displays, the computer's BIOS settings were retained during the reboot process to exit the BIOS Setup Utility. 32 VAIO Digital Studio System Reference Manual 16 If the error message "Error: Check ...
The computer's BIOS settings are now restored. appears during the reboot sequence, press F2 during the battery replacement and you can skip the remaining steps. 17 Refer to the list you made in step 3 and restore any non-default BIOS settings (see "CMOS Setup Options" on page 53). ...type Y when prompted to discard changes, then press Enter to access the BIOS Setup Utility. If no error message displays, the computer's BIOS settings were retained during the reboot process to exit the BIOS Setup Utility. 32 VAIO Digital Studio System Reference Manual 16 If the error message "Error: Check ...
System Reference Manual
Page 48
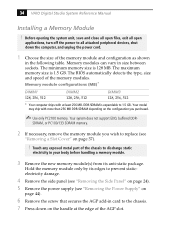
... at least 256 MB. Memory module configurations (MB)* DIMM1 128, 256, 512 DIMM2 128, 256, 512 DIMM3 128, 256, 512 * Your computer ships with more than 256 MB DDR-SDRAM depending on the configuration you wish to prevent staticelectricity damage. 4 Remove the side panel (see "Removing ...its anti-static package. Touch any exposed metal part of the AGP slot. The BIOS automatically detects the type, size and speed of the memory module and configuration as shown in the following table. 34 VAIO Digital Studio System Reference Manual Installing a Memory Module ! DDR-SDRAM is 1.5 GB....
... at least 256 MB. Memory module configurations (MB)* DIMM1 128, 256, 512 DIMM2 128, 256, 512 DIMM3 128, 256, 512 * Your computer ships with more than 256 MB DDR-SDRAM depending on the configuration you wish to prevent staticelectricity damage. 4 Remove the side panel (see "Removing ...its anti-static package. Touch any exposed metal part of the AGP slot. The BIOS automatically detects the type, size and speed of the memory module and configuration as shown in the following table. 34 VAIO Digital Studio System Reference Manual Installing a Memory Module ! DDR-SDRAM is 1.5 GB....
System Reference Manual
Page 65
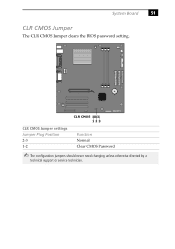
CLR CMOS 1 2 3 CLR CMOS Jumper settings Jumper Plug Position 2-3 1-2 Function Normal Clear CMOS Password ✍ The configuration jumpers should never need changing unless otherwise directed by a technical support or service technician. System Board 51 CLR CMOS Jumper The CLR CMOS Jumper clears the BIOS password setting.
CLR CMOS 1 2 3 CLR CMOS Jumper settings Jumper Plug Position 2-3 1-2 Function Normal Clear CMOS Password ✍ The configuration jumpers should never need changing unless otherwise directed by a technical support or service technician. System Board 51 CLR CMOS Jumper The CLR CMOS Jumper clears the BIOS password setting.

System Reference Manual
Page 67
... up and down arrow keys to select an option in this guide is the option currently set for each screen in the Award BIOS Setup Utility (see "Accessing the BIOS Setup Utility" on the menu bar. If you select). Use the left and right arrow keys to choose the selection. The Award... BIOS setup has five menu items on page 16). Press Enter to cycle through the other available options for your system. key to display the sub-...
... up and down arrow keys to select an option in this guide is the option currently set for each screen in the Award BIOS Setup Utility (see "Accessing the BIOS Setup Utility" on the menu bar. If you select). Use the left and right arrow keys to choose the selection. The Award... BIOS setup has five menu items on page 16). Press Enter to cycle through the other available options for your system. key to display the sub-...
System Reference Manual
Page 91
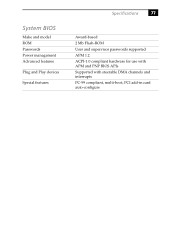
System BIOS Make and model ROM Passwords Power management Advanced features Plug and Play devices Special features Specifications 77 Award-based 2 Mb Flash-ROM User and supervisor passwords supported APM 1.2 ACPI-1.0 compliant hardware for use with APM and PNP BIOS APIs Supported with steerable DMA channels and interrupts PC-99 compliant, multi-boot, PCI add-in card auto-configure
System BIOS Make and model ROM Passwords Power management Advanced features Plug and Play devices Special features Specifications 77 Award-based 2 Mb Flash-ROM User and supervisor passwords supported APM 1.2 ACPI-1.0 compliant hardware for use with APM and PNP BIOS APIs Supported with steerable DMA channels and interrupts PC-99 compliant, multi-boot, PCI add-in card auto-configure
System Reference Manual
Page 93
... error messages beep codes 65 PCI configuration 66 expansion slots 14 specifications for 76 expansion slots - See Also BIOS CMOS Setup Utility 16 codes, beeps 65 communications, specifications 75 computer lithium battery viii configuring power management 17 connectors i.LINK 6 monitor 11 power 49 USB 6 cover, slot ...specifications 74 H hard drive specifications 76 79 See Also slots F fax/modem - See lithium battery beep codes 65 BIOS Setup Utility See CMOS Setup Utility BIOS setup utility advanced screen 57 boot screen 60 exit screen 61 main screen 55 options 53 power screen 59 screens ...
... error messages beep codes 65 PCI configuration 66 expansion slots 14 specifications for 76 expansion slots - See Also BIOS CMOS Setup Utility 16 codes, beeps 65 communications, specifications 75 computer lithium battery viii configuring power management 17 connectors i.LINK 6 monitor 11 power 49 USB 6 cover, slot ...specifications 74 H hard drive specifications 76 79 See Also slots F fax/modem - See lithium battery beep codes 65 BIOS Setup Utility See CMOS Setup Utility BIOS setup utility advanced screen 57 boot screen 60 exit screen 61 main screen 55 options 53 power screen 59 screens ...


