
System Reference Manual
Page 12
...VAIO Digital Studio™ System Reference Manual Chapter 3 - Removing, Installing, and Replacing Components 27 Removing the Side Cover 28 Replacing the Side Cover 29 Installing a PCI Add-In Card 30 Removing a PCI Add-in Card 32 Replacing the Lithium Battery 34 Installing System Memory 37 Removing a Memory... Module 41 Removing a Slot Cover 43 Covering an Open I/O Slot 44 Installing a 3.5-inch Internal Hard Disk Drive 45 To prepare a startup disk (PCV-RX490TV model only 45 To install a 3.5-inch internal hard...
...VAIO Digital Studio™ System Reference Manual Chapter 3 - Removing, Installing, and Replacing Components 27 Removing the Side Cover 28 Replacing the Side Cover 29 Installing a PCI Add-In Card 30 Removing a PCI Add-in Card 32 Replacing the Lithium Battery 34 Installing System Memory 37 Removing a Memory... Module 41 Removing a Slot Cover 43 Covering an Open I/O Slot 44 Installing a 3.5-inch Internal Hard Disk Drive 45 To prepare a startup disk (PCV-RX490TV model only 45 To install a 3.5-inch internal hard...

System Reference Manual
Page 51
...in card to the chassis. 7 Press down the computer, and unplug the power cord. 1 Choose the size of the memory module and configuration as shown in pairs. The maximum memory size is 8 MB. Hold the memory module only by its anti-static package. Direct ...VAIO Direct Web site. ✍ Use only PC-800 Rambus RIMM memory modules. Memory module configurations (MB)* RIMM1 RIMM2 0, 8, 16, 32, 64, 128, 256 0, 8, 16, 32, 64, 128, 256 * All models ship with more than 128 MB of the AGP slot. Removing, Installing, and Replacing Components 37 Installing System Memory ! RIMM memory...
...in card to the chassis. 7 Press down the computer, and unplug the power cord. 1 Choose the size of the memory module and configuration as shown in pairs. The maximum memory size is 8 MB. Hold the memory module only by its anti-static package. Direct ...VAIO Direct Web site. ✍ Use only PC-800 Rambus RIMM memory modules. Memory module configurations (MB)* RIMM1 RIMM2 0, 8, 16, 32, 64, 128, 256 0, 8, 16, 32, 64, 128, 256 * All models ship with more than 128 MB of the AGP slot. Removing, Installing, and Replacing Components 37 Installing System Memory ! RIMM memory...

System Reference Manual
Page 53
If the handles are straight up and locked into place. Removing, Installing, and Replacing Components 39 RIMMB 1 RIMMB 2 RIMMA 1 RIMMA 2 Handles Memory module (in RIMM A1/B1) WARNING HOT A1 Pin 1 side A4 A4 A9 6 7 2 Blank memory module (CRIMM) A1 A1 A4 A4 A9 6 7 2 10 Carefully but firmly insert the edge of the module...
If the handles are straight up and locked into place. Removing, Installing, and Replacing Components 39 RIMMB 1 RIMMB 2 RIMMA 1 RIMMA 2 Handles Memory module (in RIMM A1/B1) WARNING HOT A1 Pin 1 side A4 A4 A9 6 7 2 Blank memory module (CRIMM) A1 A1 A4 A4 A9 6 7 2 10 Carefully but firmly insert the edge of the module...
System Reference Manual
Page 55
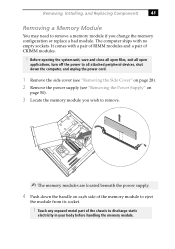
... a bad module. Removing, Installing, and Replacing Components 41 Removing a Memory Module You may need to remove a memory module if you wish to remove. ✍ The memory modules are located beneath the power supply. 4 Push down the handle on each side of the memory module to eject the module from its socket. ! The computer ships with a pair...
... a bad module. Removing, Installing, and Replacing Components 41 Removing a Memory Module You may need to remove a memory module if you wish to remove. ✍ The memory modules are located beneath the power supply. 4 Push down the handle on each side of the memory module to eject the module from its socket. ! The computer ships with a pair...
System Reference Manual
Page 64
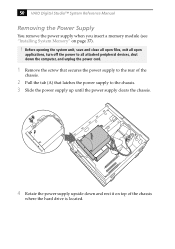
... the computer, and unplug the power cord. 1 Remove the screw that secures the power supply to the chassis. 3 Slide the power supply up until the power supply clears the chassis. 50 VAIO Digital Studio™ System Reference Manual Removing the Power Supply You remove the power supply when you insert a memory module (see "Installing System Memory" on...
... the computer, and unplug the power cord. 1 Remove the screw that secures the power supply to the chassis. 3 Slide the power supply up until the power supply clears the chassis. 50 VAIO Digital Studio™ System Reference Manual Removing the Power Supply You remove the power supply when you insert a memory module (see "Installing System Memory" on...

System Reference Manual
Page 101
CMOS Setup Options 87 Main Screen System Time [00:00:00] System Date [01/01/2001] Primary Master (see "IDE Sub-Menus" on page 88) Primary Slave (see "IDE Sub-Menus" on page 88) Secondary Master (see "IDE Sub-Menus" on page 88) Secondary Slave (see "IDE Sub-Menus" on page 88) Supervisor Password [Disabled] User Password [Disabled] Installed Memory 128 MB BIOS Revision/Version 1002 (depends on model)
CMOS Setup Options 87 Main Screen System Time [00:00:00] System Date [01/01/2001] Primary Master (see "IDE Sub-Menus" on page 88) Primary Slave (see "IDE Sub-Menus" on page 88) Secondary Master (see "IDE Sub-Menus" on page 88) Secondary Slave (see "IDE Sub-Menus" on page 88) Supervisor Password [Disabled] User Password [Disabled] Installed Memory 128 MB BIOS Revision/Version 1002 (depends on model)

System Reference Manual
Page 124
... VAIO computer is shipped with more if purchased through the VAIO Direct Web site. Memory size can be installed in pairs. 110 VAIO Digital Studio™ System Reference Manual PCI Bus PCI Level 2.2, 33 MHz zero wait state 3 PCI slots (2 open in the PCV-RX462DS/PCV-RX463DS/PCV-RX465DS/ PCV-RX470DS/PCV-RX480DS models, 1 open in the PCV-RX490TV model) Memory Modules Installed memory Maximum memory Voltage Pins Memory type...
... VAIO computer is shipped with more if purchased through the VAIO Direct Web site. Memory size can be installed in pairs. 110 VAIO Digital Studio™ System Reference Manual PCI Bus PCI Level 2.2, 33 MHz zero wait state 3 PCI slots (2 open in the PCV-RX462DS/PCV-RX463DS/PCV-RX465DS/ PCV-RX470DS/PCV-RX480DS models, 1 open in the PCV-RX490TV model) Memory Modules Installed memory Maximum memory Voltage Pins Memory type...

System Reference Manual
Page 132
... serial port 1 14 telephone and line 16 USB ports 13, 63 I/O slot covering 44 I /O address map and memory map memory - See graphics graphics specifications 110 H hard drive specifications 113 header - 118 VAIO Digital Studio™ System Reference Manual installing additional 3.5 drive 45 DVD-ROM drive performance of 11, 12 IDE connectors 59 IEEE1394 - See front panel...
... serial port 1 14 telephone and line 16 USB ports 13, 63 I/O slot covering 44 I /O address map and memory map memory - See graphics graphics specifications 110 H hard drive specifications 113 header - 118 VAIO Digital Studio™ System Reference Manual installing additional 3.5 drive 45 DVD-ROM drive performance of 11, 12 IDE connectors 59 IEEE1394 - See front panel...
System Reference Manual
Page 133
...game connector 70 headphones, line in, mic connectors 71 i.LINK connector 65 i.LINK header connectors 72 IDE connectors 59 keyboard connector 62 memory module connector 56 mouse connector 62 PCI slot connectors 57 power connector 60 See Serial slot - See graphics 119 RIMM - See ... 110 hard drives and controllers 113 I /O connectors 13 icons 11 recording ii regulatory information v removing cover 28 memory module 41 PCI add-in card installing 30 removing 32 PCI bus specifications 110 power connector 60 power management, configuring 23 printer connector 65 processor specifications 109...
...game connector 70 headphones, line in, mic connectors 71 i.LINK connector 65 i.LINK header connectors 72 IDE connectors 59 keyboard connector 62 memory module connector 56 mouse connector 62 PCI slot connectors 57 power connector 60 See Serial slot - See graphics 119 RIMM - See ... 110 hard drives and controllers 113 I /O connectors 13 icons 11 recording ii regulatory information v removing cover 28 memory module 41 PCI add-in card installing 30 removing 32 PCI bus specifications 110 power connector 60 power management, configuring 23 printer connector 65 processor specifications 109...
System Reference Manual
Page 134
120 VAIO Digital Studio™ System Reference Manual printer connector 65 Serial connector 65 USB connectors 63, 65 system I/O address map 101 system memory, installing 37 T Telephone Consumer Protection Act of 1991 vii TV interference vi U USB connectors 8, 63, 65 user password 96
120 VAIO Digital Studio™ System Reference Manual printer connector 65 Serial connector 65 USB connectors 63, 65 system I/O address map 101 system memory, installing 37 T Telephone Consumer Protection Act of 1991 vii TV interference vi U USB connectors 8, 63, 65 user password 96

VAIO User Guide (primary manual)
Page 124
... changes into the KEYBOARD port. ❑ Close all applications and turn off your computer. For information on installing memory, please see the online document Upgrading and Maintaining Your VAIO Digital Studio™ Computer. When this occurs, follow the procedures below to Current Document Title Topic: My ... reset the printer connection: 1 Right-click My Computer on the desktop, and then select Properties. 2 Click the Device Manager tab. 3 Select Refresh, and then click OK. Topic: My connected printer doesn't function after the computer resumes from the shortcut menu. 2 Clear the ...
... changes into the KEYBOARD port. ❑ Close all applications and turn off your computer. For information on installing memory, please see the online document Upgrading and Maintaining Your VAIO Digital Studio™ Computer. When this occurs, follow the procedures below to Current Document Title Topic: My ... reset the printer connection: 1 Right-click My Computer on the desktop, and then select Properties. 2 Click the Device Manager tab. 3 Select Refresh, and then click OK. Topic: My connected printer doesn't function after the computer resumes from the shortcut menu. 2 Clear the ...

Marketing Specifications
Page 1
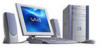
...installed on the Sony Desktop Computer are subject to change without written permission is not manufactured to any specific software, and Sony does not and cannot make recommendations, they are trademarks of Intel Corporation. Simulated graphic shown on display. ©2001 Sony... ADDITIONAL SPECIFICATIONS Model PCV-RX490TV Processor Intel® Pentium® 4 Processor 1.70 GHz† Cache Memory 256 KB Integrated... of additional fees or subscription for energy efficiency. PCV-RX490TV Sony VAIO Digital Studio™ Video Audio Integrated Operation PReW Vercisidtooherndoael r ...
...installed on the Sony Desktop Computer are subject to change without written permission is not manufactured to any specific software, and Sony does not and cannot make recommendations, they are trademarks of Intel Corporation. Simulated graphic shown on display. ©2001 Sony... ADDITIONAL SPECIFICATIONS Model PCV-RX490TV Processor Intel® Pentium® 4 Processor 1.70 GHz† Cache Memory 256 KB Integrated... of additional fees or subscription for energy efficiency. PCV-RX490TV Sony VAIO Digital Studio™ Video Audio Integrated Operation PReW Vercisidtooherndoael r ...


