

VAIO User Guide
Page 4
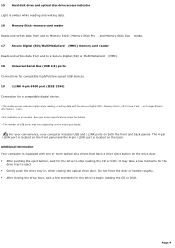
... the VAIO Recovery Wizard, a utility program that recovers your VAIO computer. For online information about hard disk recovery: 1. The online specifications sheet describes the hardware and software configuration of your computer's operating system and preinstalled software. Hard Disk Drive Recovery Your computer is equipped with the appropriate optical drive (a CD-RW, DVD-RW, or DVD±RW drive). Specifications - Connect to the Sony online support Web site at http://www.sony.com/pcsupport. 3. Go to the Internet. 2. Click Start in the Windows...
... the VAIO Recovery Wizard, a utility program that recovers your VAIO computer. For online information about hard disk recovery: 1. The online specifications sheet describes the hardware and software configuration of your computer's operating system and preinstalled software. Hard Disk Drive Recovery Your computer is equipped with the appropriate optical drive (a CD-RW, DVD-RW, or DVD±RW drive). Specifications - Connect to the Sony online support Web site at http://www.sony.com/pcsupport. 3. Go to the Internet. 2. Click Start in the Windows...
VAIO User Guide
Page 9
... DVD. 15 Hard disk drive and optical disc drive access indicator Light is amber while reading and writing data. 16 Memory Stick® memory card reader Reads and writes data from and to Memory Stick®, Memory Stick Pro , and Memory Stick Duo media. 17 Secure Digital (SD)/MultiMediaCard (MMC) memory card reader Reads and writes data from and to a Secure Digital (SD) or MultiMediaCard (MMC). 18 Universal Serial Bus (USB 2.0) ports3 Connections...
... DVD. 15 Hard disk drive and optical disc drive access indicator Light is amber while reading and writing data. 16 Memory Stick® memory card reader Reads and writes data from and to Memory Stick®, Memory Stick Pro , and Memory Stick Duo media. 17 Secure Digital (SD)/MultiMediaCard (MMC) memory card reader Reads and writes data from and to a Secure Digital (SD) or MultiMediaCard (MMC). 18 Universal Serial Bus (USB 2.0) ports3 Connections...
VAIO User Guide
Page 10
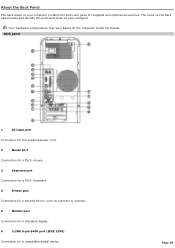
... Your hardware configuration may vary based on your computer contains the ports and jacks for a compatible digital device. The icons on the back panel locate and identify the ports and jacks on the computer model purchased. Back panel 1 AC Input port Connection for the supplied power cord. 2 Mouse port Connection for a PS/2® mouse. 3 Keyboard port Connection for a PS/2® keyboard. 4 Printer port Connection for a parallel device, such as a printer or scanner. 5 Monitor port Connection for a standard display. 6 i.LINK 6-pin S400 port...
... Your hardware configuration may vary based on your computer contains the ports and jacks for a compatible digital device. The icons on the back panel locate and identify the ports and jacks on the computer model purchased. Back panel 1 AC Input port Connection for the supplied power cord. 2 Mouse port Connection for a PS/2® mouse. 3 Keyboard port Connection for a PS/2® keyboard. 4 Printer port Connection for a parallel device, such as a printer or scanner. 5 Monitor port Connection for a standard display. 6 i.LINK 6-pin S400 port...

VAIO User Guide
Page 12
... software applications, operating system, and compatible i.LINK devices. See your c omputer's s pec ific ation s heet for details about your c omputer's hardware c onfiguration, s ee the online s pec ific ations s heet. 12 Speaker DC Out jack Connection for the speaker power cable (supplied 2-channel speakers). 13 S/PDIF Optical Out port Connection for a digital audio or optical device. 14 Ethernet port Connection for a 10BASE-T/100BASE-TX Ethernet interface. (The port marked with your compatible i.LINK device...
... software applications, operating system, and compatible i.LINK devices. See your c omputer's s pec ific ation s heet for details about your c omputer's hardware c onfiguration, s ee the online s pec ific ations s heet. 12 Speaker DC Out jack Connection for the speaker power cable (supplied 2-channel speakers). 13 S/PDIF Optical Out port Connection for a digital audio or optical device. 14 Ethernet port Connection for a 10BASE-T/100BASE-TX Ethernet interface. (The port marked with your compatible i.LINK device...

VAIO User Guide
Page 17
... while recording.) DISPLAY button During DVD playback in full-screen size. Press again to show the settings window. When using SonicStage software, press to change from the TV/Recording deck to external video equipment, such as your VCR. (Note: You cannot change the on-screen image from the music drive (hard disk drive) to the CD. 13 REW and FF buttons Press to view available sound mode options on the monitor/display. PREV and...
... while recording.) DISPLAY button During DVD playback in full-screen size. Press again to show the settings window. When using SonicStage software, press to change from the TV/Recording deck to external video equipment, such as your VCR. (Note: You cannot change the on-screen image from the music drive (hard disk drive) to the CD. 13 REW and FF buttons Press to view available sound mode options on the monitor/display. PREV and...
VAIO User Guide
Page 18
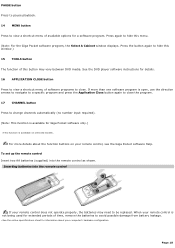
... window displays. See the DVD player software instructions for information about the function buttons on s elec ted models . PAUSE button Press to pause playback. 14 MENU button Press to close the program. 17 CHANNEL button Press to be replaced. To set up the remote control Insert two AA batteries (supplied) into the rem ote control If your remote control, see the Giga Pocket software Help. Press again to hide this button may need...
... window displays. See the DVD player software instructions for information about the function buttons on s elec ted models . PAUSE button Press to pause playback. 14 MENU button Press to close the program. 17 CHANNEL button Press to be replaced. To set up the remote control Insert two AA batteries (supplied) into the rem ote control If your remote control, see the Giga Pocket software Help. Press again to hide this button may need...

VAIO User Guide
Page 20
... specifications sheet for your computer on the Sony online support Web site at http://www.sony.com/pcsupport for details on your computer's hardware configuration. Connecting a Display (Monitor) Connecting the Speakers Connecting the Keyboard and Mouse Connecting the Telephone and Modem Connecting the Power Cords Turning On your Computer Registering Your Computer Turning Off Your Computer Page 20 The location of the hardware features described in the section. Setting...
... specifications sheet for your computer on the Sony online support Web site at http://www.sony.com/pcsupport for details on your computer's hardware configuration. Connecting a Display (Monitor) Connecting the Speakers Connecting the Keyboard and Mouse Connecting the Telephone and Modem Connecting the Power Cords Turning On your Computer Registering Your Computer Turning Off Your Computer Page 20 The location of the hardware features described in the section. Setting...

VAIO User Guide
Page 22
...; Review the connection instructions provided with a 5.1 speaker system, or you may vary. Connecting the Speakers Your VAIO® computer is supplied with a jack connector and an AC power cord that are configured-to-order (CTO), are supplied with your speaker system, as the connection setup may wish to use your 5.1 (6-channel) speaker system. To connect the speakers (supplied) The right and left speakers are supplied with a 5.1 speaker systems1. The right speaker has a speaker wire with 2-channel speakers. To set...
...; Review the connection instructions provided with a 5.1 speaker system, or you may vary. Connecting the Speakers Your VAIO® computer is supplied with a jack connector and an AC power cord that are configured-to-order (CTO), are supplied with your speaker system, as the connection setup may wish to use your 5.1 (6-channel) speaker system. To connect the speakers (supplied) The right and left speakers are supplied with a 5.1 speaker systems1. The right speaker has a speaker wire with 2-channel speakers. To set...
VAIO User Guide
Page 23
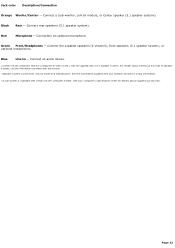
Page 23 For details about s upplied ac c es s ories . Connect rear speakers (5.1 speaker system). Connect an audio device. 1 C ertain V A I O ® c omputer models . Connection an optional microphone. See your s peaker s ys tem for details about s etting up this type of s peaker s ys tem, s ee the information provided with a 5 .1 s peaker s ys tem. Black Rear - Jack color Description/Connection Orange Woofer/Center2 - Blue Line In - Red Microphone - Green...
Page 23 For details about s upplied ac c es s ories . Connect rear speakers (5.1 speaker system). Connect an audio device. 1 C ertain V A I O ® c omputer models . Connection an optional microphone. See your s peaker s ys tem for details about s etting up this type of s peaker s ys tem, s ee the information provided with a 5 .1 s peaker s ys tem. Black Rear - Jack color Description/Connection Orange Woofer/Center2 - Blue Line In - Red Microphone - Green...
VAIO User Guide
Page 78
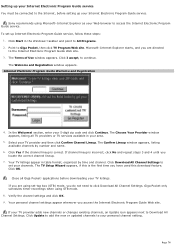
...® applications before setting up Internet Electronic Program Guide service, follow these steps: 1. Click OK. If your 5-digit zip code and click Continue. To set up your Web browser to access the Internet Electronic Program Guide service. The Welcome and Registration window appears. section, enter your TV provider adds new channels or changes existing channels, an Update icon appears next to Download All Channel Settings. Select your TV...
...® applications before setting up Internet Electronic Program Guide service, follow these steps: 1. Click OK. If your 5-digit zip code and click Continue. To set up your Web browser to access the Internet Electronic Program Guide service. The Welcome and Registration window appears. section, enter your TV provider adds new channels or changes existing channels, an Update icon appears next to Download All Channel Settings. Select your TV...

VAIO User Guide
Page 95
... support Serial ATA hard disk drives. Shut down your computer and turn off all peripheral devices, such as your computer. Replacing the original hard disk drive If you replace the original, factory-installed hard disk drive, you register for more information about the VAIO Recovery Wizard utility program: 1. Hard disk drive recovery When you start Click to correct your Sony computer. Page 95 See Before upgrading your printer. 2. Unplug your computer's operating system and preinstalled software programs. For more information. Some models, such as drive...
... support Serial ATA hard disk drives. Shut down your computer and turn off all peripheral devices, such as your computer. Replacing the original hard disk drive If you replace the original, factory-installed hard disk drive, you register for more information about the VAIO Recovery Wizard utility program: 1. Hard disk drive recovery When you start Click to correct your Sony computer. Page 95 See Before upgrading your printer. 2. Unplug your computer's operating system and preinstalled software programs. For more information. Some models, such as drive...
VAIO User Guide
Page 97
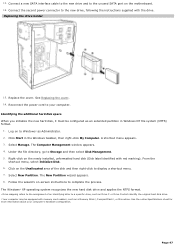
... My Computer. Select Manage. Page 97 Connect a new SATA interface cable to the new drive and to your c omputer's hardware c onfiguration. Log on the newly installed, unformatted hard disk (Disk label identified with the drive. Click on the motherboard. 14. See the online Specifications s heet for more information about your computer. See Replacing the cover. 16. The Computer Management window appears. 4. Connect the second power connector to display a shortcut menu. 7. Reconnect the power cord to the unused SATA port on...
... My Computer. Select Manage. Page 97 Connect a new SATA interface cable to the new drive and to your c omputer's hardware c onfiguration. Log on the newly installed, unformatted hard disk (Disk label identified with the drive. Click on the motherboard. 14. See the online Specifications s heet for more information about your computer. See Replacing the cover. 16. The Computer Management window appears. 4. Connect the second power connector to display a shortcut menu. 7. Reconnect the power cord to the unused SATA port on...
VAIO User Guide
Page 128
... or dirt inside the mouse ball socket. 6. Remove the mouse ball cover on the computer's front panel is free of repetitive patterning. Avoid surfaces such as mirrors, smooth glass, or magazines. Avoid possible damage to ensure proper mouse tracking. Using a wireless optical mouse If you are properly installed. Press the CONNECT button on the mouse and the computer to reestablish the connection between the two devices. ...
... or dirt inside the mouse ball socket. 6. Remove the mouse ball cover on the computer's front panel is free of repetitive patterning. Avoid surfaces such as mirrors, smooth glass, or magazines. Avoid possible damage to ensure proper mouse tracking. Using a wireless optical mouse If you are properly installed. Press the CONNECT button on the mouse and the computer to reestablish the connection between the two devices. ...

VAIO User Guide
Page 129
... the computer's front panel is plugged securely into the appropriate USB port. Save and close all open software programs. Turn off your mouse to stop working properly. Using an optical mouse If you are using a wireless optical mouse: Confirm that the supplied AA batteries are using a standard ball mouse, there may be working properly. Do not place metal furniture near your optical mouse. To clean the mouse, follow these steps: 1. Remove the mouse ball cover...
... the computer's front panel is plugged securely into the appropriate USB port. Save and close all open software programs. Turn off your mouse to stop working properly. Using an optical mouse If you are using a wireless optical mouse: Confirm that the supplied AA batteries are using a standard ball mouse, there may be working properly. Do not place metal furniture near your optical mouse. To clean the mouse, follow these steps: 1. Remove the mouse ball cover...

VAIO User Guide
Page 144
... printers do I install a printer? Connect your computer's front, back or side panels1. Follow the on your USB or IEEE 1394 printer to the appropriate port on -screen instructions to the user manual or guide supplied with Plug and Play capability. 5. Refer to print a test page and complete printer installation. If the printer is not included in the Windows taskbar, then click Control Panel. 2. Select Local...
... printers do I install a printer? Connect your computer's front, back or side panels1. Follow the on your USB or IEEE 1394 printer to the appropriate port on -screen instructions to the user manual or guide supplied with Plug and Play capability. 5. Refer to print a test page and complete printer installation. If the printer is not included in the Windows taskbar, then click Control Panel. 2. Select Local...

VAIO User Guide
Page 145
... to the appropriate port on -screen instructions to the user manual or guide supplied with your printer has a USB, IEEE 1394, or infrared connection, contact the printer manufacturer for information or updates that your printer may vary, depending upon your printer, follow these steps: 1. Enter the appropriate path for specific operating systems. To install your c omputer's hardware c onfiguration. Refer to print a test page and complete...
... to the appropriate port on -screen instructions to the user manual or guide supplied with your printer has a USB, IEEE 1394, or infrared connection, contact the printer manufacturer for information or updates that your printer may vary, depending upon your printer, follow these steps: 1. Enter the appropriate path for specific operating systems. To install your c omputer's hardware c onfiguration. Refer to print a test page and complete...

VAIO User Guide
Page 156
... And Support Center menu, click VAIO User Guide. Specifications - To view the online specifications sheet: 1. Click the Documentation button and follow the on-screen instructions to the original factory installed settings. VAIO® Computer User Guide - To access this online software information 1. From the menu bar, click Help. Immediate Help and Support You can find tutorials that describes the software's features. This support resource offers a variety of your entire hard disk drive to locate your computer. To access software...
... And Support Center menu, click VAIO User Guide. Specifications - To view the online specifications sheet: 1. Click the Documentation button and follow the on-screen instructions to the original factory installed settings. VAIO® Computer User Guide - To access this online software information 1. From the menu bar, click Help. Immediate Help and Support You can find tutorials that describes the software's features. This support resource offers a variety of your entire hard disk drive to locate your computer. To access software...

VAIO User Guide
Page 161
.... Sony Customer Information Services Center If other support options do not resolve your issue, you would like to -understand lessons on a white barc ode label. T he s erial number is on using your computer's hardware and software features. Links that enable you visit the Sony online support Web site. Model number. 3. Example: 4. The Sony online support Web site provides: Information about your specific computer model, such as hardware and software specifications...
.... Sony Customer Information Services Center If other support options do not resolve your issue, you would like to -understand lessons on a white barc ode label. T he s erial number is on using your computer's hardware and software features. Links that enable you visit the Sony online support Web site. Model number. 3. Example: 4. The Sony online support Web site provides: Information about your specific computer model, such as hardware and software specifications...

Welcome Mat
Page 1
... models. Front Panel Back Panel Optical drive 1 Optical drive 2 Floppy disk drive Floppy disk drive access indicator Power button Standby indicator Media card readers and access indicator Giga Pocket® features*† Optical drive 1 eject button Optical drive 2 eject button Floppy disk eject button AC input port Mouse port Keyboard port Printer port Monitor port* MONITOR i.LINK 6-pin S400 port (IEEE 1394) Power indicator (VAIO) Universal Serial Bus USB (USB 2.0 ports) Hard disk and optical disc drive access indicator Audio jacks Monitor port* WOOFER /CENTER FRONT REAR...
... models. Front Panel Back Panel Optical drive 1 Optical drive 2 Floppy disk drive Floppy disk drive access indicator Power button Standby indicator Media card readers and access indicator Giga Pocket® features*† Optical drive 1 eject button Optical drive 2 eject button Floppy disk eject button AC input port Mouse port Keyboard port Printer port Monitor port* MONITOR i.LINK 6-pin S400 port (IEEE 1394) Power indicator (VAIO) Universal Serial Bus USB (USB 2.0 ports) Hard disk and optical disc drive access indicator Audio jacks Monitor port* WOOFER /CENTER FRONT REAR...

Welcome Mat
Page 2
... of the TV coaxial cable (supplied) to your cable service access. 2 Connect the other end of the TV coaxial cable to original factory installed settings. Giga Pocket® enables you have questions about your computer's operating system and preinstalled software to the VHF/UHF port on the back panel of your hard disk drive. Hard Disk Drive Recovery Your computer is equipped with the appropriate optical drive (a CD-RW, DVD-RW, or DVD±RW drive). Support Options If you to...
... of the TV coaxial cable (supplied) to your cable service access. 2 Connect the other end of the TV coaxial cable to original factory installed settings. Giga Pocket® enables you have questions about your computer's operating system and preinstalled software to the VHF/UHF port on the back panel of your hard disk drive. Hard Disk Drive Recovery Your computer is equipped with the appropriate optical drive (a CD-RW, DVD-RW, or DVD±RW drive). Support Options If you to...


