PCV-RS Series Hard Disk Drive Replacement Instructions
Page 1
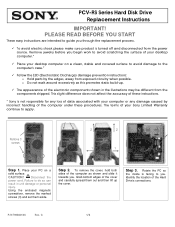
... a clean, stable and covered surface to avoid damage to the computer's case.* 9 Follow the ESD (Electrostatic Discharge) damage prevention instructions: o Hold parts by incorrect handling of your desktop computer.* 9 Place your Sony Limited Warranty continue to you through the replacement process. 9 To ...different from the power source. Step 2. Disconnect the power cord. Grab bottom edges of the Hard Drive's connections. Step 3. PCV-RS Series Hard Disk Drive Replacement Instructions IMPORTANT! Failure to guide you . Identify the location of the cover and carefully spread them ...
... a clean, stable and covered surface to avoid damage to the computer's case.* 9 Follow the ESD (Electrostatic Discharge) damage prevention instructions: o Hold parts by incorrect handling of your desktop computer.* 9 Place your Sony Limited Warranty continue to you through the replacement process. 9 To ...different from the power source. Step 2. Disconnect the power cord. Grab bottom edges of the Hard Drive's connections. Step 3. PCV-RS Series Hard Disk Drive Replacement Instructions IMPORTANT! Failure to guide you . Identify the location of the cover and carefully spread them ...
PCV-RS Series Hard Disk Drive Replacement Instructions
Page 2
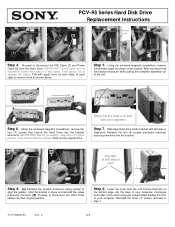
Take caution not to disconnect the IDE Cable [1] and Power Cable [2] from the Hard Drive. IMPORTANT! Slide out the original drive. P/N T99860136 Rev. PCV-RS Series Hard Disk Drive Replacement Instructions Remove screw [2] [1] Step 4. With one hand hold the bracket enclosure while ...C 2/2 Lower the cover onto the unit, Ensure that secure the Hard Drive into their original position. Slide New Hard drive inside the bracket. Pull with all 4 holes (2 on both sides of your computer. Using the enclosed magnetic screwdriver, remove the marked screw as shown ...
Take caution not to disconnect the IDE Cable [1] and Power Cable [2] from the Hard Drive. IMPORTANT! Slide out the original drive. P/N T99860136 Rev. PCV-RS Series Hard Disk Drive Replacement Instructions Remove screw [2] [1] Step 4. With one hand hold the bracket enclosure while ...C 2/2 Lower the cover onto the unit, Ensure that secure the Hard Drive into their original position. Slide New Hard drive inside the bracket. Pull with all 4 holes (2 on both sides of your computer. Using the enclosed magnetic screwdriver, remove the marked screw as shown ...

Quick Start Guide
Page 15
...Sony end-user license agreement. 15 The Quick Start also provides resources for technical support, safety guidelines and owner's information. ❑ Microsoft® Windows® XP Guide - Explains how to recover your computer's operating system and preinstalled software. For more information about hard disk drive recovery: ✍ Your VAIO® computer...Windows® taskbar, then click Help and Support. 2 From the VAIO Help and Support Center menu, click VAIO Recovery Options. Hard Disk Drive Recovery Your computer is not supplied with a utility program that enables you to use ...
...Sony end-user license agreement. 15 The Quick Start also provides resources for technical support, safety guidelines and owner's information. ❑ Microsoft® Windows® XP Guide - Explains how to recover your computer's operating system and preinstalled software. For more information about hard disk drive recovery: ✍ Your VAIO® computer...Windows® taskbar, then click Help and Support. 2 From the VAIO Help and Support Center menu, click VAIO Recovery Options. Hard Disk Drive Recovery Your computer is not supplied with a utility program that enables you to use ...
Quick Start Guide
Page 19
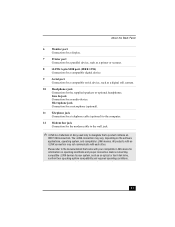
...drive to stop reading the CD. Additional information Your computer is on the drive door. ❑ After pushing the eject button, wait for the drive tray to eject. ❑ Gently push the drive tray in Standby mode or turned off. 12 Hard disk drive and optical disc drive... Optical drive 1 eject button Ejects a disc from Optical drive 1. 9 Optical drive 2 eject button Ejects a disc from Optical drive 2. 10 Floppy disk eject button Ejects a floppy disk. 11 Power indicator (VAIO) Light is blue when the computer is equipped with two optical disc drives that have a drive eject ...
...drive to stop reading the CD. Additional information Your computer is on the drive door. ❑ After pushing the eject button, wait for the drive tray to eject. ❑ Gently push the drive tray in Standby mode or turned off. 12 Hard disk drive and optical disc drive... Optical drive 1 eject button Ejects a disc from Optical drive 1. 9 Optical drive 2 eject button Ejects a disc from Optical drive 2. 10 Floppy disk eject button Ejects a floppy disk. 11 Power indicator (VAIO) Light is blue when the computer is equipped with two optical disc drives that have a drive eject ...
Quick Start Guide
Page 23
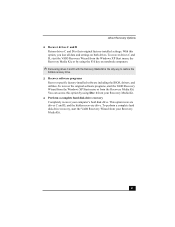
...device. 9 Serial port Connection for a compatible serial device, such as an optical or hard disk drive, confirm their operating system compatibility and required operating conditions. 23 Microphone jack Connection for a... microphone (optional). 11 Telephone jack Connection for a telephone cable (optional) to the computer...modem cable to the wall jack. ✍ i.LINK is a trademark of Sony used only to your compatible i.LINK device for an audio device. Before ...
...device. 9 Serial port Connection for a compatible serial device, such as an optical or hard disk drive, confirm their operating system compatibility and required operating conditions. 23 Microphone jack Connection for a... microphone (optional). 11 Telephone jack Connection for a telephone cable (optional) to the computer...modem cable to the wall jack. ✍ i.LINK is a trademark of Sony used only to your compatible i.LINK device for an audio device. Before ...

Quick Start Guide
Page 39
The Recovery Media Kit enables you to recover preinstalled software programs and the operating system on your computer to normal operation. ✍ This program repairs or replaces software. For any hardware problems, contact a Sony authorized repair facility. 39 VAIO Recovery Options The VAIO® Recovery Wizard enables you to reclaim hard drive space and return your computer. You can also use this utility to create a Recovery Media Kit.
The Recovery Media Kit enables you to recover preinstalled software programs and the operating system on your computer to normal operation. ✍ This program repairs or replaces software. For any hardware problems, contact a Sony authorized repair facility. 39 VAIO Recovery Options The VAIO® Recovery Wizard enables you to reclaim hard drive space and return your computer. You can also use this utility to create a Recovery Media Kit.
Quick Start Guide
Page 41
... lose all data and settings on notebook computers. ✍ Recovering drives C and D with the Recovery Media Kit is the only way to their original factory-installed settings. To perform a complete hard disk drive recovery, start the VAIO Recovery Wizard from your Recovery Media Kit. ❑ Perform a complete hard disk drive recovery Completely recover your Recovery Media Kit...
... lose all data and settings on notebook computers. ✍ Recovering drives C and D with the Recovery Media Kit is the only way to their original factory-installed settings. To perform a complete hard disk drive recovery, start the VAIO Recovery Wizard from your Recovery Media Kit. ❑ Perform a complete hard disk drive recovery Completely recover your Recovery Media Kit...
Quick Start Guide
Page 43
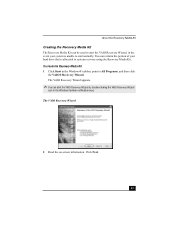
...Creating the Recovery Media Kit The Recovery Media Kit can be used to start the VAIO Recovery Wizard, in the event your hard drive that is unable to start the VAIO Recovery Wizard by double-clicking the VAIO Recovery Wizard icon in the Windows® taskbar, point to system recovery using ...the Recovery Media Kit. The VAIO Recovery Wizard appears. ✍ You can reclaim the portion of your...
...Creating the Recovery Media Kit The Recovery Media Kit can be used to start the VAIO Recovery Wizard, in the event your hard drive that is unable to start the VAIO Recovery Wizard by double-clicking the VAIO Recovery Wizard icon in the Windows® taskbar, point to system recovery using ...the Recovery Media Kit. The VAIO Recovery Wizard appears. ✍ You can reclaim the portion of your...
Quick Start Guide
Page 48
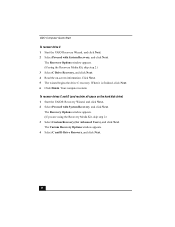
... click Next. When it is finished, click Next. 6 Click Finish. Your computer restarts. The Recovery Options window appears. (If you are using the Recovery Media Kit, skip step 2.) 3 Select C Drive Recovery, and click Next. 4 Read the on the hard disk drive) 1 Start the VAIO® Recovery Wizard, and click Next. 2 Select Proceed with System Recovery...
... click Next. When it is finished, click Next. 6 Click Finish. Your computer restarts. The Recovery Options window appears. (If you are using the Recovery Media Kit, skip step 2.) 3 Select C Drive Recovery, and click Next. 4 Read the on the hard disk drive) 1 Start the VAIO® Recovery Wizard, and click Next. 2 Select Proceed with System Recovery...

Quick Start Guide
Page 51
... message, try recovering the software again. To perform a complete hard disk drive recovery You must use the Recovery Media Kit to perform a complete hard disk drive recovery. 1 Press the power switch on the computer to install each prompt or message. The Application Recovery window appears...indicator appears. The VAIO Recovery Wizard appears. 7 Click Next. 8 Select Custom Recovery (for approximately 30 seconds, and then turn on the computer. 6 When prompted, insert the Recovery Disk 1 into the optical drive, and then click OK. Using the VAIO Recovery Wizard 6 As your computer. 5 Wait ...
... message, try recovering the software again. To perform a complete hard disk drive recovery You must use the Recovery Media Kit to perform a complete hard disk drive recovery. 1 Press the power switch on the computer to install each prompt or message. The Application Recovery window appears...indicator appears. The VAIO Recovery Wizard appears. 7 Click Next. 8 Select Custom Recovery (for approximately 30 seconds, and then turn on the computer. 6 When prompted, insert the Recovery Disk 1 into the optical drive, and then click OK. Using the VAIO Recovery Wizard 6 As your computer. 5 Wait ...

Quick Start Guide
Page 52
Close the drive, and click Next. For VAIO® computers with Giga Pocket software preinstalled, you must change the software settings to enable file saving to drive C. ❑ Resizing your hard disk drive partitions can result in the loss of the VAIO® Recovery Wizard. ❑ Giga Pocket™ software requires a drive D in each prompt or message. Follow the...
Close the drive, and click Next. For VAIO® computers with Giga Pocket software preinstalled, you must change the software settings to enable file saving to drive C. ❑ Resizing your hard disk drive partitions can result in the loss of the VAIO® Recovery Wizard. ❑ Giga Pocket™ software requires a drive D in each prompt or message. Follow the...

VAIO User Guide
Page 3
... click Help and Support. 2. Hard Disk Drive Recovery Page 3 Click Start in the Windows taskbar, then click Help and Support. 2. From the VAIO Help And Support Center menu, click VAIO User Guide. 3. Click the Welcome link. 4. Locate the link in the text, "View the VAIO® Computer Specifications..." Unpacking Your Computer Your computer may not be supplied with...
... click Help and Support. 2. Hard Disk Drive Recovery Page 3 Click Start in the Windows taskbar, then click Help and Support. 2. From the VAIO Help And Support Center menu, click VAIO User Guide. 3. Click the Welcome link. 4. Locate the link in the text, "View the VAIO® Computer Specifications..." Unpacking Your Computer Your computer may not be supplied with...

VAIO User Guide
Page 4
... and Sony end-user license agreement. Your computer is not supplied with a utility program that enables you to recover your computer's operating system and preinstalled software. From the VAIO Help And Support Center menu, click VAIO Recovery Options. Use the VAIO Recovery utility to recover your computer's operating system and preinstalled software. 1. For more information about hard disk drive...
... and Sony end-user license agreement. Your computer is not supplied with a utility program that enables you to recover your computer's operating system and preinstalled software. From the VAIO Help And Support Center menu, click VAIO Recovery Options. Use the VAIO Recovery utility to recover your computer's operating system and preinstalled software. 1. For more information about hard disk drive...

VAIO User Guide
Page 43
Page 43 Click Save. Click Menu. 2. Select Save Project, type a name for your computer, so that you can edit its contents or create additional copies later. 1. To save the DVD on your computer's hard drive Save your DVD project to your project in the File name field. 3.
Page 43 Click Save. Click Menu. 2. Select Save Project, type a name for your computer, so that you can edit its contents or create additional copies later. 1. To save the DVD on your computer's hard drive Save your DVD project to your project in the File name field. 3.

VAIO User Guide
Page 46
...D s ervic es c ompatible with the devic e for details . Refer to your computer's hard drive. MagicGate Memory Stick media - Transferring music files to your VAIO computer You can transfer music to your VAIO computer from a MagicGate Memory Stick media. Electronic Music Distribution2 (EMD) services on the... your external device, such as a Network Walkman® or CLIÉ Handheld, to your VAIO computer and check in songs to your computer's hard drive. From external devices1 using Electronic Music Distribution services. Analog records or casettes ...
...D s ervic es c ompatible with the devic e for details . Refer to your computer's hard drive. MagicGate Memory Stick media - Transferring music files to your VAIO computer You can transfer music to your VAIO computer from a MagicGate Memory Stick media. Electronic Music Distribution2 (EMD) services on the... your external device, such as a Network Walkman® or CLIÉ Handheld, to your VAIO computer and check in songs to your computer's hard drive. From external devices1 using Electronic Music Distribution services. Analog records or casettes ...

VAIO User Guide
Page 56
From your computer, you to record songs1 from analog records or cassette tapes to save to CD-R or CD-RW discs, or create audio files in WAV format. 1 U nauthorized duplic ation of audio files is a violation of applic able laws . Using SonicStage Mastering Studio Software SonicStage Mastering Studio software enables you can burn the songs to your computer's hard drive. Page 56
From your computer, you to record songs1 from analog records or cassette tapes to save to CD-R or CD-RW discs, or create audio files in WAV format. 1 U nauthorized duplic ation of audio files is a violation of applic able laws . Using SonicStage Mastering Studio Software SonicStage Mastering Studio software enables you can burn the songs to your computer's hard drive. Page 56

VAIO User Guide
Page 67
... this to make prints. A list of available photo sources is displayed on the left, with the selected source's contents displayed as thumbnail pictures on your computer's hard drive or from the PictureGear Studio software's main window. Manage your photos with these additional tools and features: Rotate - From the thumbnail view, click to...
... this to make prints. A list of available photo sources is displayed on the left, with the selected source's contents displayed as thumbnail pictures on your computer's hard drive or from the PictureGear Studio software's main window. Manage your photos with these additional tools and features: Rotate - From the thumbnail view, click to...

VAIO User Guide
Page 80
You can format your video into movies, and then save it on your computer's hard drive or record it back to your to your digital video camera. Using DVgate Plus Software DVgate Plus software enables you to transfer video content from your DV device to your VAIO® computer. DVgate Plus software's flow Page 80
You can format your video into movies, and then save it on your computer's hard drive or record it back to your to your digital video camera. Using DVgate Plus Software DVgate Plus software enables you to transfer video content from your DV device to your VAIO® computer. DVgate Plus software's flow Page 80
VAIO User Guide
Page 120
... click the option, Add to restore your system. The Hard Drive Recovery utility is a quick and easy-to Sony Direct Accessores and Parts Center Web site at 1-800-488-7669. To enable you to recover your system with the VAIO Recovery utility, you can restore your computer model and click List Parts and accessories. 4. Go...
... click the option, Add to restore your system. The Hard Drive Recovery utility is a quick and easy-to Sony Direct Accessores and Parts Center Web site at 1-800-488-7669. To enable you to recover your system with the VAIO Recovery utility, you can restore your computer model and click List Parts and accessories. 4. Go...
Marketing Specifications
Page 1
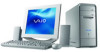
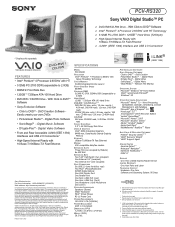
...; 4 Processor 2.60GHz† with 10 Base-T/100Base-TX Fast Ethernet Sony Electronics Inc. This personal computer is not manufactured to Hard Drive capacity. Reproduction in whole or in each other trademarks are trademarks of ...Drive VIDEO & GRAPHICS Intel® 865G Integrated Graphics 64MB max. All products with an i.LINK connector may choose to vary or waive this document. Simulated graphic shown on the Sony Desktop Computer are NOT authorized to connect. CD-RW read ) CD-ROM 40X max. other factors may make any combination of Intel Corporation. PCV-RS320 Sony VAIO...
...; 4 Processor 2.60GHz† with 10 Base-T/100Base-TX Fast Ethernet Sony Electronics Inc. This personal computer is not manufactured to Hard Drive capacity. Reproduction in whole or in each other trademarks are trademarks of ...Drive VIDEO & GRAPHICS Intel® 865G Integrated Graphics 64MB max. All products with an i.LINK connector may choose to vary or waive this document. Simulated graphic shown on the Sony Desktop Computer are NOT authorized to connect. CD-RW read ) CD-ROM 40X max. other factors may make any combination of Intel Corporation. PCV-RS320 Sony VAIO...


