Online Help Center (VAIO User Guide)
Page 20
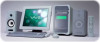
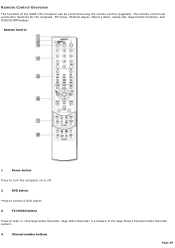
... can be controlled using the remote control (supplied). Remote Control 1 Power button Press to turn the computer on or off. 2 DVD button Press to control a DVD player. 3 TV/VIDEO button Press to start or stop Giga Video Recorder. Giga Video Recorder is a feature of the VAIO® MX Computer can control the functions for the...
... can be controlled using the remote control (supplied). Remote Control 1 Power button Press to turn the computer on or off. 2 DVD button Press to control a DVD player. 3 TV/VIDEO button Press to start or stop Giga Video Recorder. Giga Video Recorder is a feature of the VAIO® MX Computer can control the functions for the...
Online Help Center (VAIO User Guide)
Page 59
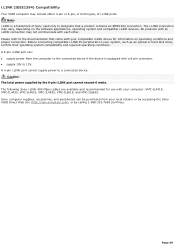
... a product contains an IEEE1394 connection. Sony computer supplies, accessories, and peripherals can : supply power from your compatible i.LINK device for use with a 6-pin connector. supply 10V to 12V. All products with an i.LINK connection may not communicate with your local retailer or by accessing the Sony VAIO Direct Web site (http://vaio.sonystyle.com), or by the...
... a product contains an IEEE1394 connection. Sony computer supplies, accessories, and peripherals can : supply power from your compatible i.LINK device for use with a 6-pin connector. supply 10V to 12V. All products with an i.LINK connection may not communicate with your local retailer or by accessing the Sony VAIO Direct Web site (http://vaio.sonystyle.com), or by the...
Online Help Center (VAIO User Guide)
Page 80
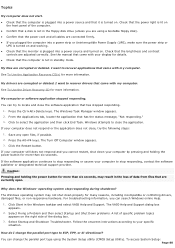
...down your specific situation. My com puter or software application stopped responding. If your computer still does not respond and you plugged the computer into a power strip or Uninterruptible Power Supply (UPS), make sure the power strip or UPS is turned on the right side of data from files that has ...more than six seconds. Press the Ctrl+Alt+Delete keys. Save any open . The Turn Off Computer window appears. 3. The Windows operating system may result in standby mode. The VAIO Help and Support dialog box appears. 2. You can change the parallel port type to select the ...
...down your specific situation. My com puter or software application stopped responding. If your computer still does not respond and you plugged the computer into a power strip or Uninterruptible Power Supply (UPS), make sure the power strip or UPS is turned on the right side of data from files that has ...more than six seconds. Press the Ctrl+Alt+Delete keys. Save any open . The Turn Off Computer window appears. 3. The Windows operating system may result in standby mode. The VAIO Help and Support dialog box appears. 2. You can change the parallel port type to select the ...
System Reference Manual
Page 10
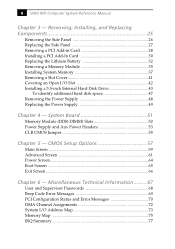
x VAIO MX Computer System Reference Manual Chapter 3 - Removing, Installing, and Replacing Components... Address Map 73 Memory Map 75 IRQ Summary 77 CMOS Setup Options 57 Main Screen 59 Advanced Screen 61 Power Screen 64 Boot Screen 65 Exit Screen 66 Chapter 6 - Miscellaneous Technical Information ......... 67 User and Supervisor ...Disk Drive 43 To identify additional hard disk space 47 Removing the Power Supply 48 Replacing the Power Supply 49 Chapter 4 - System Board 51 Memory Module (DDR-DIMM) Slots 52 Power Supply and Aux Power Headers 53 CLR CMOS Jumper 55 Chapter 5 -
x VAIO MX Computer System Reference Manual Chapter 3 - Removing, Installing, and Replacing Components... Address Map 73 Memory Map 75 IRQ Summary 77 CMOS Setup Options 57 Main Screen 59 Advanced Screen 61 Power Screen 64 Boot Screen 65 Exit Screen 66 Chapter 6 - Miscellaneous Technical Information ......... 67 User and Supervisor ...Disk Drive 43 To identify additional hard disk space 47 Removing the Power Supply 48 Replacing the Power Supply 49 Chapter 4 - System Board 51 Memory Module (DDR-DIMM) Slots 52 Power Supply and Aux Power Headers 53 CLR CMOS Jumper 55 Chapter 5 -

System Reference Manual
Page 26
...operating conditions and proper connections. Before connecting compatible i.LINK PC peripherals to your compatible i.LINK device for the Sony®/Phillips Digital Interface (S/P DIF) can supply power from the computer to a device if the device also has a 6-pin i.LINK port. The i.LINK connection may not ...depending on the software applications, operating system and compatible i.LINK devices. 14 VAIO MX Computer System Reference Manual i.LINK (IEEE 1394) Ports The 6-pin i.LINK port on the back of Sony used to connect compatible audio or video equipment, such as an optical disc...
...operating conditions and proper connections. Before connecting compatible i.LINK PC peripherals to your compatible i.LINK device for the Sony®/Phillips Digital Interface (S/P DIF) can supply power from the computer to a device if the device also has a 6-pin i.LINK port. The i.LINK connection may not ...depending on the software applications, operating system and compatible i.LINK devices. 14 VAIO MX Computer System Reference Manual i.LINK (IEEE 1394) Ports The 6-pin i.LINK port on the back of Sony used to connect compatible audio or video equipment, such as an optical disc...
System Reference Manual
Page 50
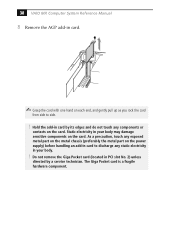
... from side to discharge any static electricity in your body may damage sensitive components on the power supply) before handling an add-in card to side. ! The Giga Pocket card is a fragile hardware component. 38 VAIO MX Computer System Reference Manual 8 Remove the AGP add-in card. ✍ Grasp the card with one hand...
... from side to discharge any static electricity in your body may damage sensitive components on the power supply) before handling an add-in card to side. ! The Giga Pocket card is a fragile hardware component. 38 VAIO MX Computer System Reference Manual 8 Remove the AGP add-in card. ✍ Grasp the card with one hand...

System Reference Manual
Page 52
No further action is required. Your computer automatically recognizes the extra memory and configures itself accordingly when you turn on the computer. 40 VAIO MX Computer System Reference Manual 12 Replace the AGP card and secure using the screw removed earlier. ✍ Press down firmly on the AGP card, until the latch locks it into place in the slot. 13 Replace the power supply (see "Replacing the Power Supply" on page 49). 14 Replace the side cover (see "Replacing the Side Panel" on page 27). 15 Reconnect the power cord and turn on the computer.
No further action is required. Your computer automatically recognizes the extra memory and configures itself accordingly when you turn on the computer. 40 VAIO MX Computer System Reference Manual 12 Replace the AGP card and secure using the screw removed earlier. ✍ Press down firmly on the AGP card, until the latch locks it into place in the slot. 13 Replace the power supply (see "Replacing the Power Supply" on page 49). 14 Replace the side cover (see "Replacing the Side Panel" on page 27). 15 Reconnect the power cord and turn on the computer.
System Reference Manual
Page 56
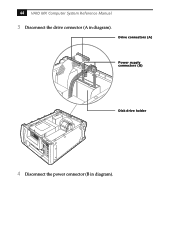
44 VAIO MX Computer System Reference Manual 3 Disconnect the drive connector (A in diagram). Drive connectors (A) Power supply connectors (B) Disk drive holder 4 Disconnect the power connector (B in diagram).
44 VAIO MX Computer System Reference Manual 3 Disconnect the drive connector (A in diagram). Drive connectors (A) Power supply connectors (B) Disk drive holder 4 Disconnect the power connector (B in diagram).
System Reference Manual
Page 58
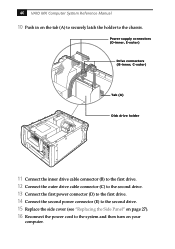
46 VAIO MX Computer System Reference Manual 10 Push in on the tab (A) to securely latch the holder to the system and then turn on page 27). 16 Reconnect the power cord to the chassis. Power supply connectors (D-inner, E-outer) Drive connectors (B-inner, C-outer) Tab (A) Disk drive holder 11 Connect the inner drive cable connector (B) to...
46 VAIO MX Computer System Reference Manual 10 Push in on the tab (A) to securely latch the holder to the system and then turn on page 27). 16 Reconnect the power cord to the chassis. Power supply connectors (D-inner, E-outer) Drive connectors (B-inner, C-outer) Tab (A) Disk drive holder 11 Connect the inner drive cable connector (B) to...
System Reference Manual
Page 60
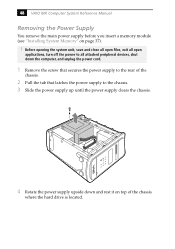
48 VAIO MX Computer System Reference Manual Removing the Power Supply You remove the main power supply before you insert a memory module (see "Installing System Memory" on top of the chassis. 2 Pull the tab that latches the power supply to the chassis. 3 Slide the power supply up until the power supply clears the chassis. 4 Rotate the power supply upside down the computer, and unplug the power cord...
48 VAIO MX Computer System Reference Manual Removing the Power Supply You remove the main power supply before you insert a memory module (see "Installing System Memory" on top of the chassis. 2 Pull the tab that latches the power supply to the chassis. 3 Slide the power supply up until the power supply clears the chassis. 4 Rotate the power supply upside down the computer, and unplug the power cord...

System Reference Manual
Page 66
54 VAIO MX Computer System Reference Manual Power Supply header (Continued) Pin Signal Name 17 Ground 18 No Connection 19 +5 V 20 +5 V Aux Power header Pin Signal Name 1 Ground 2 Ground 3 +12 V 4 +12 V
54 VAIO MX Computer System Reference Manual Power Supply header (Continued) Pin Signal Name 17 Ground 18 No Connection 19 +5 V 20 +5 V Aux Power header Pin Signal Name 1 Ground 2 Ground 3 +12 V 4 +12 V
VAIO User Guide (primary manual)
Page 64
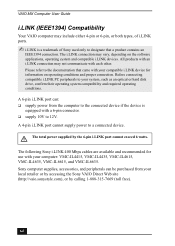
...-IL4415, VMC-IL4435, VMC-IL4615, VMC-IL4635, VMC-IL6615, and VMC-IL6635. VAIO MX Computer User Guide i.LINK (IEEE1394) Compatibility Your VAIO computer may include either 4-pin or 6-pin, or both types, of Sony used only to a connected device. The total power supplied by calling 1-888-315-7669 (toll free). 64 Before connecting compatible i.LINK PC peripherals...
...-IL4415, VMC-IL4435, VMC-IL4615, VMC-IL4635, VMC-IL6615, and VMC-IL6635. VAIO MX Computer User Guide i.LINK (IEEE1394) Compatibility Your VAIO computer may include either 4-pin or 6-pin, or both types, of Sony used only to a connected device. The total power supplied by calling 1-888-315-7669 (toll free). 64 Before connecting compatible i.LINK PC peripherals...
VAIO User Guide (primary manual)
Page 96
... S keys 21 S/P DIF OUT/IN optical ports 11 Serial port 11 Shortcut keys 21 shutting down your computer 85 slot cover 88 Software 78 stopped responding 74 Sony online service 45 speaker precaution 86 Stereo speaker terminals 11 Stop button 8 Support resources 91 surge protectors 85...response 82 system stopped responding 74 Troubleshooting 73 turning off your computer 85 TV interference 87 U Uninterruptible Power Supply 85 Universal Serial Bus (USB) port 9, 10 upgrading your computer 87 V VAIO Action Setup 21 VAIO Edit Components 61 VAIO Edit Components software 61 ventilation 86 VHF/UHF port 11 ...
... S keys 21 S/P DIF OUT/IN optical ports 11 Serial port 11 Shortcut keys 21 shutting down your computer 85 slot cover 88 Software 78 stopped responding 74 Sony online service 45 speaker precaution 86 Stereo speaker terminals 11 Stop button 8 Support resources 91 surge protectors 85...response 82 system stopped responding 74 Troubleshooting 73 turning off your computer 85 TV interference 87 U Uninterruptible Power Supply 85 Universal Serial Bus (USB) port 9, 10 upgrading your computer 87 V VAIO Action Setup 21 VAIO Edit Components 61 VAIO Edit Components software 61 ventilation 86 VHF/UHF port 11 ...


