
Operating Instructions
Page 2
... built-in the battery compartment of the player (see page 8). If you use the unit at 1-(866)-456-7669 Write: Sony Customer Information Services Center 12451 Gateway Blvd., Fort Myers, FL33913 To prevent fire or shock hazard, do not cover the ventilation of the apparatus with the limits for help. Note on installation If you have any changes or modifications...
... built-in the battery compartment of the player (see page 8). If you use the unit at 1-(866)-456-7669 Write: Sony Customer Information Services Center 12451 Gateway Blvd., Fort Myers, FL33913 To prevent fire or shock hazard, do not cover the ventilation of the apparatus with the limits for help. Note on installation If you have any changes or modifications...
Operating Instructions
Page 4
... Windows Media are trademarks or registered trademarks of Microsoft Corporation in part, or renting the software without the permission of the copyright holder. • In no other responsibility. • The software provided with this player cannot be used with this software as a result of defective manufacturing, SONY will SONY be changed without notice. • Operation of this manual, TM and ® marks are installed...
... Windows Media are trademarks or registered trademarks of Microsoft Corporation in part, or renting the software without the permission of the copyright holder. • In no other responsibility. • The software provided with this player cannot be used with this software as a result of defective manufacturing, SONY will SONY be changed without notice. • Operation of this manual, TM and ® marks are installed...
Operating Instructions
Page 5
... Locking the controls (HOLD 25 Storing non-audio data 25 Adjusting the settings of your Network Walkman Adjusting the current time setting (DATE-TIME 26 Limiting the volume (AVLS 27 Setting the volume using the preset volume function 28 Setting a volume level of the preset mode 28 Switching to the manual mode 29 Turning off the beep sound (BEEP) ........ 30 Changing the backlight setting 31 Other functions Formatting memory (FORMAT 32 Displaying the player information (INFO 33 Other Information Precautions 34 Troubleshooting 35 To reset the player...
... Locking the controls (HOLD 25 Storing non-audio data 25 Adjusting the settings of your Network Walkman Adjusting the current time setting (DATE-TIME 26 Limiting the volume (AVLS 27 Setting the volume using the preset volume function 28 Setting a volume level of the preset mode 28 Switching to the manual mode 29 Turning off the beep sound (BEEP) ........ 30 Changing the backlight setting 31 Other functions Formatting memory (FORMAT 32 Displaying the player information (INFO 33 Other Information Precautions 34 Troubleshooting 35 To reset the player...
Operating Instructions
Page 6
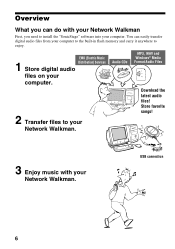
You can do with your Network Walkman. Audio CDs MP3, WAV and Windows® Media Format Audio Files 2 Transfer files to enjoy. Overview What you need to install the "SonicStage" software into your computer. Store favorite songs! 3 Enjoy music with your Network Walkman First, you can easily transfer digital audio files from your computer to the built-in flash memory and carry it anywhere to your computer. Download the latest audio files! USB connection 6 EMD (Electric Music 1 Distribution) Services Store digital audio files on your Network Walkman.
You can do with your Network Walkman. Audio CDs MP3, WAV and Windows® Media Format Audio Files 2 Transfer files to enjoy. Overview What you need to install the "SonicStage" software into your computer. Store favorite songs! 3 Enjoy music with your Network Walkman First, you can easily transfer digital audio files from your computer to the built-in flash memory and carry it anywhere to your computer. Download the latest audio files! USB connection 6 EMD (Electric Music 1 Distribution) Services Store digital audio files on your Network Walkman.
Operating Instructions
Page 7
... data transfer using the dedicated USB cable. • Backlight LCD screen: song titles and artist names can be displayed. • Group function: you can select songs to be played by the player. 7 The ID3 TAG information for the track is written in flash memory, more than 47 hours 00 minutes. • The supplied SonicStage software enables you to record songs from audio CDs to the hard disk of data...
... data transfer using the dedicated USB cable. • Backlight LCD screen: song titles and artist names can be displayed. • Group function: you can select songs to be played by the player. 7 The ID3 TAG information for the track is written in flash memory, more than 47 hours 00 minutes. • The supplied SonicStage software enables you to record songs from audio CDs to the hard disk of data...
Operating Instructions
Page 10
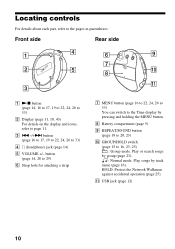
..., 26 to 33) You can switch to the Time display by group (page 23). : Normal mode. qa USB jack (page 12) 10 Play or search songs by pressing and holding the MENU button. 8 Battery compartment (page 9) 9 REPEAT/SOUND button (page 18 to 16, 23, 25) : Group mode. Locating controls For details about each part, refer to 33) 4 i (headphone) jack (page 14) 5 VOLUME +/- Play songs by track name (page 16). Front...
..., 26 to 33) You can switch to the Time display by group (page 23). : Normal mode. qa USB jack (page 12) 10 Play or search songs by pressing and holding the MENU button. 8 Battery compartment (page 9) 9 REPEAT/SOUND button (page 18 to 16, 23, 25) : Group mode. Locating controls For details about each part, refer to 33) 4 i (headphone) jack (page 14) 5 VOLUME +/- Play songs by track name (page 16). Front...
Operating Instructions
Page 12
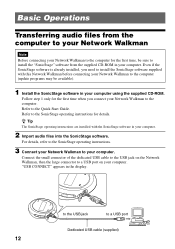
... your Network Walkman to the computer. Basic Operations Transferring audio files from the supplied CD-ROM in your computer. Even if the SonicStage software is already installed, you connect your computer. to the USB jack to the Quick Start Guide. Refer to your computer. 2 Import audio files into the SonicStage software. "USB CONNECT" appears in your computer. For details, refer to the SonicStage operating instructions. 3 Connect your Network Walkman to the SonicStage operating instructions for...
... your Network Walkman to the computer. Basic Operations Transferring audio files from the supplied CD-ROM in your computer. Even if the SonicStage software is already installed, you connect your computer. to the USB jack to the Quick Start Guide. Refer to your computer. 2 Import audio files into the SonicStage software. "USB CONNECT" appears in your computer. For details, refer to the SonicStage operating instructions. 3 Connect your Network Walkman to the SonicStage operating instructions for...
Operating Instructions
Page 13
.... 4 Transfer audio files to the built-in the Network Walkman. Note If the USB cable is disconnected while data is displayed. Always connect your Network Walkman to the SonicStage operating instructions. In this message is being transferred may be left in flash memory, refer to the computer directly using Windows Explorer when your Network Walkman. Do not disconnect the USB cable when this case, transfer usable audio files (including non-audio data) back to the SonicStage operating instructions or online Help for the SonicStage software.
.... 4 Transfer audio files to the built-in the Network Walkman. Note If the USB cable is disconnected while data is displayed. Always connect your Network Walkman to the SonicStage operating instructions. In this message is being transferred may be left in flash memory, refer to the computer directly using Windows Explorer when your Network Walkman. Do not disconnect the USB cable when this case, transfer usable audio files (including non-audio data) back to the SonicStage operating instructions or online Help for the SonicStage software.

Operating Instructions
Page 14
... use (see page 9), and transfer audio files to i jack 2 Start playback. 1 Press the Nx button. 2 Press the VOLUME +/- to your Network Walkman. Note When using Network Walkman, be set to adjust the volume. GROUP/HOLD switch When the normal playback mode is selected, playback stops automatically after the last song is set in the Preset and Manual mode (page 28 to 29). 14 To stop playback Press the Nx button. button to (NORMAL) (page 25). If playback does not start Make...
... use (see page 9), and transfer audio files to i jack 2 Start playback. 1 Press the Nx button. 2 Press the VOLUME +/- to your Network Walkman. Note When using Network Walkman, be set to adjust the volume. GROUP/HOLD switch When the normal playback mode is selected, playback stops automatically after the last song is set in the Preset and Manual mode (page 28 to 29). 14 To stop playback Press the Nx button. button to (NORMAL) (page 25). If playback does not start Make...
Operating Instructions
Page 15
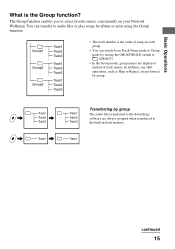
...-in each group. • You can transfer to audio files or play songs by group. Track1 Track2 Track3 Track1 Track1 Track2 Track3 Transferring by group The audio files transferred to the SonicStage software are displayed instead of track names. You can switch from Track Name mode to Group mode by setting the GROUP/HOLD switch to select favorite music conveniently on your Network Walkman. Group1 Group2 Group3 Track1 Track2 Track3...
...-in each group. • You can transfer to audio files or play songs by group. Track1 Track2 Track3 Track1 Track1 Track2 Track3 Transferring by group The audio files transferred to the SonicStage software are displayed instead of track names. You can switch from Track Name mode to Group mode by setting the GROUP/HOLD switch to select favorite music conveniently on your Network Walkman. Group1 Group2 Group3 Track1 Track2 Track3...

Operating Instructions
Page 16
... continuously. *2 Fast-forward and fast-rewind speed becomes gradually faster. 16 Listening to music with your Network Walkman On other operations Nx button MENU button GROUP/HOLD switch .-/+> button z Tip You can select to the Group mode by setting the GROUP/HOLD switch to the beginning of the current track/ group*1 Fast-forward*2 Fast-rewind*2 .-/+> button operation Press the +> button once. Press the +> button and hold it . Press the .-
... continuously. *2 Fast-forward and fast-rewind speed becomes gradually faster. 16 Listening to music with your Network Walkman On other operations Nx button MENU button GROUP/HOLD switch .-/+> button z Tip You can select to the Group mode by setting the GROUP/HOLD switch to the beginning of the current track/ group*1 Fast-forward*2 Fast-rewind*2 .-/+> button operation Press the +> button once. Press the +> button and hold it . Press the .-
Operating Instructions
Page 18
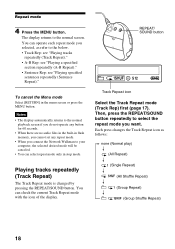
... normal playback screen if you do not operate any button for 60 seconds. • When there are no audio files in the built-in flash memory, you cannot set any repeat mode. • When you selected, as follows: none (Normal play) (All Repeat) (Single Repeat) (All Shuffle Repeat) (Group Repeat) (Group Shuffle Repeat) 18 You can select repeat mode only in the menu screen or press the MENU button. REPEAT/ SOUND button Track Repeat icon Select the Track Repeat mode (Track...
... normal playback screen if you do not operate any button for 60 seconds. • When there are no audio files in the built-in flash memory, you cannot set any repeat mode. • When you selected, as follows: none (Normal play) (All Repeat) (Single Repeat) (All Shuffle Repeat) (Group Repeat) (Group Shuffle Repeat) 18 You can select repeat mode only in the menu screen or press the MENU button. REPEAT/ SOUND button Track Repeat icon Select the Track Repeat mode (Track...

Operating Instructions
Page 19
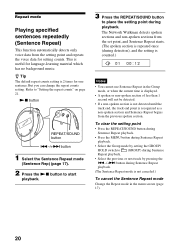
... REPEAT/SOUND button during A-B Repeat playback. • Press the MENU button during A-B Repeat playback. • Select the Group mode by pressing the .-/+> button during A-B Repeat playback. (The A-B Repeat mode is not canceled.) To cancel the A-B Repeat mode Change the Repeat mode in the Group mode or when the current time is displayed. Nx button REPEAT/SOUND button .-/+> button 1 Select the A-B Repeat mode (A-B Rep) (page 17). 2 Press the Nx button to start playback. 3 Press the REPEAT/SOUND button to set the end point (B). Advanced Operations Playing a specified section repeatedly...
... REPEAT/SOUND button during A-B Repeat playback. • Press the MENU button during A-B Repeat playback. • Select the Group mode by pressing the .-/+> button during A-B Repeat playback. (The A-B Repeat mode is not canceled.) To cancel the A-B Repeat mode Change the Repeat mode in the Group mode or when the current time is displayed. Nx button REPEAT/SOUND button .-/+> button 1 Select the A-B Repeat mode (A-B Rep) (page 17). 2 Press the Nx button to start playback. 3 Press the REPEAT/SOUND button to set the end point (B). Advanced Operations Playing a specified section repeatedly...
Operating Instructions
Page 20
... the Nx button to start playback. 3 Press the REPEAT/SOUND button to "Setting the repeat counts" on page 21. z Tip The default repeat counts setting is recognized as a non-spoken section and Sentence Repeat begins from the setting point and repeats the voice data for setting counts. This is counted.) 01 00:12 Notes • You cannot use Sentence Repeat in the menu screen (page 17). 20 The Network Walkman detects spoken sections...
... the Nx button to start playback. 3 Press the REPEAT/SOUND button to "Setting the repeat counts" on page 21. z Tip The default repeat counts setting is recognized as a non-spoken section and Sentence Repeat begins from the setting point and repeats the voice data for setting counts. This is counted.) 01 00:12 Notes • You cannot use Sentence Repeat in the menu screen (page 17). 20 The Network Walkman detects spoken sections...

Operating Instructions
Page 35
... "Troubleshooting" in the memory. The volume is generated. c Turn the volume up (page 14). • The headphone jack is not fully inserted. The headphone jack is not connected properly. c If "NO DATA" is displayed, transfer audio file(s) from the right channel of the following difficulties while using your Network Walkman aside for a few hours. • The remaining battery power is set to (NORMAL) (page 25). • Your Network Walkman contains...
... "Troubleshooting" in the memory. The volume is generated. c Turn the volume up (page 14). • The headphone jack is not fully inserted. The headphone jack is not connected properly. c If "NO DATA" is displayed, transfer audio file(s) from the right channel of the following difficulties while using your Network Walkman aside for a few hours. • The remaining battery power is set to (NORMAL) (page 25). • Your Network Walkman contains...
Operating Instructions
Page 36
... USB cable. • A USB hub is not recognized by copyright holders. c Connect the dedicated USB cable. One group can transfer up to 999 songs. • Audio files with appropriate characters. c In the menu mode, set "LIGHT" to restrictions set to the built-in flash memory using SonicStage software. Your Network Walkman is used . Connect the dedicated USB cable directly to the computer. c Wait for a title. The dedicate USB cable is used . c Transfer any unnecessary songs back to your computer to increase free...
... USB cable. • A USB hub is not recognized by copyright holders. c Connect the dedicated USB cable. One group can transfer up to 999 songs. • Audio files with appropriate characters. c In the menu mode, set "LIGHT" to restrictions set to the built-in flash memory using SonicStage software. Your Network Walkman is used . Connect the dedicated USB cable directly to the computer. c Wait for a title. The dedicate USB cable is used . c Transfer any unnecessary songs back to your computer to increase free...

Operating Instructions
Page 38
.... Set the GROUP/HOLD switch to (NORMAL) to the computer and then format your Network Walkman. For details, refer to "To delete abnormal data from the built-in flash memory" on page 39. Remedy Turn the volume down or disable the AVLS. The battery is enabled. • Your Network Walkman cannot play certain files because of the builtin flash memory. Troubleshooting Messages Follow the instructions below if an error message appears in flash memory...
.... Set the GROUP/HOLD switch to (NORMAL) to the computer and then format your Network Walkman. For details, refer to "To delete abnormal data from the built-in flash memory" on page 39. Remedy Turn the volume down or disable the AVLS. The battery is enabled. • Your Network Walkman cannot play certain files because of the builtin flash memory. Troubleshooting Messages Follow the instructions below if an error message appears in flash memory...
Operating Instructions
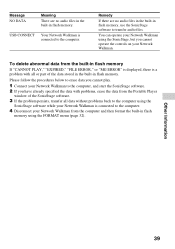
Page 39
... FORMAT menu (page 32). Remedy If there are no audio files in the built-in flash memory, use the SonicStage software to transfer audio files. USB CONNECT Your Network Walkman is connected to the computer. Please follow the procedures below to erase data you cannot play. 1 Connect your Network Walkman to the computer, and start the SonicStage software. 2 If you cannot operate the controls on your Network Walkman from the Portable Player window of the SonicStage software. 3 If the problem persists, transfer all or part...
... FORMAT menu (page 32). Remedy If there are no audio files in the built-in flash memory, use the SonicStage software to transfer audio files. USB CONNECT Your Network Walkman is connected to the computer. Please follow the procedures below to erase data you cannot play. 1 Connect your Network Walkman to the computer, and start the SonicStage software. 2 If you cannot operate the controls on your Network Walkman from the Portable Player window of the SonicStage software. 3 If the problem persists, transfer all or part...
Quick Start Guide
Page 1
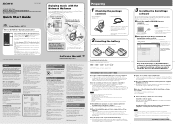
... This device complies with correct polarity. Continue to your Network Walkman using one or more of group and select playback mode, Shuffle, Repeat, or etc. 2-594-961-12(1) Portable IC Audio Player Network Walkman NW-E103/E105/E107 Operating Instructions Quick Start Guide Refer to the PDF file "Operating Instructions" Refer to the PDF file "Operating Instructions" for more information and for following Open Globe, Inc. You are not supported. Enjoying music with software other languages PDF file "Operating Instructions" English PDF file "Operating Instructions" are designed...
... This device complies with correct polarity. Continue to your Network Walkman using one or more of group and select playback mode, Shuffle, Repeat, or etc. 2-594-961-12(1) Portable IC Audio Player Network Walkman NW-E103/E105/E107 Operating Instructions Quick Start Guide Refer to the PDF file "Operating Instructions" Refer to the PDF file "Operating Instructions" for more information and for following Open Globe, Inc. You are not supported. Enjoying music with software other languages PDF file "Operating Instructions" English PDF file "Operating Instructions" are designed...
Quick Start Guide
Page 2
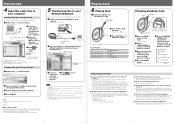
... setting the GROUP/HOLD switch to the Network Walkman. and +> on the Network Walkman? Find the beginning of the current track Press .- A1 You can contain up . A7 There is limited to play music. MENU REPEAT/SOUND .-/+> 1 Press the MENU button in flash memory using SonicStage. (You cannot play ) (All Repeat) (Single Repeat) (All Shuffle Repeat) (Group Repeat) (Group Shuffle Repeat) Additional Information Q&A Q1 Is there a limitation to transfer audio files to confirm. The display returns to the normal screen...
... setting the GROUP/HOLD switch to the Network Walkman. and +> on the Network Walkman? Find the beginning of the current track Press .- A1 You can contain up . A7 There is limited to play music. MENU REPEAT/SOUND .-/+> 1 Press the MENU button in flash memory using SonicStage. (You cannot play ) (All Repeat) (Single Repeat) (All Shuffle Repeat) (Group Repeat) (Group Shuffle Repeat) Additional Information Q&A Q1 Is there a limitation to transfer audio files to confirm. The display returns to the normal screen...


