

Instruction Manual
Page 2
Before installing or operating the unit, read prior to be ready to start using the unit. • Important Information Contains important notices to use, including warnings, specifications, and troubleshooting instructions. • Instruction Manual (PDF) (this manual) Contains descriptions of the following 3 guides. Using the manuals The manuals for future reference. • Quick Start Guide Contains instructions on this manual Illustrations and screenshots in this manual may differ from the actual device. 2 After you have read this manual, you...
Before installing or operating the unit, read prior to be ready to start using the unit. • Important Information Contains important notices to use, including warnings, specifications, and troubleshooting instructions. • Instruction Manual (PDF) (this manual) Contains descriptions of the following 3 guides. Using the manuals The manuals for future reference. • Quick Start Guide Contains instructions on this manual Illustrations and screenshots in this manual may differ from the actual device. 2 After you have read this manual, you...

Instruction Manual
Page 3
... Basic Operations 5 Menu operations 5 Gesture Command operations 7 Keyboard operations 9 Navigation 11 Checking the GPS status 11 Route searching 13 Address search 13 Home search 15 POI search 15 Intersection search 17 City center search 18 Quick Link search 18 Recent destinations search 19 Address book search 20 Favorites search 20 Option menu in the address/POI confirmation display 21 Map operations 22 Indications on the map 22 Map scrolling mode 25 Using the map tools 26 Route planning 28 Creating a new itinerary...
... Basic Operations 5 Menu operations 5 Gesture Command operations 7 Keyboard operations 9 Navigation 11 Checking the GPS status 11 Route searching 13 Address search 13 Home search 15 POI search 15 Intersection search 17 City center search 18 Quick Link search 18 Recent destinations search 19 Address book search 20 Favorites search 20 Option menu in the address/POI confirmation display 21 Map operations 22 Indications on the map 22 Map scrolling mode 25 Using the map tools 26 Route planning 28 Creating a new itinerary...

Instruction Manual
Page 13
...; "Address book search" (page 20) • "Favorites search" (page 20) Address search Address search allows you to set the desired state. The list of the destination. 1 In the menu display, touch , then "Enter Address." The house number input display appears. 2 Enter the house number. When selecting "Change to next page r 13 The city name input display appears. 5 Enter the city name. continue to Different State," enter the state name, then select the desired state. If the state selection display appears, select the new (current) state or "Change...
...; "Address book search" (page 20) • "Favorites search" (page 20) Address search Address search allows you to set the desired state. The list of the destination. 1 In the menu display, touch , then "Enter Address." The house number input display appears. 2 Enter the house number. When selecting "Change to next page r 13 The city name input display appears. 5 Enter the city name. continue to Different State," enter the state name, then select the desired state. If the state selection display appears, select the new (current) state or "Change...

Instruction Manual
Page 14
... set the destination in the list. continue to Different State," enter the state name, then select the desired state. In this case, select the desired address. The address confirmation display appears. 6 Select "Go." Street search If the house number is not known, a search can select a different state when "State" appears in the list. If the state selection display appears, select the new (current) state or "Change to an approximate point on the street. 1 In the menu display, touch , then "Enter Address." The house number input display appears. 2 Select...
... set the destination in the list. continue to Different State," enter the state name, then select the desired state. In this case, select the desired address. The address confirmation display appears. 6 Select "Go." Street search If the house number is not known, a search can select a different state when "State" appears in the list. If the state selection display appears, select the new (current) state or "Change to an approximate point on the street. 1 In the menu display, touch , then "Enter Address." The house number input display appears. 2 Select...

Instruction Manual
Page 15
... for POIs near the current position. The search method selection display appears. 2 Select "Points of Interest." 3 Select "Change City." 4 Enter the city name. 5 Select the desired city in another city You can search for the POIs in the list. With Gesture Command In the map display, draw . POI search POI (Points Of Interest) search allows you select "Take Me Home" without having registered a home address, the registration display automatically appears. To search for a route...
... for POIs near the current position. The search method selection display appears. 2 Select "Points of Interest." 3 Select "Change City." 4 Enter the city name. 5 Select the desired city in another city You can search for the POIs in the list. With Gesture Command In the map display, draw . POI search POI (Points Of Interest) search allows you select "Take Me Home" without having registered a home address, the registration display automatically appears. To search for a route...

Instruction Manual
Page 17
... the selected street. 1 In the menu display, touch , then "Find a Place." The street name input display appears. 5 Enter the other street name. The list of category candidates appears. 4 Select the desired category. Route guidance starts. Select sub category when necessary until the POI candidates are too many POI candidates in step 1 above , you can also be set as a destination, if available for a route to a POI by selecting its category(ies). 1 In the menu display, touch , then...
... the selected street. 1 In the menu display, touch , then "Find a Place." The street name input display appears. 5 Enter the other street name. The list of category candidates appears. 4 Select the desired category. Route guidance starts. Select sub category when necessary until the POI candidates are too many POI candidates in step 1 above , you can also be set as a destination, if available for a route to a POI by selecting its category(ies). 1 In the menu display, touch , then...

Instruction Manual
Page 18
... step 1 above and skipping the house number input. The search method selection display appears. 2 Select "Find City." The address confirmation display appears. 5 Select "Go." continue to the preset POI name/category. Route guidance starts. Quick Link search Quick Link allows for quick access to next page r 18 Tip The city center search can be made by selecting "Enter Address" in Quick Links as a destination. 1 In the menu display, touch , then "Find a Place."
... step 1 above and skipping the house number input. The search method selection display appears. 2 Select "Find City." The address confirmation display appears. 5 Select "Go." continue to the preset POI name/category. Route guidance starts. Quick Link search Quick Link allows for quick access to next page r 18 Tip The city center search can be made by selecting "Enter Address" in Quick Links as a destination. 1 In the menu display, touch , then "Find a Place."
Instruction Manual
Page 19
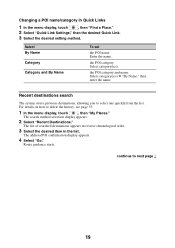
... address/POI confirmation display appears. 4 Select "Go." continue to select one quickly from the list. the POI category. Changing a POI name/category in the list. Select By Name Category Category and By Name To set the POI name. Route guidance starts. Enter the name. the POI category and name. For details on how to delete the history, see page 35. 1 In the menu display, touch , then "My Places." The list of searched destinations appears...
... address/POI confirmation display appears. 4 Select "Go." continue to select one quickly from the list. the POI category. Changing a POI name/category in the list. Select By Name Category Category and By Name To set the POI name. Route guidance starts. Enter the name. the POI category and name. For details on how to delete the history, see page 35. 1 In the menu display, touch , then "My Places." The list of searched destinations appears...

Instruction Manual
Page 21
..., "Save This Location" appears. *2 Available only during route guidance. Adds the point as an interim destination in the scrolling mode appears. The map in the current route. "Edit Item" appears when you to the map scrolling mode, and fine adjust the destination point. 1 Select "Map" in the address/POI confirmation display provides various useful operations. Edits the selected address book entry. The system navigates you select "My Places" c "Address Book." Route guidance starts. 21 Option menu in the address/POI confirmation display The option menu in the address/POI...
..., "Save This Location" appears. *2 Available only during route guidance. Adds the point as an interim destination in the scrolling mode appears. The map in the current route. "Edit Item" appears when you to the map scrolling mode, and fine adjust the destination point. 1 Select "Map" in the address/POI confirmation display provides various useful operations. Edits the selected address book entry. The system navigates you select "My Places" c "Address Book." Route guidance starts. 21 Option menu in the address/POI confirmation display The option menu in the address/POI...

Instruction Manual
Page 26
continue to the current position display. 4 To show more map options. 5 To show the main menu. 2 To toggle the map orientation (heading up/north up). 3 During route guidance: To repeat the last voice guidance. To turn list (page 33).* 6 To zoom in/out the map. Touch / . 7 To adjust the voice guidance volume. Touch / . Using the map tools The map tool bar appears when you touch "Options" on the map display. 1 2 MENU VOICE/ POS. 3 4 56...
continue to the current position display. 4 To show more map options. 5 To show the main menu. 2 To toggle the map orientation (heading up/north up). 3 During route guidance: To repeat the last voice guidance. To turn list (page 33).* 6 To zoom in/out the map. Touch / . 7 To adjust the voice guidance volume. Touch / . Using the map tools The map tool bar appears when you touch "Options" on the map display. 1 2 MENU VOICE/ POS. 3 4 56...
Instruction Manual
Page 28
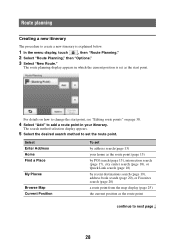
... selection display appears. 5 Select the desired search method to set by recent destinations search (page 19), address book search (page 20), or Favorites search (page 20) a route point from the map display (page 25) the current position as the start point, see "Editing route points" on page 30. 4 Select "Add" to add a route point in which the current position is set as the route point continue to create a new itinerary is explained below. 1 In the menu display, touch , then "Route Planning." 2 Select "Route Planning," then "Options." 3 Select "New Route." Route...
... selection display appears. 5 Select the desired search method to set by recent destinations search (page 19), address book search (page 20), or Favorites search (page 20) a route point from the map display (page 25) the current position as the start point, see "Editing route points" on page 30. 4 Select "Add" to add a route point in which the current position is set as the route point continue to create a new itinerary is explained below. 1 In the menu display, touch , then "Route Planning." 2 Select "Route Planning," then "Options." 3 Select "New Route." Route...

Instruction Manual
Page 31
... the route planning/route confirmation display provides various useful operations. "Edit": Shows the route planning display to create a new itinerary. "Rename": Changes the name of the route confirmation display after setting the route points. Option menu for route planning The option menu in the list, then enter the name. To overwrite a registered route, select a registered line in order of the following items. Item Save Route Saved Routes*1 Route Profile (page 45) Calculation Condition*1 New Route*1 Sort by Distance*1 Simulation*2 Purpose Saves the current route. Sets...
... the route planning/route confirmation display provides various useful operations. "Edit": Shows the route planning display to create a new itinerary. "Rename": Changes the name of the route confirmation display after setting the route points. Option menu for route planning The option menu in the list, then enter the name. To overwrite a registered route, select a registered line in order of the following items. Item Save Route Saved Routes*1 Route Profile (page 45) Calculation Condition*1 New Route*1 Sort by Distance*1 Simulation*2 Purpose Saves the current route. Sets...
Instruction Manual
Page 32
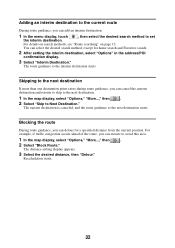
... home search and Favorites search. 2 After setting the interim destination, select "Options" in the address/POI confirmation display. 3 Select "Interim Destination." The route guidance to the next destination starts. The current destination is canceled, and the route guidance to the interim destination starts. Recalculation starts. 32 You can select the desired search method, except for a specified distance from the current position. For example, if traffic congestion occurs ahead of the route, you can add...
... home search and Favorites search. 2 After setting the interim destination, select "Options" in the address/POI confirmation display. 3 Select "Interim Destination." The route guidance to the next destination starts. The current destination is canceled, and the route guidance to the interim destination starts. Recalculation starts. 32 You can select the desired search method, except for a specified distance from the current position. For example, if traffic congestion occurs ahead of the route, you can add...
Instruction Manual
Page 35
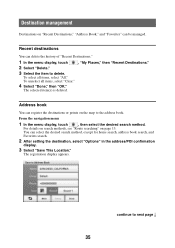
... for home search, address book search, and Favorites search. 2 After setting the destination, select "Options" in the address/POI confirmation display. 3 Select "Save This Location." From the navigation menu 1 In the menu display, touch , then select the desired search method. You can be managed. To unselect all items, select "All." continue to the address book. The selected item(s) is deleted. , "My Places," then "Recent Destinations." The registration display appears. To select all items, select "Clear." 4 Select "Done," then "OK." Address book You can delete...
... for home search, address book search, and Favorites search. 2 After setting the destination, select "Options" in the address/POI confirmation display. 3 Select "Save This Location." From the navigation menu 1 In the menu display, touch , then select the desired search method. You can be managed. To unselect all items, select "All." continue to the address book. The selected item(s) is deleted. , "My Places," then "Recent Destinations." The registration display appears. To select all items, select "Clear." 4 Select "Done," then "OK." Address book You can delete...
Instruction Manual
Page 36
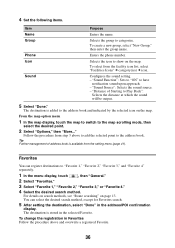
... Phone Icon Sound Purpose Enters the name. Selects the group to Play Back": Selects the distance at which the sound will be output. 5 Select "Done." To change the registration in Favorites Follow the procedure above to add the selected point to "Favorite 1," "Favorite 2," "Favorite 3," and "Favorite 4" separately. 1 In the menu display, touch , then "General." 2 Select "Favorites." 3 Select "Favorite 1," "Favorite 2," "Favorite 3," or "Favorite 4." 4 Select the desired search method. The destination is stored in the address/POI confirmation display. From the map option menu...
... Phone Icon Sound Purpose Enters the name. Selects the group to Play Back": Selects the distance at which the sound will be output. 5 Select "Done." To change the registration in Favorites Follow the procedure above to add the selected point to "Favorite 1," "Favorite 2," "Favorite 3," and "Favorite 4" separately. 1 In the menu display, touch , then "General." 2 Select "Favorites." 3 Select "Favorite 1," "Favorite 2," "Favorite 3," or "Favorite 4." 4 Select the desired search method. The destination is stored in the address/POI confirmation display. From the map option menu...
Instruction Manual
Page 41
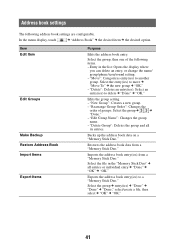
... address book data on a "Memory Stick Duo." Select the file in the list: Opens the display where you can delete an entry, or change the name/ group/phone/icon/sound setting. - Select the group c entry(ies) c "Done" c "Done" c "Done," select/create a file, then select c "OK" c "OK." 41 Item Edit Item Edit Groups Make Backup Restore Address Book Import Items Export Items Purpose Edits the address book entry. Entry in the "Memory Stick Duo" c all its entries. Edits the group setting. - Exports the address book...
... address book data on a "Memory Stick Duo." Select the file in the list: Opens the display where you can delete an entry, or change the name/ group/phone/icon/sound setting. - Select the group c entry(ies) c "Done" c "Done" c "Done," select/create a file, then select c "OK" c "OK." 41 Item Edit Item Edit Groups Make Backup Restore Address Book Import Items Export Items Purpose Edits the address book entry. Entry in the "Memory Stick Duo" c all its entries. Edits the group setting. - Exports the address book...

Instruction Manual
Page 42
..."Brightness, Day / Night Mode": Switches the display brightness automatically or sets the brightness for touch screen operation sound: "Level 3," "Level 2," "Level 1," "OFF." "Enter Address": Sets from the navigation menu. Sets daylight saving time automatically by GPS. - Item Volume (Operation Sound) Units Time Format Time Zone Select Language Display Input Home Address Start the Configuration Wizard Daylight Saving Time Purpose Presets the volume level for day time/night time use can be adjusted manually. - Adjusts the display settings. - "Manual (+1h)"/"Manual (+30min)": Sets...
..."Brightness, Day / Night Mode": Switches the display brightness automatically or sets the brightness for touch screen operation sound: "Level 3," "Level 2," "Level 1," "OFF." "Enter Address": Sets from the navigation menu. Sets daylight saving time automatically by GPS. - Item Volume (Operation Sound) Units Time Format Time Zone Select Language Display Input Home Address Start the Configuration Wizard Daylight Saving Time Purpose Presets the volume level for day time/night time use can be adjusted manually. - Adjusts the display settings. - "Manual (+1h)"/"Manual (+30min)": Sets...

Instruction Manual
Page 43
...the unit. Item GUI Day / Night Mode Power Saving (Display OFF) Keyboard Style (page 9) Password Lock Change Password Reset Factory Default Product Information GPS Status (page 12) Firmware Version Memory Stick Information Demonstration Mode Favorites (page 36) Track Log Purpose Selects the color theme of the currently inserted "Memory Stick Duo," such as used/ free space; "Delete All Track Logs": Deletes all track logs stored on the unit. To format, select "Format" c "OK" repeatedly. - Registers destinations in the unit for locking the unit. Views the detailed GPS status information...
...the unit. Item GUI Day / Night Mode Power Saving (Display OFF) Keyboard Style (page 9) Password Lock Change Password Reset Factory Default Product Information GPS Status (page 12) Firmware Version Memory Stick Information Demonstration Mode Favorites (page 36) Track Log Purpose Selects the color theme of the currently inserted "Memory Stick Duo," such as used/ free space; "Delete All Track Logs": Deletes all track logs stored on the unit. To format, select "Format" c "OK" repeatedly. - Registers destinations in the unit for locking the unit. Views the detailed GPS status information...

Instruction Manual
Page 48
... the USB cable. - Disconnecting After using the software or transferring data, do not: - Note While using the software or completing the transfer, exit the software, then disconnect the USB cable. 48 Installing the software 1 Go to http://esupport.sony.com/ 2 Enter your model number, then click "Continue." 3 Select "Drivers," then "nav-u tool" to your computer. 2 Connect the unit to download the software. 4 Follow the instructions at the website and complete the installation. turn off or reset the unit. - Connecting the unit...
... the USB cable. - Disconnecting After using the software or transferring data, do not: - Note While using the software or completing the transfer, exit the software, then disconnect the USB cable. 48 Installing the software 1 Go to http://esupport.sony.com/ 2 Enter your model number, then click "Continue." 3 Select "Drivers," then "nav-u tool" to your computer. 2 Connect the unit to download the software. 4 Follow the instructions at the website and complete the installation. turn off or reset the unit. - Connecting the unit...

Instruction Manual
Page 52
... edit the address book data on your computer You can transfer or import the address book data on the computer is complete. 5 Select "Save item(s) to next page r 52 You can edit the address book data on the unit, using the software. Before starting, connect the unit to the Unit." If the data does not appear in the list, select "Browse," then specify the data location. 2 Select . 3 Select the group/entry to delete c "Delete" c "OK." Editing the address book data on your computer, using the software. 1 Select "Address Book...
... edit the address book data on your computer You can transfer or import the address book data on the computer is complete. 5 Select "Save item(s) to next page r 52 You can edit the address book data on the unit, using the software. Before starting, connect the unit to the Unit." If the data does not appear in the list, select "Browse," then specify the data location. 2 Select . 3 Select the group/entry to delete c "Delete" c "OK." Editing the address book data on your computer, using the software. 1 Select "Address Book...


