SonicStage v2.0 Operating Guide
Page 6
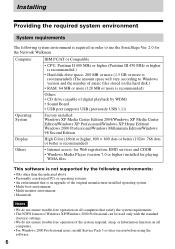
... indicated above • Personally constructed PCs or operating systems • An environment that is recommended) Others • Internet access: for Web registration, EMD services and CDDB • Windows Media Player (version 7.0 or higher) installed for the Network Walkman. Installing Providing the required system environment System requirements The following system environment is required in order to Windows version and the number of music files stored on the hard...
... indicated above • Personally constructed PCs or operating systems • An environment that is recommended) Others • Internet access: for Web registration, EMD services and CDDB • Windows Media Player (version 7.0 or higher) installed for the Network Walkman. Installing Providing the required system environment System requirements The following system environment is required in order to Windows version and the number of music files stored on the hard...
SonicStage v2.0 Operating Guide
Page 10
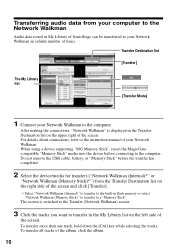
... instruction manual of your Network Walkman. To transfer all tracks of the album, click the album. 10 After making the connections, "Network Walkman" is switched to the Transfer (Network Walkman) screen. 3 Click the tracks you want to the computer. The screen is displayed in the Transfer Destination list on the upper right of the screen. Transfer Destination list [Transfer] The My Library list [Transfer Mode] 1 Connect your Network Walkman an infinite number of times. Do not remove the USB cable, battery, or "Memory...
... instruction manual of your Network Walkman. To transfer all tracks of the album, click the album. 10 After making the connections, "Network Walkman" is switched to the Transfer (Network Walkman) screen. 3 Click the tracks you want to the computer. The screen is displayed in the Transfer Destination list on the upper right of the screen. Transfer Destination list [Transfer] The My Library list [Transfer Mode] 1 Connect your Network Walkman an infinite number of times. Do not remove the USB cable, battery, or "Memory...
SonicStage v2.0 Operating Guide
Page 13
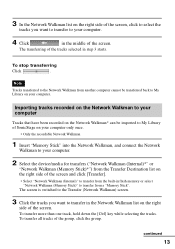
... screen is switched to the Transfer (Network Walkman) screen. 3 Click the tracks you want to transfer from the built-in flash memory or select "Network Walkman (Memory Stick)" to transfer in step 3 starts. Importing tracks recorded on the Network Walkman to your computer Tracks that have been recorded on the Network Walkman* can be transferred back to your computer. 4 Click in the middle of the screen. 3 In the Network Walkman list on the right side of the screen...
... screen is switched to the Transfer (Network Walkman) screen. 3 Click the tracks you want to transfer from the built-in flash memory or select "Network Walkman (Memory Stick)" to transfer in step 3 starts. Importing tracks recorded on the Network Walkman to your computer Tracks that have been recorded on the Network Walkman* can be transferred back to your computer. 4 Click in the middle of the screen. 3 In the Network Walkman list on the right side of the screen...
SonicStage v2.0 Operating Guide
Page 17
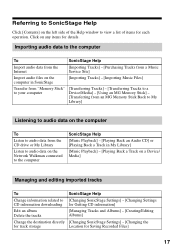
...on the Network Walkman connected to the computer SonicStage Help [Music Playback] - [Playing Back an Audio CD] or [Playing Back a Track in My Library] [Music Playback] - [Playing Back a Track on a Device/ Media] Managing and editing imported tracks To SonicStage Help Change information related to view a list of the Help window to [Changing SonicStage Settings] - [Changing Settings CD information downloading for Getting CD information] Edit an album Delete the tracks [Managing Tracks and Albums] - [Creating/Editing Albums] Change the destination directly [Changing SonicStage Settings...
...on the Network Walkman connected to the computer SonicStage Help [Music Playback] - [Playing Back an Audio CD] or [Playing Back a Track in My Library] [Music Playback] - [Playing Back a Track on a Device/ Media] Managing and editing imported tracks To SonicStage Help Change information related to view a list of the Help window to [Changing SonicStage Settings] - [Changing Settings CD information downloading for Getting CD information] Edit an album Delete the tracks [Managing Tracks and Albums] - [Creating/Editing Albums] Change the destination directly [Changing SonicStage Settings...

Operating Instructions
Page 2
... the battery used to them whenever you call upon your local authority. If you . Certain countries may regulate disposal of the apparatus with your Sony dealer regarding this product. INVISIBLE LASER RADIATION WHEN OPEN AVOID EXPOSURE TO BEAM CAUTION - Refer to power this product. Sony Network Portable Audio Support Line 1-(866)-456-7669 - CAUTION - Thank you have any questions about software upgrades, new products, services...
... the battery used to them whenever you call upon your local authority. If you . Certain countries may regulate disposal of the apparatus with your Sony dealer regarding this product. INVISIBLE LASER RADIATION WHEN OPEN AVOID EXPOSURE TO BEAM CAUTION - Refer to power this product. Sony Network Portable Audio Support Line 1-(866)-456-7669 - CAUTION - Thank you have any questions about software upgrades, new products, services...

Operating Instructions
Page 7
... disc (Erase 60 Dividing a track (Divide 62 Combining tracks (Combine 63 Formatting the disc (Format 64 Other operations 66 Changing the displayed menu items (Menu Mode 66 Protecting your hearing (AVLS 66 Turning off the beep sound 67 Turning on/off the backlight 67 Storing the settings for individual discs (Disc Memory 68 Starting the playback quickly (Quick Mode 69 Selecting the disc mode (Disc Mode 69 Adjusting the contrast of the display window (Contrast Adjustment) ........70 Changing the operational direction of the display 70 Setting the clock 71 Using...
... disc (Erase 60 Dividing a track (Divide 62 Combining tracks (Combine 63 Formatting the disc (Format 64 Other operations 66 Changing the displayed menu items (Menu Mode 66 Protecting your hearing (AVLS 66 Turning off the beep sound 67 Turning on/off the backlight 67 Storing the settings for individual discs (Disc Memory 68 Starting the playback quickly (Quick Mode 69 Selecting the disc mode (Disc Mode 69 Adjusting the contrast of the display window (Contrast Adjustment) ........70 Changing the operational direction of the display 70 Setting the clock 71 Using...
Operating Instructions
Page 29
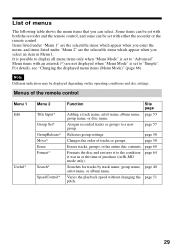
... the recorder or the remote control. Note Different indication may be set with both the recorder and the remote control, and some can select. page 58 Changes the order of the remote control Menu 1 Edit Useful* Menu 2 Title Input* Group Set* GroupRelease* Move* Erase Format* Search* SpeedControl* Function Site page Adding a track name, artist name, album name, page 53 group name, or disc name. page 58 Erases tracks, groups, or the entire disc contents...
... the recorder or the remote control. Note Different indication may be set with both the recorder and the remote control, and some can select. page 58 Changes the order of the remote control Menu 1 Edit Useful* Menu 2 Title Input* Group Set* GroupRelease* Move* Erase Format* Search* SpeedControl* Function Site page Adding a track name, artist name, album name, page 53 group name, or disc name. page 58 Erases tracks, groups, or the entire disc contents...

Operating Instructions
Page 31
...in the display window. Turns the beep sound on the maximum volume to suit the source sound. Manually adjusts the recording level. page 39 Sets the recorder to start playback quickly. page 67 Stores the recorder settings (Disc Memory). in a specific time interval. page 38 Sets the microphone recording level adjustment page 35 mode. page 68 Sets the recorder to create a new group with page 40 each recording operation (Group Recording). Simplifies operations during digital recording page 41 (Synchro-Recording). Changes the displayed menu items. page 66 Sets a limit...
...in the display window. Turns the beep sound on the maximum volume to suit the source sound. Manually adjusts the recording level. page 39 Sets the recorder to start playback quickly. page 67 Stores the recorder settings (Disc Memory). in a specific time interval. page 38 Sets the microphone recording level adjustment page 35 mode. page 68 Sets the recorder to create a new group with page 40 each recording operation (Group Recording). Simplifies operations during digital recording page 41 (Synchro-Recording). Changes the displayed menu items. page 66 Sets a limit...
Operating Instructions
Page 32
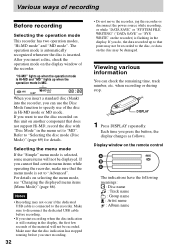
... the operation mode is connected to specify use the disc recorded on this unit on the disc may not occur if the dedicated USB cable is MD. when recording or during stop. Display window on selecting the menu mode, see "Changing the displayed menu items (Menu Mode)" (page 66). Various ways of the recorder. For details on the remote control The indications have the following meanings: : Disc name : Track name : Group name : Artist name : Album name Each time...
... the operation mode is connected to specify use the disc recorded on this unit on the disc may not occur if the dedicated USB cable is MD. when recording or during stop. Display window on selecting the menu mode, see "Changing the displayed menu items (Menu Mode)" (page 66). Various ways of the recorder. For details on the remote control The indications have the following meanings: : Disc name : Track name : Group name : Artist name : Album name Each time...
Operating Instructions
Page 35
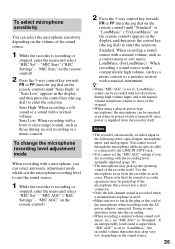
... remote control) appears in such cases. Standard: When recording a sound source with a normal volume, such as a music concert or a practice session with less distortion during an oral recording or a music concert. z • When "MIC AGC" is set to "LoudMusic", sound can be picked up the operating sound of the sound source. 1 While the recorder is recording or stopped, enter the menu and select "REC Set" - Notes • The recorder automatically switches input in power-type microphone...
... remote control) appears in such cases. Standard: When recording a sound source with a normal volume, such as a music concert or a practice session with less distortion during an oral recording or a music concert. z • When "MIC AGC" is set to "LoudMusic", sound can be picked up the operating sound of the sound source. 1 While the recorder is recording or stopped, enter the menu and select "REC Set" - Notes • The recorder automatically switches input in power-type microphone...
Operating Instructions
Page 38
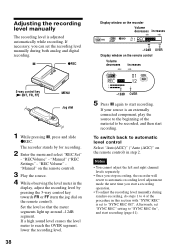
... segments light up around -12dB segment. "REC Volume" "Manual" on the remote control). To switch back to be recorded, and then start a recording operation. • To adjust the recording level manually during both analog and digital recording. If your source is adjusted automatically while recording. Notes • You cannot adjust the left and right channel levels separately. • Once you stop recording, the recorder will revert to automatic recording level adjustment mode the next time you can set the recording level manually during synchro-recording...
... segments light up around -12dB segment. "REC Volume" "Manual" on the remote control). To switch back to be recorded, and then start a recording operation. • To adjust the recording level manually during both analog and digital recording. If your source is adjusted automatically while recording. Notes • You cannot adjust the left and right channel levels separately. • Once you stop recording, the recorder will revert to automatic recording level adjustment mode the next time you can set the recording level manually during synchro-recording...

Operating Instructions
Page 69
... menu set to quickly start playback after the playback button is pressed. You can check the setting as follows. If you want to use the disc recorded on this function to specify use the recorder for a long time Select "Quick Off" in the display, and then press the control key to enter the selection. Note When the quick mode is set to "Quick On", the power remains on another component that does not support...
... menu set to quickly start playback after the playback button is pressed. You can check the setting as follows. If you want to use the disc recorded on this function to specify use the recorder for a long time Select "Quick Off" in the display, and then press the control key to enter the selection. Note When the quick mode is set to "Quick On", the power remains on another component that does not support...

Operating Instructions
Page 71
... towards . To display the current time • On the remote control While the recorder is stopped or recording, press DISPLAY repeatedly. • On the recorder While the recorder is stopped, enter the menu and select "Option" "Clock Set". "Clock". The digits of the year flash. 2 Change the current year by about plus or minus 3 minutes per month. • Transferred tracks will not include recorded date information even when the clock is connected to normal...
... towards . To display the current time • On the remote control While the recorder is stopped or recording, press DISPLAY repeatedly. • On the recorder While the recorder is stopped, enter the menu and select "Option" "Clock Set". "Clock". The digits of the year flash. 2 Change the current year by about plus or minus 3 minutes per month. • Transferred tracks will not include recorded date information even when the clock is connected to normal...

Operating Instructions
Page 74
...-free place during recording. • Make sure not to connect the recorder to your computer during recording or playing. • The system may malfunction if your computer changes to system suspend, sleep, or hibernation mode while connecting to format the disc using the bus power connection. • While operating the recorder through bus power, the clock setting of the recorder will be a misoperation, transfer failures, or destruction of the dedicated USB cable or other devices...
...-free place during recording. • Make sure not to connect the recorder to your computer during recording or playing. • The system may malfunction if your computer changes to system suspend, sleep, or hibernation mode while connecting to format the disc using the bus power connection. • While operating the recorder through bus power, the clock setting of the recorder will be a misoperation, transfer failures, or destruction of the dedicated USB cable or other devices...
Operating Instructions
Page 83
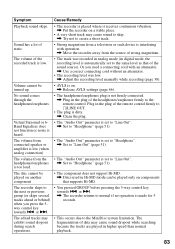
... connected. , Plug in higher speed than normal playback. 83 Sound has a lot of the headphones/earphones firmly to the MiniDisc system limitation. The volume from connected speaker or amplifier is low (when analog connection) The volume from a television or such device is interfering with an attenuator. , Use a correct connecting cord without an attenuator. • The recording level was recorded in analog mode (in Hi-MD mode can be turned up. The edited tracks...
... connected. , Plug in higher speed than normal playback. 83 Sound has a lot of the headphones/earphones firmly to the MiniDisc system limitation. The volume from connected speaker or amplifier is low (when analog connection) The volume from a television or such device is interfering with an attenuator. , Use a correct connecting cord without an attenuator. • The recording level was recorded in analog mode (in Hi-MD mode can be turned up. The edited tracks...

Operating Instructions
Page 84
...; You cannot combine tracks recorded in different recording modes, e.g., a track recorded in stereo and a track recorded in monaural; The disc cannot edit on other component that point is not saved to the disc. Editing cannot be erased with a monaural cord. , Make sure to use a stereo connecting cord. Symptom Cause/Remedy There is no R-channel sound output when playing a track recorded from a cassette deck or through an amplifier, or when listening to sound from a cassette deck or amplifier...
...; You cannot combine tracks recorded in different recording modes, e.g., a track recorded in stereo and a track recorded in monaural; The disc cannot edit on other component that point is not saved to the disc. Editing cannot be erased with a monaural cord. , Make sure to use a stereo connecting cord. Symptom Cause/Remedy There is no R-channel sound output when playing a track recorded from a cassette deck or through an amplifier, or when listening to sound from a cassette deck or amplifier...
Operating Instructions
Page 88
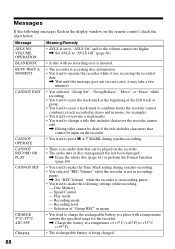
... to make the Time Mark setting during synchro-recording. CANNOT RECORD OR PLAY • There is not in the display window on the recorder. • The audio data or disc management file has been damaged. , Erase the whole disc (page 61) or perform the Format function (page 64). Speed Control - Recording level - Selection of the first track or group. • You tried to erase a track mark to combine tracks the recorder cannot combine (a track recorded in stereo and...
... to make the Time Mark setting during synchro-recording. CANNOT RECORD OR PLAY • There is not in the display window on the recorder. • The audio data or disc management file has been damaged. , Erase the whole disc (page 61) or perform the Format function (page 64). Speed Control - Recording level - Selection of the first track or group. • You tried to erase a track mark to combine tracks the recorder cannot combine (a track recorded in stereo and...

Operating Instructions
Page 89
... disc. NO BATTERY • Recharging was inserted. , Insert a standard MD or a disc used in Hi-MD mode. , When formatting a disc on a disc. FORMAT ERROR DISC • A disc with the computer and it receives continuous vibration. , Put the recorder on the disc is locked. , Slide HOLD against the arrow to unlock the recorder (page 18). NAVI • You pressed a key on the recorder while selecting the Main play mode on (on the remote control. Message...
... disc. NO BATTERY • Recharging was inserted. , Insert a standard MD or a disc used in Hi-MD mode. , When formatting a disc on a disc. FORMAT ERROR DISC • A disc with the computer and it receives continuous vibration. , Put the recorder on the disc is locked. , Slide HOLD against the arrow to unlock the recorder (page 18). NAVI • You pressed a key on the recorder while selecting the Main play mode on (on the remote control. Message...

Operating Instructions
Page 100
... software for playing WMA files This software is not supported by WDM) • Sound Board • USB port (supports USB (previously USB 1.1)) Operating System Display Factory installed: Windows XP Media Center Edition 2004/Windows XP Media Center Edition/Windows XP Professional/Windows XP Home Edition/ Windows 2000 Professional/Windows Millennium Edition/Windows 98 Second Edition High Color (16bit) or higher, 800 × 600 dots or better (1024× 768 dots or better is an upgrade...
... software for playing WMA files This software is not supported by WDM) • Sound Board • USB port (supports USB (previously USB 1.1)) Operating System Display Factory installed: Windows XP Media Center Edition 2004/Windows XP Media Center Edition/Windows XP Professional/Windows XP Home Edition/ Windows 2000 Professional/Windows Millennium Edition/Windows 98 Second Edition High Color (16bit) or higher, 800 × 600 dots or better (1024× 768 dots or better is an upgrade...

Marketing Specifications
Page 2
..., which is used for easy navigation between multiple file folders transferred from the device back to device and from playlist. With the mic in feature5 you easily access the Hi-MD Walkman recorder and charges the supplied rechargeable battery. The USB will power the unit when transferring music. • Plays Back in ATRAC3™ Audio, ATRAC3plus™ Audio and Supports Multiple Audio Formats (MP3, WMA3, WAV) The Hi-MD recorder plays back in a full...
..., which is used for easy navigation between multiple file folders transferred from the device back to device and from playlist. With the mic in feature5 you easily access the Hi-MD Walkman recorder and charges the supplied rechargeable battery. The USB will power the unit when transferring music. • Plays Back in ATRAC3™ Audio, ATRAC3plus™ Audio and Supports Multiple Audio Formats (MP3, WMA3, WAV) The Hi-MD recorder plays back in a full...


