
Operating Instructions
Page 10
button(20)(22)(46) G x (stop)/RADIO OFF button (19)(23)(48) 10 C RADIO ON/BAND button (22)(45) FM MODE button (23) D Display window (45) E VOL +/- buttons (19)(22) F Jog lever X (pause)/MODE (20)(45) >N (AMS/search, play)/F+ button (19)(22)(46) . (AMS/search)/F- The remote control with built-in digital tuner A B E C D F G A Headphones/earphones Can be replaced with optional headphones/ earphones. B HOLD switch (13)(42) Slide to lock the controls of the remote control.
button(20)(22)(46) G x (stop)/RADIO OFF button (19)(23)(48) 10 C RADIO ON/BAND button (22)(45) FM MODE button (23) D Display window (45) E VOL +/- buttons (19)(22) F Jog lever X (pause)/MODE (20)(45) >N (AMS/search, play)/F+ button (19)(22)(46) . (AMS/search)/F- The remote control with built-in digital tuner A B E C D F G A Headphones/earphones Can be replaced with optional headphones/ earphones. B HOLD switch (13)(42) Slide to lock the controls of the remote control.
Operating Instructions
Page 11
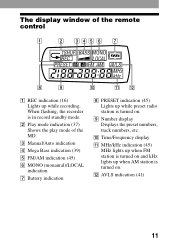
... G Battery indication H PRESET indication (45) Lights up while recording. The display window of the MD. B Play mode indication (37) Shows the play mode of the remote control A B CDE F G H I Number display Displays the preset numbers, track numbers, etc. L AVLS indication (41) 11 I J KL A REC indication (16) Lights up while preset radio station is...
... G Battery indication H PRESET indication (45) Lights up while recording. The display window of the MD. B Play mode indication (37) Shows the play mode of the remote control A B CDE F G H I Number display Displays the preset numbers, track numbers, etc. L AVLS indication (41) 11 I J KL A REC indication (16) Lights up while preset radio station is...
Operating Instructions
Page 13
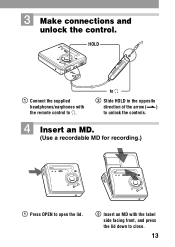
3 Make connections and unlock the control. HOLD 1 Connect the supplied headphones/earphones with the label side facing front, and press the lid down to i. to i 2 Slide HOLD in the opposite direction of the arrow (.) to unlock the controls. 4 Insert an MD. (Use a recordable MD for recording.) 1 Press OPEN to open the lid. 2 Insert an MD with the remote control to close. 13
3 Make connections and unlock the control. HOLD 1 Connect the supplied headphones/earphones with the label side facing front, and press the lid down to i. to i 2 Slide HOLD in the opposite direction of the arrow (.) to unlock the controls. 4 Insert an MD. (Use a recordable MD for recording.) 1 Press OPEN to open the lid. 2 Insert an MD with the remote control to close. 13

Operating Instructions
Page 15
... (supplied) is being received on where the recorder was purchased. 15 The shape of the plugs on the supplied cable may differ, depending on the remote control. 1 Make connections. (Insert the cables firmly and completely into the appropriate jacks.) to LINE IN (OPTICAL) ∗ The supplied cable consists of one or the...
... (supplied) is being received on where the recorder was purchased. 15 The shape of the plugs on the supplied cable may differ, depending on the remote control. 1 Make connections. (Insert the cables firmly and completely into the appropriate jacks.) to LINE IN (OPTICAL) ∗ The supplied cable consists of one or the...

Operating Instructions
Page 16
To search for another place, press N, >, or .. 3 Record an MD. REC indication lights up . 2 Press END SEARCH. The display window on the recorder and the remote control light up in the display and recording starts. 16 2 Play the source you want to record. 2 Placing the recorder into recording-standby mode. END SEARCH N x 1 Press N, and then press x. The recorder goes to the right. REC x 1 Press and slide REC to the end of the previously recorded material.
To search for another place, press N, >, or .. 3 Record an MD. REC indication lights up . 2 Press END SEARCH. The display window on the recorder and the remote control light up in the display and recording starts. 16 2 Play the source you want to record. 2 Placing the recorder into recording-standby mode. END SEARCH N x 1 Press N, and then press x. The recorder goes to the right. REC x 1 Press and slide REC to the end of the previously recorded material.

Operating Instructions
Page 18
... while "TOC Edit" appears in the display, then it will not be capable of the recorded sound is disrupted (i.e. Connect the supplied headphones/earphones with remote control to the portable CD player and use it on AC power as the power source. -Disable any anti-skip function (such as ESP*) on the...
... while "TOC Edit" appears in the display, then it will not be capable of the recorded sound is disrupted (i.e. Connect the supplied headphones/earphones with remote control to the portable CD player and use it on AC power as the power source. -Disable any anti-skip function (such as ESP*) on the...

Operating Instructions
Page 19
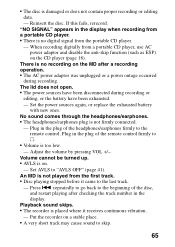
... >N). The volume will automatically turn off after: - VOL +/- A short beep sounds in the headphones/earphones when you operate on the remote control. to adjust the volume. A long beep sounds in the headphones/earphones when you press x, the recorder will be shown in parentheses.... 1 Play an MD. Playback starts from the point you operate the recorder with the supplied remote control, use the recorder on a rechargeable battery or dry battery, see "Power sources" (page 58). about 5 minutes when using batteries. 19...
... >N). The volume will automatically turn off after: - VOL +/- A short beep sounds in the headphones/earphones when you operate on the remote control. to adjust the volume. A long beep sounds in the headphones/earphones when you press x, the recorder will be shown in parentheses.... 1 Play an MD. Playback starts from the point you operate the recorder with the supplied remote control, use the recorder on a rechargeable battery or dry battery, see "Power sources" (page 58). about 5 minutes when using batteries. 19...

Operating Instructions
Page 20
... the beginning of the first track. or > (flip and hold the jog playing1) lever towards the next track >N). (Two short beeps) Pause X (Press X on the remote control). 2) You can turn off the beep sound (page 43). 3) Once you open the lid.3) 1) To go backward or forward quickly without listening, press X and press...
... the beginning of the first track. or > (flip and hold the jog playing1) lever towards the next track >N). (Two short beeps) Pause X (Press X on the remote control). 2) You can turn off the beep sound (page 43). 3) Once you open the lid.3) 1) To go backward or forward quickly without listening, press X and press...
Operating Instructions
Page 21
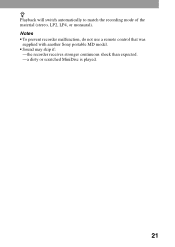
z Playback will switch automatically to match the recording mode of the material (stereo, LP2, LP4, or monaural). Notes • To prevent recorder malfunction, do not use a remote control that was supplied with another Sony portable MD model. • Sound may skip if: -the recorder receives stronger continuous shock than expected. -a dirty or scratched MiniDisc is played. 21
z Playback will switch automatically to match the recording mode of the material (stereo, LP2, LP4, or monaural). Notes • To prevent recorder malfunction, do not use a remote control that was supplied with another Sony portable MD model. • Sound may skip if: -the recorder receives stronger continuous shock than expected. -a dirty or scratched MiniDisc is played. 21

Operating Instructions
Page 22
.... 22 The radio turns on the radio. RADIO ON/BAND FM MODE RADIO OFF (x) Jog lever (F+/F-) VOL +/- 1 Press RADIO ON/BAND. to tune in the remote control. You cannot use the recorder to record a radio broadcast that is being received on the...
.... 22 The radio turns on the radio. RADIO ON/BAND FM MODE RADIO OFF (x) Jog lever (F+/F-) VOL +/- 1 Press RADIO ON/BAND. to tune in the remote control. You cannot use the recorder to record a radio broadcast that is being received on the...

Operating Instructions
Page 23
...or "LOCAL" appears in the reception. • Playback or recording stops when you cannot operate the radio Make sure the remote control is not locked (page 42). on the remote control to change. Notes • The radio will sound in a station quickly In step 3, flip and hold FM MODE (...frequency indication begins to adjust the radio volume. 23 To improve broadcast reception • For AM: Orient the built-in AM antenna inside the remote control horizontally to another electronic device, such as the recorder itself, another radio, a TV, or a computer, as the FM antenna. To tune...
...or "LOCAL" appears in the reception. • Playback or recording stops when you cannot operate the radio Make sure the remote control is not locked (page 42). on the remote control to change. Notes • The radio will sound in a station quickly In step 3, flip and hold FM MODE (...frequency indication begins to adjust the radio volume. 23 To improve broadcast reception • For AM: Orient the built-in AM antenna inside the remote control horizontally to another electronic device, such as the recorder itself, another radio, a TV, or a computer, as the FM antenna. To tune...

Operating Instructions
Page 42
On the remote control, slide HOLD to unlock the controls. 42 HOLD HOLD 1 Move HOLD in the opposite direction of the recorder. On the recorder, move HOLD to lock the controls of the arrow to lock the controls of the .. To unlock the controls Move HOLD in the direction of the remote control. Locking the controls (HOLD) To prevent the buttons from being accidentally operated when you carry the recorder, use this function.
On the remote control, slide HOLD to unlock the controls. 42 HOLD HOLD 1 Move HOLD in the opposite direction of the recorder. On the recorder, move HOLD to lock the controls of the arrow to lock the controls of the .. To unlock the controls Move HOLD in the direction of the remote control. Locking the controls (HOLD) To prevent the buttons from being accidentally operated when you carry the recorder, use this function.

Operating Instructions
Page 43
RK-G136 (not supplied) Stereo mini-plug Portable DAT recorder, etc. This keeps the beep sound out of the remote control, be sure to set the "BEEP" setting to the externally connected equipment. R (red) to LINE IN to the LINE IN jacks of an amplifier ...to a stereo system Connect the i jack of the recorder to i Stereo system, etc. The output is connected to an another audio component through the supplied remote control. When connecting a line cable (not supplied) to the i jack of the recorded signal or the output from the externally connected equipment. 1 Press ENTER, ...
RK-G136 (not supplied) Stereo mini-plug Portable DAT recorder, etc. This keeps the beep sound out of the remote control, be sure to set the "BEEP" setting to the externally connected equipment. R (red) to LINE IN to the LINE IN jacks of an amplifier ...to a stereo system Connect the i jack of the recorder to i Stereo system, etc. The output is connected to an another audio component through the supplied remote control. When connecting a line cable (not supplied) to the i jack of the recorded signal or the output from the externally connected equipment. 1 Press ENTER, ...

Operating Instructions
Page 51
2 Press
2 Press
Operating Instructions
Page 59
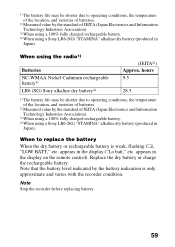
... display on the remote control). hours 9.5 28.5 1) The battery life may be shorter due to operating conditions, the temperature of the location, and varieties of batteries. 2) Measured value by the standard of JEITA (Japan Electronics and Information Technology Industries Association). 3) When using a 100% fully charged rechargeable battery. 4) When using a Sony LR6 (SG) "STAMINA...
... display on the remote control). hours 9.5 28.5 1) The battery life may be shorter due to operating conditions, the temperature of the location, and varieties of batteries. 2) Measured value by the standard of JEITA (Japan Electronics and Information Technology Industries Association). 3) When using a 100% fully charged rechargeable battery. 4) When using a Sony LR6 (SG) "STAMINA...
Operating Instructions
Page 61
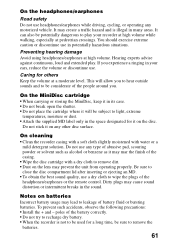
... headphones/earphones while driving, cycling, or operating any motorized vehicle. This will be potentially dangerous to wipe the plugs of the headphones/earphones or the remote control. Dirty plugs may create a traffic hazard and is not to light, extreme temperatures, moisture or dust. • Attach the supplied MD label only in the...
... headphones/earphones while driving, cycling, or operating any motorized vehicle. This will be potentially dangerous to wipe the plugs of the headphones/earphones or the remote control. Dirty plugs may create a traffic hazard and is not to light, extreme temperatures, moisture or dust. • Attach the supplied MD label only in the...
Operating Instructions
Page 65
... AC power adaptor and disable the anti-skip function (such as ESP) on the MD after checking the track number in the plug of the remote control firmly to the last track. - An MD is too low. - The lid does not open. • The power sources have been exhausted. - ...Plug in the display. Set AVLS to the remote control. "NO SIGNAL" appears in the plug of the disc, and restart playing after a recording operation. • The AC power adaptor was unplugged or a power ...
... AC power adaptor and disable the anti-skip function (such as ESP) on the MD after checking the track number in the plug of the remote control firmly to the last track. - An MD is too low. - The lid does not open. • The power sources have been exhausted. - ...Plug in the display. Set AVLS to the remote control. "NO SIGNAL" appears in the plug of the disc, and restart playing after a recording operation. • The AC power adaptor was unplugged or a power ...

Operating Instructions
Page 66
... inserted incorrectly or the AC power adaptor has been connected incorrectly. - Record in the display on the remote control and the radio does not operate. • The supplied remote control is interfering with this recorder. Press X before or pressing . Release RADIO OFF (x). Move the recorder ... 48) - Insert the battery correctly or connect the AC power adaptor correctly. Radio appears in normal stereo or LP2 mode. The supplied remote control should be used in LP4 mode, momentary noise may occur on very rare occasions with new LR6 (size AA) alkaline dry battery. ...
... inserted incorrectly or the AC power adaptor has been connected incorrectly. - Record in the display on the remote control and the radio does not operate. • The supplied remote control is interfering with this recorder. Press X before or pressing . Release RADIO OFF (x). Move the recorder ... 48) - Insert the battery correctly or connect the AC power adaptor correctly. Radio appears in normal stereo or LP2 mode. The supplied remote control should be used in LP4 mode, momentary noise may occur on very rare occasions with new LR6 (size AA) alkaline dry battery. ...
Operating Instructions
Page 69
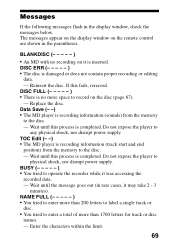
... is no recording on it may take 2 - 3 minutes). TOC Edit (- -) • The MD player is recording information (sounds) from the memory to record on the remote control are shown in the display window, check the messages below. Do not expose the player to the disc. - The messages appear on the display window...
... is no recording on it may take 2 - 3 minutes). TOC Edit (- -) • The MD player is recording information (sounds) from the memory to record on the remote control are shown in the display window, check the messages below. Do not expose the player to the disc. - The messages appear on the display window...

Operating Instructions
Page 73
Design and specifications are subject to a remote control, use headphones/earphones with a belt clip (except U.S.A. You cannot use only headphones/earphones with stereo mini plugs. stereo mini plugs micro ...information about the accessories in .) without notice. Mass Approx. 118 g (4.2 oz) the recorder only Supplied accessories AC power adaptor (1) Headphones/earphones with a remote control (1) Optical cable (1) NC-WMAA Nickel Cadmium rechargeable battery (1) Rechargeable battery carrying case (1) Carrying pouch/carrying case with micro plugs. Optional accessories Optical Cable POC...
Design and specifications are subject to a remote control, use headphones/earphones with a belt clip (except U.S.A. You cannot use only headphones/earphones with stereo mini plugs. stereo mini plugs micro ...information about the accessories in .) without notice. Mass Approx. 118 g (4.2 oz) the recorder only Supplied accessories AC power adaptor (1) Headphones/earphones with a remote control (1) Optical cable (1) NC-WMAA Nickel Cadmium rechargeable battery (1) Rechargeable battery carrying case (1) Carrying pouch/carrying case with micro plugs. Optional accessories Optical Cable POC...

