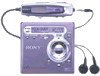

Operating Instructions
Page 2
... ANY DEFECTIVE PRODUCT OR THE USE OF ANY PRODUCT. Model No. Serial No. 2 WARNING To prevent fire or shock hazard, do not open the cabinet. CAUTION - Refer to them whenever you call upon your hearing. Record the serial number in cabinet. Caution The use of the disc compartment lid and the model number is located at maximum volume may damage your Sony dealer regarding...
... ANY DEFECTIVE PRODUCT OR THE USE OF ANY PRODUCT. Model No. Serial No. 2 WARNING To prevent fire or shock hazard, do not open the cabinet. CAUTION - Refer to them whenever you call upon your hearing. Record the serial number in cabinet. Caution The use of the disc compartment lid and the model number is located at maximum volume may damage your Sony dealer regarding...

Operating Instructions
Page 6
... Recording from a microphone 32 Adjusting the recording level manually (Manual recording 33 Checking the remaining time or the recording position 35 Various ways of playback Playing tracks repeatedly 37 Emphasizing bass (DIGITAL MEGA BASS 38 Checking the remaining time or the playing position 40 Protecting your hearing (AVLS 41 Locking the controls (HOLD 42 Connecting to a stereo system 43 Various way to use the radio Presetting radio stations automatically 45 Presetting radio manually 46 Listening to the preset radio stations 47 Receiving stations...
... Recording from a microphone 32 Adjusting the recording level manually (Manual recording 33 Checking the remaining time or the recording position 35 Various ways of playback Playing tracks repeatedly 37 Emphasizing bass (DIGITAL MEGA BASS 38 Checking the remaining time or the playing position 40 Protecting your hearing (AVLS 41 Locking the controls (HOLD 42 Connecting to a stereo system 43 Various way to use the radio Presetting radio stations automatically 45 Presetting radio manually 46 Listening to the preset radio stations 47 Receiving stations...

Operating Instructions
Page 9
...number of tracks. When flashing, the recorder is rotating for recording, playing or editing an MD. 9 K Disc indication Shows that the disc is in record standby mode. F Level meter (34) Shows the volume of the MD. J REC REMAIN/REMAIN (remaining time/tracks) indication (35)(40) Lights up while recording. The display window A B C D E F GHI J K A Character information display (35)(40) Displays the disc and track names, error messages, track numbers, etc. E Mega bass indication (39). C Time display D Battery indication (59) Shows approximate battery condition. B Play mode...
...number of tracks. When flashing, the recorder is rotating for recording, playing or editing an MD. 9 K Disc indication Shows that the disc is in record standby mode. F Level meter (34) Shows the volume of the MD. J REC REMAIN/REMAIN (remaining time/tracks) indication (35)(40) Lights up while recording. The display window A B C D E F GHI J K A Character information display (35)(40) Displays the disc and track names, error messages, track numbers, etc. E Mega bass indication (39). C Time display D Battery indication (59) Shows approximate battery condition. B Play mode...
Operating Instructions
Page 11
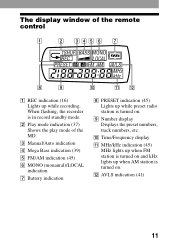
...11 When flashing, the recorder is turned on . B Play mode indication (37) Shows the play mode of the remote control A B CDE F G H I Number display Displays the preset numbers, track numbers, etc. C Manual/Auto indication D Mega Bass indication (39) E FM/AM indication (45) F MONO (monaural)/LOCAL indication G Battery indication H PRESET indication (45) Lights up while preset radio station is turned on . J Time/Frequency display K MHz/kHz indication (45) MHz lights up when FM station is turned on and kHz lights up while recording. I J KL A REC indication (16) Lights up when...
...11 When flashing, the recorder is turned on . B Play mode indication (37) Shows the play mode of the remote control A B CDE F G H I Number display Displays the preset numbers, track numbers, etc. C Manual/Auto indication D Mega Bass indication (39) E FM/AM indication (45) F MONO (monaural)/LOCAL indication G Battery indication H PRESET indication (45) Lights up while preset radio station is turned on . J Time/Frequency display K MHz/kHz indication (45) MHz lights up when FM station is turned on and kHz lights up while recording. I J KL A REC indication (16) Lights up when...

Operating Instructions
Page 18
... recorded sound is adjusted automatically. • You can monitor the sound during a recording or editing operation, or while "TOC Edit" appears in the display, then it will not be possible to open the lid until power is restored. • You can make a digital recording only from an optical type output. • When recording from a portable CD player, set the CD player to the portable CD player and use it on AC power...
... recorded sound is adjusted automatically. • You can monitor the sound during a recording or editing operation, or while "TOC Edit" appears in the display, then it will not be possible to open the lid until power is restored. • You can make a digital recording only from an optical type output. • When recording from a portable CD player, set the CD player to the portable CD player and use it on AC power...

Operating Instructions
Page 19
... lever towards >N). Playback starts from the point you operate on the remote control. 2 Press VOL +/- about 10 seconds when using AC power adaptor. - N x >N VOL +/- After you operate on the remote control. The volume will be shown in the headphones/earphones when you press x, the recorder will automatically turn off after: - To stop play, press x. VOL +/- about 5 minutes when using batteries. 19 To use the buttons and control shown in the...
... lever towards >N). Playback starts from the point you operate on the remote control. 2 Press VOL +/- about 10 seconds when using AC power adaptor. - N x >N VOL +/- After you operate on the remote control. The volume will be shown in the headphones/earphones when you press x, the recorder will automatically turn off after: - To stop play, press x. VOL +/- about 5 minutes when using batteries. 19 To use the buttons and control shown in the...

Operating Instructions
Page 23
... stops when it finds a clear station. To tune in a station quickly In step 3, flip and hold FM MODE (RADIO ON/BAND) until the frequency indication begins to another electronic device, such as the recorder itself, another radio, a TV, or a computer, as the FM antenna. Notes • The radio will sound in the reception. • Playback or recording stops when you cannot operate the radio Make sure the remote control is not locked...
... stops when it finds a clear station. To tune in a station quickly In step 3, flip and hold FM MODE (RADIO ON/BAND) until the frequency indication begins to another electronic device, such as the recorder itself, another radio, a TV, or a computer, as the FM antenna. Notes • The radio will sound in the reception. • Playback or recording stops when you cannot operate the radio Make sure the remote control is not locked...

Operating Instructions
Page 27
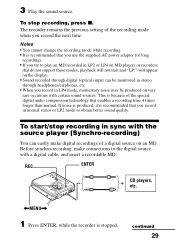
REC indication lights up in the display and recording starts. 2 Play the source you press X again to resume recording. The recording continues from on the disc. Note If you temporarily stop a recording operation by pressing X, a track mark will be added at that point when you want to LINE IN (OPTICAL) L (white) CD player, cassette recorder, etc. R (red) to the right. To connect to a portable CD player having a stereo mini-jack, use the RK-G136 connecting cord (not...
REC indication lights up in the display and recording starts. 2 Play the source you press X again to resume recording. The recording continues from on the disc. Note If you temporarily stop a recording operation by pressing X, a track mark will be added at that point when you want to LINE IN (OPTICAL) L (white) CD player, cassette recorder, etc. R (red) to the right. To connect to a portable CD player having a stereo mini-jack, use the RK-G136 connecting cord (not...

Operating Instructions
Page 28
... REC MODE, the display changes as follows. REC MODE REC 1 Press REC MODE repeatedly to the right. 28 Approx. 320 min. Recording for long times Select each recording mode according to the recording time that support the LP2 or LP4 modes are indicated by the or logo marks. MDs recorded in monaural, the sounds from left and right will be played back only on MD players or recorders with a monaural, LP2, or LP4 playback mode...
... REC MODE, the display changes as follows. REC MODE REC 1 Press REC MODE repeatedly to the right. 28 Approx. 320 min. Recording for long times Select each recording mode according to the recording time that support the LP2 or LP4 modes are indicated by the or logo marks. MDs recorded in monaural, the sounds from left and right will be played back only on MD players or recorders with a monaural, LP2, or LP4 playback mode...
Operating Instructions
Page 29
... MD players or recorders that do not support these modes, playback will not start /stop recording, press x. To start and "LP:" will appear on the display. • Sound recorded through headphones/earphones, etc. • When you record the next time. This is recommended that enables a recording time 4 times longer than normal. Before synchro-recording, make digital recordings of the special digital audio compression technology that you use the supplied AC power adaptor for long recordings. •...
... MD players or recorders that do not support these modes, playback will not start /stop recording, press x. To start and "LP:" will appear on the display. • Sound recorded through headphones/earphones, etc. • When you record the next time. This is recommended that enables a recording time 4 times longer than normal. Before synchro-recording, make digital recordings of the special digital audio compression technology that you use the supplied AC power adaptor for long recordings. •...

Operating Instructions
Page 30
2 Press
2 Press
Operating Instructions
Page 32
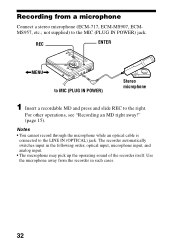
not supplied) to the MIC (PLUG IN POWER) jack. REC ENTER Recording from a microphone Connect a stereo microphone (ECM-717, ECM-MS907, ECMMS957, etc.;
not supplied) to the MIC (PLUG IN POWER) jack. REC ENTER Recording from a microphone Connect a stereo microphone (ECM-717, ECM-MS907, ECMMS957, etc.;

Operating Instructions
Page 33
REC X ENTER You cannot adjust it while recording. Adjusting the recording level manually (Manual recording) When you can set the level manually. If necessary, you record, the sound level is in standby mode. Note Adjust the recording level while the recorder is adjusted automatically.
REC X ENTER You cannot adjust it while recording. Adjusting the recording level manually (Manual recording) When you can set the level manually. If necessary, you record, the sound level is in standby mode. Note Adjust the recording level while the recorder is adjusted automatically.

Operating Instructions
Page 44
... the beep sound Select "BEEP ON" in step 2. To turn on your recording or the output from the externally connected equipment, set "BASS" to "BASS OFF" (page 38). • When recording to an externally connected equipment, press VOL + repeatedly to raise the volume level to maximum, which is operative. VOL + 44 Notes • Even when connecting to the externally connected equipment, the Mega Bass function is optimum...
... the beep sound Select "BEEP ON" in step 2. To turn on your recording or the output from the externally connected equipment, set "BASS" to "BASS OFF" (page 38). • When recording to an externally connected equipment, press VOL + repeatedly to raise the volume level to maximum, which is operative. VOL + 44 Notes • Even when connecting to the externally connected equipment, the Mega Bass function is optimum...

Operating Instructions
Page 58
... 48 58 In the recorder ... - Battery life When recording1)2) Batteries NC-WMAA Nickel Cadmium rechargeable battery4) LR6 (SG) Sony alkaline dry battery5) (Unit: approx.hours) (JEITA3)) Stereo LP2 LP4 4 6 7.5 96) 136) 166) 1) The battery life may be shorter due to operating conditions, the temperature of the location, and varieties of batteries. 2) When you record, use a fully charged rechargeable battery. 3) Measured value by the...
... 48 58 In the recorder ... - Battery life When recording1)2) Batteries NC-WMAA Nickel Cadmium rechargeable battery4) LR6 (SG) Sony alkaline dry battery5) (Unit: approx.hours) (JEITA3)) Stereo LP2 LP4 4 6 7.5 96) 136) 166) 1) The battery life may be shorter due to operating conditions, the temperature of the location, and varieties of batteries. 2) When you record, use a fully charged rechargeable battery. 3) Measured value by the...

Operating Instructions
Page 64
...; The HOLD function is weak (r or "LOW BATT" flashes on the recorder). - Insert the battery correctly (page 12). • You pressed a button while the disc indication was made these checks, consult your nearest Sony dealer. Charge the rechargeable battery or replace the dry battery (page 58). • The rechargeable battery or dry battery have made using a connecting cord with the lid open for about 30 seconds. 3 Connect the power source...
...; The HOLD function is weak (r or "LOW BATT" flashes on the recorder). - Insert the battery correctly (page 12). • You pressed a button while the disc indication was made these checks, consult your nearest Sony dealer. Charge the rechargeable battery or replace the dry battery (page 58). • The rechargeable battery or dry battery have made using a connecting cord with the lid open for about 30 seconds. 3 Connect the power source...
Operating Instructions
Page 65
... to the remote control. When recording digitally from the portable CD player. - Adjust the volume by pressing VOL +/-. Set AVLS to skip. 65 Plug in the display when recording from a portable CD player. • There is on the MD after checking the track number in the display. The lid does not open. • The power sources have been exhausted. - Reinsert the disc. Set the power sources again, or replace the exhausted battery with...
... to the remote control. When recording digitally from the portable CD player. - Adjust the volume by pressing VOL +/-. Set AVLS to skip. 65 Plug in the display when recording from a portable CD player. • There is on the MD after checking the track number in the display. The lid does not open. • The power sources have been exhausted. - Reinsert the disc. Set the power sources again, or replace the exhausted battery with...

Operating Instructions
Page 73
You cannot use only headphones/earphones with stereo mini plugs. stereo mini plugs micro plug 73 Design and specifications are subject to a remote control, use headphones/earphones with a belt clip (except U.S.A. Mass Approx. 118 g (4.2 oz) the recorder only Supplied accessories AC power adaptor (1) Headphones/earphones with a remote control (1) Optical cable (1) NC-WMAA Nickel Cadmium rechargeable battery (1) Rechargeable battery carrying case (1) Carrying pouch/carrying case with micro plugs. model) (1) US and foreign patents...
You cannot use only headphones/earphones with stereo mini plugs. stereo mini plugs micro plug 73 Design and specifications are subject to a remote control, use headphones/earphones with a belt clip (except U.S.A. Mass Approx. 118 g (4.2 oz) the recorder only Supplied accessories AC power adaptor (1) Headphones/earphones with a remote control (1) Optical cable (1) NC-WMAA Nickel Cadmium rechargeable battery (1) Rechargeable battery carrying case (1) Carrying pouch/carrying case with micro plugs. model) (1) US and foreign patents...
Marketing Specifications
Page 1
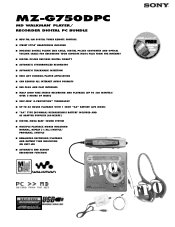
.../PLAYER APPLICATION s CAN RECORD ALL INTERNET AUDIO FORMATS s USB PLUG AND PLAY INTERFACE s MDLP LONG TIME STEREO RECORDING AND PLAYBACK (UP TO 320 MINUTES/ OVER 5 HOURS OF MUSIC) s SKIP-FREE* G-PROTECTION™ TECHNOLOGY s UP TO 48 HOURS PLAYBACK WITH 1 SONY "AA" BATTERY (LP4 MODE) s "AA" TYPE (NC-WMAA) RECHARGEABLE BATTERY INCLUDED AND AC ADAPTER SUPPLIED (AC-MZR55) s DIGITAL MEGA BASS® SOUND SYSTEM s MULTIPLE PLAYBACK MODES INCLUDING NORMAL, REPEAT (1/ALL/SHUFFLE/ PROGRAM), SHUFFLE s REMAINING RECORDING/PLAYBACK AND BATTERY TIME INDICATION ON UNIT...
.../PLAYER APPLICATION s CAN RECORD ALL INTERNET AUDIO FORMATS s USB PLUG AND PLAY INTERFACE s MDLP LONG TIME STEREO RECORDING AND PLAYBACK (UP TO 320 MINUTES/ OVER 5 HOURS OF MUSIC) s SKIP-FREE* G-PROTECTION™ TECHNOLOGY s UP TO 48 HOURS PLAYBACK WITH 1 SONY "AA" BATTERY (LP4 MODE) s "AA" TYPE (NC-WMAA) RECHARGEABLE BATTERY INCLUDED AND AC ADAPTER SUPPLIED (AC-MZR55) s DIGITAL MEGA BASS® SOUND SYSTEM s MULTIPLE PLAYBACK MODES INCLUDING NORMAL, REPEAT (1/ALL/SHUFFLE/ PROGRAM), SHUFFLE s REMAINING RECORDING/PLAYBACK AND BATTERY TIME INDICATION ON UNIT...

Marketing Specifications
Page 2
... playing performance without skipping even during many active uses. MZ-G750DPC FEATURES s NEW FM/AM DIGITAL TUNER REMOTE CONTROL provides super convenient access to MD recorder and radio functions, with digital synthesized tuning to precisely lock in power (stereo mini) OUTPUTS: Headphones/Remote: Stereo mini jack POWER REQUIREMENTS: NC-WMAA NiCad Rechargeable Battery (supplied), AC-MZR55 AC Adapter (supplied), "AA" Alkaline Battery x 1 (optional), DCC-E230 Car Battery Cord (optional) BATTERY LIFE (APPROX.): With Sony NC-WMAA: Standard mode: Record: 4 hrs, Playback...
... playing performance without skipping even during many active uses. MZ-G750DPC FEATURES s NEW FM/AM DIGITAL TUNER REMOTE CONTROL provides super convenient access to MD recorder and radio functions, with digital synthesized tuning to precisely lock in power (stereo mini) OUTPUTS: Headphones/Remote: Stereo mini jack POWER REQUIREMENTS: NC-WMAA NiCad Rechargeable Battery (supplied), AC-MZR55 AC Adapter (supplied), "AA" Alkaline Battery x 1 (optional), DCC-E230 Car Battery Cord (optional) BATTERY LIFE (APPROX.): With Sony NC-WMAA: Standard mode: Record: 4 hrs, Playback...


