
Operating Instructions
Page 2
... manual could void your authority to radio communications. INFORMATION This equipment has been tested and found to comply with the instructions, may be determined by turning the equipment off and on a circuit different from Dolby Laboratories Licensing Corporation. This equipment generates, uses, and can be of sufficient magnitude to which can radiate radio frequency energy and, if not installed and used...
... manual could void your authority to radio communications. INFORMATION This equipment has been tested and found to comply with the instructions, may be determined by turning the equipment off and on a circuit different from Dolby Laboratories Licensing Corporation. This equipment generates, uses, and can be of sufficient magnitude to which can radiate radio frequency energy and, if not installed and used...

Operating Instructions
Page 3
... Flashing part of a CD 26 Sound Adjustment Adjusting the sound 27 Selecting the audio emphasis 28 Changing the spectrum analyzer display 29 Selecting the surround effect 29 Other Features Using the Radio Data System (RDS)*. 30 Singing along: Karaoke 32 Falling asleep to music 34 Waking up to music 34 Timer-recording radio programs ....... 36 Optional Components Connecting audio components .......... 37 Connecting a VCR 38 Connecting external antennas 39 Additional Information Precautions 40 Troubleshooting 41 Specifications 44 Index 46 * European model...
... Flashing part of a CD 26 Sound Adjustment Adjusting the sound 27 Selecting the audio emphasis 28 Changing the spectrum analyzer display 29 Selecting the surround effect 29 Other Features Using the Radio Data System (RDS)*. 30 Singing along: Karaoke 32 Falling asleep to music 34 Waking up to music 34 Timer-recording radio programs ....... 36 Optional Components Connecting audio components .......... 37 Connecting a VCR 38 Connecting external antennas 39 Additional Information Precautions 40 Troubleshooting 41 Specifications 44 Index 46 * European model...

Operating Instructions
Page 4
AM loop antenna FM antenna 2 1 Front speaker (Right) 1 Connect the speakers. Red (') Black (') 3 4 Front speaker (Left) Notes • Keep the speaker cords away from the antennas to prevent noise. • The type of front speakers to the SPEAKER jacks as below. R + L + - Connect the speaker cords of speakers supplied varies according to hook up your system using the supplied cords (for European model only) and accessories. Getting Started Step 1: Hooking up the system Do the following...
AM loop antenna FM antenna 2 1 Front speaker (Right) 1 Connect the speakers. Red (') Black (') 3 4 Front speaker (Left) Notes • Keep the speaker cords away from the antennas to prevent noise. • The type of front speakers to the SPEAKER jacks as below. R + L + - Connect the speaker cords of speakers supplied varies according to hook up your system using the supplied cords (for European model only) and accessories. Getting Started Step 1: Hooking up the system Do the following...

Operating Instructions
Page 7
The minute indication flashes. To change the time The previous explanation shows you purchased. (Power) 4 Jog dial 1 4 Turn the jog dial to set the minute. 5 Press ENTER/NEXT. The hour indication flashes. 2 Turn the jog dial to set the hour. 3 Press ENTER/NEXT. Step 3: Presetting radio stations You can preset the following number of stations: - 2 band model: 20 for FM, 10 for AM. - 3 band model: 20 for FM...
The minute indication flashes. To change the time The previous explanation shows you purchased. (Power) 4 Jog dial 1 4 Turn the jog dial to set the minute. 5 Press ENTER/NEXT. The hour indication flashes. 2 Turn the jog dial to set the hour. 3 Press ENTER/NEXT. Step 3: Presetting radio stations You can preset the following number of stations: - 2 band model: 20 for FM, 10 for AM. - 3 band model: 20 for FM...
Operating Instructions
Page 8
... bands you want to change the AM tuning interval, tune in the display. To change the interval, AM preset stations will be erased. To change , then release. The stations are renumbered. Step 3: Presetting radio stations (continued) 1 Press TUNER/BAND repeatedly until the band you can receive. To set to select the preset number you erase a preset number, the preset number decreases by one are stored from step 1. ALL DISCS VOLUME ß 2 Turn the jog dial...
... bands you want to change the AM tuning interval, tune in the display. To change the interval, AM preset stations will be erased. To change , then release. The stations are renumbered. Step 3: Presetting radio stations (continued) 1 Press TUNER/BAND repeatedly until the band you can receive. To set to select the preset number you erase a preset number, the preset number decreases by one are stored from step 1. ALL DISCS VOLUME ß 2 Turn the jog dial...
Operating Instructions
Page 12
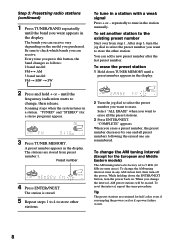
... CD SYNC button lets you want to reduce the hiss noise in lowlevel high-frequency signals, press DOLBY NR so that it on TAPE B ( (for playback. Tips • If you play a CD single, place it lights green. Note You cannot listen to a tape easily. You can use TYPE I (normal) or TYPE II (CrO2) tapes. The recording level is not lit green, press DISC SKIP/ EX-CHANGE...
... CD SYNC button lets you want to reduce the hiss noise in lowlevel high-frequency signals, press DOLBY NR so that it on TAPE B ( (for playback. Tips • If you play a CD single, place it lights green. Note You cannot listen to a tape easily. You can use TYPE I (normal) or TYPE II (CrO2) tapes. The recording level is not lit green, press DISC SKIP/ EX-CHANGE...
Operating Instructions
Page 14
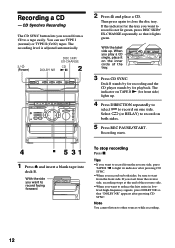
... antennas. Preset number* Frequency ALL DISCS VOLUME kHz MHz ß * When only one station is noisy, press STEREO/MONO so that "MONO" appears in the display. 14 When the system is in the Power Saving Mode, the One Touch Play function does not work. • You can switch from the radio You can use TYPE I (normal) or TYPE II (CrO2) tapes. Turn counterclockwise for lower preset numbers. = + Turn clockwise for higher preset numbers. For automatic tuning...
... antennas. Preset number* Frequency ALL DISCS VOLUME kHz MHz ß * When only one station is noisy, press STEREO/MONO so that "MONO" appears in the display. 14 When the system is in the Power Saving Mode, the One Touch Play function does not work. • You can switch from the radio You can use TYPE I (normal) or TYPE II (CrO2) tapes. Turn counterclockwise for lower preset numbers. = + Turn clockwise for higher preset numbers. For automatic tuning...
Operating Instructions
Page 16
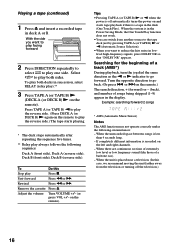
... low level or low frequency sound (like those of a track (AMS*) During playback, turn the jog dial the same direction as the 9 or ( indicator to reduce the hiss noise in the display. With the side you want to play facing forward ~6 2 Press DIRECTION repeatedly to select A to play the reverse side.) The tape starts playing. * The deck stops automatically after repeating the sequence five times. ** Relay play...
... low level or low frequency sound (like those of a track (AMS*) During playback, turn the jog dial the same direction as the 9 or ( indicator to reduce the hiss noise in the display. With the side you want to play facing forward ~6 2 Press DIRECTION repeatedly to select A to play the reverse side.) The tape starts playing. * The deck stops automatically after repeating the sequence five times. ** Relay play...
Operating Instructions
Page 26
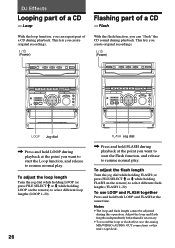
... flash effect, use LOOP and FLASH together Press and hold FLASH during this unit's tape deck. Flash With the loop function, you want to start the Flash function, and release to resume normal play . To adjust the flash length Turn the jog dial while holding LOOP on the remote) to select different flash lengths (FLASH 1~20). Loop Flashing part of a CD - To use the analog MD/VIDEO (AUDIO) OUT connections or this operation. DJ Effects Looping part of a CD...
... flash effect, use LOOP and FLASH together Press and hold FLASH during this unit's tape deck. Flash With the loop function, you want to start the Flash function, and release to resume normal play . To adjust the flash length Turn the jog dial while holding LOOP on the remote) to select different flash lengths (FLASH 1~20). Loop Flashing part of a CD - To use the analog MD/VIDEO (AUDIO) OUT connections or this operation. DJ Effects Looping part of a CD...
Operating Instructions
Page 30
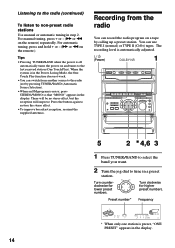
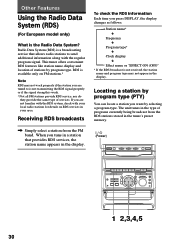
... Each time you are not familiar with the RDS system, check with the regular program signal. Receiving RDS broadcasts / Simply select a station from the RDS stations stored in your local radio stations for details on FM stations.* Note RDS may not appear in the display. RDS is available only on RDS services in the tuner's preset memory. (Power) 6 6 1 2,3,4,5 30 This tuner offers convenient RDS features like station name display...
... Each time you are not familiar with the RDS system, check with the regular program signal. Receiving RDS broadcasts / Simply select a station from the RDS stations stored in your local radio stations for details on FM stations.* Note RDS may not appear in the display. RDS is available only on RDS services in the tuner's preset memory. (Power) 6 6 1 2,3,4,5 30 This tuner offers convenient RDS features like station name display...
Operating Instructions
Page 33
... FUNCTION or recall a sound effect, the karaoke mode is canceled. • The instrumental sound may not be canceled when you select "KARAOKE PON". 1 Press FUNCTION repeatedly to start playing the CD player (or TAPE A ( for tape deck A). Note With some songs, vocals may not be reduced when: -only a few instruments are done Turn MIC LEVEL to 0 and disconnect the microphone from the speakers or change the direction of the microphone...
... FUNCTION or recall a sound effect, the karaoke mode is canceled. • The instrumental sound may not be canceled when you select "KARAOKE PON". 1 Press FUNCTION repeatedly to start playing the CD player (or TAPE A ( for tape deck A). Note With some songs, vocals may not be reduced when: -only a few instruments are done Turn MIC LEVEL to 0 and disconnect the microphone from the speakers or change the direction of the microphone...

Operating Instructions
Page 34
... to be turned off Select the time you want to play facing forward. • Radio: Tune in the preset station you want to 100 minutes). Falling asleep to music - Sleep Timer You can preset the time to music at the preset time, so you press the button, the minute display (the turn off at a preset time every day. To start from a specific track, make a program (see "Step 3: Presetting radio stations"). 2 Adjust the volume. 3 Press CLOCK/TIMER SET.
... to be turned off Select the time you want to play facing forward. • Radio: Tune in the preset station you want to 100 minutes). Falling asleep to music - Sleep Timer You can preset the time to music at the preset time, so you press the button, the minute display (the turn off at a preset time every day. To start from a specific track, make a program (see "Step 3: Presetting radio stations"). 2 Adjust the volume. 3 Press CLOCK/TIMER SET.

Operating Instructions
Page 35
... DISCS VOLUME ß 5 Set the time to select the respective mode (DAILY 1 or DAILY 2), then press ENTER/NEXT. Tip The power turns on 15 seconds before the preset time. 35 Turn jog dial to select "DAILY 1 (or 2)", then press ENTER/NEXT. The hour indication flashes again. 6 Set the time to set the hour, then press ENTER/NEXT. The indications change the setting, start playback. To change as follows: n TUNER ˜ CD PLAY N n TAPE PLAY...
... DISCS VOLUME ß 5 Set the time to select the respective mode (DAILY 1 or DAILY 2), then press ENTER/NEXT. Tip The power turns on 15 seconds before the preset time. 35 Turn jog dial to select "DAILY 1 (or 2)", then press ENTER/NEXT. The hour indication flashes again. 6 Set the time to set the hour, then press ENTER/NEXT. The indications change the setting, start playback. To change as follows: n TUNER ˜ CD PLAY N n TAPE PLAY...

Operating Instructions
Page 36
... and the hour digits flash in the preset radio station (see "Step 2: Setting the time") beforehand. 7 TIMER SELECT 6 6 4 Set the time to be made. 36 The hour indication flashes again. 5 Set the time to stop time, the preset radio station to start over from step 1. Note If the power is set to the minimum. 2 3,4,5 6 1 Tune in the display. 1 2 REC SLEEP ALL DISCS VOLUME ß To check the setting Press TIMER SELECT and turn the jog dial...
... and the hour digits flash in the preset radio station (see "Step 2: Setting the time") beforehand. 7 TIMER SELECT 6 6 4 Set the time to be made. 36 The hour indication flashes again. 5 Set the time to stop time, the preset radio station to start over from step 1. Note If the power is set to the minimum. 2 3,4,5 6 1 Tune in the display. 1 2 REC SLEEP ALL DISCS VOLUME ß To check the setting Press TIMER SELECT and turn the jog dial...
Operating Instructions
Page 41
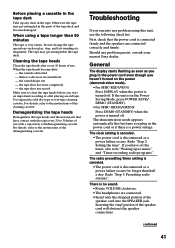
.../ DEMO (STANDBY). •For MHC-GRX30/GRX30J: Press DEMO (STANDBY) when the power is a power outage. If the unit is in the power cord or if there is turned off . Redo "Step 2: Setting the time". Redo "Step 3: Presetting radio stations". Do not change the tape operations such as you haven't turned on the power (demonstration mode). •For MHC-RXD5/R550: Press DISPLAY when the power is no sound. •Rotate VOLUME clockwise. •The headphones are connected...
.../ DEMO (STANDBY). •For MHC-GRX30/GRX30J: Press DEMO (STANDBY) when the power is a power outage. If the unit is in the power cord or if there is turned off . Redo "Step 2: Setting the time". Redo "Step 3: Presetting radio stations". Do not change the tape operations such as you haven't turned on the power (demonstration mode). •For MHC-RXD5/R550: Press DISPLAY when the power is no sound. •Rotate VOLUME clockwise. •The headphones are connected...
Operating Instructions
Page 42
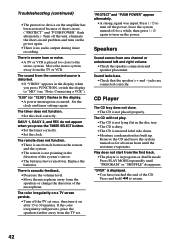
... problem and turn on the power again. •There is not placed properly. The sound from the first track. •The player is acoustic feedback. •Decrease the volume level. •Move the microphone away form the speakers or change the direction of the microphone. The timer does not function. •Set the clock correctly. Sound lacks bass. •Check that the speaker's + and - The CD will not play...
... problem and turn on the power again. •There is not placed properly. The sound from the first track. •The player is acoustic feedback. •Decrease the volume level. •Move the microphone away form the speakers or change the direction of the microphone. The timer does not function. •Set the clock correctly. Sound lacks bass. •Check that the speaker's + and - The CD will not play...
Operating Instructions
Page 43
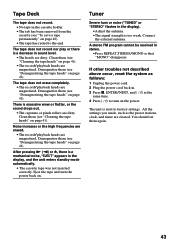
... in the display, and the unit enters standby mode automatically. • The cassette tape was not inserted correctly. Clean them (see "Cleaning the tape heads" on page 41). Eject the tape and turn on page 40). •The tape has reeled to the end. Connect the external antenna. at the 4 Press to factory settings. The unit is reset to turn the power back on page...
... in the display, and the unit enters standby mode automatically. • The cassette tape was not inserted correctly. Clean them (see "Cleaning the tape heads" on page 41). Eject the tape and turn on page 40). •The tape has reeled to the end. Connect the external antenna. at the 4 Press to factory settings. The unit is reset to turn the power back on page...
Operating Instructions
Page 44
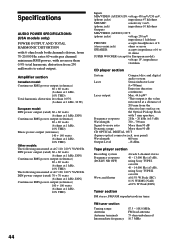
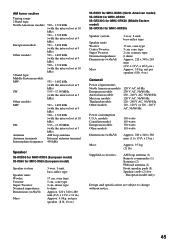
...) 0.1% W.RMS (NAB) ±0.2% W.Peak (DIN) Tuner section FM stereo, FM/AM superheterodyne tuner FM tuner section Tuning range Antenna Antenna terminals Intermediate frequency 87.5 - 108.0 MHz FM lead antenna 75 ohm unbalanced 10.7 MHz 44 Amplifier section Canadian model: Continuous RMS power output (reference) 60 + 60 watts (6 ohms at a distance of 6 to 16 ohms SUPER WOOFER (except for European model): voltage 1V, impedance 1 kilohm CD player section System Compact disc and digital audio system Laser Semiconductor laser (λ=780nm...
...) 0.1% W.RMS (NAB) ±0.2% W.Peak (DIN) Tuner section FM stereo, FM/AM superheterodyne tuner FM tuner section Tuning range Antenna Antenna terminals Intermediate frequency 87.5 - 108.0 MHz FM lead antenna 75 ohm unbalanced 10.7 MHz 44 Amplifier section Canadian model: Continuous RMS power output (reference) 60 + 60 watts (6 ohms at a distance of 6 to 16 ohms SUPER WOOFER (except for European model): voltage 1V, impedance 1 kilohm CD player section System Compact disc and digital audio system Laser Semiconductor laser (λ=780nm...
Operating Instructions
Page 45
models: Canadian model: European models: Other models: 130 watts 110 watts 130 watts 110 watts Dimensions (w/h/d) Mass : Approx. 280 x 340 x 380 mm (11 x 133/8 x 15 in.) Approx. 9.5 kg (21 lb.) Supplied accessories: AM loop antenna (1) Remote commander (1) Batteries (2) FM lead antenna (1) Front speaker pads (8) Speaker cords (2) (for MHC-GRX30J Speaker system Speaker units Woofer: Center Tweeter: Super Tweeter: Nominal impedance Dimensions (w/h/d) Mass 3-way, 3-unit, bass-reflex type 15 cm, cone type 5 cm, cone...
models: Canadian model: European models: Other models: 130 watts 110 watts 130 watts 110 watts Dimensions (w/h/d) Mass : Approx. 280 x 340 x 380 mm (11 x 133/8 x 15 in.) Approx. 9.5 kg (21 lb.) Supplied accessories: AM loop antenna (1) Remote commander (1) Batteries (2) FM lead antenna (1) Front speaker pads (8) Speaker cords (2) (for MHC-GRX30J Speaker system Speaker units Woofer: Center Tweeter: Super Tweeter: Nominal impedance Dimensions (w/h/d) Mass 3-way, 3-unit, bass-reflex type 15 cm, cone type 5 cm, cone...
Operating Instructions
Page 46
... desired order (Program Play) 21 tracks repeatedly (Repeat Play) 19 Presetting radio stations 7 Preset Tuning 13 Program Edit 24 Program Play 21 Protecting recordings 40 PTY 30 R Radio Data System 30 Radio stations presetting 7 tuning in 13 Recording a CD 12, 24 a radio program 14 a tape 17, 23 timer recording 36 Repeat Play 19 Resetting the system 43 S Saving recordings 40 Selecting the audio emphasis 28 Setting the time 6 Shuffle Play 20 Sleep Timer 34 Sound adjustment 27 Speakers 4, 38 Station name 31 T, U, V, W, X, Y, Z Tape deck 15, 23...
... desired order (Program Play) 21 tracks repeatedly (Repeat Play) 19 Presetting radio stations 7 Preset Tuning 13 Program Edit 24 Program Play 21 Protecting recordings 40 PTY 30 R Radio Data System 30 Radio stations presetting 7 tuning in 13 Recording a CD 12, 24 a radio program 14 a tape 17, 23 timer recording 36 Repeat Play 19 Resetting the system 43 S Saving recordings 40 Selecting the audio emphasis 28 Setting the time 6 Shuffle Play 20 Sleep Timer 34 Sound adjustment 27 Speakers 4, 38 Station name 31 T, U, V, W, X, Y, Z Tape deck 15, 23...

