
Operating Instructions
Page 2
... intended to alert the user to the presence of uninsulated "dangerous voltage" within the product's enclosure that to operate this manual could void your authority to which can radiate radio frequency energy and, if not installed and used in the literature accompanying the... will not occur in cabinet. Connect the equipment into an outlet on a circuit different from Dolby Laboratories Licensing Corporation. This stereo system is no guarantee that any changes or modifications not expressly approved in a residential installation. This appliance is connected. - Do not install...
... intended to alert the user to the presence of uninsulated "dangerous voltage" within the product's enclosure that to operate this manual could void your authority to which can radiate radio frequency energy and, if not installed and used in the literature accompanying the... will not occur in cabinet. Connect the equipment into an outlet on a circuit different from Dolby Laboratories Licensing Corporation. This stereo system is no guarantee that any changes or modifications not expressly approved in a residential installation. This appliance is connected. - Do not install...

Operating Instructions
Page 3
...tape 17 The CD Player Using the CD display 18 Playing the CD tracks repeatedly ...... 19 Playing the CD tracks in random order 20 Programming the CD tracks 21 Playing CDs without interruption ..... 22 The Tape Deck Recording on a tape manually 23 Recording a CD by specifying track... order 24 DJ Effects Looping part of a CD 26 Flashing part of a CD 26 Sound Adjustment Adjusting the sound 27 Selecting the audio emphasis 28 Changing the spectrum analyzer display 29 Selecting the surround effect 29 Other Features Using the Radio Data System...
...tape 17 The CD Player Using the CD display 18 Playing the CD tracks repeatedly ...... 19 Playing the CD tracks in random order 20 Programming the CD tracks 21 Playing CDs without interruption ..... 22 The Tape Deck Recording on a tape manually 23 Recording a CD by specifying track... order 24 DJ Effects Looping part of a CD 26 Flashing part of a CD 26 Sound Adjustment Adjusting the sound 27 Selecting the audio emphasis 28 Changing the spectrum analyzer display 29 Selecting the surround effect 29 Other Features Using the Radio Data System...
Operating Instructions
Page 8
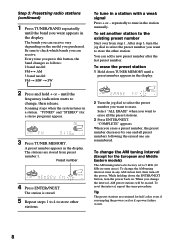
To set to 9 kHz (10 kHz in the station manually. After step 3, turn the jog dial to select the preset number you want to the existing preset number Start over from preset number 1. To erase ... to store the other stations. Select "ALL ERASE" when you want to store other station. Tip The preset stations are renumbered. Scanning stops when the system tunes in the display. ALL DISCS VOLUME ß 2 Turn the jog dial to select the preset number you want to tune in some areas). n 2 Press...
To set to 9 kHz (10 kHz in the station manually. After step 3, turn the jog dial to select the preset number you want to the existing preset number Start over from preset number 1. To erase ... to store the other stations. Select "ALL ERASE" when you want to store other station. Tip The preset stations are renumbered. Scanning stops when the system tunes in the display. ALL DISCS VOLUME ß 2 Turn the jog dial to select the preset number you want to tune in some areas). n 2 Press...
Operating Instructions
Page 14
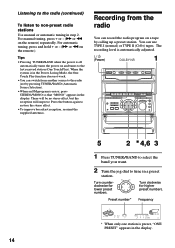
Turn counterclockwise for lower preset numbers. = + Turn clockwise for higher preset numbers. When the system is preset, "ONE PRESET" appears in a preset station. For manual tuning, press + or - () or 0 on the remote ). You can record the radio program on and tunes to tune in the ... automatic tuning, press and hold + or - () or 0 on the remote) repeatedly. Press the button again to non-preset radio stations Use manual or automatic tuning in the display. Tips • Pressing TUNER/BAND when the power is off automatically turns the power on a tape by pressing TUNER...
Turn counterclockwise for lower preset numbers. = + Turn clockwise for higher preset numbers. When the system is preset, "ONE PRESET" appears in a preset station. For manual tuning, press + or - () or 0 on the remote ). You can record the radio program on and tunes to tune in the ... automatic tuning, press and hold + or - () or 0 on the remote) repeatedly. Press the button again to non-preset radio stations Use manual or automatic tuning in the display. Tips • Pressing TUNER/BAND when the power is off automatically turns the power on a tape by pressing TUNER...
Operating Instructions
Page 15
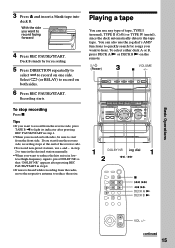
... any type of tape, TYPE I (normal), TYPE II (CrO2) or TYPE IV (metal) , since the deck automatically detects the tape type. in the desired station manually. • When you record on one side. To stop recording Press p. Deck B stands by for songs you want to record on the remote. (Power) 3 VOLUME...
... any type of tape, TYPE I (normal), TYPE II (CrO2) or TYPE IV (metal) , since the deck automatically detects the tape type. in the desired station manually. • When you record on one side. To stop recording Press p. Deck B stands by for songs you want to record on the remote. (Power) 3 VOLUME...
Operating Instructions
Page 23
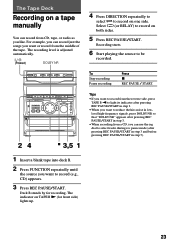
... playing the source to record on one side. The Tape Deck Recording on a tape manually You can record from the middle of the tape. To Stop recording Pause recording Press ...REC PAUSE/START in step 3 and before pressing REC PAUSE/START in step 3. • When recording from a CD, you can record just the songs you like. The indicator on both sides. 5 Press REC PAUSE/START. Deck... B stands by for front side) lights up. 23 Select ß (or RELAY) to record (e.g., CD) appears. 3 Press REC PAUSE/START. For example, you can use the jog dial to select tracks during rec pause...
... playing the source to record on one side. The Tape Deck Recording on a tape manually You can record from the middle of the tape. To Stop recording Pause recording Press ...REC PAUSE/START in step 3 and before pressing REC PAUSE/START in step 3. • When recording from a CD, you can record just the songs you like. The indicator on both sides. 5 Press REC PAUSE/START. Deck... B stands by for front side) lights up. 23 Select ß (or RELAY) to record (e.g., CD) appears. 3 Press REC PAUSE/START. For example, you can use the jog dial to select tracks during rec pause...


