Operating Instructions
Page 2
... try to which can radiate radio frequency energy and, if not installed and used in a particular installation. This symbol is equipped with the Dolby* Pro Logic Surround decoder. * Manufactured under license from that to correct the interference by turning the equipment off and on, the user is located on a circuit different from Dolby Laboratories. MHC-GS300AV only This stereo system is intended to alert...
... try to which can radiate radio frequency energy and, if not installed and used in a particular installation. This symbol is equipped with the Dolby* Pro Logic Surround decoder. * Manufactured under license from that to correct the interference by turning the equipment off and on, the user is located on a circuit different from Dolby Laboratories. MHC-GS300AV only This stereo system is intended to alert...

Operating Instructions
Page 3
... Connecting a sub woofer speaker 36 Connecting a DVD player 36 Troubleshooting Problems and remedies 37 Messages 39 Additional Information Precautions 40 Specifications 42 * MHC-GS300AV only 3US Game Mixing 31 Falling asleep to the radio - Disc Memo 16 Playing a disc with other sound source - Daily Timer 32 Using an Optional Keyboard Setting the keyboard 33 Labeling titles through the keyboard 33 Operating the system through the keyboard 33 Optional Components Hooking up your speakers for Dolby Pro...
... Connecting a sub woofer speaker 36 Connecting a DVD player 36 Troubleshooting Problems and remedies 37 Messages 39 Additional Information Precautions 40 Specifications 42 * MHC-GS300AV only 3US Game Mixing 31 Falling asleep to the radio - Disc Memo 16 Playing a disc with other sound source - Daily Timer 32 Using an Optional Keyboard Setting the keyboard 33 Labeling titles through the keyboard 33 Operating the system through the keyboard 33 Optional Components Hooking up your speakers for Dolby Pro...

Operating Instructions
Page 4
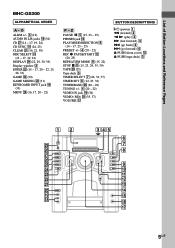
... PLAY MODE/DIRECTION wd (14 - 17, 23 - 25) PRESET +/- 4 (20 - 22) PRESET EQ 8 (27) REC z PAUSE/START qs (24, 25) REPEAT/FM MODE wd (15, 22) STOP x qa (15, 23, 24, 35, 39) SURROUND MODE 7 (27) TAPE wh (23) Tape deck 3 TIMER SELECT wd (26, 32, 37) TIMER SET wd (12, 25, 32) TUNER/BAND wj (20 - 22) TUNING +/- 4 (20 - 22) VIDEO IN jack ql (34) VOLUME qj BUTTON...
... PLAY MODE/DIRECTION wd (14 - 17, 23 - 25) PRESET +/- 4 (20 - 22) PRESET EQ 8 (27) REC z PAUSE/START qs (24, 25) REPEAT/FM MODE wd (15, 22) STOP x qa (15, 23, 24, 35, 39) SURROUND MODE 7 (27) TAPE wh (23) Tape deck 3 TIMER SELECT wd (26, 32, 37) TIMER SET wd (12, 25, 32) TUNER/BAND wj (20 - 22) TUNING +/- 4 (20 - 22) VIDEO IN jack ql (34) VOLUME qj BUTTON...
Operating Instructions
Page 5
... jack qg PLAY MODE/DIRECTION 8 (14 - 17, 23 - 25) PRESET +/- 4 (20 - 22) REC z PAUSE/START qs (24, 25) REPEAT/FM MODE 9 (15, 22) STOP x qa (15, 23, 24, 35, 39) TAPE wg (23) Tape deck 3 TIMER SELECT 7 (26, 32, 37) TIMER SET 6 (12, 25, 32) TUNER/BAND wh (20 - 22) TUNING +/- 4 (20 - 22) VIDEO IN jack ql (34) VIDEO (MD) wf (35, 37) VOLUME qj BUTTON DESCRIPTIONS =/1 (power) 1 m (rewind) 4 n N (play...
... jack qg PLAY MODE/DIRECTION 8 (14 - 17, 23 - 25) PRESET +/- 4 (20 - 22) REC z PAUSE/START qs (24, 25) REPEAT/FM MODE 9 (15, 22) STOP x qa (15, 23, 24, 35, 39) TAPE wg (23) Tape deck 3 TIMER SELECT 7 (26, 32, 37) TIMER SET 6 (12, 25, 32) TUNER/BAND wh (20 - 22) TUNING +/- 4 (20 - 22) VIDEO IN jack ql (34) VIDEO (MD) wf (35, 37) VOLUME qj BUTTON DESCRIPTIONS =/1 (power) 1 m (rewind) 4 n N (play...
Operating Instructions
Page 6
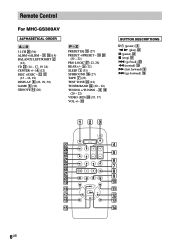
..., 19, 24) CENTER +/- 4 (12) DISC +/DISC - qg BUTTON DESCRIPTIONS @/1 (power) 3 n N (play) wa X (pause) wa x (stop) wa . (go forward) q; 123 wj 4 wh wg 5 wf 6 wd ws 7 wa 8 w; 9 ql 0 qk qa qj qs qh qd qg qf 6US w; (20 - 22) PRO LOGIC wj (12, 28) REAR +/- 5 (12) SLEEP 1 (31) SURROUND qh (27) TAPE 7 (23) TEST TONE wf (12) TUNER/BAND ws (20 - 22) TUNING +/TUNING - 9 ql (20...
..., 19, 24) CENTER +/- 4 (12) DISC +/DISC - qg BUTTON DESCRIPTIONS @/1 (power) 3 n N (play) wa X (pause) wa x (stop) wa . (go forward) q; 123 wj 4 wh wg 5 wf 6 wd ws 7 wa 8 w; 9 ql 0 qk qa qj qs qh qd qg qf 6US w; (20 - 22) PRO LOGIC wj (12, 28) REAR +/- 5 (12) SLEEP 1 (31) SURROUND qh (27) TAPE 7 (23) TEST TONE wf (12) TUNER/BAND ws (20 - 22) TUNING +/TUNING - 9 ql (20...
Operating Instructions
Page 11
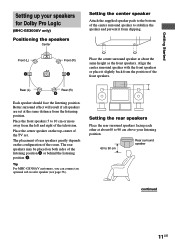
... center speaker on both sides of the front speakers. Setting the rear speakers Place the rear surround speakers facing each other at the same distance from the left and right of the center surround speaker to the bottom of the television. Tip For MHC-GS300AV customers, you can connect an optional sub woofer speaker (see page 36). The rear speakers may be placed on the top-center of the room. Rear (L) Rear (R) Each speaker...
... center speaker on both sides of the front speakers. Setting the rear speakers Place the rear surround speakers facing each other at the same distance from the left and right of the center surround speaker to the bottom of the television. Tip For MHC-GS300AV customers, you can connect an optional sub woofer speaker (see page 36). The rear speakers may be placed on the top-center of the room. Rear (L) Rear (R) Each speaker...
Operating Instructions
Page 20
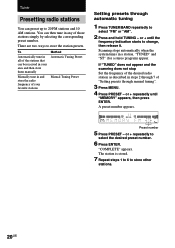
.... "TUNED" and "ST" (for a stereo program) appear. A preset number appears. You can be received in your area and then store them manually Manually tune in any of "Setting presets through automatic tuning 1 Press TUNER/BAND repeatedly to 20 FM stations and 10 AM stations. To Automatically tune in all of the stations that can then tune in and store the radio frequency of your favorite stations Method Automatic Tuning Preset Manual Tuning Preset Setting presets through manual tuning". 3 Press MENU. 4 Press PRESET...
.... "TUNED" and "ST" (for a stereo program) appear. A preset number appears. You can be received in your area and then store them manually Manually tune in any of "Setting presets through automatic tuning 1 Press TUNER/BAND repeatedly to 20 FM stations and 10 AM stations. To Automatically tune in all of the stations that can then tune in and store the radio frequency of your favorite stations Method Automatic Tuning Preset Manual Tuning Preset Setting presets through manual tuning". 3 Press MENU. 4 Press PRESET...
Operating Instructions
Page 21
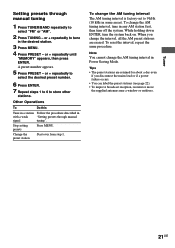
... change the AM tuning interval in Power Saving Mode. Stop setting presets Press MENU. Change the preset station Start over from step 1. Tuner Setting presets through manual signal tuning". Note You cannot change the AM tuning interval The AM tuning interval is factory-set to 9 kHz (10 kHz in with a weak "Setting presets through manual tuning 1 Press TUNER/BAND repeatedly to select "FM" or "AM". 2 Press TUNING - A preset number appears. 5 Press PRESET - While holding down ENTER, turn off the system. Other Operations To...
... change the AM tuning interval in Power Saving Mode. Stop setting presets Press MENU. Change the preset station Start over from step 1. Tuner Setting presets through manual signal tuning". Note You cannot change the AM tuning interval The AM tuning interval is factory-set to 9 kHz (10 kHz in with a weak "Setting presets through manual tuning 1 Press TUNER/BAND repeatedly to select "FM" or "AM". 2 Press TUNING - A preset number appears. 5 Press PRESET - While holding down ENTER, turn off the system. Other Operations To...
Operating Instructions
Page 22
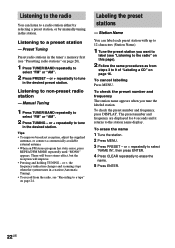
... name 1 Tune the station. 2 Press MENU. 3 Press PRESET - Listening to the station name display. or + repeatedly to 9 of "Labeling a CD" on page 16. Tips • To improve broadcast reception, adjust the supplied antennas, or connect a commercially available external antenna. • When an FM stereo program has static noise, press REPEAT/FM MODE repeatedly until "MONO" appears. To check the preset number and frequency The station name appears...
... name 1 Tune the station. 2 Press MENU. 3 Press PRESET - Listening to the station name display. or + repeatedly to 9 of "Labeling a CD" on page 16. Tips • To improve broadcast reception, adjust the supplied antennas, or connect a commercially available external antenna. • When an FM stereo program has static noise, press REPEAT/FM MODE repeatedly until "MONO" appears. To check the preset number and frequency The station name appears...
Operating Instructions
Page 26
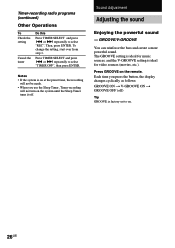
... the button, the display changes cyclically as follows: GROOVE ON t V-GROOVE ON t GROOVE OFF (off . or > repeatedly to select "REC". Notes • If the system is on at the preset time, the recording will not turn on the system until the Sleep Timer turns it off ) Tip GROOVE is ideal for video sources (movies, etc.). Timer-recording radio programs (continued) Other Operations To...
... the button, the display changes cyclically as follows: GROOVE ON t V-GROOVE ON t GROOVE OFF (off . or > repeatedly to select "REC". Notes • If the system is on at the preset time, the recording will not turn on the system until the Sleep Timer turns it off ) Tip GROOVE is ideal for video sources (movies, etc.). Timer-recording radio programs (continued) Other Operations To...
Operating Instructions
Page 28
... sure to select the sound formation. To cancel the Dolby Pro Logic Surround sound Press DOLBY PRO LOGIC (or PRO LOGIC on the remote) while playing a program source. Press DOLBY PRO LOGIC (or PRO LOGIC on the remote) again. Complete the setup and adjustments first (see page 11). Notes • You cannot use both the front and rear surround speakers. 28US Each time you press the button, the display changes as follows and the speakers producing sound light up on...
... sure to select the sound formation. To cancel the Dolby Pro Logic Surround sound Press DOLBY PRO LOGIC (or PRO LOGIC on the remote) while playing a program source. Press DOLBY PRO LOGIC (or PRO LOGIC on the remote) again. Complete the setup and adjustments first (see page 11). Notes • You cannot use both the front and rear surround speakers. 28US Each time you press the button, the display changes as follows and the speakers producing sound light up on...
Operating Instructions
Page 32
... you have set the clock (see "Listening to play facing forward. • Radio: Tune in step 5. 7 Press . Press . or > repeatedly to music - The indication changes as follows: t TUNER y CD PLAY T t TAPE PLAY T 8 Press ENTER. Start over from a specific track, make a program (see "Programing CD tracks" on page 22). 2 Adjust the volume. 3 Press TIMER SET. 4 Press . "ON" appears and the hour indication flashes. 5 Set the time to select "DAILY SET", then press...
... you have set the clock (see "Listening to play facing forward. • Radio: Tune in step 5. 7 Press . Press . or > repeatedly to music - The indication changes as follows: t TUNER y CD PLAY T t TAPE PLAY T 8 Press ENTER. Start over from a specific track, make a program (see "Programing CD tracks" on page 22). 2 Adjust the volume. 3 Press TIMER SET. 4 Press . "ON" appears and the hour indication flashes. 5 Set the time to select "DAILY SET", then press...
Operating Instructions
Page 33
... A CD Switch the function to label. "COMPLETE" appears for the following table. 6 Press [Enter]. Besides letter keys, you may enter the AM radio sound depending on the remote. Note Hum or noise may use any IBM*compatible keyboard with a PS/2 interface.** However, not all keyboards are guaranteed to TUNER and select the desired preset radio station number. 2 Press MENU. 3 Press . The text input screen appears...
... A CD Switch the function to label. "COMPLETE" appears for the following table. 6 Press [Enter]. Besides letter keys, you may enter the AM radio sound depending on the remote. Note Hum or noise may use any IBM*compatible keyboard with a PS/2 interface.** However, not all keyboards are guaranteed to TUNER and select the desired preset radio station number. 2 Press MENU. 3 Press . The text input screen appears...
Operating Instructions
Page 34
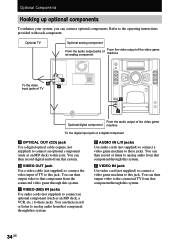
... these jacks. Optional Components Hooking up optional components To enhance your system, you can then record digital audio from that component through this system. B VIDEO OUT jack Use a video cable (not supplied) to connect the video input of a digital component A OPTICAL OUT (CD) jack Use a digital optical cable (square, not supplied) to connect an optional component (such as an MD deck, a VCR, etc.) to the operating instructions provided with each component. You can then output video to this jack. C VIDEO (MD) IN jacks Use audio cords (not...
... these jacks. Optional Components Hooking up optional components To enhance your system, you can then record digital audio from that component through this system. B VIDEO OUT jack Use a video cable (not supplied) to connect the video input of a digital component A OPTICAL OUT (CD) jack Use a digital optical cable (square, not supplied) to connect an optional component (such as an MD deck, a VCR, etc.) to the operating instructions provided with each component. You can then output video to this jack. C VIDEO (MD) IN jacks Use audio cords (not...
Operating Instructions
Page 37
... press 5.1CH/VIDEO (MD) (for MHC-GS300AV or VIDEO (MD) (for MHC-GS300AV only). • The source being played back is monaural. There is severe hum or noise. • A TV or VCR is turned off. General The display starts flashing as soon as possible. • Connect only one channel or unbalanced left and right volume. • Connect the speaker cords properly (see "Hooking up optional components" on the remote). •...
... press 5.1CH/VIDEO (MD) (for MHC-GS300AV or VIDEO (MD) (for MHC-GS300AV only). • The source being played back is monaural. There is severe hum or noise. • A TV or VCR is turned off. General The display starts flashing as soon as possible. • Connect only one channel or unbalanced left and right volume. • Connect the speaker cords properly (see "Hooking up optional components" on the remote). •...
Operating Instructions
Page 38
... 9660 level 1 or level 2. Use a CD that the speaker's + and - jacks are not stored in MP3 format. the number of folders or files on the disc, playback may not be written. * "RealJukebox is a registered trademark of a bit rate other than 128 kbps, time is not output. Skip time changes depending ID3 tag ver. 2 capacity. Sound lacks bass. • Check that conforms with bass sounds at...
... 9660 level 1 or level 2. Use a CD that the speaker's + and - jacks are not stored in MP3 format. the number of folders or files on the disc, playback may not be written. * "RealJukebox is a registered trademark of a bit rate other than 128 kbps, time is not output. Skip time changes depending ID3 tag ver. 2 capacity. Sound lacks bass. • Check that conforms with bass sounds at...
Operating Instructions
Page 39
... CD. A stereo FM program cannot be received in stereo. • Press REPEAT/FM MODE (or REPEAT on the system again after a while. PROTECT • Press ?/1 (Power) to turn on the system. 4 Press STOP x, CLEAR, and DISPLAY at the same time. The tape does not record nor play . Turn on the remote for MHC-GS200) so that "ST" appears. If other troubles not described above occur, reset the...
... CD. A stereo FM program cannot be received in stereo. • Press REPEAT/FM MODE (or REPEAT on the system again after a while. PROTECT • Press ?/1 (Power) to turn on the system. 4 Press STOP x, CLEAR, and DISPLAY at the same time. The tape does not record nor play . Turn on the remote for MHC-GS200) so that "ST" appears. If other troubles not described above occur, reset the...

Operating Instructions
Page 42
...SPEAKER: accepts impedance of 6 to 16 ohms SURROUND SPEAKER REAR (MHC-GS300AV only): accepts impedance of 6 to 16 ohms SURROUND SPEAKER CENTER (MHC-GS300AV only): accepts impedance of 6 ohms SUB WOOFER (MHC-GS300AV only): voltage 1 V, impedance 1 kilohm CD player section System Compact disc and digital audio system Laser Semiconductor laser (λ = 780 nm) Emission duration: continuous Frequency response 2 Hz - 20 kHz (±0.5 dB) Wavelength 780 - 790 nm Signal-to rated output. Specifications Amplifier section MHC-GS300AV/GS200 U.S.A. rated 60 watts per channel...
...SPEAKER: accepts impedance of 6 to 16 ohms SURROUND SPEAKER REAR (MHC-GS300AV only): accepts impedance of 6 to 16 ohms SURROUND SPEAKER CENTER (MHC-GS300AV only): accepts impedance of 6 ohms SUB WOOFER (MHC-GS300AV only): voltage 1 V, impedance 1 kilohm CD player section System Compact disc and digital audio system Laser Semiconductor laser (λ = 780 nm) Emission duration: continuous Frequency response 2 Hz - 20 kHz (±0.5 dB) Wavelength 780 - 790 nm Signal-to rated output. Specifications Amplifier section MHC-GS300AV/GS200 U.S.A. rated 60 watts per channel...
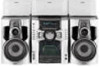
Marketing Specifications (MHCGS300AV)
Page 1
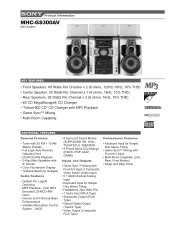
...; Optical Digital Output (Toslink Type) • Video Output (Composite RCA Type) Convenience Features • Keyboard Input for Simple Disc Memo Titling • Game Sync™ Mixing with 6" Woofer • Color Fluorescent Display • 12-Band Spectrum Analyzer Audio Features • Dolby® Pro Logic® Decoding • MP3 Playback - Product Information MHC-GS300AV Mini System KEY FEATURES • Front Speakers: 60 Watts Per Channel x 2 (6 ohms, 120Hz-10Hz, 10% THD) • Center Speaker...
...; Optical Digital Output (Toslink Type) • Video Output (Composite RCA Type) Convenience Features • Keyboard Input for Simple Disc Memo Titling • Game Sync™ Mixing with 6" Woofer • Color Fluorescent Display • 12-Band Spectrum Analyzer Audio Features • Dolby® Pro Logic® Decoding • MP3 Playback - Product Information MHC-GS300AV Mini System KEY FEATURES • Front Speakers: 60 Watts Per Channel x 2 (6 ohms, 120Hz-10Hz, 10% THD) • Center Speaker...
Marketing Specifications (MHCGS300AV)
Page 2
... • Instruction Manual • Remote Commander® Remote Control RM-SGS3 • Batteries AA x 2 • AM Loop Antenna • FM Lead Antenna • Rear Speaker Cord x 2 ©2002 Sony Electronics Inc. Main Unit Overview • Approx. Dimensions (W/H/D): 8.4" x 4.7" 5" • Approx. Weight: 2.3 lbs. Dolby Digital is a registered trademark of Digital Output: -18dBm Tape Player Section • Recording System: 4 Track, 2 Channel Stereo • Frequency Response: 40 - 13,000 Hz(±3dB), using Sony Type I Cassette...
... • Instruction Manual • Remote Commander® Remote Control RM-SGS3 • Batteries AA x 2 • AM Loop Antenna • FM Lead Antenna • Rear Speaker Cord x 2 ©2002 Sony Electronics Inc. Main Unit Overview • Approx. Dimensions (W/H/D): 8.4" x 4.7" 5" • Approx. Weight: 2.3 lbs. Dolby Digital is a registered trademark of Digital Output: -18dBm Tape Player Section • Recording System: 4 Track, 2 Channel Stereo • Frequency Response: 40 - 13,000 Hz(±3dB), using Sony Type I Cassette...


