
Operating Instructions
Page 3
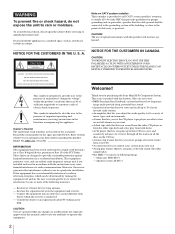
...determined by one or more of important operating and maintenance (servicing) instructions in particular, specifies that provides guidelines for purchasing the Sony Mini Hi-Fi Component System. CAUTION RISK OF ELECTRIC SHOCK DO NOT OPEN CAUTION : TO REDUCE THE RISK OF ELECTRIC SHOCK, DO NOT REMOVE COVER ... play a CD with sound effect like sampler play from your authority to operate this product. This series is encouraged to try to them whenever you adjust the audio quality to fit a variety of following measures: - Speaker system: SS-H771 2 MHC-771 Serial No INFORMATION This...
...determined by one or more of important operating and maintenance (servicing) instructions in particular, specifies that provides guidelines for purchasing the Sony Mini Hi-Fi Component System. CAUTION RISK OF ELECTRIC SHOCK DO NOT OPEN CAUTION : TO REDUCE THE RISK OF ELECTRIC SHOCK, DO NOT REMOVE COVER ... play a CD with sound effect like sampler play from your authority to operate this product. This series is encouraged to try to them whenever you adjust the audio quality to fit a variety of following measures: - Speaker system: SS-H771 2 MHC-771 Serial No INFORMATION This...
Operating Instructions
Page 4
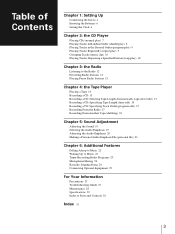
... (time edit) 16 Recording a CD: Specifying Track Order (program edit) 17 Recording From the Radio 17 Recording From Another Tape (dubbing) 18 Chapter 5: Sound Adjustment Adjusting the Sound 19 Selecting the Audio Emphasis 19 Adjusting the Audio Emphasis 20 Making a Personal Audio Emphasis File (personal file) 21 Chapter 6: Additional Features Falling Asleep...
... (time edit) 16 Recording a CD: Specifying Track Order (program edit) 17 Recording From the Radio 17 Recording From Another Tape (dubbing) 18 Chapter 5: Sound Adjustment Adjusting the Sound 19 Selecting the Audio Emphasis 19 Adjusting the Audio Emphasis 20 Making a Personal Audio Emphasis File (personal file) 21 Chapter 6: Additional Features Falling Asleep...
Operating Instructions
Page 8
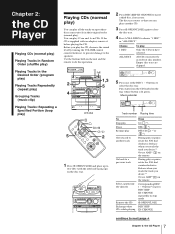
... 4k 8k 16k(Hz) VOLUME 5 Press one of disc number. Choose 1 DISC ALL DISCS To play Only the CD you play the CD, decrease the sound level by turning the VOLUME control counterclockwise, to prevent damage to the speakers. Music calendar CLIP CD 12 345 678 ALL 1 DISC DOLBY NR OFF...
... 4k 8k 16k(Hz) VOLUME 5 Press one of disc number. Choose 1 DISC ALL DISCS To play Only the CD you play the CD, decrease the sound level by turning the VOLUME control counterclockwise, to prevent damage to the speakers. Music calendar CLIP CD 12 345 678 ALL 1 DISC DOLBY NR OFF...
Operating Instructions
Page 13
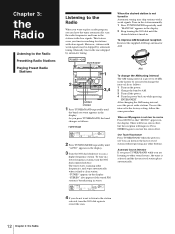
... Stations EN Listening to the Radio When you want to play a radio program, you can listen to the last received station without pressing any other sound source, the tuner is broadcasting in the display. You can have the tuner automatically scan the radio frequencies and tune in the factory. AM To...
... Stations EN Listening to the Radio When you want to play a radio program, you can listen to the last received station without pressing any other sound source, the tuner is broadcasting in the display. You can have the tuner automatically scan the radio frequencies and tune in the factory. AM To...
Operating Instructions
Page 15
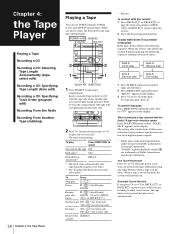
...Recording From Another Tape (dubbing) 14 Chapter 4: the Tape Player Playing a Tape You can listen to the tape without pressing any other sound source, the tape deck is selected and the play starts automatically. The tape starts playing. To play both decks in the deck. ... Rewind º ( *) for front side , ( *) for reverse side Remove the § EJECT cassette * Remote To control with the Dolby* B-type noise reduction system Press DOLBY NR button so that "DOLBY NR B" appears in low-level high-frequency signals. * Dolby noise reduction manufactured under license from the front side...
...Recording From Another Tape (dubbing) 14 Chapter 4: the Tape Player Playing a Tape You can listen to the tape without pressing any other sound source, the tape deck is selected and the play starts automatically. The tape starts playing. To play both decks in the deck. ... Rewind º ( *) for front side , ( *) for reverse side Remove the § EJECT cassette * Remote To control with the Dolby* B-type noise reduction system Press DOLBY NR button so that "DOLBY NR B" appears in low-level high-frequency signals. * Dolby noise reduction manufactured under license from the front side...
Operating Instructions
Page 16
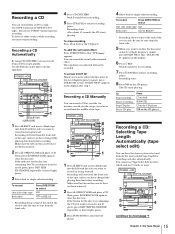
...you must stop recording Press π on the CD player Recording a CD: Selecting Tape Length Automatically (tape select edit) You can have the stereo system select and indicate the most suitable tape length for recording. 5 Press ∏ PAUSE to a tape. Recording a CD Automatically By using CD SYNCHRO, ...you can record the sound with the side you adjusted will start from a CD to release recording pause. Use the buttons on the CD player. Recording will not be ...
...you must stop recording Press π on the CD player Recording a CD: Selecting Tape Length Automatically (tape select edit) You can have the stereo system select and indicate the most suitable tape length for recording. 5 Press ∏ PAUSE to a tape. Recording a CD Automatically By using CD SYNCHRO, ...you can record the sound with the side you adjusted will start from a CD to release recording pause. Use the buttons on the CD player. Recording will not be ...
Operating Instructions
Page 20
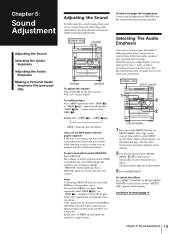
...return to PHONES jack. In this case, set to next page 19 Chapter 5: Sound Adjustment See the chart "Music menu options" on the remote repeatedly) to select the preset you store your stereo system, make the following audio adjustments. The last effect chosen from that menu appears ...when connecting an optional super woofer (Sony SA-W10, etc.) to musical genre or use the DBFB System with the graphic equalizer If the bass is too strong, the music will come from different graphic equalizer and surround effect settings. To get a powerful sound (GROOVE) Press GROOVE. Notes •...
...return to PHONES jack. In this case, set to next page 19 Chapter 5: Sound Adjustment See the chart "Music menu options" on the remote repeatedly) to select the preset you store your stereo system, make the following audio adjustments. The last effect chosen from that menu appears ...when connecting an optional super woofer (Sony SA-W10, etc.) to musical genre or use the DBFB System with the graphic equalizer If the bass is too strong, the music will come from different graphic equalizer and surround effect settings. To get a powerful sound (GROOVE) Press GROOVE. Notes •...
Operating Instructions
Page 21
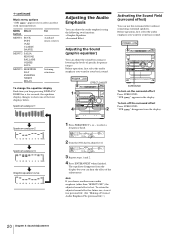
...If you select an effect with surround effects. "SUR " disappears from the display but you keep pressing DISPLAY/ DEMO for your basic sound. Before operation, first select the audio emphasis you want for future use, store it in the display. POWERnON SURROUND To turn off ...the surround effect Press SURROUND. To retain the adjusted sound effect for your basic sound. To turn on the surround effect Press SURROUND. continued Music menu options "SUR " appears if you choose another menu audio...
...If you select an effect with surround effects. "SUR " disappears from the display but you keep pressing DISPLAY/ DEMO for your basic sound. Before operation, first select the audio emphasis you want for future use, store it in the display. POWERnON SURROUND To turn off ...the surround effect Press SURROUND. To retain the adjusted sound effect for your basic sound. To turn on the surround effect Press SURROUND. continued Music menu options "SUR " appears if you choose another menu audio...
Operating Instructions
Page 22
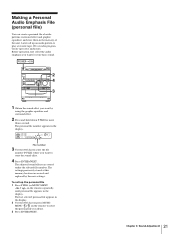
...You can create a personal file of audio patterns (surround effect and graphic equalizer) and store them in the display. EN 21 Chapter 5: Sound Adjustment Before operation, first select the audio emphasis you want for more than a second. The settings previously stored at this memory location are ...stored under the selected file number. Later call up an audio pattern to store the sound effect. 4 Press ENTER/NEXT. The last selected personal file appears in the display. 2 Use the JOG dial (or press MUSIC MENU /...
...You can create a personal file of audio patterns (surround effect and graphic equalizer) and store them in the display. EN 21 Chapter 5: Sound Adjustment Before operation, first select the audio emphasis you want for more than a second. The settings previously stored at this memory location are ...stored under the selected file number. Later call up an audio pattern to store the sound effect. 4 Press ENTER/NEXT. The last selected personal file appears in the display. 2 Use the JOG dial (or press MUSIC MENU /...
Operating Instructions
Page 23
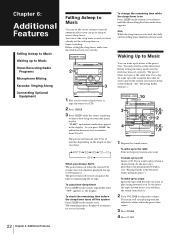
... Tracks in the preset station you want to listen to beforehand. (See "Presetting Radio Stations".) 1 Play your favorite sound source (a tape, the tuner or a CD). 2 Press TIMER. 3 Press SLEEP while the source is on Press...been set the timer once. The power will hear the sound from deck A. 2 Turn VOLUME to adjust the volume. The power turns off the system Press SLEEP on the length of the radio, be sure ... timer-recording. Before setting the sleep timer, make sure the clock has been set the stereo system to turn off after 90 to music (sleep timer). Waking Up to Music You can go ...
... Tracks in the preset station you want to listen to beforehand. (See "Presetting Radio Stations".) 1 Play your favorite sound source (a tape, the tuner or a CD). 2 Press TIMER. 3 Press SLEEP while the source is on Press...been set the timer once. The power will hear the sound from deck A. 2 Turn VOLUME to adjust the volume. The power turns off the system Press SLEEP on the length of the radio, be sure ... timer-recording. Before setting the sleep timer, make sure the clock has been set the stereo system to turn off after 90 to music (sleep timer). Waking Up to Music You can go ...
Operating Instructions
Page 24
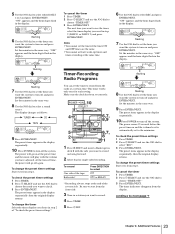
...the timer, select the timer display you want to record. 4 Press TIMER. 5 Press t SET. 6 Use the JOG dial to turn off the system. continue to select a sound source. Set the minutes in the display. The preset items appear in step 2 (DAILY1 or DAILY 2) and press ENTER/NEXT. To change the ...preset timer settings Start over from the front side. 3 Tune in deck B with the volume you want the system to turn off again. "ON"...
...the timer, select the timer display you want to record. 4 Press TIMER. 5 Press t SET. 6 Use the JOG dial to turn off the system. continue to select a sound source. Set the minutes in the display. The preset items appear in step 2 (DAILY1 or DAILY 2) and press ENTER/NEXT. To change the ...preset timer settings Start over from the front side. 3 Tune in deck B with the volume you want the system to turn off again. "ON"...

Operating Instructions
Page 25
... on the source is singing in the stereo recorded source •A duet is being played, press π on the CD player to record the sound of the components and singing or speaking into the microphone. Notes on vocal reduction The singer's voice may not be reduced completely for the following reasons: •...
... on the source is singing in the stereo recorded source •A duet is being played, press π on the CD player to record the sound of the components and singing or speaking into the microphone. Notes on vocal reduction The singer's voice may not be reduced completely for the following reasons: •...
Operating Instructions
Page 26
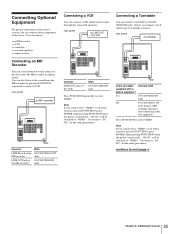
...100 CD" will be switched to "VIDEO". Connecting a Turntable You can connect other components to the stereo. Yes 100 CD/VIDEO IN EN jacks No 100 CD/VIDEO IN... •a turntable •surround speakers •a super woofer Connecting an MD Recorder You can connect a VCR and hear the sound through the connected speakers. To return to "100 CD", do the same procedures. Note If you cannot select "VIDEO" even... is turned off . Connecting Optional Equipment For greater enjoyment of your stereo system, you can connect a turntable to 100CD/ VIDEO IN jacks. continue to select VIDEO.
...100 CD" will be switched to "VIDEO". Connecting a Turntable You can connect other components to the stereo. Yes 100 CD/VIDEO IN EN jacks No 100 CD/VIDEO IN... •a turntable •surround speakers •a super woofer Connecting an MD Recorder You can connect a VCR and hear the sound through the connected speakers. To return to "100 CD", do the same procedures. Note If you cannot select "VIDEO" even... is turned off . Connecting Optional Equipment For greater enjoyment of your stereo system, you can connect a turntable to 100CD/ VIDEO IN jacks. continue to select VIDEO.
Operating Instructions
Page 28
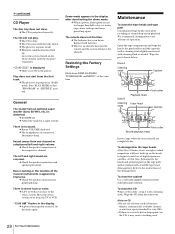
... consult your nearest Sony dealer. To disconnect the AC power cord, pull it out by qualified personnel before operating it any further. • AC power cord must be received in sound level. Dusty or dirty - Should any problem using a TYPE II (CrO2) or TYPE IV (metal) cassette, be used ...recorded over, break off the cassette tab from side A or B as it is connected to direct sunlight On condensation in the CD player component If the system is brought directly from the cassette. "STEREO" flashes in the cassette holder. Adjust the antenna. No tape in the display. The heads are...
... consult your nearest Sony dealer. To disconnect the AC power cord, pull it out by qualified personnel before operating it any further. • AC power cord must be received in sound level. Dusty or dirty - Should any problem using a TYPE II (CrO2) or TYPE IV (metal) cassette, be used ...recorded over, break off the cassette tab from side A or B as it is connected to direct sunlight On condensation in the CD player component If the system is brought directly from the cassette. "STEREO" flashes in the cassette holder. Adjust the antenna. No tape in the display. The heads are...
Operating Instructions
Page 29
... built up on CD •Do not use , enough residual magnetism will not play. There is dirty. EN General The sound from an optional super woofer (Sony SA-W10, etc.) is in program or shuffle mode. Rotate VOLUME clockwise. Check the speaker connection and speaker placement. Move ... occurs for about an hour until the moisture evaporates. The batteries have built up . There is too close . Refer to the stereo system. Leave the system turned on the CD, it with a commercially available tape head demagnetizer. The remote does not function. At this time, demagnetize the heads...
... built up on CD •Do not use , enough residual magnetism will not play. There is dirty. EN General The sound from an optional super woofer (Sony SA-W10, etc.) is in program or shuffle mode. Rotate VOLUME clockwise. Check the speaker connection and speaker placement. Move ... occurs for about an hour until the moisture evaporates. The batteries have built up . There is too close . Refer to the stereo system. Leave the system turned on the CD, it with a commercially available tape head demagnetizer. The remote does not function. At this time, demagnetize the heads...
Operating Instructions
Page 32
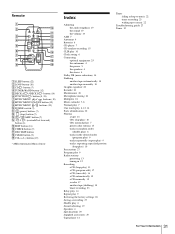
...!¶ DISC SKIP button !• CLEAR button (9) !ª VOL (+/-) button (19) * AMS=Automatic Music Sensor Index Adjusting the audio emphasis 19 the sound 19 the volume 19 AMS 7 Antennas 4 Batteries 6 CD player 7 CD synchro recording 15 CLIP play 10 Clock setting 6 Connecting optional equipment 25 the antennnas... (dubbing) 18 timer recording 23 Relay play 14 Repeat play 9 Restoring the factory settings 28 Saving a recording 27 Shuffle play 8 Sound adjusting 19 Speakers 4 Specifications 29 Supplied accessories 29 Tape player 14 Timer falling asleep to music 22 timer recording 23 waking up to...
...!¶ DISC SKIP button !• CLEAR button (9) !ª VOL (+/-) button (19) * AMS=Automatic Music Sensor Index Adjusting the audio emphasis 19 the sound 19 the volume 19 AMS 7 Antennas 4 Batteries 6 CD player 7 CD synchro recording 15 CLIP play 10 Clock setting 6 Connecting optional equipment 25 the antennnas... (dubbing) 18 timer recording 23 Relay play 14 Repeat play 9 Restoring the factory settings 28 Saving a recording 27 Shuffle play 8 Sound adjusting 19 Speakers 4 Specifications 29 Supplied accessories 29 Tape player 14 Timer falling asleep to music 22 timer recording 23 waking up to...

