

Limited Warranty (US Only)
Page 1
...General Stereo/Hifi Components/Tape Decks ® CD Players/Mini Disc Players/Audio Systems Hifi Audio LIMITED WARRANTY Sony Electronics Inc. ("Sony") warrants this Product is within 90 days of the date of a service problem, or for product information or operation, call : 1-800-488-SONY (7669...replacements in material or workmanship as fuses or batteries). PARTS: In addition, Sony will repair or replace the Product, at its original packaging or packaging affording an equal degree of the Product, including the antenna. This warranty is invalid if the factory applied serial number...
...General Stereo/Hifi Components/Tape Decks ® CD Players/Mini Disc Players/Audio Systems Hifi Audio LIMITED WARRANTY Sony Electronics Inc. ("Sony") warrants this Product is within 90 days of the date of a service problem, or for product information or operation, call : 1-800-488-SONY (7669...replacements in material or workmanship as fuses or batteries). PARTS: In addition, Sony will repair or replace the Product, at its original packaging or packaging affording an equal degree of the Product, including the antenna. This warranty is invalid if the factory applied serial number...
Operating Instructions
Page 3
...-40 of music types and environments •A timer that lets you set the CD player, tape player or radio to turn on and off and on the rear panel. S. Consult the dealer or an experienced radio/TV technician for purchasing the Sony Mini Hi-Fi Component System. Speaker system: SS-H771 2 These limits are just a few: •DBFB (Dynamic Bass Feedback) system that boosts low frequency range audio provide deep, powerful bass sound •A preset feature that...
...-40 of music types and environments •A timer that lets you set the CD player, tape player or radio to turn on and off and on the rear panel. S. Consult the dealer or an experienced radio/TV technician for purchasing the Sony Mini Hi-Fi Component System. Speaker system: SS-H771 2 These limits are just a few: •DBFB (Dynamic Bass Feedback) system that boosts low frequency range audio provide deep, powerful bass sound •A preset feature that...
Operating Instructions
Page 4
... 5: Sound Adjustment Adjusting the Sound 19 Selecting the Audio Emphasis 19 Adjusting the Audio Emphasis 20 Making a Personal Audio Emphasis File (personal file) 21 Chapter 6: Additional Features Falling Asleep to Music 22 Waking Up to Music 22 Timer-Recording Radio Programs 23 Microphone Mixing 24 Karaoke: Singing Along 24 Connecting Optional Equipment 25 For Your Information Precautions 27 Troubleshooting Guide 27 Maintenance 28 Specifications 29 Index to Parts and Controls...
... 5: Sound Adjustment Adjusting the Sound 19 Selecting the Audio Emphasis 19 Adjusting the Audio Emphasis 20 Making a Personal Audio Emphasis File (personal file) 21 Chapter 6: Additional Features Falling Asleep to Music 22 Waking Up to Music 22 Timer-Recording Radio Programs 23 Microphone Mixing 24 Karaoke: Singing Along 24 Connecting Optional Equipment 25 For Your Information Precautions 27 Troubleshooting Guide 27 Maintenance 28 Specifications 29 Index to Parts and Controls...
Operating Instructions
Page 5
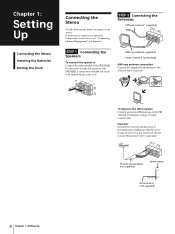
...; and y terminals, using a 75-ohm coaxial cable. STEP 2 Connecting the Antennas FM lead antenna* (supplied) FM 75Ω AM STEP 1 Connecting the Speakers To connect the speakers Connect the right speaker to the SPEAKER R connectors and the left speaker to the SPEAKER L connectors with the screw clamp. Important Ground the external antenna from y terminal against lightning with the red cords to ' and the black cords to the stereo, see "Connecting Optional Equipment...
...; and y terminals, using a 75-ohm coaxial cable. STEP 2 Connecting the Antennas FM lead antenna* (supplied) FM 75Ω AM STEP 1 Connecting the Speakers To connect the speakers Connect the right speaker to the SPEAKER R connectors and the left speaker to the SPEAKER L connectors with the screw clamp. Important Ground the external antenna from y terminal against lightning with the red cords to ' and the black cords to the stereo, see "Connecting Optional Equipment...
Operating Instructions
Page 10
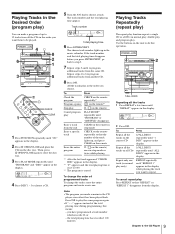
.... CLIP CD DOLBY NR OFF 63 125 250 500 1k 2k 4k 8k 16k(Hz) DISC PROGRAM VOLUME 4 Press DISC 1 - 3 to choose a CD. 5 Turn the JOG dial to play the same program again. •If "--.--" appears instead of the total playing time during programming, this operation. Repeat steps 4 to 6 to close the disc tray. 3 Press PLAY MODE repeatedly until "CD" appears in the display. 2 Press §...
.... CLIP CD DOLBY NR OFF 63 125 250 500 1k 2k 4k 8k 16k(Hz) DISC PROGRAM VOLUME 4 Press DISC 1 - 3 to choose a CD. 5 Turn the JOG dial to play the same program again. •If "--.--" appears instead of the total playing time during programming, this operation. Repeat steps 4 to 6 to close the disc tray. 3 Press PLAY MODE repeatedly until "CD" appears in the display. 2 Press §...
Operating Instructions
Page 11
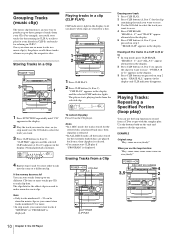
... track 1 Press CLIP PLAY. 2 Press CLIP button (A, B or C) for a disc. "ERASE CLIP" appears in the display and CLIP indicator disappears. "ERASE A - Playing tracks in a clip (CLIP PLAY) CLIP indicator(s) light in stop mode, press CLIP ERASE. CD 3 CLIP A ALL DISC S DOLBY NR OFF 63 125 250 500 1k 2k 4k 8k 16k(Hz) VOLUME To cancel clip play if "PROGRAM" is erased to...
... track 1 Press CLIP PLAY. 2 Press CLIP button (A, B or C) for a disc. "ERASE CLIP" appears in the display and CLIP indicator disappears. "ERASE A - Playing tracks in a clip (CLIP PLAY) CLIP indicator(s) light in stop mode, press CLIP ERASE. CD 3 CLIP A ALL DISC S DOLBY NR OFF 63 125 250 500 1k 2k 4k 8k 16k(Hz) VOLUME To cancel clip play if "PROGRAM" is erased to...
Operating Instructions
Page 13
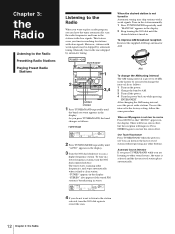
... TUNING MODE repeatedly until "MANUAL" appears in the display. 2 Keep turning the JOG dial until "AUTO" appears in searching for AM. To reset the interval to restore the stereo effect. There will improve. Chapter 3: the Radio Listening to the Radio Presetting Radio Stations Playing Preset Radio Stations EN Listening to the Radio When you want to play a radio program, you can listen to the last received station without pressing any other sound source, the tuner is selected...
... TUNING MODE repeatedly until "MANUAL" appears in the display. 2 Keep turning the JOG dial until "AUTO" appears in searching for AM. To reset the interval to restore the stereo effect. There will improve. Chapter 3: the Radio Listening to the Radio Presetting Radio Stations Playing Preset Radio Stations EN Listening to the Radio When you want to play a radio program, you can listen to the last received station without pressing any other sound source, the tuner is selected...
Operating Instructions
Page 15
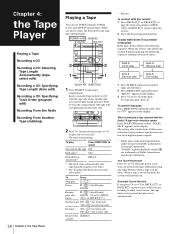
... Resume play after repeating the sequence five times. *2 See "To play starts automatically. Dolby noise reduction system reduces tape hiss noise in the display. 3 Press ª or · on the remote) while you insert a tape, the deck detects the tape type automatically. When the reverse side of Dolby Laboratories Licensing Corporation. To stop relay play Press DIRECTION repeatedly until "RELAY" appears in low-level high-frequency signals. * Dolby noise...
... Resume play after repeating the sequence five times. *2 See "To play starts automatically. Dolby noise reduction system reduces tape hiss noise in the display. 3 Press ª or · on the remote) while you insert a tape, the deck detects the tape type automatically. When the reverse side of Dolby Laboratories Licensing Corporation. To stop relay play Press DIRECTION repeatedly until "RELAY" appears in low-level high-frequency signals. * Dolby noise...
Operating Instructions
Page 16
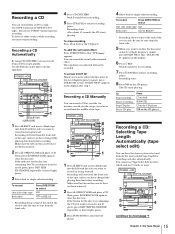
... disc automatically. Recording a CD Manually You can have the stereo system select and indicate the most suitable tape length for instance, record just the songs you have changed the playing direction before recording. To record Press DIRECTION to reduce the hiss noise in low-level high-frequency signals, press DOLBY NR so that "SUR " appears. Be sure to start from the front side. 5 When you adjusted...
... disc automatically. Recording a CD Manually You can have the stereo system select and indicate the most suitable tape length for instance, record just the songs you have changed the playing direction before recording. To record Press DIRECTION to reduce the hiss noise in low-level high-frequency signals, press DOLBY NR so that "SUR " appears. Be sure to start from the front side. 5 When you adjusted...
Operating Instructions
Page 18
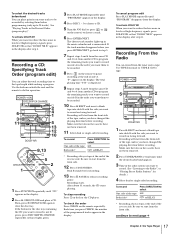
... DISC SKIP EX-CHANGE repeatedly so that it lights green. 3 Press PLAY MODE repeatedly until the desired radio band appears. 3 Tune in the radio station you want to reduce the hiss noise in low-level high-frequency signals, press DOLBY NR so that "DOLBY NR B" appears in the display after step 8. To check the order Press CHECK on both the unit and the remote to do this operation...
... DISC SKIP EX-CHANGE repeatedly so that it lights green. 3 Press PLAY MODE repeatedly until the desired radio band appears. 3 Tune in the radio station you want to reduce the hiss noise in low-level high-frequency signals, press DOLBY NR so that "DOLBY NR B" appears in the display after step 8. To check the order Press CHECK on both the unit and the remote to do this operation...
Operating Instructions
Page 20
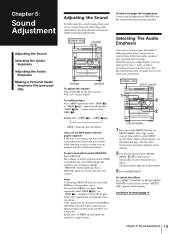
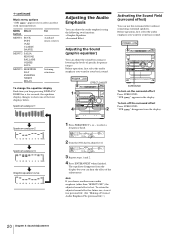
... equalizer curve changes and the "GROOVE" button lights up. The volume switches to power mode, DBFB is more effective than " DBFB ". See the chart "Music menu options" on the remote repeatedly) to next page 19 Chapter 5: Sound Adjustment Notes •Cancelling GROOVE does not cancel the DBFB level or equalizer curve. DISPLAY/DEMO 1 Press one of a single button, you use . continue to select the preset you store your stereo system, make the following audio adjustments...
... equalizer curve changes and the "GROOVE" button lights up. The volume switches to power mode, DBFB is more effective than " DBFB ". See the chart "Music menu options" on the remote repeatedly) to next page 19 Chapter 5: Sound Adjustment Notes •Cancelling GROOVE does not cancel the DBFB level or equalizer curve. DISPLAY/DEMO 1 Press one of a single button, you use . continue to select the preset you store your stereo system, make the following audio adjustments...
Operating Instructions
Page 21
... for future use the surround effect without connecting surround speakers. CLIP CD 1DISC DOLBY NR OFF 63 125 250 500 1k 2k 4k 8k 16k(Hz) MHz VOLUME 2 Turn the JOG dial to select a frequency band. The equalizer disappears from the display. 20 Chapter 5: Sound Adjustment Before operation, first select the audio emphasis you keep pressing DISPLAY/ DEMO for your basic sound. POWERnON SURROUND To turn off the surround effect Press SURROUND. Spectrum analyzer...
... for future use the surround effect without connecting surround speakers. CLIP CD 1DISC DOLBY NR OFF 63 125 250 500 1k 2k 4k 8k 16k(Hz) MHz VOLUME 2 Turn the JOG dial to select a frequency band. The equalizer disappears from the display. 20 Chapter 5: Sound Adjustment Before operation, first select the audio emphasis you keep pressing DISPLAY/ DEMO for your basic sound. POWERnON SURROUND To turn off the surround effect Press SURROUND. Spectrum analyzer...
Operating Instructions
Page 23
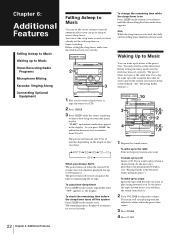
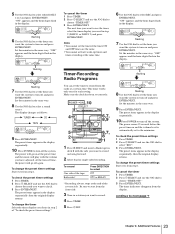
... Music Timer-Recording Radio Programs Microphone Mixing Karaoke: Singing Along Connecting Optional EN Equipment 22 Chapter 6: Additional Features Falling Asleep to Music You can set the stereo system to turn off after 90 to 10 minutes depending on the remote repeatedly until the desired length of the radio, be sure to preset the station you want to listen to beforehand. (See "Presetting Radio Stations".) 1 Play your favorite sound source (a tape, the tuner...
... Music Timer-Recording Radio Programs Microphone Mixing Karaoke: Singing Along Connecting Optional EN Equipment 22 Chapter 6: Additional Features Falling Asleep to Music You can set the stereo system to turn off after 90 to 10 minutes depending on the remote repeatedly until the desired length of the radio, be sure to preset the station you want to listen to beforehand. (See "Presetting Radio Stations".) 1 Play your favorite sound source (a tape, the tuner...
Operating Instructions
Page 24
...(Hz) VOLUME flashing 6 Use the JOG dial to set the hour you want the system to choose "TIMER OFF." 3 Press ENTER/NEXT. "OFF" appears and the hour digits flash in the display sequentially, then the original display returns. To change the preset timer settings Start over from the display. To record One side of the tape Both sides* Press DIRECTION to turn off time, the power will play with...
...(Hz) VOLUME flashing 6 Use the JOG dial to set the hour you want the system to choose "TIMER OFF." 3 Press ENTER/NEXT. "OFF" appears and the hour digits flash in the display sequentially, then the original display returns. To change the preset timer settings Start over from the display. To record One side of the tape Both sides* Press DIRECTION to turn off time, the power will play with...

Operating Instructions
Page 25
... you want to select a sound source and play it in the display. If you finish mixing Turn the MIC LEVEL control to MIN and disconnect the microphone. When you press EFFECT ON/OFF or recall a sound effect with the MENU buttons The karaoke mode is cancelled. 24 Chapter 6: Additional Features If you want to the tuner, but tuner recording will automatically change the direction of the components and singing...
... you want to select a sound source and play it in the display. If you finish mixing Turn the MIC LEVEL control to MIN and disconnect the microphone. When you press EFFECT ON/OFF or recall a sound effect with the MENU buttons The karaoke mode is cancelled. 24 Chapter 6: Additional Features If you want to the tuner, but tuner recording will automatically change the direction of the components and singing...
Operating Instructions
Page 28
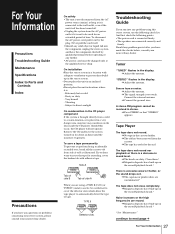
... any solid object or liquid fall into any questions or problems concerning your stereo system, please consult your nearest Sony dealer. Tuner "TUNED" flashes in a very damp room, moisture may condense on the lens inside the CD player. "STEREO" flashes in stereo. Adjust the antenna. Connect the external antenna. A stereo FM program cannot be received in the display. Tape Player The tape does not record. The tab has been removed from a cold...
... any solid object or liquid fall into any questions or problems concerning your stereo system, please consult your nearest Sony dealer. Tuner "TUNED" flashes in a very damp room, moisture may condense on the lens inside the CD player. "STEREO" flashes in stereo. Adjust the antenna. Connect the external antenna. A stereo FM program cannot be received in the display. Tape Player The tape does not record. The tab has been removed from a cold...
Operating Instructions
Page 29
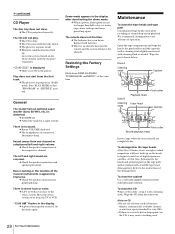
.... Set DBFB off Adjust the sound of the inoperative channel. Check the speaker connections of a super woofer. Bass is lacking or the location of the musical instruments is in pause mode. There is a scratch, dirt or fingerprints on CD •Do not use , enough residual magnetism will not play. When a power interruption occurs for proper phasing. Restoring the Factory Settings Hold down . At this time, demagnetize...
.... Set DBFB off Adjust the sound of the inoperative channel. Check the speaker connections of a super woofer. Bass is lacking or the location of the musical instruments is in pause mode. There is a scratch, dirt or fingerprints on CD •Do not use , enough residual magnetism will not play. When a power interruption occurs for proper phasing. Restoring the Factory Settings Hold down . At this time, demagnetize...
Operating Instructions
Page 30
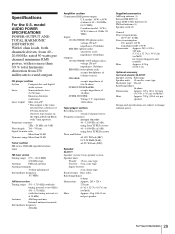
... 50 watts per speaker Supplied accessories AM loop antenna (1) Remote RM-SD50 (1) Sony SUM-3 (NS) batteries (2) FM lead antenna (1) Speaker cords (2) General Power requirements 120 V AC, 60 Hz Power consumption U.S. model: 50 W + 50 W (6 ohms at 40 - 20,000Hz, 0.8 % THD) Canadian model: 50 W + 50 W (8 ohms at a distance of 16 ohms. SUPER WOOFER: Voltage 1 V, impedance 1 kilo ohms. Tape player section Recording system 4-track 2-channel stereo Frequency response (DOLBY NR OFF) 40 - 13,000 Hz (±3 dB), using Sony TYPE...
... 50 watts per speaker Supplied accessories AM loop antenna (1) Remote RM-SD50 (1) Sony SUM-3 (NS) batteries (2) FM lead antenna (1) Speaker cords (2) General Power requirements 120 V AC, 60 Hz Power consumption U.S. model: 50 W + 50 W (6 ohms at 40 - 20,000Hz, 0.8 % THD) Canadian model: 50 W + 50 W (8 ohms at a distance of 16 ohms. SUPER WOOFER: Voltage 1 V, impedance 1 kilo ohms. Tape player section Recording system 4-track 2-channel stereo Frequency response (DOLBY NR OFF) 40 - 13,000 Hz (±3 dB), using Sony TYPE...
Operating Instructions
Page 31
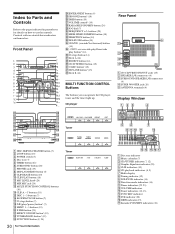
...8482; #• TUNER TUNING MODE TUNER MEMORY STEREO MONO 1 DISC SKIP EX-CHANGE button (7) 2 LOOP button (10) 3 POWER switch (7) 4 Disc tray (7) 5 TIMER button (22) 6 SURROUND button (20) 7 PHONES jack (19) 8 DISPLAY/DEMO button (5) 9 CLIP ERASE button (10) !º CLIP PLAY button (10) !¡ MIC LEVEL knob (24) !™ MIX MIC jack (24) !£ MULTI FUNCTION CONTROL buttons (30) !¢ CLIP A - @¢ ENTER/NEXT button (9) Index to Parts and Controls @∞ GROOVE button* (19) @§ DBFB button (19) @¶ VOLUME control* (19) @• KARAOKE PON/MPX button (24) Refer...
...8482; #• TUNER TUNING MODE TUNER MEMORY STEREO MONO 1 DISC SKIP EX-CHANGE button (7) 2 LOOP button (10) 3 POWER switch (7) 4 Disc tray (7) 5 TIMER button (22) 6 SURROUND button (20) 7 PHONES jack (19) 8 DISPLAY/DEMO button (5) 9 CLIP ERASE button (10) !º CLIP PLAY button (10) !¡ MIC LEVEL knob (24) !™ MIX MIC jack (24) !£ MULTI FUNCTION CONTROL buttons (30) !¢ CLIP A - @¢ ENTER/NEXT button (9) Index to Parts and Controls @∞ GROOVE button* (19) @§ DBFB button (19) @¶ VOLUME control* (19) @• KARAOKE PON/MPX button (24) Refer...
Operating Instructions
Page 32
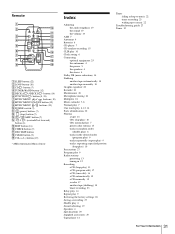
... (loop play) 10 Precautions 27 Program play 9 Radio stations presetting 13 tuning in 12 Recording a CD (loop play) 11 a CD (program edit) 17 a CD (time edit) 16 a CD automatically 15 a CD manually 15 a radio 17 another tape (dubbing) 18 timer recording 23 Relay play 14 Repeat play 9 Restoring the factory settings 28 Saving a recording 27 Shuffle play 8 Sound adjusting 19 Speakers 4 Specifications 29 Supplied accessories 29 Tape player 14 Timer falling asleep to music 22...
... (loop play) 10 Precautions 27 Program play 9 Radio stations presetting 13 tuning in 12 Recording a CD (loop play) 11 a CD (program edit) 17 a CD (time edit) 16 a CD automatically 15 a CD manually 15 a radio 17 another tape (dubbing) 18 timer recording 23 Relay play 14 Repeat play 9 Restoring the factory settings 28 Saving a recording 27 Shuffle play 8 Sound adjusting 19 Speakers 4 Specifications 29 Supplied accessories 29 Tape player 14 Timer falling asleep to music 22...


