
Operating Instructions
Page 3
...CAUTION RISK OF ELECTRIC SHOCK DO NOT OPEN CAUTION : TO REDUCE THE RISK OF ELECTRIC SHOCK, DO NOT REMOVE COVER (OR BACK). MHC-771 Serial No INFORMATION This equipment has been tested and found to 30 of cable entry as a bookcase or built-in a particular installation. ... a risk of favorite tracks from your CDs •A remote that lets you control your Sony dealer regarding this product will not occur in cabinet. Consult the dealer or an experienced radio/TV technician for purchasing the Sony Mini Hi-Fi Component System. This equipment generates, uses, and can be determined by...
...CAUTION RISK OF ELECTRIC SHOCK DO NOT OPEN CAUTION : TO REDUCE THE RISK OF ELECTRIC SHOCK, DO NOT REMOVE COVER (OR BACK). MHC-771 Serial No INFORMATION This equipment has been tested and found to 30 of cable entry as a bookcase or built-in a particular installation. ... a risk of favorite tracks from your CDs •A remote that lets you control your Sony dealer regarding this product will not occur in cabinet. Consult the dealer or an experienced radio/TV technician for purchasing the Sony Mini Hi-Fi Component System. This equipment generates, uses, and can be determined by...
Operating Instructions
Page 7
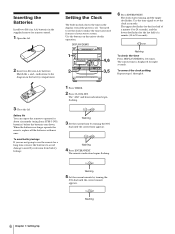
...the timer-activated features of your stereo system. The current time is off. When the batteries no longer operate the remote, replace all the batteries with new ones..."AM" and hour indication begin flashing. Battery life You can expect the remote to set the clock to 59 seconds). Use the time signal to operate...flashes. To avoid battery leakage If you are not going to use the remote for remote control. 1 Open the lid. 2 Insert two R6 (size AA) batteries... Install two R6 (size AA) batteries in the supplied remote for a long time, remove the batteries to the diagram in the...
...the timer-activated features of your stereo system. The current time is off. When the batteries no longer operate the remote, replace all the batteries with new ones..."AM" and hour indication begin flashing. Battery life You can expect the remote to set the clock to 59 seconds). Use the time signal to operate...flashes. To avoid battery leakage If you are not going to use the remote for remote control. 1 Open the lid. 2 Insert two R6 (size AA) batteries... Install two R6 (size AA) batteries in the supplied remote for a long time, remove the batteries to the diagram in the...
Operating Instructions
Page 8
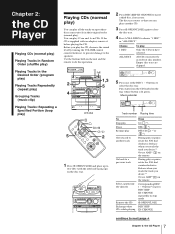
...CHANGE repeatedly in order of the DISC 1 - 3 buttons to insert a third disc, if necessary. Use the buttons both on the remote. During play or pause, rotate the JOG dial clockwise. Release when you reach the track you can play 12 cm and 8 cm... Chapter 2: the CD Player Before you play Only the CD you desire.*2 Or use AMS*3 on the unit and the remote to three discs consecutively in their original order (normal play). Release when you reach the track you have selected. Play starts ...the tracks on the tray whose button is supplied with the label side facing up) on the remote.
...CHANGE repeatedly in order of the DISC 1 - 3 buttons to insert a third disc, if necessary. Use the buttons both on the remote. During play or pause, rotate the JOG dial clockwise. Release when you reach the track you can play 12 cm and 8 cm... Chapter 2: the CD Player Before you play Only the CD you desire.*2 Or use AMS*3 on the unit and the remote to three discs consecutively in their original order (normal play). Release when you reach the track you have selected. Play starts ...the tracks on the tray whose button is supplied with the label side facing up) on the remote.
Operating Instructions
Page 9
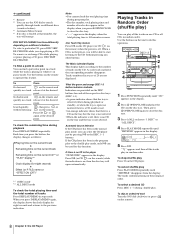
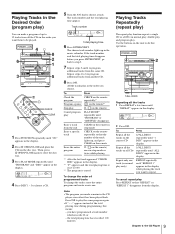
... point in the display. 2 Press § OPEN/CLOSE and place the CDs on the unit to the CD without listening , then press or on the remote) when the power is 100 minutes or more. POWERnON π DISC 1-3 5 2 1 3 4 1 Press FUNCTION repeatedly until "CD" appears in a track while the track... "1 DISC" or "ALL DISCS". 4 Press PLAY MODE repeatedly until "SHUFFLE" disappears from the display. " J " appears and then all the tracks on the remote and quickly in random order. The tracks continue playing in random order. One Touch Play feature Press fl on the CD player (or CD on...
... point in the display. 2 Press § OPEN/CLOSE and place the CDs on the unit to the CD without listening , then press or on the remote) when the power is 100 minutes or more. POWERnON π DISC 1-3 5 2 1 3 4 1 Press FUNCTION repeatedly until "CD" appears in a track while the track... "1 DISC" or "ALL DISCS". 4 Press PLAY MODE repeatedly until "SHUFFLE" disappears from the display. " J " appears and then all the tracks on the remote and quickly in random order. The tracks continue playing in random order. One Touch Play feature Press fl on the CD player (or CD on...
Operating Instructions
Page 10
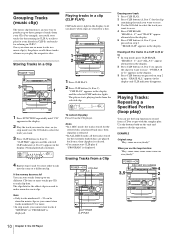
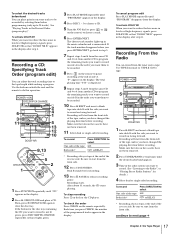
... 4 to 6 to choose a track. Playing Tracks Repeatedly (repeat play) The repeat play function repeats a single CD or all the tracks on the remote repeatedly so that "REPEAT" or "REPEAT 1" disappears from the display. Playing Tracks in the Desired Order (program play) You can make a program of...up inthe music calendar. EN 9 Chapter 2: the CD Player The chosen track number lights up , and press CLEAR on the remote π ( on all the tracks on the remote) once in stop mode CHECK on the current CD 1/ALL DISCS repeatedly until "ALL DISCS" appears in the display. *2 ...
... 4 to 6 to choose a track. Playing Tracks Repeatedly (repeat play) The repeat play function repeats a single CD or all the tracks on the remote repeatedly so that "REPEAT" or "REPEAT 1" disappears from the display. Playing Tracks in the Desired Order (program play) You can make a program of...up inthe music calendar. EN 9 Chapter 2: the CD Player The chosen track number lights up , and press CLEAR on the remote π ( on all the tracks on the remote) once in stop mode CHECK on the current CD 1/ALL DISCS repeatedly until "ALL DISCS" appears in the display. *2 ...
Operating Instructions
Page 11
... for the morning in CLIP A, tracks to select the track you use the loop function: "Hey, come come come come come on the unit and remote to store other tracks into the same or a different clip. Use the buttons both on everybody!"
... for the morning in CLIP A, tracks to select the track you use the loop function: "Hey, come come come come come on the unit and remote to store other tracks into the same or a different clip. Use the buttons both on everybody!"

Operating Instructions
Page 14
... a station you want to select a preset channel number. 4 Press ENTER/NEXT. POWERnON 1 4 2 3 1 Tune in the preset memory. 2 Press TUNER MEMORY. Use the buttons on the remote) to select the band you want . CLIP TUNER 63 125 250 500 1k 2k 4k 8k 16k(Hz) VOLUME MHz PRESET 3 Turn the JOG dial...
... a station you want to select a preset channel number. 4 Press ENTER/NEXT. POWERnON 1 4 2 3 1 Tune in the preset memory. 2 Press TUNER MEMORY. Use the buttons on the remote) to select the band you want . CLIP TUNER 63 125 250 500 1k 2k 4k 8k 16k(Hz) VOLUME MHz PRESET 3 Turn the JOG dial...
Operating Instructions
Page 15
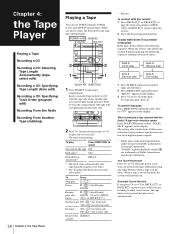
... under license from the front side. 2 Press · (to play Press DIRECTION repeatedly until "RELAY" appears in the display. Dolby noise reduction system reduces tape hiss noise in deck B finishes playing, the following sequence. You can use TYPE I (normal), TYPE II (CrO2) and TYPE IV...The setting affects both decks. 2 Press DIRECTION repeatedly until "A" or "ß" appears in the display. 3 Press ª or · on the remote) while you want to play starts automatically. "DOLBY" and the double-D symbol a are listening to play the front side and press DECK A or DECK...
... under license from the front side. 2 Press · (to play Press DIRECTION repeatedly until "RELAY" appears in the display. Dolby noise reduction system reduces tape hiss noise in deck B finishes playing, the following sequence. You can use TYPE I (normal), TYPE II (CrO2) and TYPE IV...The setting affects both decks. 2 Press DIRECTION repeatedly until "A" or "ß" appears in the display. 3 Press ª or · on the remote) while you want to play starts automatically. "DOLBY" and the double-D symbol a are listening to play the front side and press DECK A or DECK...
Operating Instructions
Page 17
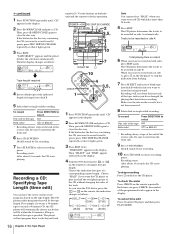
... sure to start from the front side. 9 Press CD SYNCHRO. Recording a CD: Specifying Tape Length (time edit) You can have the stereo system create programs based on the remote repeatedly. The player will fit the tape length. If the button for the disc tray containing the CD you want to designate the... automatically. To record One side of the reverse side. For example, if you want to close the disc tray. Tracks to be recorded on the remote, the indication changes as follows: CLIP CD 12 345 678 ALL DISC S 63 125 DOLBY NR OFF VOLUME EN Tape length required CLIP CD 12...
... sure to start from the front side. 9 Press CD SYNCHRO. Recording a CD: Specifying Tape Length (time edit) You can have the stereo system create programs based on the remote repeatedly. The player will fit the tape length. If the button for the disc tray containing the CD you want to designate the... automatically. To record One side of the reverse side. For example, if you want to close the disc tray. Tracks to be recorded on the remote, the indication changes as follows: CLIP CD 12 345 678 ALL DISC S 63 125 DOLBY NR OFF VOLUME EN Tape length required CLIP CD 12...
Operating Instructions
Page 18
...Use TYPE I (normal) or TYPE II (CrO2) tape. Recording will start from another CD to program the remaining tracks you want to record on the remote to start from the display. Be sure to start from the tuner onto a tape. Recording a CD: Specifying Track Order (program edit) You can record... you want to record on side B in the display. 4 Press DISC 1 - 3 to choose a CD. 5 Turn the JOG dial (or press or on the remote) to choose a track. 6 Press ENTER/NEXT. To cancel program edit Press PLAY MODE repeatedly until the desired radio band appears. 3 Tune in the display. Recording...
...Use TYPE I (normal) or TYPE II (CrO2) tape. Recording will start from another CD to program the remaining tracks you want to record on the remote to start from the display. Be sure to start from the tuner onto a tape. Recording a CD: Specifying Track Order (program edit) You can record... you want to record on side B in the display. 4 Press DISC 1 - 3 to choose a CD. 5 Turn the JOG dial (or press or on the remote) to choose a track. 6 Press ENTER/NEXT. To cancel program edit Press PLAY MODE repeatedly until the desired radio band appears. 3 Tune in the display. Recording...
Operating Instructions
Page 20
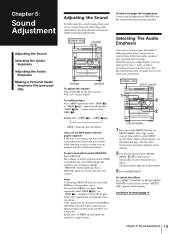
... 19 Chapter 5: Sound Adjustment The volume switches to power mode, DBFB is provided with DBFB or GROOVE activated when connecting an optional super woofer (Sony SA-W10, etc.) to full strength, the equalizer curve changes and the "GROOVE" button lights up. To get a powerful sound (GROOVE) ...in the display. With the press of the MENU buttons (or MUSIC MENU / on the remote) so that you desire. DISPLAY/DEMO 1 Press one of a single button, you store your stereo system, make the following audio adjustments. To cancel the effect Press EFFECT ON/OFF (or MUSIC ...
... 19 Chapter 5: Sound Adjustment The volume switches to power mode, DBFB is provided with DBFB or GROOVE activated when connecting an optional super woofer (Sony SA-W10, etc.) to full strength, the equalizer curve changes and the "GROOVE" button lights up. To get a powerful sound (GROOVE) ...in the display. With the press of the MENU buttons (or MUSIC MENU / on the remote) so that you desire. DISPLAY/DEMO 1 Press one of a single button, you store your stereo system, make the following audio adjustments. To cancel the effect Press EFFECT ON/OFF (or MUSIC ...
Operating Instructions
Page 22
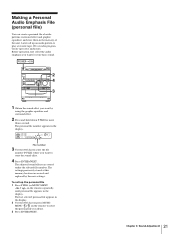
... personal file number appears in the memory of the unit. To call up the personal file 1 Press P FILE (or MUSIC MENU / on the remote) to select the personal file you want by the new settings. Before operation, first select the audio emphasis you want to select the file number.... 4 Press ENTER/NEXT. The last selected personal file appears in the display. 2 Use the JOG dial (or press MUSIC MENU / on the remote) repeatedly until personal file appears in the display. EN 21 Chapter 5: Sound Adjustment The settings previously stored at this memory location are stored under the...
... personal file number appears in the memory of the unit. To call up the personal file 1 Press P FILE (or MUSIC MENU / on the remote) to select the personal file you want by the new settings. Before operation, first select the audio emphasis you want to select the file number.... 4 Press ENTER/NEXT. The last selected personal file appears in the display. 2 Use the JOG dial (or press MUSIC MENU / on the remote) repeatedly until personal file appears in the display. EN 21 Chapter 5: Sound Adjustment The settings previously stored at this memory location are stored under the...
Operating Instructions
Page 23
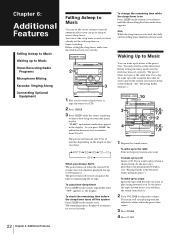
... off after 90 to play it from deck A. 2 Turn VOLUME to a CD Insert a CD. If you want to 10 minutes depending on the remote once. Before setting the sleep timer, make sure the clock has been set correctly. To wake up to the sound of time indication appears. To...Recording Radio Programs Microphone Mixing Karaoke: Singing Along Connecting Optional EN Equipment 22 Chapter 6: Additional Features Falling Asleep to Music You can set the stereo system to turn off even if you pause the tape or stop playing CD or tape. The music will hear the sound from a desired track,...
... off after 90 to play it from deck A. 2 Turn VOLUME to a CD Insert a CD. If you want to 10 minutes depending on the remote once. Before setting the sleep timer, make sure the clock has been set correctly. To wake up to the sound of time indication appears. To...Recording Radio Programs Microphone Mixing Karaoke: Singing Along Connecting Optional EN Equipment 22 Chapter 6: Additional Features Falling Asleep to Music You can set the stereo system to turn off even if you pause the tape or stop playing CD or tape. The music will hear the sound from a desired track,...
Operating Instructions
Page 29
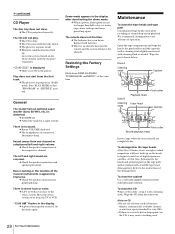
...distorted. There is no CD in the player. EN General The sound from an optional super woofer (Sony SA-W10, etc.) is dirty. Set DBFB off Adjust the sound of the demagnetizer. Sound comes from... woofer. "CD NO DISC" is inserted label side down. The player is in program or shuffle mode. Move the stereo system away from the first track. A power interruption occurred. The CD will have run down DISPLAY/DEMO, TUNER/BAND and MENU ...and tuner presetting again. Disconnect them. Remove the obstacle. The CD is an obstacle between the remote and the system.
...distorted. There is no CD in the player. EN General The sound from an optional super woofer (Sony SA-W10, etc.) is dirty. Set DBFB off Adjust the sound of the demagnetizer. Sound comes from... woofer. "CD NO DISC" is inserted label side down. The player is in program or shuffle mode. Move the stereo system away from the first track. A power interruption occurred. The CD will have run down DISPLAY/DEMO, TUNER/BAND and MENU ...and tuner presetting again. Disconnect them. Remove the obstacle. The CD is an obstacle between the remote and the system.
Operating Instructions
Page 30
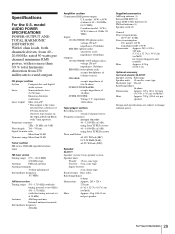
... Information Specifications For the U.S. projecting parts and controls Mass Approx. 8.2 kg (18 lb 1 oz) Optional accessory Surround speaker SS-SR10P Speaker system Full range Speaker units 10 cm dia., cone type Enclosure type Closed Rated impedance 16 ohms Dimensions Mass Approx. 125 x 160 x 110 mm... (5 x 63/8 x 43/8 in) (w/h/d/) Approx. 700 g (1 lb 8 oz) per speaker Supplied accessories AM loop antenna (1) Remote RM-SD50 (1) Sony SUM-3 (NS) batteries (2) FM lead antenna (1) Speaker cords (2) General Power requirements 120 V AC, 60 Hz Power consumption U.S.
... Information Specifications For the U.S. projecting parts and controls Mass Approx. 8.2 kg (18 lb 1 oz) Optional accessory Surround speaker SS-SR10P Speaker system Full range Speaker units 10 cm dia., cone type Enclosure type Closed Rated impedance 16 ohms Dimensions Mass Approx. 125 x 160 x 110 mm... (5 x 63/8 x 43/8 in) (w/h/d/) Approx. 700 g (1 lb 8 oz) per speaker Supplied accessories AM loop antenna (1) Remote RM-SD50 (1) Sony SUM-3 (NS) batteries (2) FM lead antenna (1) Speaker cords (2) General Power requirements 120 V AC, 60 Hz Power consumption U.S.
Operating Instructions
Page 32
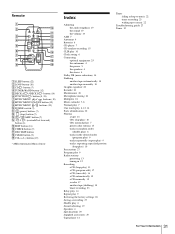
Remote 1 2 !º !¡ 3 !™ 4 !£ 5 !¢ !∞ 6 !§ 7 !¶ 8 !• 9 !ª 1 SLEEP button (22) 2 LOOP button (10) 3 CD button (7) 4 TUNER/BAND button (12) 5 DECK A /DECK B button (...
Remote 1 2 !º !¡ 3 !™ 4 !£ 5 !¢ !∞ 6 !§ 7 !¶ 8 !• 9 !ª 1 SLEEP button (22) 2 LOOP button (10) 3 CD button (7) 4 TUNER/BAND button (12) 5 DECK A /DECK B button (...


