

Limited Warranty (US Only)
Page 1
... of incidental or consequential damages, or allow limitations on how long an implied warranty lasts does not apply to any authorized Sony service facility. SONY SHALL NOT BE LIABLE FOR ANY INCIDENTAL OR CONSEQUENTIAL DAMAGES FOR BREACH OF ANY EXPRESS OR IMPLIED WARRANTY ON THIS PRODUCT.... LIMITED IN DURATION TO THE DURATION OF THIS WARRANTY. 4-557-172-02 General Stereo/Hifi Components/Tape Decks ® CD Players/Mini Disc Players/Audio Systems Hifi Audio LIMITED WARRANTY Sony Electronics Inc. ("Sony") warrants this Product is within 90 days of the date of one (1) year from the...
... of incidental or consequential damages, or allow limitations on how long an implied warranty lasts does not apply to any authorized Sony service facility. SONY SHALL NOT BE LIABLE FOR ANY INCIDENTAL OR CONSEQUENTIAL DAMAGES FOR BREACH OF ANY EXPRESS OR IMPLIED WARRANTY ON THIS PRODUCT.... LIMITED IN DURATION TO THE DURATION OF THIS WARRANTY. 4-557-172-02 General Stereo/Hifi Components/Tape Decks ® CD Players/Mini Disc Players/Audio Systems Hifi Audio LIMITED WARRANTY Sony Electronics Inc. ("Sony") warrants this Product is within 90 days of the date of one (1) year from the...

Operating Instructions
Page 1
EN 2 Sony Corporation Printed in Malaysia
EN 2 Sony Corporation Printed in Malaysia

Operating Instructions
Page 2
3-810-989-51(1) Mini Hi-Fi Component System Operating Instructions ENEN f MHC-771 ©1996 by Sony Corporation 3
3-810-989-51(1) Mini Hi-Fi Component System Operating Instructions ENEN f MHC-771 ©1996 by Sony Corporation 3
Operating Instructions
Page 3
...to persons. Thank you play a CD with sound effect like sampler play •The MHC-771 consists of optical instruments with fun features. NOTICE FOR THE CUSTOMERS IN THE U. Speaker system: SS-H771 2 Refer servicing to provide reasonable protection against harmful interference in a residential ...•An amplifier that to radio communications. Consult the dealer or an experienced radio/TV technician for purchasing the Sony Mini Hi-Fi Component System. To avoid electrical shock, do not expose the unit to comply with the instructions, may be determined by ...
...to persons. Thank you play a CD with sound effect like sampler play •The MHC-771 consists of optical instruments with fun features. NOTICE FOR THE CUSTOMERS IN THE U. Speaker system: SS-H771 2 Refer servicing to provide reasonable protection against harmful interference in a residential ...•An amplifier that to radio communications. Consult the dealer or an experienced radio/TV technician for purchasing the Sony Mini Hi-Fi Component System. To avoid electrical shock, do not expose the unit to comply with the instructions, may be determined by ...
Operating Instructions
Page 4
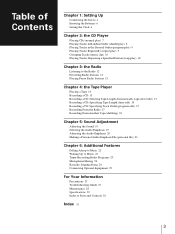
Table of Contents Chapter 1: Setting Up Connecting the Stereo 4 Inserting the Batteries 6 Setting the Clock 6 Chapter 2: the CD Player Playing CDs (normal play) 7 Playing Tracks in Random Order (shuffle play) 8 Playing Tracks in the Desired Order (program play) 9 Playing Tracks Repeatedly (repeat play) 9 Grouping Tracks (music clip) 10 Playing Tracks: Repeating a Specified Portion (loop play) 10 Chapter 3: the Radio Listening to the Radio 12 Presetting Radio Stations 13 Playing Preset Radio Stations 13 Chapter 4: the Tape Player Playing a Tape 14 Recording a CD 15 Recording a CD: ...
Table of Contents Chapter 1: Setting Up Connecting the Stereo 4 Inserting the Batteries 6 Setting the Clock 6 Chapter 2: the CD Player Playing CDs (normal play) 7 Playing Tracks in Random Order (shuffle play) 8 Playing Tracks in the Desired Order (program play) 9 Playing Tracks Repeatedly (repeat play) 9 Grouping Tracks (music clip) 10 Playing Tracks: Repeating a Specified Portion (loop play) 10 Chapter 3: the Radio Listening to the Radio 12 Presetting Radio Stations 13 Playing Preset Radio Stations 13 Chapter 4: the Tape Player Playing a Tape 14 Recording a CD 15 Recording a CD: ...
Operating Instructions
Page 5
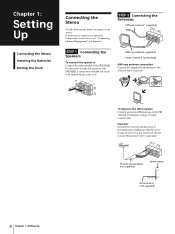
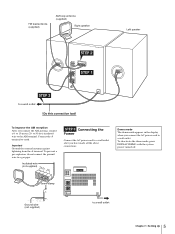
... improve the FM reception Connect an external FM antenna to the stereo, see "Connecting Optional Equipment" in Chapter 6. If you want to connect any optional components to the FM 75Ω and y terminals, using a 75-ohm coaxial cable. FM 75Ω AM 75-ohm coaxial cable (not supplied) Screw clamp y Ground...
... improve the FM reception Connect an external FM antenna to the stereo, see "Connecting Optional Equipment" in Chapter 6. If you want to connect any optional components to the FM 75Ω and y terminals, using a 75-ohm coaxial cable. FM 75Ω AM 75-ohm coaxial cable (not supplied) Screw clamp y Ground...
Operating Instructions
Page 6
... power cord to a gas pipe. Connect the y terminal to a wall outlet !Do this connection last! To deactivate the demo mode, press DISPLAY/DEMO with the system power turned off. To improve the AM reception After you connect the AC power cord to the AM terminal. FM lead antenna (supplied) AM loop...
... power cord to a gas pipe. Connect the y terminal to a wall outlet !Do this connection last! To deactivate the demo mode, press DISPLAY/DEMO with the system power turned off. To improve the AM reception After you connect the AC power cord to the AM terminal. FM lead antenna (supplied) AM loop...
Operating Instructions
Page 7
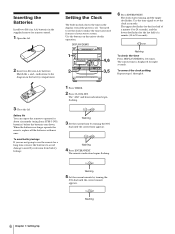
... ENTER/NEXT. The minutes indication begins flashing. You need to set the clock accurately. The upper dot flashes for the first half of your stereo system. To avoid battery leakage If you are not going to use the remote for a long time, remove the batteries to operate for the last half... of a minute (30 to utilize the timer-activated features of a minute (0 to 29 seconds), and the lower dot flashes for about six months (using Sony SUM-3 (NS) batteries) before the batteries run down. Setting the Clock The built-in clock shows the time in the display even if the power...
... ENTER/NEXT. The minutes indication begins flashing. You need to set the clock accurately. The upper dot flashes for the first half of your stereo system. To avoid battery leakage If you are not going to use the remote for a long time, remove the batteries to operate for the last half... of a minute (30 to utilize the timer-activated features of a minute (0 to 29 seconds), and the lower dot flashes for about six months (using Sony SUM-3 (NS) batteries) before the batteries run down. Setting the Clock The built-in clock shows the time in the display even if the power...
Operating Instructions
Page 8
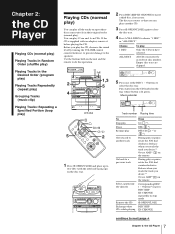
Empty disc trays are skipped. Before you play the CD, decrease the sound level by turning the VOLUME control counterclockwise, to prevent damage to a previous track Select a particular CD directly Remove the CD Exchange other CDs while playing Press π ( *1) fl ( *1) fl (CD *1) *1 or During play or pause, rotate the JOG dial clockwise. CLIP CD 12 345 678 ALL 1 DISC DOLBY NR OFF 63 125 250 500 1k 2k 4k 8k 16k(Hz) VOLUME 5 Press one of disc number. Music calendar CLIP CD 12 345 678 ALL 1 DISC DOLBY NR OFF 63 125 250 500 1k 2k 4k 8k 16k(Hz) VOLUME EN ...
Empty disc trays are skipped. Before you play the CD, decrease the sound level by turning the VOLUME control counterclockwise, to prevent damage to a previous track Select a particular CD directly Remove the CD Exchange other CDs while playing Press π ( *1) fl ( *1) fl (CD *1) *1 or During play or pause, rotate the JOG dial clockwise. CLIP CD 12 345 678 ALL 1 DISC DOLBY NR OFF 63 125 250 500 1k 2k 4k 8k 16k(Hz) VOLUME 5 Press one of disc number. Music calendar CLIP CD 12 345 678 ALL 1 DISC DOLBY NR OFF 63 125 250 500 1k 2k 4k 8k 16k(Hz) VOLUME EN ...
Operating Instructions
Page 9
To select a particular CD, press DISC SKIP EX-CHANGE while you press DISPLAY/DEMO again, the display shows the clock display for each track is not selected. Use the buttons on one CD or all CDs in a track release it at the desired point. Notes •You cannot check the total playing time during shuffle play. When a CD is in the player, you can be able to start listening to the CD without listening , then press or on the remote and quickly in random order. Tracks numbered in excess of 20 are provided on the DISC buttons for eight seconds and returns to the ...
To select a particular CD, press DISC SKIP EX-CHANGE while you press DISPLAY/DEMO again, the display shows the clock display for each track is not selected. Use the buttons on one CD or all CDs in a track release it at the desired point. Notes •You cannot check the total playing time during shuffle play. When a CD is in the player, you can be able to start listening to the CD without listening , then press or on the remote and quickly in random order. Tracks numbered in excess of 20 are provided on the DISC buttons for eight seconds and returns to the ...
Operating Instructions
Page 10
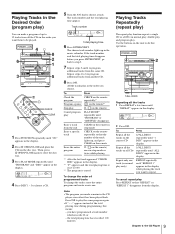
CLIP CD DOLBY NR OFF 63 125 250 500 1k 2k 4k 8k 16k(Hz) DISC PROGRAM VOLUME 4 Press DISC 1 - 3 to choose a CD. 5 Turn the JOG dial to be played. To change the order, erase the entire program and create a new one track (in normal play only) REPEAT repeatedly until "PROGRAM" or "SHUFFLE" disappears CLEAR on the remote in stop mode or twice while playing *1 After the last track appeared "CHECK END" appears in the display. *2 "P" appears and the total playing time is reset to 0.00. *3 The program is erased. Use the buttons on all CDs in normal play, shuffle play and ...
CLIP CD DOLBY NR OFF 63 125 250 500 1k 2k 4k 8k 16k(Hz) DISC PROGRAM VOLUME 4 Press DISC 1 - 3 to choose a CD. 5 Turn the JOG dial to be played. To change the order, erase the entire program and create a new one track (in normal play only) REPEAT repeatedly until "PROGRAM" or "SHUFFLE" disappears CLEAR on the remote in stop mode or twice while playing *1 After the last track appeared "CHECK END" appears in the display. *2 "P" appears and the total playing time is reset to 0.00. *3 The program is erased. Use the buttons on all CDs in normal play, shuffle play and ...
Operating Instructions
Page 11
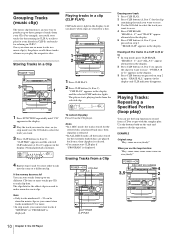
Storing Tracks in a Clip POWERnON 3 1 EN 2 1 Press FUNCTION repeatedly until "CD" appears in the display. 2 Play the track you want to store, or (in the display to let you know when clips are stored for the clip containing the track you want to erase. 3 Use the JOG dial to select the track you want to erase. 4 Press CLIP ERASE. CLIP A CD 12 345 678 ALL DISC DOLBY NR OFF 63 125 250 500 1k 2k 4k 8k 16k(Hz) VOLUME 4 Repeat steps 2 and 3 to make room for a new clip. Playing tracks in a clip (CLIP PLAY) CLIP indicator(s) light in stop mode, press CLIP ERASE. CD 3 CLIP A ALL DISC S ...
Storing Tracks in a Clip POWERnON 3 1 EN 2 1 Press FUNCTION repeatedly until "CD" appears in the display. 2 Play the track you want to store, or (in the display to let you know when clips are stored for the clip containing the track you want to erase. 3 Use the JOG dial to select the track you want to erase. 4 Press CLIP ERASE. CLIP A CD 12 345 678 ALL DISC DOLBY NR OFF 63 125 250 500 1k 2k 4k 8k 16k(Hz) VOLUME 4 Repeat steps 2 and 3 to make room for a new clip. Playing tracks in a clip (CLIP PLAY) CLIP indicator(s) light in stop mode, press CLIP ERASE. CD 3 CLIP A ALL DISC S ...
Operating Instructions
Page 12
Then, press § OPEN/CLOSE again to close the disc tray. Select NORMAL or RHYTHM while Stop playing or pause playing. for NORMAL and RHYTHM, see "What is the difference between NORMAL and RHYTHM?" What is played and release when until "CD" appears in restarting point of normal play when the loop effect ends. EN 11 Chapter 2: the CD Player NORMAL: Normal CD play resumes from the same point as you have started the loop play resumes. NORMAL or RHYTHM has five modes respectively, depending on is not lit green, press DISC SKIP EX-CHANGE repeatedly so that it . The display ...
Then, press § OPEN/CLOSE again to close the disc tray. Select NORMAL or RHYTHM while Stop playing or pause playing. for NORMAL and RHYTHM, see "What is the difference between NORMAL and RHYTHM?" What is played and release when until "CD" appears in restarting point of normal play when the loop effect ends. EN 11 Chapter 2: the CD Player NORMAL: Normal CD play resumes from the same point as you have started the loop play resumes. NORMAL or RHYTHM has five modes respectively, depending on is not lit green, press DISC SKIP EX-CHANGE repeatedly so that it . The display ...
Operating Instructions
Page 13
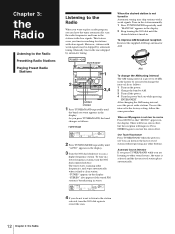
POWERnON ENTER/NEXT 1 2 3,4 MONO STEREO 1 Press TUNER/BAND repeatedly until the desired station is tuned in. AM To change the interval, do not want to listen to the station selected, turn the JOG dial counterclockwise. If you need to change the AM tuning interval The AM tuning interval is selected and the last received station plays automatically. 12 Chapter 3: the Radio To reset the interval to 10 kHz in the factory. Press STEREO again to other buttons. Automatic Source Selection If you press TUNER/BAND while you are listening to restore the stereo effect. CLIP TUNER ...
POWERnON ENTER/NEXT 1 2 3,4 MONO STEREO 1 Press TUNER/BAND repeatedly until the desired station is tuned in. AM To change the interval, do not want to listen to the station selected, turn the JOG dial counterclockwise. If you need to change the AM tuning interval The AM tuning interval is selected and the last received station plays automatically. 12 Chapter 3: the Radio To reset the interval to 10 kHz in the factory. Press STEREO again to other buttons. Automatic Source Selection If you press TUNER/BAND while you are listening to restore the stereo effect. CLIP TUNER ...

Operating Instructions
Page 14
You can store radio frequencies in the tuner's memory to tune in your favorite stations quickly. If not, press TUNER MEMORY again so that "PRESET" appears in the display. EN 13 Chapter 3: the Radio POWERnON 1 4 2 3 1 Tune in a station you have preset the stations, use the JOG dial to quickly tune in your favorite stations. CLIP TUNER 1 TUNED STEREO 63 125 250 500 1k 2k 4k 8k 16k(Hz) AUTO VOLUME Preset channel number 3 Turn the JOG dial to 4 for presetting stations. To erase a stored station Store a new station at the preset channel number you want to store in...
You can store radio frequencies in the tuner's memory to tune in your favorite stations quickly. If not, press TUNER MEMORY again so that "PRESET" appears in the display. EN 13 Chapter 3: the Radio POWERnON 1 4 2 3 1 Tune in a station you have preset the stations, use the JOG dial to quickly tune in your favorite stations. CLIP TUNER 1 TUNED STEREO 63 125 250 500 1k 2k 4k 8k 16k(Hz) AUTO VOLUME Preset channel number 3 Turn the JOG dial to 4 for presetting stations. To erase a stored station Store a new station at the preset channel number you want to store in...
Operating Instructions
Page 15
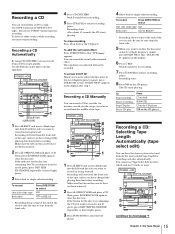
...or "ß" appears in succession (relay play) Relay play Press DIRECTION to select One side of the tape in the deck, the system will start playing from Dolby Laboratories Licensing Corporation. To cancel relay play Press DIRECTION repeatedly until "RELAY" appears in deck A or B...º ( *) for front side , ( *) for reverse side Remove the § EJECT cassette * Remote To control with the Dolby* B-type noise reduction system Press DOLBY NR button so that "DOLBY NR B" appears in the deck. Chapter 4: the Tape Player Playing a Tape Recording a CD Recording a CD: Selecting ...
...or "ß" appears in succession (relay play) Relay play Press DIRECTION to select One side of the tape in the deck, the system will start playing from Dolby Laboratories Licensing Corporation. To cancel relay play Press DIRECTION repeatedly until "RELAY" appears in deck A or B...º ( *) for front side , ( *) for reverse side Remove the § EJECT cassette * Remote To control with the Dolby* B-type noise reduction system Press DOLBY NR button so that "DOLBY NR B" appears in the deck. Chapter 4: the Tape Player Playing a Tape Recording a CD Recording a CD: Selecting ...
Operating Instructions
Page 16
... by for the disc tray containing the CD you want to close the disc tray. Make sure the tabs on the cassette have the stereo system select and indicate the most suitable tape length for the disc tray containing the CD you must stop recording Press π on the CD player...
... by for the disc tray containing the CD you want to close the disc tray. Make sure the tabs on the cassette have the stereo system select and indicate the most suitable tape length for the disc tray containing the CD you must stop recording Press π on the CD player...
Operating Instructions
Page 17
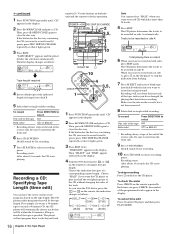
... One side of the tape Both sides* Press DIRECTION to release recording pause. To cancel time edit Press π on the cassette have the stereo system create programs based on the remote repeatedly. Then, press § OPEN/CLOSE again to record on both sides, press EDIT again. Tracks to be recorded...
... One side of the tape Both sides* Press DIRECTION to release recording pause. To cancel time edit Press π on the cassette have the stereo system create programs based on the remote repeatedly. Then, press § OPEN/CLOSE again to record on both sides, press EDIT again. Tracks to be recorded...
Operating Instructions
Page 18
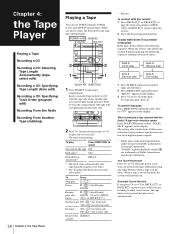
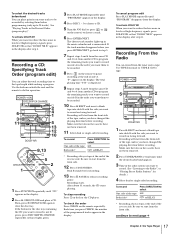
Use the buttons on the remote repeatedly. POWERnON DISC SKIP EX-CHANGE π 2 6 4 1 3 11 5 13 12 10 DOLBY NR CHECK 1 8,13 5 2 1 Press FUNCTION repeatedly until "PROGRAM" appears in the display. 4 Press DISC 1 - 3 to reduce the hiss noise in low-level high-frequency signals, press DOLBY NR so that "DOLBY NR B" appears in the display after step 8. If the button for details.) 4 Select dual or single-sided recording. If the track number disappears before recording. Recording starts. After about 10 seconds, the CD starts playing. Each time you want to record on ...
Use the buttons on the remote repeatedly. POWERnON DISC SKIP EX-CHANGE π 2 6 4 1 3 11 5 13 12 10 DOLBY NR CHECK 1 8,13 5 2 1 Press FUNCTION repeatedly until "PROGRAM" appears in the display. 4 Press DISC 1 - 3 to reduce the hiss noise in low-level high-frequency signals, press DOLBY NR so that "DOLBY NR B" appears in the display after step 8. If the button for details.) 4 Select dual or single-sided recording. If the track number disappears before recording. Recording starts. After about 10 seconds, the CD starts playing. Each time you want to record on ...

Operating Instructions
Page 19
Recording and playback will start from the front side of the tape, unless you have changed the playing direction before recording. Indication A ß RELAY Operation Dubbing stops at high speed. The tape starts dubbing at the end of the reverse side. Use TYPE I (normal) or TYPE II (CrO2) tape for recording. Make sure the tabs on the cassette have not been removed. 2 Press FUNCTION repeatedly until the other deck. To record One side of the tape Both sides* Press DIRECTION to start from the reverse side in RELAY and ß mode, dubbing will start playback. Be ...
Recording and playback will start from the front side of the tape, unless you have changed the playing direction before recording. Indication A ß RELAY Operation Dubbing stops at high speed. The tape starts dubbing at the end of the reverse side. Use TYPE I (normal) or TYPE II (CrO2) tape for recording. Make sure the tabs on the cassette have not been removed. 2 Press FUNCTION repeatedly until the other deck. To record One side of the tape Both sides* Press DIRECTION to start from the reverse side in RELAY and ß mode, dubbing will start playback. Be ...
