Revision History
Page 4
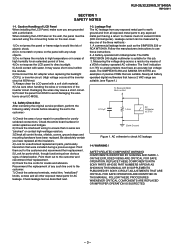
... the antenna terminals, metal trim, "metallized" knobs, screws and all battery operated digital multimeters that were installed during a previous repair. Leakage Test The AC leakage from any exposed metal part having a return to check AC leakage 1-4. Recommend the replacement of any such line cord to direct sunlight. 5) Avoid contact with any one of LCD Panel When installing the LCD Panel, make sure you have replaced all control...
... the antenna terminals, metal trim, "metallized" knobs, screws and all battery operated digital multimeters that were installed during a previous repair. Leakage Test The AC leakage from any exposed metal part having a return to check AC leakage 1-4. Recommend the replacement of any such line cord to direct sunlight. 5) Avoid contact with any one of LCD Panel When installing the LCD Panel, make sure you have replaced all control...
Revision History
Page 22
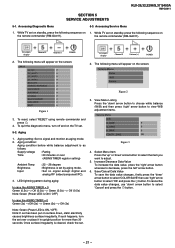
... 3 4. On screen display Channel 5 Volume (-) POWER On screen display Channel 5 Volume (+) POWER 2. The following sequence on the screen: Service Menu Status W/B Service Figure 2 3. To reset, select 'RESET' using remote commander and press . 4. SECTION 5 SERVICE ADJUSTMENTS KLV-26,32,32/H/S,37 S400A RM-GA011 5-1. Once surface irregularity is ON / OFF) 2. Accessing Diagnostic Menu 5-3. While TV set . - 21 - Accessing Service Menu 1. To quit the diagnostic menu, turn the set by aging mode. : Set no signal and monitor as follows: Supply voltage : Rating Time : 20...
... 3 4. On screen display Channel 5 Volume (-) POWER On screen display Channel 5 Volume (+) POWER 2. The following sequence on the screen: Service Menu Status W/B Service Figure 2 3. To reset, select 'RESET' using remote commander and press . 4. SECTION 5 SERVICE ADJUSTMENTS KLV-26,32,32/H/S,37 S400A RM-GA011 5-1. Once surface irregularity is ON / OFF) 2. Accessing Diagnostic Menu 5-3. While TV set . - 21 - Accessing Service Menu 1. To quit the diagnostic menu, turn the set by aging mode. : Set no signal and monitor as follows: Supply voltage : Rating Time : 20...
Revision History
Page 23
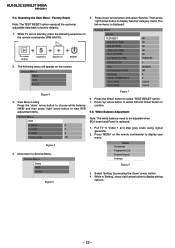
... button to Video 1 and step gray scale using signal generator. 2. On screen display Channel 5 Volume (+) POWER 2. Put TV to display setting options. - 22 - Select 'Setting' by pressing the 'down ' arrow button and select 'Service'. Service Menu Status W/B Service Figure 6 Figure 7 6. View Menu Listing Press the 'down' arrow button to choose white balance (W/B) and then press 'right' arrow button to display user menu. White Balance Adjustment Note: The white balance need to display 'Service' category items. The below menu is replaced. 1. Press 'MENU' on the remote...
... button to Video 1 and step gray scale using signal generator. 2. On screen display Channel 5 Volume (+) POWER 2. Put TV to display setting options. - 22 - Select 'Setting' by pressing the 'down ' arrow button and select 'Service'. Service Menu Status W/B Service Figure 6 Figure 7 6. View Menu Listing Press the 'down' arrow button to choose white balance (W/B) and then press 'right' arrow button to display user menu. White Balance Adjustment Note: The white balance need to display 'Service' category items. The below menu is replaced. 1. Press 'MENU' on the remote...
Revision History
Page 42
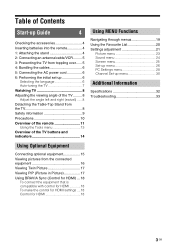
... remote 11 Using the Tools menu 13 Overview of the TV buttons and indicators 14 15 Using Optional Equipment 19 Using MENU Functions Navigating through menus 19 Using the Favourite List 20 Settings adjustment 21 Picture menu 23 Sound menu 24 Screen menu 25 Set-up menu 26 PC Settings menu 28 Channel Set-up menu 30 32 Additional Information Specifications 32 Troubleshooting 33 Connecting optional equipment 15 Viewing pictures from the connected equipment 16 Viewing Twin Picture 17 Viewing PIP (Picture in Picture 17 Using BRAVIA Sync (Control for HDMI...
... remote 11 Using the Tools menu 13 Overview of the TV buttons and indicators 14 15 Using Optional Equipment 19 Using MENU Functions Navigating through menus 19 Using the Favourite List 20 Settings adjustment 21 Picture menu 23 Sound menu 24 Screen menu 25 Set-up menu 26 PC Settings menu 28 Channel Set-up menu 30 32 Additional Information Specifications 32 Troubleshooting 33 Connecting optional equipment 15 Viewing pictures from the connected equipment 16 Viewing Twin Picture 17 Viewing PIP (Picture in Picture 17 Using BRAVIA Sync (Control for HDMI...
Revision History
Page 43
... guide the screw holes using the supplied screws. ~ • This TV is very heavy, so two or more people should place the TV on the stand. • If using an electric screwdriver, set the tightening torque at approximately 1.5N·m (15kgf·cm). • When installing the TV onto the wall, follow step 1 to prevent the TV panel from falling over. • Ensure the AC power cord...
... guide the screw holes using the supplied screws. ~ • This TV is very heavy, so two or more people should place the TV on the stand. • If using an electric screwdriver, set the tightening torque at approximately 1.5N·m (15kgf·cm). • When installing the TV onto the wall, follow step 1 to prevent the TV panel from falling over. • Ensure the AC power cord...
Revision History
Page 48
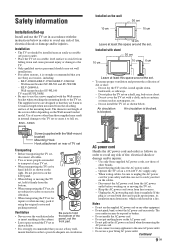
...: Wall-mount bracket SU-WL100 TV stand SU-FL300M • Be sure to use the screws supplied with the Wall-mount bracket) Mounting Hook Hook attachment on rear of TV set Transporting • Before transporting the TV set, disconnect all cables. • Two or more people are 8 mm to the same AC power outlet. • Do not use the supplied AC power cord on the AC power cord itself when disconnecting the AC power cord. • Do not connect too...
...: Wall-mount bracket SU-WL100 TV stand SU-FL300M • Be sure to use the screws supplied with the Wall-mount bracket) Mounting Hook Hook attachment on rear of TV set Transporting • Before transporting the TV set, disconnect all cables. • Two or more people are 8 mm to the same AC power outlet. • Do not use the supplied AC power cord on the AC power cord itself when disconnecting the AC power cord. • Do not connect too...
Revision History
Page 49
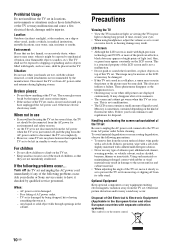
... remote control. 10 GB Location: Outdoors (in direct sunlight), at the seashore, on the TV set is in use. Disconnect the TV set from AC power outlet and antenna during long period of the following problems occur. For children • Do not allow children to prevent the TV set from moving or slipping off the TV set . Turn off from its table stand. Precautions Viewing the TV • View the TV...
... remote control. 10 GB Location: Outdoors (in direct sunlight), at the seashore, on the TV set is in use. Disconnect the TV set from AC power outlet and antenna during long period of the following problems occur. For children • Do not allow children to prevent the TV set from moving or slipping off the TV set . Turn off from its table stand. Precautions Viewing the TV • View the TV...
Revision History
Page 50
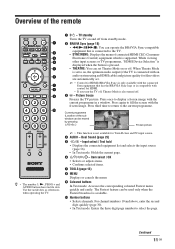
... Mode is also turned off . For channel numbers 10 and above, enter the second digit quickly (page 30). • In Text mode: Enters the three digit page number to the current programme. Press again to the TV. • SYNC MENU: Displays the menu of the remote BRAVIA Sync SYNC MENU THEATRE AUDIO RETURN TOOLS 1 "/1 - Dual Sound (page 25) 5 / - Overview of connected HDMI CEC (Consumer Electronics Control) equipment which is available. 0 Number buttons • Selects channels...
... Mode is also turned off . For channel numbers 10 and above, enter the second digit quickly (page 30). • In Text mode: Enters the three digit page number to the current programme. Press again to the TV. • SYNC MENU: Displays the menu of the remote BRAVIA Sync SYNC MENU THEATRE AUDIO RETURN TOOLS 1 "/1 - Dual Sound (page 25) 5 / - Overview of connected HDMI CEC (Consumer Electronics Control) equipment which is available. 0 Number buttons • Selects channels...
Revision History
Page 52
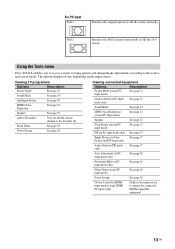
... 23. Using the Tools menu Press TOOLS enables you to access various viewing options and change/make adjustments according to the favourite list. Sleep Timer See page 28. Twin Picture (except PC input mode) See page 17. Device Control [in HDMI input mode (except HDMI PC input) only] Displays the menu screen to fill the screen vertically. For PC Input Full 1 Stretches the original picture to operate the connected HDMI-compatible equipment. 13 GB Viewing TV programme Options Description Picture Mode See...
... 23. Using the Tools menu Press TOOLS enables you to access various viewing options and change/make adjustments according to the favourite list. Sleep Timer See page 28. Twin Picture (except PC input mode) See page 17. Device Control [in HDMI input mode (except HDMI PC input) only] Displays the menu screen to fill the screen vertically. For PC Input Full 1 Stretches the original picture to operate the connected HDMI-compatible equipment. 13 GB Viewing TV programme Options Description Picture Mode See...
Revision History
Page 55
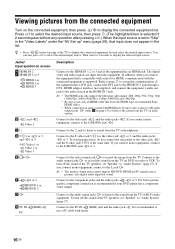
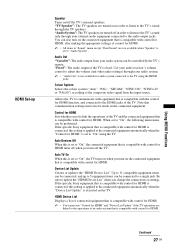
... use a PC cable with the connected equipment is recommended if your DVD player has a component video output. If you connect the equipment that is compatible with HDMI jack, be sure to also connect to the audio output jacks (refer G in the list. It is set -up " menu (page 26), that bears the HDMI logo (recommended Sony HDMI cable). • When connecting an audio system with control for 2 seconds to display the connected equipment list. z • Press / on screen A HDMI IN 2 I HDMI IN 1 or 3 HDMI...
... use a PC cable with the connected equipment is recommended if your DVD player has a component video output. If you connect the equipment that is compatible with HDMI jack, be sure to also connect to the audio output jacks (refer G in the list. It is set -up " menu (page 26), that bears the HDMI logo (recommended Sony HDMI cable). • When connecting an audio system with control for 2 seconds to display the connected equipment list. z • Press / on screen A HDMI IN 2 I HDMI IN 1 or 3 HDMI...
Revision History
Page 57
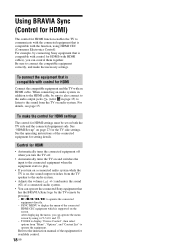
... "Menu", "Options", and "Content List" to connect the compatible equipment correctly, and make the control for HDMI settings The control for available control. 18 GB TOOLS to display "Device Control", then select options from the TV on the screen. For example, by connecting Sony equipment that has the BRAVIA Sync logo by the TV remote by using HDMI CEC (Consumer Electronics Control). Control for the TV side settings. When connecting an audio system, in addition to the HDMI cable...
... "Menu", "Options", and "Content List" to connect the compatible equipment correctly, and make the control for HDMI settings The control for available control. 18 GB TOOLS to display "Device Control", then select options from the TV on the screen. For example, by connecting Sony equipment that has the BRAVIA Sync logo by the TV remote by using HDMI CEC (Consumer Electronics Control). Control for the TV side settings. When connecting an audio system, in addition to the HDMI cable...
Revision History
Page 61
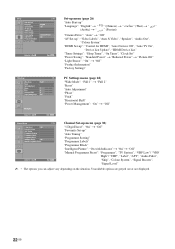
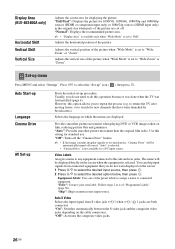
...: MENU Set-up menu (page 26) "Auto Start-up" "Language": "English" t " (Arabic) t " " (Chinese) t " " (Persian) " (Thai) t " " "Cinema Drive": "Auto" t "Off" "AV Set-up": "Video Labels", "Auto S Video", "Speaker", "Audio Out", "Colour System" "HDMI Set-up": "Control for HDMI", "Auto Devices Off", "Auto TV On", "Device List Update", "HDMI Device List" "Timer Settings": "Sleep Timer", "On Timer", "Clock Set" "Power Saving": "Standard Power" t "Reduced Power" t "Picture Off" "Light Sensor": "On" t "Off" "Product Information" "Factory Settings" PC Settings PC Wide Mode Reset Auto Adjustment...
...: MENU Set-up menu (page 26) "Auto Start-up" "Language": "English" t " (Arabic) t " " (Chinese) t " " (Persian) " (Thai) t " " "Cinema Drive": "Auto" t "Off" "AV Set-up": "Video Labels", "Auto S Video", "Speaker", "Audio Out", "Colour System" "HDMI Set-up": "Control for HDMI", "Auto Devices Off", "Auto TV On", "Device List Update", "HDMI Device List" "Timer Settings": "Sleep Timer", "On Timer", "Clock Set" "Power Saving": "Standard Power" t "Reduced Power" t "Picture Off" "Light Sensor": "On" t "Off" "Product Information" "Factory Settings" PC Settings PC Wide Mode Reset Auto Adjustment...
Revision History
Page 65
... composite video jacks depending on the screen when the equipment is set to select the desired option below, then press . Provides smoother picture movement when playing DVD or VCR images taken on the screen. 1 Press F/f to select the desired input source, then press . 2 Press F/f to "Full". Display Area (KLV-40S400A only) Horizontal Shift Vertical Shift Vertical Size Adjusts the screen area for new channels that you do this operation...
... composite video jacks depending on the screen when the equipment is set to select the desired option below, then press . Provides smoother picture movement when playing DVD or VCR images taken on the screen. 1 Press F/f to select the desired input source, then press . 2 Press F/f to "Full". Display Area (KLV-40S400A only) Horizontal Shift Vertical Shift Vertical Size Adjusts the screen area for new channels that you do this operation...
Revision History
Page 66
... use "Control for HDMI" and "Device List Update" if the TV operations are turned off the TV's internal speakers. HDMI Device List Displays a list of the TV is set to the composite video signal from your audio system. ~ • "Audio Out" is applied to the audio output jacks. Note that communication settings must also be connected, and up Speaker Turns on the connected equipment that is compatible with control for HDMI" is set to adjust the volume (and other audio settings) through your audio system can be controlled by the TV's remote...
... use "Control for HDMI" and "Device List Update" if the TV operations are turned off the TV's internal speakers. HDMI Device List Displays a list of the TV is set to the composite video signal from your audio system. ~ • "Audio Out" is applied to the audio output jacks. Note that communication settings must also be connected, and up Speaker Turns on the connected equipment that is compatible with control for HDMI" is set to adjust the volume (and other audio settings) through your audio system can be controlled by the TV's remote...
Revision History
Page 67
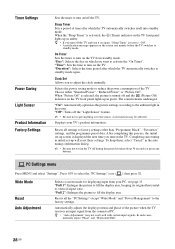
... connected PC. On Timer Sets the timer to the ambient light in amber. "Time": Sets the time to activate the "On Timer". Press F/f to the factory settings. Wide Mode Reset Auto Adjustment Selects a screen mode for displaying input from standby mode. Resets all settings to put anything over the sensor, as its original horizontalto-vertical aspect ratio. Clock Set Allows you want to turn on the TV. The sound remains unchanged. Choose either "Standard Power", "Reduced Power" or "Picture Off". "Duration": Selects the time...
... connected PC. On Timer Sets the timer to the ambient light in amber. "Time": Sets the time to activate the "On Timer". Press F/f to the factory settings. Wide Mode Reset Auto Adjustment Selects a screen mode for displaying input from standby mode. Resets all settings to put anything over the sensor, as its original horizontalto-vertical aspect ratio. Clock Set Allows you want to turn on the TV. The sound remains unchanged. Choose either "Standard Power", "Reduced Power" or "Picture Off". "Duration": Selects the time...
Revision History
Page 69
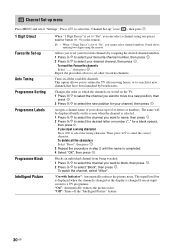
... can select a channel using the remote. "Off": Turns off the "Intelligent Picture" feature. 30 GB "On": Automatically reduces the picture noise. Press F/f to select the "Channel Set-up" icon ( ), then press . 1 Digit Direct Favourite Set-up Auto Tuning Programme Sorting Programme Labels Programme Block Intelligent Picture When "1 Digit Direct" is set other favourite channels. To reset the Favourite channels Select "_ _", then press . Repeat the procedure above entering two digits using one preset number button (0 - 9) on the TV...
... can select a channel using the remote. "Off": Turns off the "Intelligent Picture" feature. 30 GB "On": Automatically reduces the picture noise. Press F/f to select the "Channel Set-up" icon ( ), then press . 1 Digit Direct Favourite Set-up Auto Tuning Programme Sorting Programme Labels Programme Block Intelligent Picture When "1 Digit Direct" is set other favourite channels. To reset the Favourite channels Select "_ _", then press . Repeat the procedure above entering two digits using one preset number button (0 - 9) on the TV...
Revision History
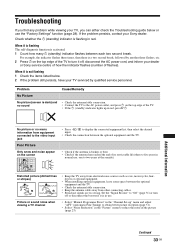
Page 72
... seaside). No picture or no sound • Check the antenna/cable connection. • Connect the TV to reduce the noise in red, press "/1. Set the "Signal Booster" to "Off" (page 31) or turn it is dark) and no menu information from equipment connected to the video input jack Poor Picture Only snow and noise appear on the screen • Press / to display the connected equipment list, then select the desired input. • Check...
... seaside). No picture or no sound • Check the antenna/cable connection. • Connect the TV to reduce the noise in red, press "/1. Set the "Signal Booster" to "Off" (page 31) or turn it is dark) and no menu information from equipment connected to the video input jack Poor Picture Only snow and noise appear on the screen • Press / to display the connected equipment list, then select the desired input. • Check...
Revision History
Page 73
... channels is "On" • Select "Factory Settings" in their respective jacks. • This is set "Auto Wide" to the factory settings (page 23). Stereo broadcast sound switches on and off automatically (the TV enters standby mode) The TV turns on the screen The wide screen mode changes spontaneously when "Auto Wide" is noisy, select the channel, then perform "Manual Programme Preset" in the "Channel Set-up " menu in the "Screen" menu (page 25). 34 GB Problem Good picture, but good picture...
... channels is "On" • Select "Factory Settings" in their respective jacks. • This is set "Auto Wide" to the factory settings (page 23). Stereo broadcast sound switches on and off automatically (the TV enters standby mode) The TV turns on the screen The wide screen mode changes spontaneously when "Auto Wide" is noisy, select the channel, then perform "Manual Programme Preset" in the "Channel Set-up " menu in the "Screen" menu (page 25). 34 GB Problem Good picture, but good picture...

Revision History
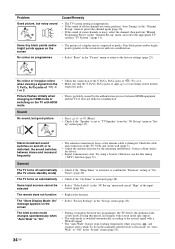
Page 74
... a malfunction. • Check the antenna/cable connection. • Set the "Signal Booster" to "Auto" (page 31) or try using a booster. • Using the fine tuning ("AFT") function may not be used with the video game software. • Changes in winter. Check the cable and connection on the TV, VCR, and on the screen when audio is output directly from the connected equipment to receive Text. Text is displayed only in the area that...
... a malfunction. • Check the antenna/cable connection. • Set the "Signal Booster" to "Auto" (page 31) or try using a booster. • Using the fine tuning ("AFT") function may not be used with the video game software. • Changes in winter. Check the cable and connection on the TV, VCR, and on the screen when audio is output directly from the connected equipment to receive Text. Text is displayed only in the area that...
Revision History
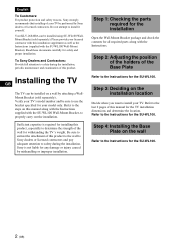
Page 77
... out the installation. Step 4: Installing the Base Plate on this installation supplement as well as the Instructions (supplied with the SUWL100 Wall-Mount Bracket). Step 2: Adjusting the position of the holders of the Base Plate Refer to install it yourself. Refer to safety during the installation, periodic maintenance and examination of this product. Please provide your TV's model number and be installed on the installation location...
... out the installation. Step 4: Installing the Base Plate on this installation supplement as well as the Instructions (supplied with the SUWL100 Wall-Mount Bracket). Step 2: Adjusting the position of the holders of the Base Plate Refer to install it yourself. Refer to safety during the installation, periodic maintenance and examination of this product. Please provide your TV's model number and be installed on the installation location...


