Revision History
Page 6
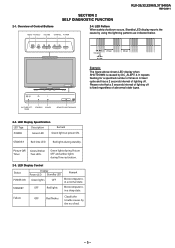
...SHUTDOWN is in a sleep state. Overview of lighting off is in 0.3sec/ cycle and has a 2 seconds interval of Control Buttons MENU TV/VIDEO VOLUME CHANNEL POWER 2-4. Timer Green/Amber : Two LEDs Green lights during Picture OFF and amber lights during standby. STANDBY Red: One ... When safety shutdown occurs, Standby LED display reports the cause by the no. KLV-26,32,32/H/S,37 S400A RM-GA011 SECTION 2 SELF DIAGNOSTIC FUNCTION 2-1. PICTURE OFF/ STANDBY POWER TIMER REMOTE/LIGHT SENSOR 2-2. LED Display Control Status POWER ON Display Power LED Standby LED Green lights OFF...
...SHUTDOWN is in a sleep state. Overview of lighting off is in 0.3sec/ cycle and has a 2 seconds interval of Control Buttons MENU TV/VIDEO VOLUME CHANNEL POWER 2-4. Timer Green/Amber : Two LEDs Green lights during Picture OFF and amber lights during standby. STANDBY Red: One ... When safety shutdown occurs, Standby LED display reports the cause by the no. KLV-26,32,32/H/S,37 S400A RM-GA011 SECTION 2 SELF DIAGNOSTIC FUNCTION 2-1. PICTURE OFF/ STANDBY POWER TIMER REMOTE/LIGHT SENSOR 2-2. LED Display Control Status POWER ON Display Power LED Standby LED Green lights OFF...
Revision History
Page 22
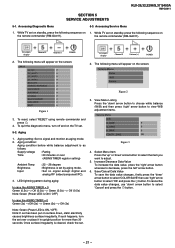
...TV... The following sequence on the remote commander (RM-GA011). To ... 0 BALANCER ERROR 0 HDMI ERROR 0 RESET 0 Figure 1 3. the remote commander (RM-GA011). While TV set . - 21 - LED lightning pattern during aging: In case the... AGING TIMER > 0 Green (0.5s) --> Off (0.5s) --> Green (0.5s) --> Off (0.5s) Note: Green (Power LED is ON / OFF) Note: If set by aging mode. : Set no signal and monitor as follows: Supply voltage.... To reset, select 'RESET' using remote commander and press . 4. View Menu ...
...TV... The following sequence on the remote commander (RM-GA011). To ... 0 BALANCER ERROR 0 HDMI ERROR 0 RESET 0 Figure 1 3. the remote commander (RM-GA011). While TV set . - 21 - LED lightning pattern during aging: In case the... AGING TIMER > 0 Green (0.5s) --> Off (0.5s) --> Green (0.5s) --> Off (0.5s) Note: Green (Power LED is ON / OFF) Note: If set by aging mode. : Set no signal and monitor as follows: Supply voltage.... To reset, select 'RESET' using remote commander and press . 4. View Menu ...
Revision History
Page 23
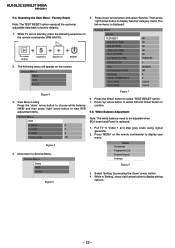
... RESET option resets all the customer adjustable data back to Service Menu. While TV set on standby, press the following menu will appear on the screen: Service Menu Status W/B Service 5. The following sequence on the remote commander to view W/B adjustment items. Service Menu W/B R_DRIVE 0 G_DRIVE 0 ...OPTIONS SERIAL NUMBER EDIT ETI1 CLEAR ETI2 CLEAR OK No No No No SHIBAURA 0 NORMAL Off 0 0 Cancel Cancel Figure 4 3. KLV-26,32,32/H/S,37 S400A RM-GA011 5-4. Select 'Setting' by pressing the 'down' arrow button. 4. White Balance Adjustment Note: The white balance need to...
... RESET option resets all the customer adjustable data back to Service Menu. While TV set on standby, press the following menu will appear on the screen: Service Menu Status W/B Service 5. The following sequence on the remote commander to view W/B adjustment items. Service Menu W/B R_DRIVE 0 G_DRIVE 0 ...OPTIONS SERIAL NUMBER EDIT ETI1 CLEAR ETI2 CLEAR OK No No No No SHIBAURA 0 NORMAL Off 0 0 Cancel Cancel Figure 4 3. KLV-26,32,32/H/S,37 S400A RM-GA011 5-4. Select 'Setting' by pressing the 'down' arrow button. 4. White Balance Adjustment Note: The white balance need to...
Revision History
Page 42
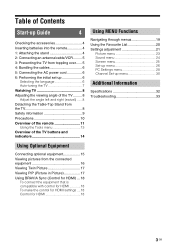
...up 6 Selecting the language 6 Auto-tuning the TV 7 Watching TV 8 Adjusting the viewing angle of the TV ......... 8 Adjust the angle left and right (swivel) ......8 Detaching the Table-Top Stand from the TV 8 Safety information 9 Precautions 10 Overview of the remote 11 Using the Tools menu 13 Overview of the...23 Sound menu 24 Screen menu 25 Set-up menu 26 PC Settings menu 28 Channel Set-up menu 30 32 Additional Information Specifications 32 Troubleshooting 33 Connecting optional equipment 15 Viewing pictures from the connected equipment 16 Viewing Twin Picture 17 Viewing PIP ...
...up 6 Selecting the language 6 Auto-tuning the TV 7 Watching TV 8 Adjusting the viewing angle of the TV ......... 8 Adjust the angle left and right (swivel) ......8 Detaching the Table-Top Stand from the TV 8 Safety information 9 Precautions 10 Overview of the remote 11 Using the Tools menu 13 Overview of the...23 Sound menu 24 Screen menu 25 Set-up menu 26 PC Settings menu 28 Channel Set-up menu 30 32 Additional Information Specifications 32 Troubleshooting 33 Connecting optional equipment 15 Viewing pictures from the connected equipment 16 Viewing Twin Picture 17 Viewing PIP ...
Revision History
Page 43
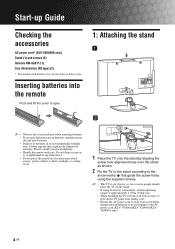
... ferrite cores, do not remove these cores. Do not drop or step on it . • Do not place the remote in an environmentally friendly way. Inserting batteries into the remote Push and lift the cover to open. 1: Attaching the stand ~ • Observe the correct polarity when inserting batteries. ... an electric screwdriver, set the tightening torque at approximately 1.5N·m (15kgf·cm). • When installing the TV onto the wall, follow step 1 to prevent the TV panel from falling over. • Ensure the AC power cord is away from screw holes during stand installation to avoid damage...
... ferrite cores, do not remove these cores. Do not drop or step on it . • Do not place the remote in an environmentally friendly way. Inserting batteries into the remote Push and lift the cover to open. 1: Attaching the stand ~ • Observe the correct polarity when inserting batteries. ... an electric screwdriver, set the tightening torque at approximately 1.5N·m (15kgf·cm). • When installing the TV onto the wall, follow step 1 to prevent the TV panel from falling over. • Ensure the AC power cord is away from screw holes during stand installation to avoid damage...
Revision History
Page 45
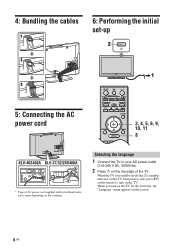
... in standby mode (the 1 (standby) indicator on the TV front panel is red), press "/1 on the remote to your AC power outlet (110-240 V AC, 50/60 Hz). 2 Press 1 on the countries. When you turn on the screen. 6 GB 4: Bundling the cables 6: ... MENU THEATRE AUDIO 3, 4, 5, 6, 9, RETURN TOOLS 10, 11 8 KLV-40S400A KLV-37/32/26S400A * Type of AC power cord supplied (with or without ferrite core) varies depending on the top edge of the TV. Selecting the language 1 Connect the TV to turn on the TV for the first time, the "Language" menu appears on the...
... in standby mode (the 1 (standby) indicator on the TV front panel is red), press "/1 on the remote to your AC power outlet (110-240 V AC, 50/60 Hz). 2 Press 1 on the countries. When you turn on the screen. 6 GB 4: Bundling the cables 6: ... MENU THEATRE AUDIO 3, 4, 5, 6, 9, RETURN TOOLS 10, 11 8 KLV-40S400A KLV-37/32/26S400A * Type of AC power cord supplied (with or without ferrite core) varies depending on the top edge of the TV. Selecting the language 1 Connect the TV to turn on the TV for the first time, the "Language" menu appears on the...
Revision History
Page 46
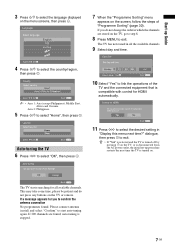
...-tuning again. If a message appears for HDMI automatically. If you do not press any buttons on the TV, go to step 8. 8 Press MENU to exit. If 100 channels are stored on the TV or remote. This may take some time, please be patient and do not change the order in "Display this menu... next time?" z • If "Yes" is selected and the TV is turned off by pressing 1 on the TV, or is disconnected from the AC power...
...-tuning again. If a message appears for HDMI automatically. If you do not press any buttons on the TV, go to step 8. 8 Press MENU to exit. If 100 channels are stored on the TV or remote. This may take some time, please be patient and do not change the order in "Display this menu... next time?" z • If "Yes" is selected and the TV is turned off by pressing 1 on the TV, or is disconnected from the AC power...
Revision History
Page 49
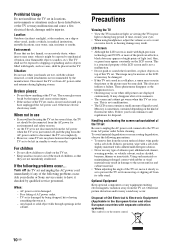
...Sony service centre to have it might be disconnected from its table stand. Environment: Places that require the TV set to be exposed to climb on top of this TV...TV • View the TV in moderate light, as to the TV set from the TV set from the screen surface/cabinet, wipe gently with rubber or vinyl materials may break by the manufacturer. This does not indicate a failure. The image may be uneven or the LCD screen may be placed on the remote... wet, with the cabinet removed, or with separate collection systems) This symbol is sometimes contained depending on a ship or...
...Sony service centre to have it might be disconnected from its table stand. Environment: Places that require the TV set to be exposed to climb on top of this TV...TV • View the TV in moderate light, as to the TV set from the TV set from the screen surface/cabinet, wipe gently with rubber or vinyl materials may break by the manufacturer. This does not indicate a failure. The image may be uneven or the LCD screen may be placed on the remote... wet, with the cabinet removed, or with separate collection systems) This symbol is sometimes contained depending on a ship or...
Revision History
Page 50
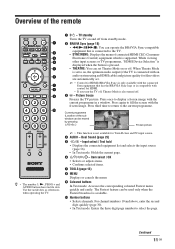
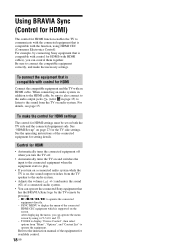
... BRAVIA Sync-compatible equipment that has the BRAVIA Sync logo or is compatible with the connected Sony equipment that is connected to display a frozen image with the frozen image. Item select / ...• Selects channels. Dual Sound (page 25) 5 / - Press third time to return to select the page. Press once to the TV. • SYNC MENU: Displays the menu of the remote BRAVIA Sync SYNC MENU...feature can set Theatre Mode on , the optimum audio output (if the TV is connected with an audio system using an HDMI cable) and picture quality for film videos are automatically ...
... BRAVIA Sync-compatible equipment that has the BRAVIA Sync logo or is compatible with the connected Sony equipment that is connected to display a frozen image with the frozen image. Item select / ...• Selects channels. Dual Sound (page 25) 5 / - Press third time to return to select the page. Press once to the TV. • SYNC MENU: Displays the menu of the remote BRAVIA Sync SYNC MENU...feature can set Theatre Mode on , the optimum audio output (if the TV is connected with an audio system using an HDMI cable) and picture quality for film videos are automatically ...
Revision History
Page 53
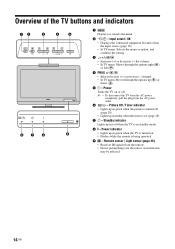
... AC power outlet. 6 / - Power Turns the TV on . • Flashes while the remote is being operated. 9 - Standby indicator Lights up in standby mode. 8 " - Input select / OK • Displays the connected equipment list and selects the input source (page 16). • In TV menu: Selects the menu or option, and confirms the... up in amber when the timer is in green when the picture is turned off . ~ • To disconnect the TV from the AC power completely, pull the plug from the remote. • Do not put anything over the sensor, as its function may be affected. 14 GB Picture Off / Timer...
... AC power outlet. 6 / - Power Turns the TV on . • Flashes while the remote is being operated. 9 - Standby indicator Lights up in standby mode. 8 " - Input select / OK • Displays the connected equipment list and selects the input source (page 16). • In TV menu: Selects the menu or option, and confirms the... up in amber when the timer is in green when the picture is turned off . ~ • To disconnect the TV from the AC power completely, pull the plug from the remote. • Do not put anything over the sensor, as its function may be affected. 14 GB Picture Off / Timer...
Revision History
Page 57
..., the sound output switches from the TV speaker to the audio system. • Adjusts the volume (2 +/-) and mutes the sound (%) of a connected audio system. • You can operate the connected Sony equipment that has the BRAVIA Sync logo by the TV remote by using HDMI CEC (Consumer Electronics ... . - For details, see page 15. TOOLS to display "Device Control", then select options from the TV on audio system. Refer to operate the connected equipment directly. - When connecting an audio system, in page 15) to listen to the sound from "Menu", "Options", and "Content List" to ...
..., the sound output switches from the TV speaker to the audio system. • Adjusts the volume (2 +/-) and mutes the sound (%) of a connected audio system. • You can operate the connected Sony equipment that has the BRAVIA Sync logo by the TV remote by using HDMI CEC (Consumer Electronics ... . - For details, see page 15. TOOLS to display "Device Control", then select options from the TV on audio system. Refer to operate the connected equipment directly. - When connecting an audio system, in page 15) to listen to the sound from "Menu", "Options", and "Content List" to ...
Revision History
Page 66
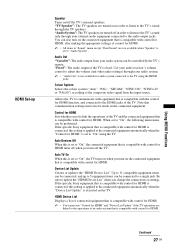
...on in "Sound" menu except "Dual Sound" are linked to the operations of control for HDMI is connected, this is set to "Audio System". If the specific Sony equipment that is compatible with control for audio system connected to the TV using the TV. Device List Update Creates or updates... equipment automatically when the "Control for HDMI. "Fixed": The audio output of the TV. Allows the TV to communicate with equipment that communication settings must also be controlled by the TV's remote. Note that is compatible with the control for HDMI. Control for HDMI Sets whether ...
...on in "Sound" menu except "Dual Sound" are linked to the operations of control for HDMI is connected, this is set to "Audio System". If the specific Sony equipment that is compatible with control for audio system connected to the TV using the TV. Device List Update Creates or updates... equipment automatically when the "Control for HDMI. "Fixed": The audio output of the TV. Allows the TV to communicate with equipment that communication settings must also be controlled by the TV's remote. Note that is compatible with the control for HDMI. Control for HDMI Sets whether ...
Revision History
Page 69
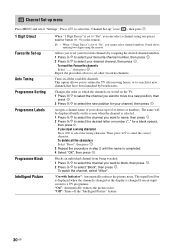
...then press . Tunes in all the characters Select "Reset", then press . 3 Repeat the procedure in which the channels are stored on the TV. 1 Press F/f to select the channel you input a wrong character Press G/g to select the new position for your favourite channels by broadcasters. ...or numbers. Blocks an individual channel from an input screen to select "Block", then press . Allows you can select a channel using the remote. "On with Indicator": Automatically reduces the picture noise. To delete all the available channels. Channel Set-up to select the desired letter or...
...then press . Tunes in all the characters Select "Reset", then press . 3 Repeat the procedure in which the channels are stored on the TV. 1 Press F/f to select the channel you input a wrong character Press G/g to select the new position for your favourite channels by broadcasters. ...or numbers. Blocks an individual channel from an input screen to select "Block", then press . Allows you can select a channel using the remote. "On with Indicator": Automatically reduces the picture noise. To delete all the available channels. Channel Set-up to select the desired letter or...
Revision History
Page 73
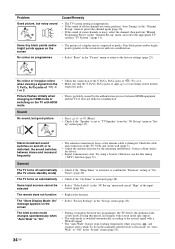
...the channels are firmly seated in "Set- Sound No sound, but noisy sound Cause/Remedy • The TV system setting is inappropriate. • If the sound of some channels is activated (page 28). Stereo broadcast ... the TV detects the optimum wide screen mode. Contact a Sony dealer for the minimum interference. Some input sources cannot be • Select "Video Labels" in the "Set-up " menu, and select the appropriate TV system ("TV System") (...using a booster. Problem Good picture, but good picture • Press 2 +/- The remote does not function • Replace the batteries.
...the channels are firmly seated in "Set- Sound No sound, but noisy sound Cause/Remedy • The TV system setting is inappropriate. • If the sound of some channels is activated (page 28). Stereo broadcast ... the TV detects the optimum wide screen mode. Contact a Sony dealer for the minimum interference. Some input sources cannot be • Select "Video Labels" in the "Set-up " menu, and select the appropriate TV system ("TV System") (...using a booster. Problem Good picture, but good picture • Press 2 +/- The remote does not function • Replace the batteries.


