
Operating Instructions
Page 3
...or splashing and no guarantee that interference will not be using the unit for installing the specified product. s If you use it further. KLV-32U100M KLV-40U100M SONY WALL-MOUNT BRACKET MODEL NO. This equipment generates, uses and can be placed on page 5. s To prevent internal heat buildup, do... illumination or direct sunlight. Use with an extension cord, receptacle or other WALL-MOUNT BRACKET may be determined by turning the equipment off and on, the user is required for several days, disconnect the power by qualified service personnel before...
...or splashing and no guarantee that interference will not be using the unit for installing the specified product. s If you use it further. KLV-32U100M KLV-40U100M SONY WALL-MOUNT BRACKET MODEL NO. This equipment generates, uses and can be placed on page 5. s To prevent internal heat buildup, do... illumination or direct sunlight. Use with an extension cord, receptacle or other WALL-MOUNT BRACKET may be determined by turning the equipment off and on, the user is required for several days, disconnect the power by qualified service personnel before...

Operating Instructions
Page 5
..., it from the unit with a wet hand, it in electric shock. If it is damaged, stop using it and ask your dealer or Sony service center to have a suitable outlet installed. Contact your electrician to exchange it picks up moisture, its insulation may result in . If not,... on the apparatus. (Continued) 5 Ventilation holes Never push objects of an internal malfunction that could create a fire hazard. This is not being turned on the unit. Never use strong solvents such as a precaution against injury, the following basic safety precautions should be bared and cut, and cause...
..., it from the unit with a wet hand, it in electric shock. If it is damaged, stop using it and ask your dealer or Sony service center to have a suitable outlet installed. Contact your electrician to exchange it picks up moisture, its insulation may result in . If not,... on the apparatus. (Continued) 5 Ventilation holes Never push objects of an internal malfunction that could create a fire hazard. This is not being turned on the unit. Never use strong solvents such as a precaution against injury, the following basic safety precautions should be bared and cut, and cause...

Operating Instructions
Page 6
... electric shock or damage to overturn. Quick stops, excessive force, and uneven surfaces may occur when still pictures are displayed continuously. s Do not push or scratch the LCD screen, or place objects on the unit. These phenomena improve as its light source. s Ghosting may cause the ... serious damage to watch the unit at the unit. Handling of a wall-mount bracket. This is turned off. The image may be damaged. It may be uneven or the LCD panel may disappear after the unit is a structural property of liquid crystal. If the screen image becomes dark...
... electric shock or damage to overturn. Quick stops, excessive force, and uneven surfaces may occur when still pictures are displayed continuously. s Do not push or scratch the LCD screen, or place objects on the unit. These phenomena improve as its light source. s Ghosting may cause the ... serious damage to watch the unit at the unit. Handling of a wall-mount bracket. This is turned off. The image may be damaged. It may be uneven or the LCD panel may disappear after the unit is a structural property of liquid crystal. If the screen image becomes dark...

Operating Instructions
Page 7
s Be sure to attach the brackets supplied with a cloth or other similar surface. s Do not install the unit turned over and causing injury. Outdoor use Do not install this unit in a ship or vessel. If the unit is exposed to direct sunlight, the unit ... (4 inches) 10 cm (4 inches) 10 cm (4 inches) When installing the unit using a wall-mount bracket. Optional accessories Observe the following : s Do not install the unit turned backward or sideways. s Be sure to the wall or pillar. (Continued) 7 Corrosion Use of the unit, and to fall and cause injury.
s Be sure to attach the brackets supplied with a cloth or other similar surface. s Do not install the unit turned over and causing injury. Outdoor use Do not install this unit in a ship or vessel. If the unit is exposed to direct sunlight, the unit ... (4 inches) 10 cm (4 inches) 10 cm (4 inches) When installing the unit using a wall-mount bracket. Optional accessories Observe the following : s Do not install the unit turned backward or sideways. s Be sure to the wall or pillar. (Continued) 7 Corrosion Use of the unit, and to fall and cause injury.

Operating Instructions
Page 13
...3 Bb In the MENU screen, these buttons serve as up/down buttons. 5 POWER Press to turn on and off the unit. 6 Headphones jack Connects to adjust the volume. If your headphones....that the Picture Off feature is set. Unit Controls and Connectors Front, Top and Side Panel MENU INPUT Introducing the Unit VOLUME POWER Introducing the Unit PIC OFF/TIMER STANDBY POWER ...inputs. Press again to exit MENU. 2 INPUT/ Press repeatedly to cycle through the external equipment connected to display MENU. The VOLUME + button has a tactile dot. VOLUME + Press to your headphones do not match...
...3 Bb In the MENU screen, these buttons serve as up/down buttons. 5 POWER Press to turn on and off the unit. 6 Headphones jack Connects to adjust the volume. If your headphones....that the Picture Off feature is set. Unit Controls and Connectors Front, Top and Side Panel MENU INPUT Introducing the Unit VOLUME POWER Introducing the Unit PIC OFF/TIMER STANDBY POWER ...inputs. Press again to exit MENU. 2 INPUT/ Press repeatedly to cycle through the external equipment connected to display MENU. The VOLUME + button has a tactile dot. VOLUME + Press to your headphones do not match...

Operating Instructions
Page 14
Lights up in red when in green when the unit is turned on. Receives IR signals from the remote control. 14 Introducing the Unit Item 8 STANDBY LED 9 POWER LED 0 (IR) Infrared Receiver Description Lights up in the standby mode for PC inputs.
Lights up in red when in green when the unit is turned on. Receives IR signals from the remote control. 14 Introducing the Unit Item 8 STANDBY LED 9 POWER LED 0 (IR) Infrared Receiver Description Lights up in the standby mode for PC inputs.

Operating Instructions
Page 26
... is the case, connect the adapter to the computer before connecting the supplied HD15-HD15 cable. When your personal computer's display on the unit. or Press INPUT on the top panel repeatedly to the unit Do This ... If this is noisy, flickering or not clear, adjust the Phase and Pitch in...Personal Computer z When connecting to an Apple Macintosh computer, use an adapter (not supplied). For some Apple Macintosh computers, it on page 40. 26 The power turns off when you press the power button in the Setup settings when no signal is connected to the unit with the supplied HD15-HD15...
... is the case, connect the adapter to the computer before connecting the supplied HD15-HD15 cable. When your personal computer's display on the unit. or Press INPUT on the top panel repeatedly to the unit Do This ... If this is noisy, flickering or not clear, adjust the Phase and Pitch in...Personal Computer z When connecting to an Apple Macintosh computer, use an adapter (not supplied). For some Apple Macintosh computers, it on page 40. 26 The power turns off when you press the power button in the Setup settings when no signal is connected to the unit with the supplied HD15-HD15...

Operating Instructions
Page 28
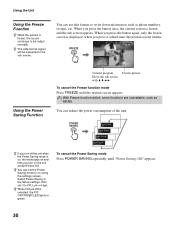
...the available picture modes: Vivid, Standard, Custom. The current program appears in freeze. Some functions will be displayed by matching the e and E on the batteries to the diagram inside the remote control's battery compartment. 6...on and off . Press repeatedly to remain on before shutting off the unit. See page 40 on page 36. The power saving modes can be also accessed in the Sound settings. Press... to adjust the volume. Press to unit functions. Press to navigate to turn on -screen cursor. Press again or press VOL + to restore the picture. Press ...
...the available picture modes: Vivid, Standard, Custom. The current program appears in freeze. Some functions will be displayed by matching the e and E on the batteries to the diagram inside the remote control's battery compartment. 6...on and off . Press repeatedly to remain on before shutting off the unit. See page 40 on page 36. The power saving modes can be also accessed in the Sound settings. Press... to adjust the volume. Press to unit functions. Press to navigate to turn on -screen cursor. Press again or press VOL + to restore the picture. Press ...
Operating Instructions
Page 30
... format signal will be output normally. When you press the button again, only the frozen screen is on, the mode stays on next time you turn on using the settings screen. POWER SAVING Power Saving : Off Power Saving : Low Power Saving : High Power Saving : Picture Off z If you... turn off the unit when the Power Saving mode is displayed; When you press it to be squeezed in the sub screen. z You can set it a third time, the normal screen returns...
... format signal will be output normally. When you press the button again, only the frozen screen is on, the mode stays on next time you turn on using the settings screen. POWER SAVING Power Saving : Off Power Saving : Low Power Saving : High Power Saving : Picture Off z If you... turn off the unit when the Power Saving mode is displayed; When you press it to be squeezed in the sub screen. z You can set it a third time, the normal screen returns...

Operating Instructions
Page 31
z "Sleep Timer: Power will be turned off" appears one minute before the unit shuts off automatically after a predetermined period of time (15...Sleep Timer is activated, the PIC OFF/TIMER LED on using the Setup settings. z You can set the unit to turn on the unit again. Using the Unit 31 Select Sleep Timer in the Setup settings, then set it on again, ... orange. This message may not appear if you turn the unit off, and then turn it to off then turn off . To cancel Sleep Timer Press SLEEP repeatedly until "Sleep Timer : Off" appears or turn the unit power to 15 min, 30 min,...
z "Sleep Timer: Power will be turned off" appears one minute before the unit shuts off automatically after a predetermined period of time (15...Sleep Timer is activated, the PIC OFF/TIMER LED on using the Setup settings. z You can set the unit to turn on the unit again. Using the Unit 31 Select Sleep Timer in the Setup settings, then set it on again, ... orange. This message may not appear if you turn the unit off, and then turn it to off then turn off . To cancel Sleep Timer Press SLEEP repeatedly until "Sleep Timer : Off" appears or turn the unit power to 15 min, 30 min,...
Operating Instructions
Page 41
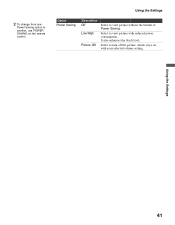
It also enhances the black level. Select to another, use POWER SAVING on with reduced power consumption. z To change from one Power Saving option to turn off the picture. Using the Settings 41 Audio stays on the remote control. Select to view picture without the benefit of Power Saving. Using the Settings Option Power Saving Description Off Low/High Picture Off Select to view picture with your selected volume setting.
It also enhances the black level. Select to another, use POWER SAVING on with reduced power consumption. z To change from one Power Saving option to turn off the picture. Using the Settings 41 Audio stays on the remote control. Select to view picture without the benefit of Power Saving. Using the Settings Option Power Saving Description Off Low/High Picture Off Select to view picture with your selected volume setting.

Operating Instructions
Page 42
No color/Dark picture/The ❑ Press PICTURE to V5 on the remote control (page 28) or press INPUT repeatedly on the top panel (page 13). Good picture, no sound. ❑ Check the volume control. ❑ Press MUTING or VOL + so that "Muting" disappears from the screen (page ... cords. ❑ Do not use 300-ohm twin lead cables as interference may occur. picture is too bright/Color is activated (pages 31, 40). try turning off automatically. ❑ Check if Sleep Timer is not ❑ Adjust the Picture Mode options in the Wide Screen Mode selected with remote control...
No color/Dark picture/The ❑ Press PICTURE to V5 on the remote control (page 28) or press INPUT repeatedly on the top panel (page 13). Good picture, no sound. ❑ Check the volume control. ❑ Press MUTING or VOL + so that "Muting" disappears from the screen (page ... cords. ❑ Do not use 300-ohm twin lead cables as interference may occur. picture is too bright/Color is activated (pages 31, 40). try turning off automatically. ❑ Check if Sleep Timer is not ❑ Adjust the Picture Mode options in the Wide Screen Mode selected with remote control...

Operating Instructions
Page 45
... player 22 DVI-HDTV-equipped device 25 HD equipment 20 HDMI-equipped device 24 Personal computer 26 Satellite receiver 18 VCR and cable 19 D Display Area 37 DISPLAY button 28 F Freeze 30 FREEZE button 28 H HD/DVD IN jack (1080i/720p/ 480p/480i) 15 HDMI IN jack 16 Headphones jack 13 High... 32, 35 Sharpness 33 Sleep 31 SLEEP button 28 Sleep Timer 40 SOUND button 28 Sound Mode 35 Sound Mode Reset 35 STANDBY LED 14 Support Belt 11 T, U Treble 35 Troubleshooting 42 turning on/off the unit 13 V Vertical Center 37, 38 Vertical Size 37 VIDEO/AUDIO (L/R) jacks 15 VOL button 13...
... player 22 DVI-HDTV-equipped device 25 HD equipment 20 HDMI-equipped device 24 Personal computer 26 Satellite receiver 18 VCR and cable 19 D Display Area 37 DISPLAY button 28 F Freeze 30 FREEZE button 28 H HD/DVD IN jack (1080i/720p/ 480p/480i) 15 HDMI IN jack 16 Headphones jack 13 High... 32, 35 Sharpness 33 Sleep 31 SLEEP button 28 Sleep Timer 40 SOUND button 28 Sound Mode 35 Sound Mode Reset 35 STANDBY LED 14 Support Belt 11 T, U Treble 35 Troubleshooting 42 turning on/off the unit 13 V Vertical Center 37, 38 Vertical Size 37 VIDEO/AUDIO (L/R) jacks 15 VOL button 13...

