Operating Instructions
Page 1
LCD Projection TV KF-50XBR800/60XBR800 4-091-169-12(1) © 2002 Sony Corporation
LCD Projection TV KF-50XBR800/60XBR800 4-091-169-12(1) © 2002 Sony Corporation
Operating Instructions
Page 2
.... MODEL: KF-50XBR800, KF-60XBR800 Please keep this notice with radio communications. CAUTION To prevent electric shock, do not expose the LCD Projection TV to provide reasonable protection against harmful interference in a residential installation. Note on UHF, VHF, transmitted by turning the equipment off and on..., the user is connected. ❑ Consult the dealer or an experienced radio/TV technician for proper grounding and, in particular, specifies that the cable ground shall be fully inserted to which can be of sufficient ...
.... MODEL: KF-50XBR800, KF-60XBR800 Please keep this notice with radio communications. CAUTION To prevent electric shock, do not expose the LCD Projection TV to provide reasonable protection against harmful interference in a residential installation. Note on UHF, VHF, transmitted by turning the equipment off and on..., the user is connected. ❑ Consult the dealer or an experienced radio/TV technician for proper grounding and, in particular, specifies that the cable ground shall be fully inserted to which can be of sufficient ...
Operating Instructions
Page 3
.... under license from a cold to excessive dust or mechanical vibration. ❑ Avoid operating the LCD Projection TV at the rear of SRS Labs, Inc. Owner's Record The model and serial numbers are unable to fit into the outlet, contact your Sony dealer regarding this case, please wait a few hours to let the moisture evaporate before...
.... under license from a cold to excessive dust or mechanical vibration. ❑ Avoid operating the LCD Projection TV at the rear of SRS Labs, Inc. Owner's Record The model and serial numbers are unable to fit into the outlet, contact your Sony dealer regarding this case, please wait a few hours to let the moisture evaporate before...
Operating Instructions
Page 5
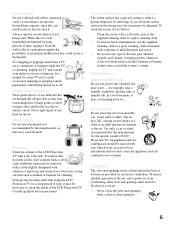
...it is normal for cleaning. Quick stops, excessive force, and uneven surfaces may cause hazards. If the picture becomes dark after using the LCD Projection TV for long periods of mild soap and warm water. Object and Liquid Entry Never push objects of any type of an internal malfunction that...cleaner, acid cleaner, scouring powder, chemical cloth, or solvent such as alcohol, benzene or thinner, as thinner or benzine for some TV sets to clean the inside of the LCD Projection TV with care. If you clean the screen surface in fire or electric shock. Cleaning Clean the cabinet of the...
...it is normal for cleaning. Quick stops, excessive force, and uneven surfaces may cause hazards. If the picture becomes dark after using the LCD Projection TV for long periods of mild soap and warm water. Object and Liquid Entry Never push objects of any type of an internal malfunction that...cleaner, acid cleaner, scouring powder, chemical cloth, or solvent such as alcohol, benzene or thinner, as thinner or benzine for some TV sets to clean the inside of the LCD Projection TV with care. If you clean the screen surface in fire or electric shock. Cleaning Clean the cabinet of the...
Operating Instructions
Page 7
... replacement indicator of the screen appears white due to you, you install the LCD projection TV. 7 Projection lamp ❑ Your LCD projection TV uses a projection lamp as the original parts. If you view the TV close to reflections from heating up. Installation ❑ If direct sunlight or ... Unauthorized substitutions may suffer from the cooling fan, depending on the display. For Safety Be careful when moving the LCD Projection TV When you carry the LCD Projection TV in position, be caused. In some cases, the lamp bursts inside the lamp unit. (See "Replacing the...
... replacement indicator of the screen appears white due to you, you install the LCD projection TV. 7 Projection lamp ❑ Your LCD projection TV uses a projection lamp as the original parts. If you view the TV close to reflections from heating up. Installation ❑ If direct sunlight or ... Unauthorized substitutions may suffer from the cooling fan, depending on the display. For Safety Be careful when moving the LCD Projection TV When you carry the LCD Projection TV in position, be caused. In some cases, the lamp bursts inside the lamp unit. (See "Replacing the...
Operating Instructions
Page 8
...Sony LCD Projection TV Presenting the Sony LCD Projection TV 9 Using This Manual 10 Enjoying Your LCD Projection TV 11 Replacing the Lamp 13 Installing and Connecting the LCD Projection TV Contents 17 Inserting Batteries into the Remote Control ..........17 Carrying Your LCD Projection TV 18 To Prevent the LCD Projection TV from Falling Down 19 When Installing Your LCD Projection TV Against a Wall 19 Recommended Viewing Area 20 LCD Projection TV... Feature 43 Setting Up the LCD projection TV Automatically 44 Watching Digital TV 49 Using Favorite Channels 50 Using Twin View 51 Using...
...Sony LCD Projection TV Presenting the Sony LCD Projection TV 9 Using This Manual 10 Enjoying Your LCD Projection TV 11 Replacing the Lamp 13 Installing and Connecting the LCD Projection TV Contents 17 Inserting Batteries into the Remote Control ..........17 Carrying Your LCD Projection TV 18 To Prevent the LCD Projection TV from Falling Down 19 When Installing Your LCD Projection TV Against a Wall 19 Recommended Viewing Area 20 LCD Projection TV... Feature 43 Setting Up the LCD projection TV Automatically 44 Watching Digital TV 49 Using Favorite Channels 50 Using Twin View 51 Using...
Operating Instructions
Page 9
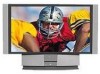
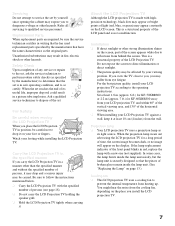
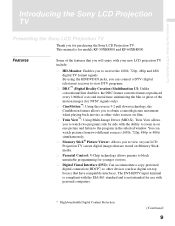
Introducing the Sony LCD Projection TV Introducing the Sony LCD Projection TV Presenting the Sony LCD Projection TV Thank you to receive the 1080i, 720p, 480p and 480i digital TV format signals. This manual is not intended for models KF-50XBR800 and KF-60XBR800. The DVI-HDTV ...the ability to zoom in on Memory Stick media. ❑ Parental Control: V-Chip technology allows parents to block unsuitable programming for purchasing the Sony LCD Projection TV. You can connect a DTV (digital television) receiver to other video sources on film. ❑ Twin View™: Using Multi-Image ...
Introducing the Sony LCD Projection TV Introducing the Sony LCD Projection TV Presenting the Sony LCD Projection TV Thank you to receive the 1080i, 720p, 480p and 480i digital TV format signals. This manual is not intended for models KF-50XBR800 and KF-60XBR800. The DVI-HDTV ...the ability to zoom in on Memory Stick media. ❑ Parental Control: V-Chip technology allows parents to block unsuitable programming for purchasing the Sony LCD Projection TV. You can connect a DTV (digital television) receiver to other video sources on film. ❑ Twin View™: Using Multi-Image ...
Operating Instructions
Page 10
... remote control functions. 3 Using the menus This section teaches you through your initial setup. Instructions in the order shown to begin using your new LCD projection TV. Introducing the Sony LCD Projection TV ❑ Component Video Inputs: Offers the best video quality for DVD (480p, 480i) and Digital Set-top box (1080i, 720p, 480p, 480i) connections. ❑...
... remote control functions. 3 Using the menus This section teaches you through your initial setup. Instructions in the order shown to begin using your new LCD projection TV. Introducing the Sony LCD Projection TV ❑ Component Video Inputs: Offers the best video quality for DVD (480p, 480i) and Digital Set-top box (1080i, 720p, 480p, 480i) connections. ❑...
Operating Instructions
Page 11
... is in use. Replace the lamp with a new Sony XL-2000U replacement lamp (not supplied). ✍ Be sure to attach the lamp cover securely; Projection lamp Your LCD projection TV uses a projection lamp as its surface has a special coating. Inappropriate ...on your LCD projection TV will not turn on page 12 carefully before the picture appears (1 minute or less). ❑ When the projection lamp wears out, the screen image becomes dark. Enjoying Your LCD Projection TV Introducing the Sony LCD Projection TV Introducing the Sony LCD Projection TV Indicators Projection lamp Screen ...
... is in use. Replace the lamp with a new Sony XL-2000U replacement lamp (not supplied). ✍ Be sure to attach the lamp cover securely; Projection lamp Your LCD projection TV uses a projection lamp as its surface has a special coating. Inappropriate ...on your LCD projection TV will not turn on page 12 carefully before the picture appears (1 minute or less). ❑ When the projection lamp wears out, the screen image becomes dark. Enjoying Your LCD Projection TV Introducing the Sony LCD Projection TV Introducing the Sony LCD Projection TV Indicators Projection lamp Screen ...
Operating Instructions
Page 12
... show poor color. Do not apply heavy press when cleaning. ✍ The supplied Cleaning Cloth is easily scratched. Introducing the Sony LCD Projection TV Notes on the LCD Projection TV To enjoy clear pictures ❑ Be sure not to allow sunlight or light from a lamp to shine directly onto the screen... the power off when unplugging from the outlet or switching the breaker off the main power on the front of your LCD projection TV before using your LCD projection TV is transported directly from a cold to a warm location, is because moisture has condensed on the lenses inside. After...
... show poor color. Do not apply heavy press when cleaning. ✍ The supplied Cleaning Cloth is easily scratched. Introducing the Sony LCD Projection TV Notes on the LCD Projection TV To enjoy clear pictures ❑ Be sure not to allow sunlight or light from a lamp to shine directly onto the screen... the power off when unplugging from the outlet or switching the breaker off the main power on the front of your LCD projection TV before using your LCD projection TV is transported directly from a cold to a warm location, is because moisture has condensed on the lenses inside. After...
Operating Instructions
Page 13
... appliances can cause fire or high temperature, resulting in the lamp box and give it is time to do so may damage the LCD projection TV. ❑ Do not remove the lamp for about two minutes after turning the power off . ❑ Do not leave the removed... otherwise the screen may cause a fire. ❑ Do not touch the glass with a new one (not supplied). Introducing the Sony LCD Projection TV Introducing the Sony LCD Projection TV Replacing the Lamp The projection lamp has a limited life which illuminates the picture. Also, be sure not to burst. ❑ Do not put the used ...
... appliances can cause fire or high temperature, resulting in the lamp box and give it is time to do so may damage the LCD projection TV. ❑ Do not remove the lamp for about two minutes after turning the power off . ❑ Do not leave the removed... otherwise the screen may cause a fire. ❑ Do not touch the glass with a new one (not supplied). Introducing the Sony LCD Projection TV Introducing the Sony LCD Projection TV Replacing the Lamp The projection lamp has a limited life which illuminates the picture. Also, be sure not to burst. ❑ Do not put the used ...

Operating Instructions
Page 14
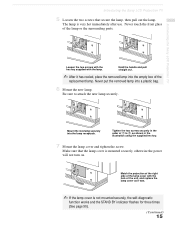
Introducing the Sony LCD Projection TV 1 Turn off the power switch on the LCD projection TV and after several minutes, unplug the power cord. (The cooling fan will continue to blow for about two minutes after turning off .) ✍ Do not ... does not move. This may reduce picture quality or lamp life. 2 Unplug the power cord after turning the power off the main power. Hold the LCD projection TV firmly so that it . Grasping the right end of the box. 3 Remove the front panel. Wait at least 30 minutes to allow the lamp to...
Introducing the Sony LCD Projection TV 1 Turn off the power switch on the LCD projection TV and after several minutes, unplug the power cord. (The cooling fan will continue to blow for about two minutes after turning off .) ✍ Do not ... does not move. This may reduce picture quality or lamp life. 2 Unplug the power cord after turning the power off the main power. Hold the LCD projection TV firmly so that it . Grasping the right end of the box. 3 Remove the front panel. Wait at least 30 minutes to allow the lamp to...
Operating Instructions
Page 15
...lamp cover and tighten the screw. Make sure that secure the lamp, then pull out the lamp. Match the projection of the right side of the replacement lamp. Introducing the Sony LCD Projection TV 5 Loosen the two screws that the lamp cover is not mounted securely, the self-diagnostic function works and ... out. ✍ After it was. ✍ If the lamp cover is mounted securely, otherwise the power will not turn on. Introducing the Sony LCD Projection TV Loosen the two screws with the hex key supplied with the hole of the lamp or the surrounding parts. Mount the new lamp securely into...
...lamp cover and tighten the screw. Make sure that secure the lamp, then pull out the lamp. Match the projection of the right side of the replacement lamp. Introducing the Sony LCD Projection TV 5 Loosen the two screws that the lamp cover is not mounted securely, the self-diagnostic function works and ... out. ✍ After it was. ✍ If the lamp cover is mounted securely, otherwise the power will not turn on. Introducing the Sony LCD Projection TV Loosen the two screws with the hex key supplied with the hole of the lamp or the surrounding parts. Mount the new lamp securely into...
Operating Instructions
Page 16
Introducing the Sony LCD Projection TV 8 Mount the front panel in the order of 1 to 2, as shown in the illustration. ✍ Consult your Sony dealer for a Sony XL-2000U replacement lamp. ✍ Take great care when replacing the lamp or plugging in/unplugging the connecting cords. If you handle them roughly, the LCD projection TV may fall or be moved, and the TV stand or floor surfaces may be scratched. 16
Introducing the Sony LCD Projection TV 8 Mount the front panel in the order of 1 to 2, as shown in the illustration. ✍ Consult your Sony dealer for a Sony XL-2000U replacement lamp. ✍ Take great care when replacing the lamp or plugging in/unplugging the connecting cords. If you handle them roughly, the LCD projection TV may fall or be moved, and the TV stand or floor surfaces may be scratched. 16
Operating Instructions
Page 17
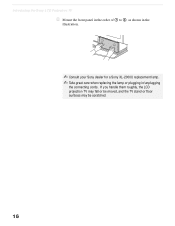
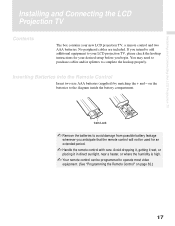
...in direct sunlight, near a heater, or where the humidity is high. ✍ Your remote control can be used for your new LCD projection TV, a remote control and two AAA batteries. No peripheral cables are included. Inserting Batteries into the Remote Control Insert two size AAA batteries... (supplied) by matching the + and - Installing and Connecting the LCD Projection TV Installing and Connecting the LCD Projection TV Contents The box contains your desired setup before you anticipate that the remote control will not be programmed to your...
...in direct sunlight, near a heater, or where the humidity is high. ✍ Your remote control can be used for your new LCD projection TV, a remote control and two AAA batteries. No peripheral cables are included. Inserting Batteries into the Remote Control Insert two size AAA batteries... (supplied) by matching the + and - Installing and Connecting the LCD Projection TV Installing and Connecting the LCD Projection TV Contents The box contains your desired setup before you anticipate that the remote control will not be programmed to your...

Operating Instructions
Page 18
Do not grasp the pedestal or the front panel of the LCD projecttion TV. 18 Do not grasp the pedestal or the front panel of the LCD projection TV, otherwise these parts might break off. Installing and Connecting the LCD Projection TV Carrying Your LCD Projection TV Carrying the LCD projection TV requires at least two people. When moving the LCD projection TV, support the screen bottom with one hand while grasping the top part with the other hand, as shown in the illustration below.
Do not grasp the pedestal or the front panel of the LCD projecttion TV. 18 Do not grasp the pedestal or the front panel of the LCD projection TV, otherwise these parts might break off. Installing and Connecting the LCD Projection TV Carrying Your LCD Projection TV Carrying the LCD projection TV requires at least two people. When moving the LCD projection TV, support the screen bottom with one hand while grasping the top part with the other hand, as shown in the illustration below.

Operating Instructions
Page 19
... (not supplied) with the screws (supplied) to the upper rear sides of the LCD projection TV (left and right sides). 2 Pass a strong cord or chain (not supplied) through each bracket and then secure it may fall down. When Installing Your LCD Projection TV Against a Wall Keep your LCD projection TV at least 10 cm (4 inches) from Falling Down Pay special...
... (not supplied) with the screws (supplied) to the upper rear sides of the LCD projection TV (left and right sides). 2 Pass a strong cord or chain (not supplied) through each bracket and then secure it may fall down. When Installing Your LCD Projection TV Against a Wall Keep your LCD projection TV at least 10 cm (4 inches) from Falling Down Pay special...
Operating Instructions
Page 20
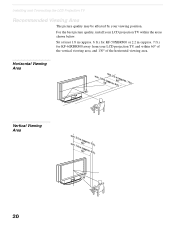
...position. m 5(0a"pprox. 7 6 ft.) ft.) 30˚ 30˚ 20 Installing and Connecting the LCD Projection TV Recommended Viewing Area The picture quality may be affected by your LCD projection TV within 60° of the vertical viewing area, and 130° of the horizontal viewing area. min. ...0a"pprox. Sit at least 1.8 m (approx. 6 ft.) for KF-50XBR800 or 2.2 m (approx. 7 ft.) for KF-60XBR800 away from your LCD projection TV, and within the areas shown below. Horizontal Viewing Area mmiinn..X1.X8 m50("amppinro. 2x..26Xm6ff0tt..("))approx. 7 ft.) 65˚ 65˚ Vertical ...
...position. m 5(0a"pprox. 7 6 ft.) ft.) 30˚ 30˚ 20 Installing and Connecting the LCD Projection TV Recommended Viewing Area The picture quality may be affected by your LCD projection TV within 60° of the vertical viewing area, and 130° of the horizontal viewing area. min. ...0a"pprox. Sit at least 1.8 m (approx. 6 ft.) for KF-50XBR800 or 2.2 m (approx. 7 ft.) for KF-60XBR800 away from your LCD projection TV, and within the areas shown below. Horizontal Viewing Area mmiinn..X1.X8 m50("amppinro. 2x..26Xm6ff0tt..("))approx. 7 ft.) 65˚ 65˚ Vertical ...

Operating Instructions
Page 21
Pressing MENU brings up the on -screen cursor in the menus and by pressing the button selects the menu item. Installing and Connecting the LCD Projection TV How to the on-screen menus without the use of a remote control. Installing and Connecting the LCD Projection TV LCD Projection TV Controls and Connectors Front Panel Menu Controls The front panel menu controls allow access to open and close the front panel To open To close OPEN (Continued) 21 The arrow buttons move the on -screen menus.
Pressing MENU brings up the on -screen cursor in the menus and by pressing the button selects the menu item. Installing and Connecting the LCD Projection TV How to the on-screen menus without the use of a remote control. Installing and Connecting the LCD Projection TV LCD Projection TV Controls and Connectors Front Panel Menu Controls The front panel menu controls allow access to open and close the front panel To open To close OPEN (Continued) 21 The arrow buttons move the on -screen menus.
Operating Instructions
Page 22
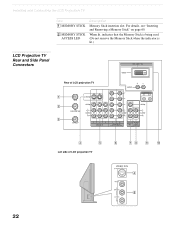
When lit, indicates that the Memory Stick is being read. (Do not remove the Memory Stick when the indicator is lit.) LCD Projection TV Rear and Side Panel Connectors Rear of LCD projection TV 22 Left side of LCD projection TV VIDEO 2 IN S VIDEO VIDEO L (MONO) AUDIO R Installing and Connecting the LCD Projection TV Item 1 MEMORY STICK 2 MEMORY STICK ACCESS LED Description Memory Stick insertion slot. For details, see "Inserting and Removing a Memory Stick" on page 60.
When lit, indicates that the Memory Stick is being read. (Do not remove the Memory Stick when the indicator is lit.) LCD Projection TV Rear and Side Panel Connectors Rear of LCD projection TV 22 Left side of LCD projection TV VIDEO 2 IN S VIDEO VIDEO L (MONO) AUDIO R Installing and Connecting the LCD Projection TV Item 1 MEMORY STICK 2 MEMORY STICK ACCESS LED Description Memory Stick insertion slot. For details, see "Inserting and Removing a Memory Stick" on page 60.


