Operating Instructions
Page 2
... a Class B digital device pursuant to Part 15 of cable entry as close to provide reasonable protection against harmful interference in this manual could void your warranty and your authority to rain or moisture. MODEL: KF-50XBR800, KF-60XBR800 Please keep this equipment. This ... COVER (OR BACK). NO USER-SERVICEABLE PARTS INSIDE. CAUTION To prevent electric shock, do not expose the LCD Projection TV to operate this notice with the instruction manual. 2 Note to CATV system installer This reminder is no guarantee that any changes or modifications not expressly approved in...
... a Class B digital device pursuant to Part 15 of cable entry as close to provide reasonable protection against harmful interference in this manual could void your warranty and your authority to rain or moisture. MODEL: KF-50XBR800, KF-60XBR800 Please keep this equipment. This ... COVER (OR BACK). NO USER-SERVICEABLE PARTS INSIDE. CAUTION To prevent electric shock, do not expose the LCD Projection TV to operate this notice with the instruction manual. 2 Note to CATV system installer This reminder is no guarantee that any changes or modifications not expressly approved in...
Operating Instructions
Page 8
...Sony LCD Projection TV Presenting the Sony LCD Projection TV 9 Using This Manual 10 Enjoying Your LCD Projection TV 11 Replacing the Lamp 13 Installing and Connecting the LCD Projection TV Contents 17 Inserting Batteries into the Remote Control ..........17 Carrying Your LCD Projection TV 18 To Prevent the LCD Projection TV from Falling Down 19 When Installing Your LCD Projection TV... 42 Using the CONTROL S Feature 43 Setting Up the LCD projection TV Automatically 44 Watching Digital TV 49 Using Favorite Channels 50 Using Twin View 51 Using the Freeze Function 54 Using Scrolling ...
...Sony LCD Projection TV Presenting the Sony LCD Projection TV 9 Using This Manual 10 Enjoying Your LCD Projection TV 11 Replacing the Lamp 13 Installing and Connecting the LCD Projection TV Contents 17 Inserting Batteries into the Remote Control ..........17 Carrying Your LCD Projection TV 18 To Prevent the LCD Projection TV from Falling Down 19 When Installing Your LCD Projection TV... 42 Using the CONTROL S Feature 43 Setting Up the LCD projection TV Automatically 44 Watching Digital TV 49 Using Favorite Channels 50 Using Twin View 51 Using the Freeze Function 54 Using Scrolling ...
Operating Instructions
Page 9
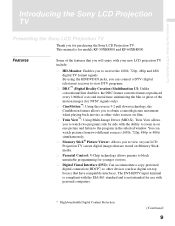
...View allows you to other devices (such as digital set-top boxes) that have compatible interfaces. This manual is not intended for use with your LCD Projection TV screen digital images that you will enjoy with personal computers. * High-bandwidth Digital Content Protection (Continued) ...one picture and listen to the program in the selected window. Introducing the Sony LCD Projection TV Introducing the Sony LCD Projection TV Presenting the Sony LCD Projection TV Thank you to view on your new LCD projection TV include: ❑ HD-Monitor: Enables you to watch pictures from two ...
...View allows you to other devices (such as digital set-top boxes) that have compatible interfaces. This manual is not intended for use with your LCD Projection TV screen digital images that you will enjoy with personal computers. * High-bandwidth Digital Content Protection (Continued) ...one picture and listen to the program in the selected window. Introducing the Sony LCD Projection TV Introducing the Sony LCD Projection TV Presenting the Sony LCD Projection TV Thank you to view on your new LCD projection TV include: ❑ HD-Monitor: Enables you to watch pictures from two ...
Operating Instructions
Page 10
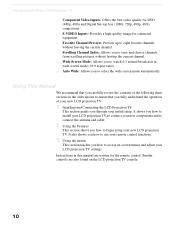
...your remote control functions. 3 Using the menus This section teaches you to access on the LCD projection TV console. 10 Introducing the Sony LCD Projection TV ❑ Component Video Inputs: Offers the best video quality for DVD (480p, 480i) and ...Digital Set-top box (1080i, 720p, 480p, 480i) connections. ❑ S-VIDEO Inputs: Provides a high-quality image for the remote control. Instructions in this manual are also found on -screen menus and adjust your LCD projection TV...
...your remote control functions. 3 Using the menus This section teaches you to access on the LCD projection TV console. 10 Introducing the Sony LCD Projection TV ❑ Component Video Inputs: Offers the best video quality for DVD (480p, 480i) and ...Digital Set-top box (1080i, 720p, 480p, 480i) connections. ❑ S-VIDEO Inputs: Provides a high-quality image for the remote control. Instructions in this manual are also found on -screen menus and adjust your LCD projection TV...
Operating Instructions
Page 23
... feature local channels. See the instruction manual that came with your equipment for details about connecting and using it with the CONTROL S cable. 0 DVI-HDTV VIDEO Can accommodate a copy-protected digital connection AUDIO R/L (HDCP*) to other Sony equipment with the LCD projection TV's remote control, connect the CONTROL S... S VIDEO-equipped video component. Provides better picture quality than the VHF/UHF jacks or the Video IN jack. 5 VIDEO/ (L/R) AUDIO (Rear and side) Connects to the audio and video OUT jacks on the side panel of the equipment to the CONTROL S OUT jack on the...
... feature local channels. See the instruction manual that came with your equipment for details about connecting and using it with the CONTROL S cable. 0 DVI-HDTV VIDEO Can accommodate a copy-protected digital connection AUDIO R/L (HDCP*) to other Sony equipment with the LCD projection TV's remote control, connect the CONTROL S... S VIDEO-equipped video component. Provides better picture quality than the VHF/UHF jacks or the Video IN jack. 5 VIDEO/ (L/R) AUDIO (Rear and side) Connects to the audio and video OUT jacks on the side panel of the equipment to the CONTROL S OUT jack on the...
Operating Instructions
Page 32
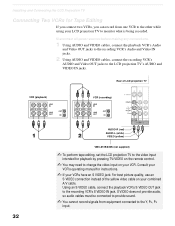
Rear of the yellow video cable on your VCR. Disconnect all power sources before making any connections. ...recording VCR's S VIDEO IN jack. Using an S VIDEO cable, connect the playback VCR's S VIDEO OUT jack to the LCD projection TV's AUDIO and VIDEO IN jacks. S VIDEO does not provide audio, so audio cables must be connected to provide sound. ✍... You cannot record signals from one VCR to the other while using your LCD projection TV to the Y, PB, PR input. 32 Consult your VCR's operating manual for Tape Editing If you connect two VCRs, you can record from equipment connected to...
Rear of the yellow video cable on your VCR. Disconnect all power sources before making any connections. ...recording VCR's S VIDEO IN jack. Using an S VIDEO cable, connect the playback VCR's S VIDEO OUT jack to the LCD projection TV's AUDIO and VIDEO IN jacks. S VIDEO does not provide audio, so audio cables must be connected to provide sound. ✍... You cannot record signals from one VCR to the other while using your LCD projection TV to the Y, PB, PR input. 32 Consult your VCR's operating manual for Tape Editing If you connect two VCRs, you can record from equipment connected to...

Operating Instructions
Page 35
Consult your VCR's operating manual for instructions. ✍ Use TV/VIDEO to watch satellite TV or the VCR (your VCR must be turned on). - VHF/UHF to select - VIDEO 1 to watch cable TV. ✍ If your VCR or satellite receiver is set correctly. Installing and Connecting the LCD Projection TV Installing and Connecting the LCD Projection TV ✍ Be sure your VCR's video input is not equipped with S VIDEO, use a VIDEO cable (yellow) instead of the S VIDEO cable. 35
Consult your VCR's operating manual for instructions. ✍ Use TV/VIDEO to watch satellite TV or the VCR (your VCR must be turned on). - VHF/UHF to select - VIDEO 1 to watch cable TV. ✍ If your VCR or satellite receiver is set correctly. Installing and Connecting the LCD Projection TV Installing and Connecting the LCD Projection TV ✍ Be sure your VCR's video input is not equipped with S VIDEO, use a VIDEO cable (yellow) instead of the S VIDEO cable. 35
Operating Instructions
Page 39
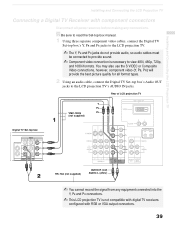
z Be sure to read the Set-top box manual. 1 Using three separate component video cables, connect the Digital TV Set-top box's Y, PB and PR jacks to the LCD projection TV. ✍ The Y, PB and PR jacks do not provide audio, so audio cables must be connected ...power sources before making any connections. Installing and Connecting the LCD Projection TV Installing and Connecting the LCD Projection TV Connecting a Digital TV Receiver with RGB or VGA output connectors. 39 Rear of LCD projection TV Y PB VMC-10HG PR (not supplied) Digital TV Set-top box RK-74A (not supplied) AUDIO-R (red)...
z Be sure to read the Set-top box manual. 1 Using three separate component video cables, connect the Digital TV Set-top box's Y, PB and PR jacks to the LCD projection TV. ✍ The Y, PB and PR jacks do not provide audio, so audio cables must be connected ...power sources before making any connections. Installing and Connecting the LCD Projection TV Installing and Connecting the LCD Projection TV Connecting a Digital TV Receiver with RGB or VGA output connectors. 39 Rear of LCD projection TV Y PB VMC-10HG PR (not supplied) Digital TV Set-top box RK-74A (not supplied) AUDIO-R (red)...
Operating Instructions
Page 40
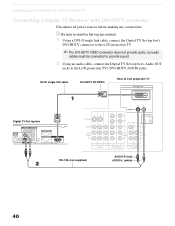
DVI-D single link cable DVI-HDTV IN VIDEO Rear of LCD projection TV Digital TV Set-top box OPTICAL AUDIO OUT VIDEO OUT (480i) 1 2 L1 L2 ...-74A (not supplied) AUDIO-R (red) AUDIO-L (white) 40 Installing and Connecting the LCD Projection TV Connecting a Digital TV Receiver with DVI-HDTV connector Disconnect all power sources before making any connections. z Be sure to read the... Set-top box manual. 1 Using a DVI-D single link cable, connect the Digital TV Set-top box's DVI-HDTV connector to the LCD projection TV. ✍ The DVI-HDTV VIDEO connector does not ...
DVI-D single link cable DVI-HDTV IN VIDEO Rear of LCD projection TV Digital TV Set-top box OPTICAL AUDIO OUT VIDEO OUT (480i) 1 2 L1 L2 ...-74A (not supplied) AUDIO-R (red) AUDIO-L (white) 40 Installing and Connecting the LCD Projection TV Connecting a Digital TV Receiver with DVI-HDTV connector Disconnect all power sources before making any connections. z Be sure to read the... Set-top box manual. 1 Using a DVI-D single link cable, connect the Digital TV Set-top box's DVI-HDTV connector to the LCD projection TV. ✍ The DVI-HDTV VIDEO connector does not ...

Operating Instructions
Page 49
For details, see page 39). 2 Press TV/VIDEO to select HD/DVD IN 5 or 6. 3 Select a digital channel on the DTV receiver. Using the Features Using the Features Watching Digital TV When you have connected the DTV receiver, you can enjoy digital TV programs. This LCD projection TV is capable of the LCD projection TV as necessary. 49 To view a digital TV program 1 Connect the DTV receiver to HD/DVD IN 5 or 6 on the LCD projection TV (for details, see the Operating Manual of the DTV receiver. 4 Adjust the volume of receiving the 1080i, 720p, 480p and 480i digital TV formats.
For details, see page 39). 2 Press TV/VIDEO to select HD/DVD IN 5 or 6. 3 Select a digital channel on the DTV receiver. Using the Features Using the Features Watching Digital TV When you have connected the DTV receiver, you can enjoy digital TV programs. This LCD projection TV is capable of the LCD projection TV as necessary. 49 To view a digital TV program 1 Connect the DTV receiver to HD/DVD IN 5 or 6 on the LCD projection TV (for details, see the Operating Manual of the DTV receiver. 4 Adjust the volume of receiving the 1080i, 720p, 480p and 480i digital TV formats.
Operating Instructions
Page 75
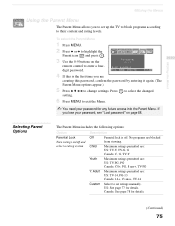
...: Option Parental Lock Turn ratings on/off and select a rating system Description Off Parental lock is the first time you are : US: TV-14, PG-13 Canada: 14+, 13 ans+, TV-14 Custom Select to highlight the Parent icon and press . 3 Use the 0-9 buttons on page 88. 68Using the Menus 68Using the... and rating levels. Adult Maximum ratings permitted are creating this is off. Canada: See page 78 for details. (Continued) 75 If you to set ratings manually. Press setting. To select the Parent Menu 1 Press MENU. 2 Press B or b to set up the...
...: Option Parental Lock Turn ratings on/off and select a rating system Description Off Parental lock is the first time you are : US: TV-14, PG-13 Canada: 14+, 13 ans+, TV-14 Custom Select to highlight the Parent icon and press . 3 Use the 0-9 buttons on page 88. 68Using the Menus 68Using the... and rating levels. Adult Maximum ratings permitted are creating this is off. Canada: See page 78 for details. (Continued) 75 If you to set ratings manually. Press setting. To select the Parent Menu 1 Press MENU. 2 Press B or b to set up the...
Operating Instructions
Page 81
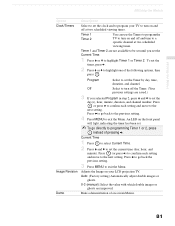
... turn on your TV to set the current time (day, hour, and minute). To set the timer, press b. 2 Press V or v to exit the Menu. Press B to go directly to a specific channel at two scheduled viewing times. Auto: (Factory setting) Automatically adjust double images or ghosts. 0-3 (manual): Select the value with which ... day, time, duration, and channel. 68Using the Menus 68Using the Menus Option Clock/Timers Description Select to set the clock and to program your LCD projection TV. Current Time 1 Press to select Current Time. 2 Press V and v to turn on -screen Menus. 81
... turn on your TV to set the current time (day, hour, and minute). To set the timer, press b. 2 Press V or v to exit the Menu. Press B to go directly to a specific channel at two scheduled viewing times. Auto: (Factory setting) Automatically adjust double images or ghosts. 0-3 (manual): Select the value with which ... day, time, duration, and channel. 68Using the Menus 68Using the Menus Option Clock/Timers Description Select to set the clock and to program your LCD projection TV. Current Time 1 Press to select Current Time. 2 Press V and v to turn on -screen Menus. 81

Operating Instructions
Page 96
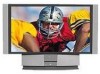
If, after reading this instruction manual, you have additional questions related to the use of your Sony projection TV, please call one of the following numbers (English only). Customers in the continental United States contact the Direct Response Center at: 1-800-222-SONY (7669) Customers in U.S.A. Printed in Canada contact the Customer Relations Center at: (416) 499-SONY (7669)
If, after reading this instruction manual, you have additional questions related to the use of your Sony projection TV, please call one of the following numbers (English only). Customers in the continental United States contact the Direct Response Center at: 1-800-222-SONY (7669) Customers in U.S.A. Printed in Canada contact the Customer Relations Center at: (416) 499-SONY (7669)


