Operating Instructions
Page 7
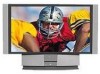
...may result in safe operating condition, and to so certify. For Safety Be careful when moving the LCD Projection TV When you place the LCD Projection TV in red, replace the lamp with a new one (not supplied). You might hear the noise from heating up. Servicing Do not ... the LCD Projection TV. About the LCD Projection TV Although the LCD projection TV is securely designed so that the set . When the projection lamp wears out after using the LCD projection TV for KF-60XBR800 away from the wall. In some cases, the lamp bursts inside the lamp unit. (See "Replacing the Lamp" on the...
...may result in safe operating condition, and to so certify. For Safety Be careful when moving the LCD Projection TV When you place the LCD Projection TV in red, replace the lamp with a new one (not supplied). You might hear the noise from heating up. Servicing Do not ... the LCD Projection TV. About the LCD Projection TV Although the LCD projection TV is securely designed so that the set . When the projection lamp wears out after using the LCD projection TV for KF-60XBR800 away from the wall. In some cases, the lamp bursts inside the lamp unit. (See "Replacing the Lamp" on the...
Operating Instructions
Page 8
...Sony LCD Projection TV Presenting the Sony LCD Projection TV 9 Using This Manual 10 Enjoying Your LCD Projection TV 11 Replacing the Lamp 13 Installing and Connecting the LCD Projection TV Contents 17 Inserting Batteries into the Remote Control ..........17 Carrying Your LCD Projection TV 18 To Prevent the LCD Projection TV from Falling Down 19 When Installing Your LCD Projection TV... 42 Using the CONTROL S Feature 43 Setting Up the LCD projection TV Automatically 44 Watching Digital TV 49 Using Favorite Channels 50 Using Twin View 51 Using the Freeze Function 54 Using Scrolling ...
...Sony LCD Projection TV Presenting the Sony LCD Projection TV 9 Using This Manual 10 Enjoying Your LCD Projection TV 11 Replacing the Lamp 13 Installing and Connecting the LCD Projection TV Contents 17 Inserting Batteries into the Remote Control ..........17 Carrying Your LCD Projection TV 18 To Prevent the LCD Projection TV from Falling Down 19 When Installing Your LCD Projection TV... 42 Using the CONTROL S Feature 43 Setting Up the LCD projection TV Automatically 44 Watching Digital TV 49 Using Favorite Channels 50 Using Twin View 51 Using the Freeze Function 54 Using Scrolling ...
Operating Instructions
Page 11
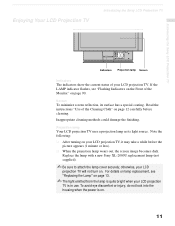
... becomes dark. Projection lamp Your LCD projection TV uses a projection lamp as its surface has a special coating. Enjoying Your LCD Projection TV Introducing the Sony LCD Projection TV Introducing the Sony LCD Projection TV Indicators Projection lamp Screen Indicators The indicators show the current status of your LCD projection TV will not turn on . 11 Inappropriate cleaning methods could damage the finishing. Replace the lamp with a new Sony XL-2000U replacement lamp (not...
... becomes dark. Projection lamp Your LCD projection TV uses a projection lamp as its surface has a special coating. Enjoying Your LCD Projection TV Introducing the Sony LCD Projection TV Introducing the Sony LCD Projection TV Indicators Projection lamp Screen Indicators The indicators show the current status of your LCD projection TV will not turn on . 11 Inappropriate cleaning methods could damage the finishing. Replace the lamp with a new Sony XL-2000U replacement lamp (not...
Operating Instructions
Page 13
... the front of the lamp receptacle. Doing so may cause the lamp to follow the instructions below. ❑ Use a Sony XL-2000U replacement lamp (not supplied) for any object inside the lamp receptacle of the LCD projection TV after turning the power off on the new lamp. Introducing the Sony LCD Projection TV Introducing the Sony LCD Projection TV Replacing the Lamp The projection lamp has a limited life which...
... the front of the lamp receptacle. Doing so may cause the lamp to follow the instructions below. ❑ Use a Sony XL-2000U replacement lamp (not supplied) for any object inside the lamp receptacle of the LCD projection TV after turning the power off on the new lamp. Introducing the Sony LCD Projection TV Introducing the Sony LCD Projection TV Replacing the Lamp The projection lamp has a limited life which...

Operating Instructions
Page 14
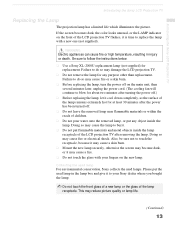
... similar object to cool down before replacing it does not move. This may reduce picture quality or lamp life. 2 Unplug the power cord after turning the power off the main power. Hold the LCD projection TV firmly so that it . Introducing the Sony LCD Projection TV 1 Turn off the power switch... on the LCD projection TV and after several minutes, unplug the ...
... similar object to cool down before replacing it does not move. This may reduce picture quality or lamp life. 2 Unplug the power cord after turning the power off the main power. Hold the LCD projection TV firmly so that it . Introducing the Sony LCD Projection TV 1 Turn off the power switch... on the LCD projection TV and after several minutes, unplug the ...
Operating Instructions
Page 15
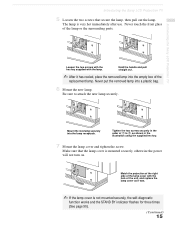
... securely, otherwise the power will not turn on. Introducing the Sony LCD Projection TV Loosen the two screws with the hex key supplied with the hole of the replacement lamp. Make sure that secure the lamp, then pull out the lamp. Never put the removed lamp into the lamp receptacle. Tighten the two screws securely in the order of...
... securely, otherwise the power will not turn on. Introducing the Sony LCD Projection TV Loosen the two screws with the hex key supplied with the hole of the replacement lamp. Make sure that secure the lamp, then pull out the lamp. Never put the removed lamp into the lamp receptacle. Tighten the two screws securely in the order of...
Operating Instructions
Page 16
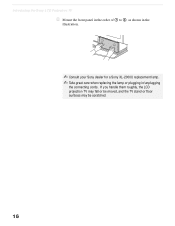
Introducing the Sony LCD Projection TV 8 Mount the front panel in the order of 1 to 2, as shown in the illustration. ✍ Consult your Sony dealer for a Sony XL-2000U replacement lamp. ✍ Take great care when replacing the lamp or plugging in/unplugging the connecting cords. If you handle them roughly, the LCD projection TV may fall or be moved, and the TV stand or floor surfaces may be scratched. 16
Introducing the Sony LCD Projection TV 8 Mount the front panel in the order of 1 to 2, as shown in the illustration. ✍ Consult your Sony dealer for a Sony XL-2000U replacement lamp. ✍ Take great care when replacing the lamp or plugging in/unplugging the connecting cords. If you handle them roughly, the LCD projection TV may fall or be moved, and the TV stand or floor surfaces may be scratched. 16
Operating Instructions
Page 87
... channel. A 300-ohm twin lead cable can receive digital broadcasts in your LCD projection TV may need service. Do not use a 300-ohm twin lead cable, keep it with new Sony XL-2000U replacement lamp (see page 13). ❏ If your LCD projection TV does not turn on, and a red light keeps flashing, your area. It could...
... channel. A 300-ohm twin lead cable can receive digital broadcasts in your LCD projection TV may need service. Do not use a 300-ohm twin lead cable, keep it with new Sony XL-2000U replacement lamp (see page 13). ❏ If your LCD projection TV does not turn on, and a red light keeps flashing, your area. It could...
Operating Instructions
Page 90
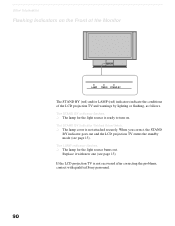
...; The lamp for the light source is ready to turn on the Front of the Monitor LAMP TIMER STAND BY The STAND BY (red) and/or LAMP (red) indicators indicate the conditions of the LCD projection TV and warnings by lighting or flashing, as follows. Other Information Flashing Indicators on . Replace it with qualified Sony personnel. 90...
...; The lamp for the light source is ready to turn on the Front of the Monitor LAMP TIMER STAND BY The STAND BY (red) and/or LAMP (red) indicators indicate the conditions of the LCD projection TV and warnings by lighting or flashing, as follows. Other Information Flashing Indicators on . Replace it with qualified Sony personnel. 90...
Operating Instructions
Page 94
I Image Revision 81 Inputs, labeling 80 Installation of the projection TV 25-43 J JUMP button 45 Jump, using 47 L Label Channels 74 video inputs 80 Lamp, replacing 13-16 M Memory Stick Index 62 indicator (LED) 22 inserting 60 insertion slot 22 Menu 61 precautions 86 Rotate Picture 65...in Twin View 53 POWER buttons (GREEN) 46 Presetting channels 44 Problems, troubleshooting 87-90 R Ratings setting 76 viewing blocked programs 76 Rear panel controls and connections 23 Remote control Function of buttons 47 inserting batteries 17 programming 82-83 Remote control, operating other components with Cable...
I Image Revision 81 Inputs, labeling 80 Installation of the projection TV 25-43 J JUMP button 45 Jump, using 47 L Label Channels 74 video inputs 80 Lamp, replacing 13-16 M Memory Stick Index 62 indicator (LED) 22 inserting 60 insertion slot 22 Menu 61 precautions 86 Rotate Picture 65...in Twin View 53 POWER buttons (GREEN) 46 Presetting channels 44 Problems, troubleshooting 87-90 R Ratings setting 76 viewing blocked programs 76 Rear panel controls and connections 23 Remote control Function of buttons 47 inserting batteries 17 programming 82-83 Remote control, operating other components with Cable...


