
Operating Instructions
Page 2
...interference with the limits for the remote control RM-Y910. CAUTION To prevent electric shock, do not expose the LCD Projection TV to operate this equipment. Use of this manual could void your warranty and your authority to rain or moisture. NOTIFICATION... digital device pursuant to which can radiate radio frequency energy and, if not installed and used in a residential installation. MODEL: KF-60DX100 Please keep this equipment does cause harmful interference to provide reasonable protection against harmful interference in accordance with the instructions, may require ...
...interference with the limits for the remote control RM-Y910. CAUTION To prevent electric shock, do not expose the LCD Projection TV to operate this equipment. Use of this manual could void your warranty and your authority to rain or moisture. NOTIFICATION... digital device pursuant to which can radiate radio frequency energy and, if not installed and used in a residential installation. MODEL: KF-60DX100 Please keep this equipment does cause harmful interference to provide reasonable protection against harmful interference in accordance with the instructions, may require ...

Operating Instructions
Page 3
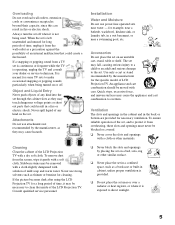
...license from Dolby Laboratories. registered mark. BBE and BBE Symbol are trademarks of Sony. Refer to a warm location, or if the room temperature changes suddenly, the picture may be using the LCD Projection TV for several days, disconnect the power by pulling the plug itself. Installing ... in a place subject to excessive dust or mechanical vibration. ❑ Avoid operating the LCD Projection TV at the rear of the LCD Projection TV, below the Sony logo, on the sticker, and also on the TV box (white label). Record these numbers in the spaces provided below 41°F (5°C). ...
...license from Dolby Laboratories. registered mark. BBE and BBE Symbol are trademarks of Sony. Refer to a warm location, or if the room temperature changes suddenly, the picture may be using the LCD Projection TV for several days, disconnect the power by pulling the plug itself. Installing ... in a place subject to excessive dust or mechanical vibration. ❑ Avoid operating the LCD Projection TV at the rear of the LCD Projection TV, below the Sony logo, on the sticker, and also on the TV box (white label). Record these numbers in the spaces provided below 41°F (5°C). ...
Operating Instructions
Page 5
...on the set through the cabinet slots as thinner or benzine for example, near water - Object and Liquid Entry Never push objects of LCD Projection TV. Attachments Do not use attachments not recommended by the manufacturer, as they may cause hazards. Never use power-line operated sets near a ...moved with a cloth or other materials. ❑ Never block the slots and openings by the manufacturer for a long period of the LCD Projection TV. The set may be blocked or covered. ❑ Never cover the slots and openings with care. Overloading Do not overload wall outlets, extension...
...on the set through the cabinet slots as thinner or benzine for example, near water - Object and Liquid Entry Never push objects of LCD Projection TV. Attachments Do not use attachments not recommended by the manufacturer, as they may cause hazards. Never use power-line operated sets near a ...moved with a cloth or other materials. ❑ Never block the slots and openings by the manufacturer for a long period of the LCD Projection TV. The set may be blocked or covered. ❑ Never cover the slots and openings with care. Overloading Do not overload wall outlets, extension...
Operating Instructions
Page 7
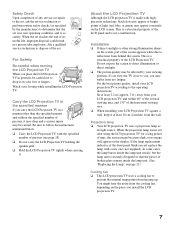
... specified number of persons, it at least 10 cm (4 inches) from heating up. Sit at least 2.2 m (approx. 7 ft.) away from your LCD projection TV, and within 60° of the vertical viewing area, and 130° of the horizontal viewing area. ❑ When installing your LCD... Projection TV against a wall, keep it may drop and a serious injury may appear constantly on page 13.) Cooling fan ❑ This LCD projection TV uses a cooling fan to prevent the internal...
... specified number of persons, it at least 10 cm (4 inches) from heating up. Sit at least 2.2 m (approx. 7 ft.) away from your LCD projection TV, and within 60° of the vertical viewing area, and 130° of the horizontal viewing area. ❑ When installing your LCD... Projection TV against a wall, keep it may drop and a serious injury may appear constantly on page 13.) Cooling fan ❑ This LCD projection TV uses a cooling fan to prevent the internal...
Operating Instructions
Page 8
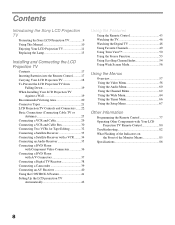
Contents Introducing the Sony LCD Projection TV Presenting the Sony LCD Projection TV 9 Using This Manual 10 Enjoying Your LCD Projection TV 11 Replacing the Lamp 13 Installing and Connecting the LCD Projection TV Contents 17 Inserting Batteries into the Remote Control ..........17 Carrying Your LCD Projection TV 18 To Prevent the LCD Projection TV from Falling Down 19 When Installing Your LCD Projection TV Against a Wall...
Contents Introducing the Sony LCD Projection TV Presenting the Sony LCD Projection TV 9 Using This Manual 10 Enjoying Your LCD Projection TV 11 Replacing the Lamp 13 Installing and Connecting the LCD Projection TV Contents 17 Inserting Batteries into the Remote Control ..........17 Carrying Your LCD Projection TV 18 To Prevent the LCD Projection TV from Falling Down 19 When Installing Your LCD Projection TV Against a Wall...
Operating Instructions
Page 9
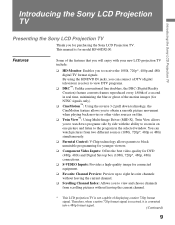
... capable of the motion images (for purchasing the Sony LCD Projection TV. Introducing the Sony LCD Projection TV Introducing the Sony LCD Projection TV Presenting the Sony LCD Projection TV Thank you to receive the 1080i, 720p*, 480p and 480i digital TV format signals. By using the HD/DVD IN ... model KF-60DX100. This manual is for connected equipment. ❑ Favorite Channel Preview: Preview up to eight favorite channels without leaving the current channel. ❑ Scrolling Channel Index: Allows you to watch two programs side by side with your new LCD projection TV include:...
... capable of the motion images (for purchasing the Sony LCD Projection TV. Introducing the Sony LCD Projection TV Introducing the Sony LCD Projection TV Presenting the Sony LCD Projection TV Thank you to receive the 1080i, 720p*, 480p and 480i digital TV format signals. By using the HD/DVD IN ... model KF-60DX100. This manual is for connected equipment. ❑ Favorite Channel Preview: Preview up to eight favorite channels without leaving the current channel. ❑ Scrolling Channel Index: Allows you to watch two programs side by side with your new LCD projection TV include:...
Operating Instructions
Page 10
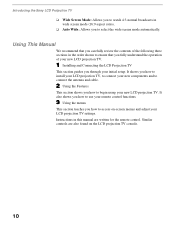
...in the order shown to ensure that you fully understand the operation of your new LCD projection TV. 1 Installing and Connecting the LCD Projection TV This section guides you how to access on the LCD projection TV console. 10 It also shows you how to use your remote control functions. 3 Using... the menus This section teaches you through your initial setup. Introducing the Sony LCD Projection TV ❑ Wide Screen Mode: Allows you to watch 4:3 normal broadcasts in wide screen mode (16:9 aspect ratio). ❑ Auto Wide: ...
...in the order shown to ensure that you fully understand the operation of your new LCD projection TV. 1 Installing and Connecting the LCD Projection TV This section guides you how to access on the LCD projection TV console. 10 It also shows you how to use your remote control functions. 3 Using... the menus This section teaches you through your initial setup. Introducing the Sony LCD Projection TV ❑ Wide Screen Mode: Allows you to watch 4:3 normal broadcasts in wide screen mode (16:9 aspect ratio). ❑ Auto Wide: ...
Operating Instructions
Page 11
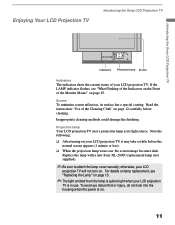
... the lamp is on. 11 Replace the lamp with a new Sony XL-2000U replacement lamp (not supplied). ✍ Be sure to attach the lamp cover securely; Projection lamp Your LCD projection TV uses a projection lamp as its surface has a special coating. Screen To minimize ...quite bright when your LCD projection TV, it may take a while before cleaning. Enjoying Your LCD Projection TV Introducing the Sony LCD Projection TV Introducing the Sony LCD Projection TV Indicators Projection lamp Screen Indicators The indicators show the current status of your LCD projection TV will not turn on. ...
... the lamp is on. 11 Replace the lamp with a new Sony XL-2000U replacement lamp (not supplied). ✍ Be sure to attach the lamp cover securely; Projection lamp Your LCD projection TV uses a projection lamp as its surface has a special coating. Screen To minimize ...quite bright when your LCD projection TV, it may take a while before cleaning. Enjoying Your LCD Projection TV Introducing the Sony LCD Projection TV Introducing the Sony LCD Projection TV Indicators Projection lamp Screen Indicators The indicators show the current status of your LCD projection TV will not turn on. ...
Operating Instructions
Page 12
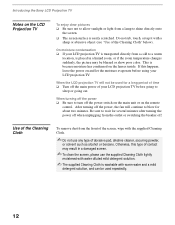
...; The supplied Cleaning Cloth is washable with a sharp or abrasive object (see "Use of your LCD projection TV before using your LCD projection TV is transported directly from a lamp to a warm location, is easily scratched. If this type of contact... may be used repeatedly. 12 When the LCD projection TV will continue to sleep or going out. Use of the Cleaning Cloth To remove dust from the outlet ...; Turn off the main power of the Cleaning Cloth" below). Introducing the Sony LCD Projection TV Notes on the lenses inside.
...; The supplied Cleaning Cloth is washable with a sharp or abrasive object (see "Use of your LCD projection TV before using your LCD projection TV is transported directly from a lamp to a warm location, is easily scratched. If this type of contact... may be used repeatedly. 12 When the LCD projection TV will continue to sleep or going out. Use of the Cleaning Cloth To remove dust from the outlet ...; Turn off the main power of the Cleaning Cloth" below). Introducing the Sony LCD Projection TV Notes on the lenses inside.
Operating Instructions
Page 13
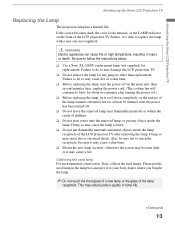
... for at least 30 minutes after removing the lamp. Collecting the used lamp For environmental conservation, Sony collects the used lamp in injury or death. Introducing the Sony LCD Projection TV Introducing the Sony LCD Projection TV Replacing the Lamp The projection lamp has a limited life. WARNING Electric appliances can cause fire or high temperature, resulting in the...
... for at least 30 minutes after removing the lamp. Collecting the used lamp For environmental conservation, Sony collects the used lamp in injury or death. Introducing the Sony LCD Projection TV Introducing the Sony LCD Projection TV Replacing the Lamp The projection lamp has a limited life. WARNING Electric appliances can cause fire or high temperature, resulting in the...
Operating Instructions
Page 14
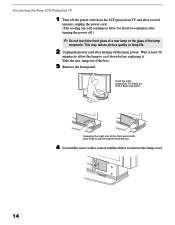
... reduce picture quality or lamp life. 2 Unplug the power cord after turning the power off the main power. Introducing the Sony LCD Projection TV 1 Turn off the power switch on the LCD projection TV and after several minutes, unplug the power cord. (The cooling fan will continue to blow for about two minutes after turning... of the lamp receptacle. Wait at least 30 minutes to allow the lamp to cool down before replacing it does not move. Hold the LCD projection TV firmly so that it . Grasping the right end of the box. 3 Remove the front panel.
... reduce picture quality or lamp life. 2 Unplug the power cord after turning the power off the main power. Introducing the Sony LCD Projection TV 1 Turn off the power switch on the LCD projection TV and after several minutes, unplug the power cord. (The cooling fan will continue to blow for about two minutes after turning... of the lamp receptacle. Wait at least 30 minutes to allow the lamp to cool down before replacing it does not move. Hold the LCD projection TV firmly so that it . Grasping the right end of the box. 3 Remove the front panel.
Operating Instructions
Page 15
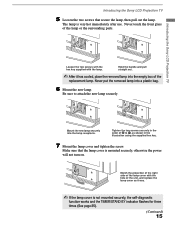
...cooled, place the removed lamp into the lamp receptacle. Mount the new lamp securely into the empty box of the replacement lamp. Introducing the Sony LCD Projection TV Loosen the two screws with the hex key supplied with the hole of the unit, and replace the lamp cover as shown in the order... the right side of the lamp cover with the lamp. Make sure that secure the lamp, then pull out the lamp. Introducing the Sony LCD Projection TV 5 Loosen the two screws that the lamp cover is not mounted securely, the self-diagnostic function works and the TIMER/STAND BY indicator flashes ...
...cooled, place the removed lamp into the lamp receptacle. Mount the new lamp securely into the empty box of the replacement lamp. Introducing the Sony LCD Projection TV Loosen the two screws with the hex key supplied with the hole of the unit, and replace the lamp cover as shown in the order... the right side of the lamp cover with the lamp. Make sure that secure the lamp, then pull out the lamp. Introducing the Sony LCD Projection TV 5 Loosen the two screws that the lamp cover is not mounted securely, the self-diagnostic function works and the TIMER/STAND BY indicator flashes ...
Operating Instructions
Page 16
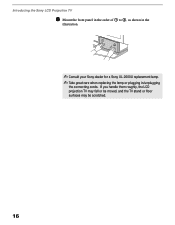
If you handle them roughly, the LCD projection TV may fall or be moved, and the TV stand or floor surfaces may be scratched. 16 Introducing the Sony LCD Projection TV 8 Mount the front panel in the order of 1 to 2, as shown in the illustration. ✍ Consult your Sony dealer for a Sony XL-2000U replacement lamp. ✍ Take great care when replacing the lamp or plugging in/unplugging the connecting cords.
If you handle them roughly, the LCD projection TV may fall or be moved, and the TV stand or floor surfaces may be scratched. 16 Introducing the Sony LCD Projection TV 8 Mount the front panel in the order of 1 to 2, as shown in the illustration. ✍ Consult your Sony dealer for a Sony XL-2000U replacement lamp. ✍ Take great care when replacing the lamp or plugging in/unplugging the connecting cords.
Operating Instructions
Page 17
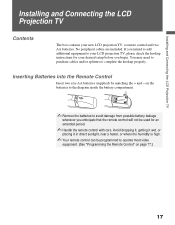
... Batteries into the Remote Control Insert two size AA batteries (supplied) by matching the + and - Installing and Connecting the LCD Projection TV Installing and Connecting the LCD Projection TV Contents The box contains your desired setup before you anticipate that the remote control will not be used for an extended period. ✍... placing it in direct sunlight, near a heater, or where the humidity is high. ✍ Your remote control can be programmed to your LCD projection TV, please check the hookup instructions for your new LCD projection TV, a remote control and two AA batteries.
... Batteries into the Remote Control Insert two size AA batteries (supplied) by matching the + and - Installing and Connecting the LCD Projection TV Installing and Connecting the LCD Projection TV Contents The box contains your desired setup before you anticipate that the remote control will not be used for an extended period. ✍... placing it in direct sunlight, near a heater, or where the humidity is high. ✍ Your remote control can be programmed to your LCD projection TV, please check the hookup instructions for your new LCD projection TV, a remote control and two AA batteries.
Operating Instructions
Page 18
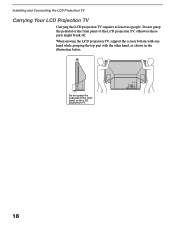
Do not grasp the pedestal or the front panel of the LCD projecttion TV. 18 Do not grasp the pedestal or the front panel of the LCD projection TV, otherwise these parts might break off. When moving the LCD projection TV, support the screen bottom with one hand while grasping the top part with the other hand, as shown in the illustration below. Installing and Connecting the LCD Projection TV Carrying Your LCD Projection TV Carrying the LCD projection TV requires at least two people.
Do not grasp the pedestal or the front panel of the LCD projecttion TV. 18 Do not grasp the pedestal or the front panel of the LCD projection TV, otherwise these parts might break off. When moving the LCD projection TV, support the screen bottom with one hand while grasping the top part with the other hand, as shown in the illustration below. Installing and Connecting the LCD Projection TV Carrying Your LCD Projection TV Carrying the LCD projection TV requires at least two people.
Operating Instructions
Page 19
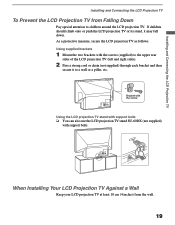
... brackets 1 Mount the two brackets with support belts. As a protective measure, secure the LCD projection TV as follows. If children should climb onto or push the LCD projection TV or its stand, it to the upper rear sides of the LCD projection TV (left and right sides). 2 Pass a strong cord or chain (not supplied) through each bracket...
... brackets 1 Mount the two brackets with support belts. As a protective measure, secure the LCD projection TV as follows. If children should climb onto or push the LCD projection TV or its stand, it to the upper rear sides of the LCD projection TV (left and right sides). 2 Pass a strong cord or chain (not supplied) through each bracket...
Operating Instructions
Page 20
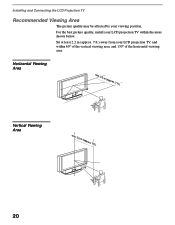
For the best picture quality, install your LCD projection TV within 60° of the vertical viewing area, and 130° of the horizontal viewing area. Sit at least 2.2 m (approx. 7 ft.) away from your viewing position. Horizontal Viewing Area min. 2.2 m (approx. 7 ft.) 65˚ 65˚ Vertical Viewing Area min. 2.2 m (approx. 7 ft.) 230˚ 30˚ 20 Installing and Connecting the LCD Projection TV Recommended Viewing Area The picture quality may be affected by your LCD projection TV, and within the areas shown below.
For the best picture quality, install your LCD projection TV within 60° of the vertical viewing area, and 130° of the horizontal viewing area. Sit at least 2.2 m (approx. 7 ft.) away from your viewing position. Horizontal Viewing Area min. 2.2 m (approx. 7 ft.) 65˚ 65˚ Vertical Viewing Area min. 2.2 m (approx. 7 ft.) 230˚ 30˚ 20 Installing and Connecting the LCD Projection TV Recommended Viewing Area The picture quality may be affected by your LCD projection TV, and within the areas shown below.
Operating Instructions
Page 21
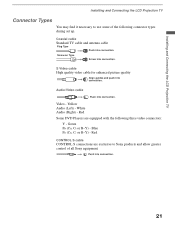
...equipped with the following connector types during set up. Yellow Audio (Left) - White Audio (Right) - Coaxial cable Standard TV cable and antenna cable Plug Type Push into connection. S Video cable High quality video cable for enhanced picture quality Align guides ...connection. 21 Red Some DVD Players are exclusive to use some of all Sony equipment. Installing and Connecting the LCD Projection TV Installing and Connecting the LCD Projection TV Connector Types You may find it necessary to Sony products and allow greater control of the following three video connectors: Y ...
...equipped with the following connector types during set up. Yellow Audio (Left) - White Audio (Right) - Coaxial cable Standard TV cable and antenna cable Plug Type Push into connection. S Video cable High quality video cable for enhanced picture quality Align guides ...connection. 21 Red Some DVD Players are exclusive to use some of all Sony equipment. Installing and Connecting the LCD Projection TV Installing and Connecting the LCD Projection TV Connector Types You may find it necessary to Sony products and allow greater control of the following three video connectors: Y ...
Operating Instructions
Page 22
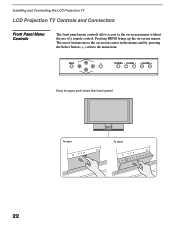
How to the on-screen menus without the use of a remote control. The arrow buttons move the on -screen menus. Pressing MENU brings up the on -screen cursor in the menus and by pressing the Select button ( ) selects the menu item. Installing and Connecting the LCD Projection TV LCD Projection TV Controls and Connectors Front Panel Menu Controls The front panel menu controls allow access to open and close the front panel To open To close 22
How to the on-screen menus without the use of a remote control. The arrow buttons move the on -screen menus. Pressing MENU brings up the on -screen cursor in the menus and by pressing the Select button ( ) selects the menu item. Installing and Connecting the LCD Projection TV LCD Projection TV Controls and Connectors Front Panel Menu Controls The front panel menu controls allow access to open and close the front panel To open To close 22
Operating Instructions
Page 23
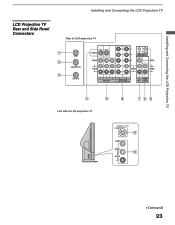
LCD Projection TV Rear and Side Panel Connectors Installing and Connecting the LCD Projection TV Rear of LCD projection TV Installing and Connecting the LCD Projection TV Left side of LCD projection TV VIDEO 2 IN S VIDEO VIDEO L (MONO) AUDIO R (Continued) 23
LCD Projection TV Rear and Side Panel Connectors Installing and Connecting the LCD Projection TV Rear of LCD projection TV Installing and Connecting the LCD Projection TV Left side of LCD projection TV VIDEO 2 IN S VIDEO VIDEO L (MONO) AUDIO R (Continued) 23


