Operating Instructions (Large File - 11.3 MB)
Page 8
Projection lamp ❑ Your LCD projection TV uses a projection lamp as a heater. Cooling fan ❑ This LCD projection TV uses a cooling fan. Do not expose the screen to contain all of broken glass pieces inside the lamp unit. (See "Replacing the Lamp" on page 15.) ❑ When the lamp eventually burns out, you may be affected by the manufacturer, or sold with the manufacturer...
Projection lamp ❑ Your LCD projection TV uses a projection lamp as a heater. Cooling fan ❑ This LCD projection TV uses a cooling fan. Do not expose the screen to contain all of broken glass pieces inside the lamp unit. (See "Replacing the Lamp" on page 15.) ❑ When the lamp eventually burns out, you may be affected by the manufacturer, or sold with the manufacturer...
Operating Instructions (Large File - 11.3 MB)
Page 9
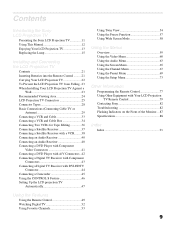
...Sony LCD Projection TV Presenting the Sony LCD Projection TV 11 Using This Manual 12 Enjoying Your LCD Projection TV 13 Replacing the Lamp 15 Installing and Connecting the LCD Projection TV Contents 21 Inserting Batteries into the Remote Control ..........21 Carrying Your LCD Projection TV 22 To Prevent the LCD Projection TV from Falling ..23 When Installing Your LCD Projection TV Against a Wall 23 Recommended Viewing Area 24 LCD Projection TV...with Your LCD Projection TV Remote Control 79 Contacting Sony 82 Troubleshooting 82 Flashing Indicators on the Front of the Monitor....87 ...
...Sony LCD Projection TV Presenting the Sony LCD Projection TV 11 Using This Manual 12 Enjoying Your LCD Projection TV 13 Replacing the Lamp 15 Installing and Connecting the LCD Projection TV Contents 21 Inserting Batteries into the Remote Control ..........21 Carrying Your LCD Projection TV 22 To Prevent the LCD Projection TV from Falling ..23 When Installing Your LCD Projection TV Against a Wall 23 Recommended Viewing Area 24 LCD Projection TV...with Your LCD Projection TV Remote Control 79 Contacting Sony 82 Troubleshooting 82 Flashing Indicators on the Front of the Monitor....87 ...
Operating Instructions (Large File - 11.3 MB)
Page 13
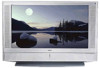
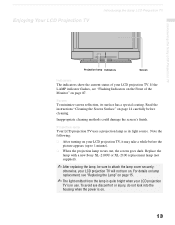
Enjoying Your LCD Projection TV Introducing the Sony LCD Projection TV Introducing the Sony LCD Projection TV Projection lamp Indicators Screen Indicators The indicators show the current status of the Monitor" on page 87. Read the instructions "Cleaning the Screen Surface" on . 13 Projection lamp Your LCD projection TV uses a projection lamp as its surface has a special coating. For details on lamp replacement, see "Flashing Indicators on your LCD projection TV. Inappropriate cleaning methods could damage...
Enjoying Your LCD Projection TV Introducing the Sony LCD Projection TV Introducing the Sony LCD Projection TV Projection lamp Indicators Screen Indicators The indicators show the current status of the Monitor" on page 87. Read the instructions "Cleaning the Screen Surface" on . 13 Projection lamp Your LCD projection TV uses a projection lamp as its surface has a special coating. For details on lamp replacement, see "Flashing Indicators on your LCD projection TV. Inappropriate cleaning methods could damage...
Operating Instructions (Large File - 11.3 MB)
Page 14
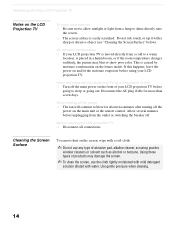
... abrasive pad, alkaline cleaner, scouring powder, window cleaners or solvent such as alcohol or benzene. Introducing the Sony LCD Projection TV Notes on the LCD Projection TV To enjoy clear pictures ❑ Be sure not to allow sunlight or light from a lamp to a warm location, is placed in a humid room, or if the room temperature changes suddenly, the...
... abrasive pad, alkaline cleaner, scouring powder, window cleaners or solvent such as alcohol or benzene. Introducing the Sony LCD Projection TV Notes on the LCD Projection TV To enjoy clear pictures ❑ Be sure not to allow sunlight or light from a lamp to a warm location, is placed in a humid room, or if the room temperature changes suddenly, the...
Operating Instructions (Large File - 11.3 MB)
Page 15
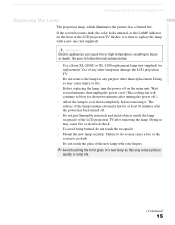
... screen to go dark. ❑ Do not touch the glass of the new lamp with a new one (not supplied). Be sure to do not touch the receptacle. ❑ Mount the new lamp securely. Introducing the Sony LCD Projection TV Introducing the Sony LCD Projection TV Replacing the Lamp The projection lamp, which illuminates the picture, has a limited life. Wait several minutes, then unplug...
... screen to go dark. ❑ Do not touch the glass of the new lamp with a new one (not supplied). Be sure to do not touch the receptacle. ❑ Mount the new lamp securely. Introducing the Sony LCD Projection TV Introducing the Sony LCD Projection TV Replacing the Lamp The projection lamp, which illuminates the picture, has a limited life. Wait several minutes, then unplug...
Operating Instructions (Large File - 11.3 MB)
Page 16
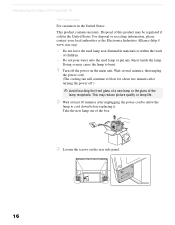
....org). ❑ Do not leave the used lamp or put any object inside the lamp. Doing so may reduce picture quality or lamp life. 2 Wait at least 30 minutes after turning the power off the power on the rear side panel. 16 Introducing the Sony LCD Projection TV The Used Lamp For customers in the United States. This...
....org). ❑ Do not leave the used lamp or put any object inside the lamp. Doing so may reduce picture quality or lamp life. 2 Wait at least 30 minutes after turning the power off the power on the rear side panel. 16 Introducing the Sony LCD Projection TV The Used Lamp For customers in the United States. This...
Operating Instructions (Large File - 11.3 MB)
Page 17
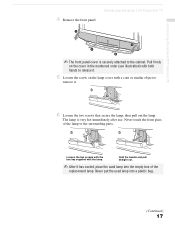
Never touch the front glass of the replacement lamp. The lamp is securely attached to release it has cooled, place the used lamp into the empty box of the lamp or the surrounding parts. Loosen the two screws with the hex key supplied with a coin or similar ... Hold the handle and pull straight out. ✍ After it . 5 Loosen the screw on the lamp cover with the lamp. 4 Remove the front panel. Introducing the Sony LCD Projection TV Introducing the Sony LCD Projection TV ✍ The front panel cover is very hot immediately after use. Pull firmly on the cover in the...
Never touch the front glass of the replacement lamp. The lamp is securely attached to release it has cooled, place the used lamp into the empty box of the lamp or the surrounding parts. Loosen the two screws with the hex key supplied with a coin or similar ... Hold the handle and pull straight out. ✍ After it . 5 Loosen the screw on the lamp cover with the lamp. 4 Remove the front panel. Introducing the Sony LCD Projection TV Introducing the Sony LCD Projection TV ✍ The front panel cover is very hot immediately after use. Pull firmly on the cover in the...
Operating Instructions (Large File - 11.3 MB)
Page 18
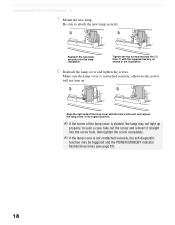
... up properly. In such a case, take out the screw and reinsert it straight into the lamp receptacle. Be sure to attach the new lamp securely. Make sure the lamp cover is reattached securely, otherwise the power will not turn on the unit, and replace the... lamp cover in its original position. ✍ If the screw of the lamp cover with the supplied hex key, as shown in the illustration. 8 Reattach the lamp cover and tighten the screws. Introducing the Sony LCD Projection TV 7 Mount the new lamp...
... up properly. In such a case, take out the screw and reinsert it straight into the lamp receptacle. Be sure to attach the new lamp securely. Make sure the lamp cover is reattached securely, otherwise the power will not turn on the unit, and replace the... lamp cover in its original position. ✍ If the screw of the lamp cover with the supplied hex key, as shown in the illustration. 8 Reattach the lamp cover and tighten the screws. Introducing the Sony LCD Projection TV 7 Mount the new lamp...
Operating Instructions (Large File - 11.3 MB)
Page 19
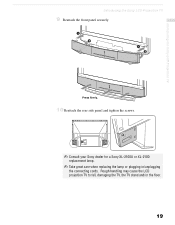
Introducing the Sony LCD Projection TV Introducing the Sony LCD Projection TV 9 Reattach the front panel securely. Rough handling may cause the LCD projection TV to fall, damaging the TV, the TV stand and/or the floor. 19 Press firmly. 10 Reattach the rear side panel and tighten the screws. ✍ Consult your Sony dealer for a Sony XL-2100U or XL-2100 replacement lamp. ✍ Take great care when replacing the lamp or plugging in/unplugging the connecting cords.
Introducing the Sony LCD Projection TV Introducing the Sony LCD Projection TV 9 Reattach the front panel securely. Rough handling may cause the LCD projection TV to fall, damaging the TV, the TV stand and/or the floor. 19 Press firmly. 10 Reattach the rear side panel and tighten the screws. ✍ Consult your Sony dealer for a Sony XL-2100U or XL-2100 replacement lamp. ✍ Take great care when replacing the lamp or plugging in/unplugging the connecting cords.
Operating Instructions (Large File - 11.3 MB)
Page 83
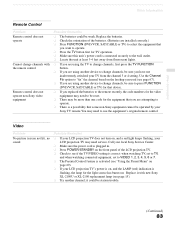
...sure this unit's power cord is flashing, the lamp for the light source has burnt out. Replace the batteries. ❏ Check the orientation of the LCD projection TV. ❏ Check to see if the TV/VIDEO setting is correct: when watching TV, set to TV, and when watching connected equipment, set to ...10063; If your LCD projection TV does not turn on, and a red light keeps flashing, your LCD projection TV's power is on page 69). ❏ If your LCD projection TV may need service. it with the remote control Remote control does not operate non-Sony video equipment Possible Remedies...
...sure this unit's power cord is flashing, the lamp for the light source has burnt out. Replace the batteries. ❏ Check the orientation of the LCD projection TV. ❏ Check to see if the TV/VIDEO setting is correct: when watching TV, set to TV, and when watching connected equipment, set to ...10063; If your LCD projection TV does not turn on, and a red light keeps flashing, your LCD projection TV's power is on page 69). ❏ If your LCD projection TV may need service. it with the remote control Remote control does not operate non-Sony video equipment Possible Remedies...
Operating Instructions (Large File - 11.3 MB)
Page 86
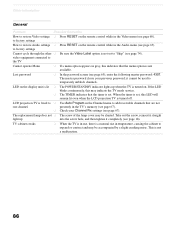
... causing the cabinet to restore Video settings ❏ Press RESET on . TV cabinet creaks ❏ When the TV is in the Audio menu (see page 67). The replacement lamp does not ❏ The screw of the lamp cover may be used to add receivable channels that the menu option is ... service. ❏ The TIMER indicates that the timer is turned on the remote control while in the TV's memory (see page 67). ❏ Check your previous password; LCD projection TV is lit ❏ The POWER/STANDBY indicator lights up into the screw hole, and then tighten it completely (see page...
... causing the cabinet to restore Video settings ❏ Press RESET on . TV cabinet creaks ❏ When the TV is in the Audio menu (see page 67). The replacement lamp does not ❏ The screw of the lamp cover may be used to add receivable channels that the menu option is ... service. ❏ The TIMER indicates that the timer is turned on the remote control while in the TV's memory (see page 67). ❏ Check your previous password; LCD projection TV is lit ❏ The POWER/STANDBY indicator lights up into the screw hole, and then tighten it completely (see page...
Operating Instructions (Large File - 11.3 MB)
Page 87
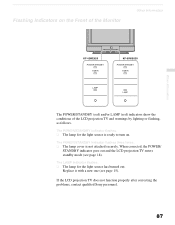
...; The lamp cover is ready to turn on the Front of the Monitor Other Information Other Information KF-42WE620 POWER/STANDBY TIMER KF-50WE620 POWER/STANDBY TIMER LAMP LAMP The POWER/STANDBY (red) and/or LAMP (red) indicators show the conditions of the LCD projection TV and warnings... by lighting or flashing, as follows. The LAMP indicator flashes. ❑ The lamp for the light source is not attached securely. Replace it with a new one (see page 18). If the LCD projection TV does not function properly after correcting the problems, contact qualified Sony...
...; The lamp cover is ready to turn on the Front of the Monitor Other Information Other Information KF-42WE620 POWER/STANDBY TIMER KF-50WE620 POWER/STANDBY TIMER LAMP LAMP The POWER/STANDBY (red) and/or LAMP (red) indicators show the conditions of the LCD projection TV and warnings... by lighting or flashing, as follows. The LAMP indicator flashes. ❑ The lamp for the light source is not attached securely. Replace it with a new one (see page 18). If the LCD projection TV does not function properly after correcting the problems, contact qualified Sony...
Operating Instructions (Large File - 11.3 MB)
Page 88
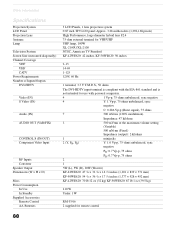
Other Information Specifications Projection System LCD Panel Projection Lens Antenna Lamp Television System Screen Size (measured diagonally) Channel Coverage VHF UHF CATV Power Requirements Number of Inputs/Outputs DVI-HDTV Video (IN) S Video (IN) Audio (... Remote Control AA Batteries 3 LCD Panels, 1 lens projection system 0.87 inch TFT LCD panel Approx. 3.28 million dots (1,092,168 pixels) High Performance, large diameter hybrid lens F2.4 75 ohm external terminal for VHF/UHF UHP lamp, 100W XL-2100U/XL-2100 NTSC, American TV Standard KF-42WE620: 42 inches, KF-50WE620: 50 inches 2-13 14-...
Other Information Specifications Projection System LCD Panel Projection Lens Antenna Lamp Television System Screen Size (measured diagonally) Channel Coverage VHF UHF CATV Power Requirements Number of Inputs/Outputs DVI-HDTV Video (IN) S Video (IN) Audio (... Remote Control AA Batteries 3 LCD Panels, 1 lens projection system 0.87 inch TFT LCD panel Approx. 3.28 million dots (1,092,168 pixels) High Performance, large diameter hybrid lens F2.4 75 ohm external terminal for VHF/UHF UHP lamp, 100W XL-2100U/XL-2100 NTSC, American TV Standard KF-42WE620: 42 inches, KF-50WE620: 50 inches 2-13 14-...

Operating Instructions (Large File - 11.3 MB)
Page 89
Optional Accessories TV Stand Lamp Other Information SU-GW11 (for KF-50WE620/KF-42WE620) SU-GW1 (for KF-50WE620) SU-GW2 (for KF-42WE620) XL-2100U/XL-2100 Design and specifications are subject to change without notice. Other Information 89
Optional Accessories TV Stand Lamp Other Information SU-GW11 (for KF-50WE620/KF-42WE620) SU-GW1 (for KF-50WE620) SU-GW2 (for KF-42WE620) XL-2100U/XL-2100 Design and specifications are subject to change without notice. Other Information 89
Operating Instructions (Large File - 11.3 MB)
Page 92
... Picture Adjust 74 H High Altitude 76 Hue, adjusting 61 I Image Shift 76 Inputs, labeling 74 Installation of the projection TV 21-47 J JUMP button 49 Jump, using 49 L Label Channels 68 video inputs 74 Lamp, replacing 15-20 Language 74 M MENU button 50 Menus Audio 59, 63 Channel 59, 67 Parent 59, 69...from the channel list 68 RESET button 50 Resetting Audio options 63 Video options 60 S S Video cable 28 Satellite receiver connecting 37 using with TV remote control 79 Screen menu 65 Select Country 70 Setting up channels 47 Setup menu 73 Sharpness, adjusting 61 Sleep 75 Speaker 64 Specifications 88...
... Picture Adjust 74 H High Altitude 76 Hue, adjusting 61 I Image Shift 76 Inputs, labeling 74 Installation of the projection TV 21-47 J JUMP button 49 Jump, using 49 L Label Channels 68 video inputs 74 Lamp, replacing 15-20 Language 74 M MENU button 50 Menus Audio 59, 63 Channel 59, 67 Parent 59, 69...from the channel list 68 RESET button 50 Resetting Audio options 63 Video options 60 S S Video cable 28 Satellite receiver connecting 37 using with TV remote control 79 Screen menu 65 Select Country 70 Setting up channels 47 Setup menu 73 Sharpness, adjusting 61 Sleep 75 Speaker 64 Specifications 88...


