Operating Instructions
Page 3
... to alert the user to the presence of uninsulated "dangerous voltage" within the product's enclosure that interference will not be determined by turning the equipment off and on, the user is encouraged to try to correct the interference by your warranty because they are unable to ...reasonable protection against harmful interference in accordance with your warranty. If you will not occur in this manual could void your projection TV, keep the brightness and contrast functions at a high brightness or contrast setting, the image can cause the imprint of station logos onto the...
... to alert the user to the presence of uninsulated "dangerous voltage" within the product's enclosure that interference will not be determined by turning the equipment off and on, the user is encouraged to try to correct the interference by your warranty because they are unable to ...reasonable protection against harmful interference in accordance with your warranty. If you will not occur in this manual could void your projection TV, keep the brightness and contrast functions at a high brightness or contrast setting, the image can cause the imprint of station logos onto the...
Operating Instructions
Page 4
...direct sunlight. registered mark. HDMI, the HDMI logo and HighDefinition Multimedia Interface are trademarks of SRS Labs, Inc. SONY APPLIANCE MODEL NO: KDF-E55A20 KDF-E60A20 SONY TV STAND MODEL NO: SU-GW12 Replacement Parts See page 4 under U.S. TruSurround XT technology is manufactured under license from... the ceiling or to cover the windows that this case, please wait a few hours to let the moisture evaporate before turning on...
...direct sunlight. registered mark. HDMI, the HDMI logo and HighDefinition Multimedia Interface are trademarks of SRS Labs, Inc. SONY APPLIANCE MODEL NO: KDF-E55A20 KDF-E60A20 SONY TV STAND MODEL NO: SU-GW12 Replacement Parts See page 4 under U.S. TruSurround XT technology is manufactured under license from... the ceiling or to cover the windows that this case, please wait a few hours to let the moisture evaporate before turning on...

Operating Instructions
Page 12
Introducing the Sony TV Enjoying Your TV To enjoy your TV is moved directly from a cold to let the moisture evaporate before unplugging from shining directly on the TV To enjoy clear picture ❑ Prevent sunlight or other light sources from the outlet or switching the breaker off... has evaporated, the picture will continue to follow the cleaning instruction on the TV. Allow several minutes before turning on page 4 for about two minutes. On moisture condensation ❑ If your TV for years to come and maintain its original picture quality, you anticipate not using...
Introducing the Sony TV Enjoying Your TV To enjoy your TV is moved directly from a cold to let the moisture evaporate before unplugging from shining directly on the TV To enjoy clear picture ❑ Prevent sunlight or other light sources from the outlet or switching the breaker off... has evaporated, the picture will continue to follow the cleaning instruction on the TV. Allow several minutes before turning on page 4 for about two minutes. On moisture condensation ❑ If your TV for years to come and maintain its original picture quality, you anticipate not using...
Operating Instructions
Page 13
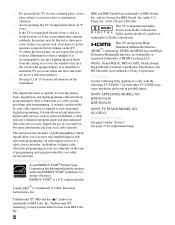
...light housing when the power is set, the indicator will remain lit lit. (will turn on . Introducing the Sony TV Introducing the Sony TV Screen Projection lamp POWER LAMP TIMER POWER Indicators Indicators Projection Lamp How to replace the lamp, see page 14). The indicators show the current ...ready, it is placed correctly. Indicator Flashing because... Your TV uses a projection lamp as shown in use. When (green) flashing it turns on . TIMER indicator is in the diagram above. Replace it with a new Sony XL-2200 replacement lamp (not supplied). ✍ The light...
...light housing when the power is set, the indicator will remain lit lit. (will turn on . Introducing the Sony TV Introducing the Sony TV Screen Projection lamp POWER LAMP TIMER POWER Indicators Indicators Projection Lamp How to replace the lamp, see page 14). The indicators show the current ...ready, it is placed correctly. Indicator Flashing because... Your TV uses a projection lamp as shown in use. When (green) flashing it turns on . TIMER indicator is in the diagram above. Replace it with a new Sony XL-2200 replacement lamp (not supplied). ✍ The light...
Operating Instructions
Page 16
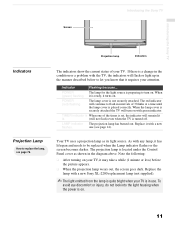
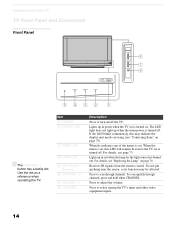
...6 CHANNEL +/- 7 VOLUME +/- 8 TV/VIDEO Description Press to scan through channels, press and hold either CHANNEL. When lit, indicates one of the timers is set is turned off the TV. When the timer is turned on page 76. Introducing the Sony TV TV Front Panel and Connectors Front Panel POWER... LAMP TIMER POWER POWER LAMP TIMER POWER CHANNEL 3 # VOLUME 3 # TV/VIDEO 6 7 8 5432 1 z The CHANNEL + ...
...6 CHANNEL +/- 7 VOLUME +/- 8 TV/VIDEO Description Press to scan through channels, press and hold either CHANNEL. When lit, indicates one of the timers is set is turned off the TV. When the timer is turned on page 76. Introducing the Sony TV TV Front Panel and Connectors Front Panel POWER... LAMP TIMER POWER POWER LAMP TIMER POWER CHANNEL 3 # VOLUME 3 # TV/VIDEO 6 7 8 5432 1 z The CHANNEL + ...
Operating Instructions
Page 32
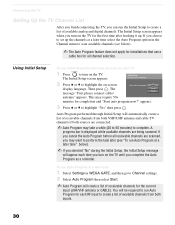
...will create a list of available channels from both VHF/UHF antenna and cable TV channels if both inputs. 30 appears. 3 Press V or v to create a list of receivable channels for each time you turn on the TV for completion and "Start auto program now?" A progress bar is displayed while...The Initial Setup screen appears when you turn on -screen display language. Connecting the TV Setting Up the TV Channel List After you finish connecting the TV, you can run Initial Setup the first time you turn on your TV 1 TV POWER Press to turn on the TV until you complete the Auto Program as...
...will create a list of available channels from both VHF/UHF antenna and cable TV channels if both inputs. 30 appears. 3 Press V or v to create a list of receivable channels for each time you turn on the TV for completion and "Start auto program now?" A progress bar is displayed while...The Initial Setup screen appears when you turn on -screen display language. Connecting the TV Setting Up the TV Channel List After you finish connecting the TV, you can run Initial Setup the first time you turn on your TV 1 TV POWER Press to turn on the TV until you complete the Auto Program as...

Operating Instructions
Page 45
... the external equipment selected from the FUNCTION button 3. Adjust or customize TV settings (see "Using the FREEZE Button" on page 60. To scan quickly through 74). qj MENU Press to acess the following through the Multi-channel TV Sound (MTS) options: Stereo, Auto SAP (Second Audio Program), ...) View signals from your connected external equipment that supports this button alone will start the Record Buttons recording. Press again to turn Display off the TV. By pressing this TOOLS function. (This button does not operate for details on page 46. 43 To be used only ...
... the external equipment selected from the FUNCTION button 3. Adjust or customize TV settings (see "Using the FREEZE Button" on page 60. To scan quickly through 74). qj MENU Press to acess the following through the Multi-channel TV Sound (MTS) options: Stereo, Auto SAP (Second Audio Program), ...) View signals from your connected external equipment that supports this button alone will start the Record Buttons recording. Press again to turn Display off the TV. By pressing this TOOLS function. (This button does not operate for details on page 46. 43 To be used only ...

Operating Instructions
Page 46
...step 1 again. 3 Press button. Watching the TV Programming the Remote Control The remote control is not ...lit. ENT JUMP ANT MTS/SAP FREEZE SOUND PICTURE TV/SAT SUR WIDE DISPLAY GUIDE TOOLS RETURN WEGA GATE PREV...TV 44 Sony Equipment DVR DVD/VCR SAT/Cable Programmable Code Number 772 601 (Sony Dream System) 801 (Sony Satellite Receiver) MUTING TV/VIDEO POWER TV POWER DVD/ SAT/ DVR VCR CABLE TV Follow the steps below to program your TV...seconds, you may cause the programmed codes to operate Sony brand video equipment. If not, try 2 entering from the "Manufacturer...
...step 1 again. 3 Press button. Watching the TV Programming the Remote Control The remote control is not ...lit. ENT JUMP ANT MTS/SAP FREEZE SOUND PICTURE TV/SAT SUR WIDE DISPLAY GUIDE TOOLS RETURN WEGA GATE PREV...TV 44 Sony Equipment DVR DVD/VCR SAT/Cable Programmable Code Number 772 601 (Sony Dream System) 801 (Sony Satellite Receiver) MUTING TV/VIDEO POWER TV POWER DVD/ SAT/ DVR VCR CABLE TV Follow the steps below to program your TV...seconds, you may cause the programmed codes to operate Sony brand video equipment. If not, try 2 entering from the "Manufacturer...
Operating Instructions
Page 48
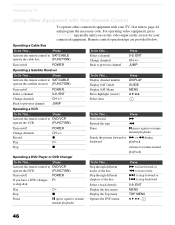
...disk Play Stop Pause H x X (press again to SAT/CABLE operate the cable box (FUNCTION) Turn on /off Select a channel Change channels Back to previous channel POWER 0-9, ENT CH +/- JUMP To Do This ... Watching the TV Using Other Equipment with Your Remote Control To operate other connected equipment with your connected equipment... a Cable Box To Do This ... Remote control operation tips are provided below. Press Activate the remote control to DVD/VCR operate the VCR (FUNCTION) Turn on the screen for your TV, first turn to resume normal playback) To Do This ...
...disk Play Stop Pause H x X (press again to SAT/CABLE operate the cable box (FUNCTION) Turn on /off Select a channel Change channels Back to previous channel POWER 0-9, ENT CH +/- JUMP To Do This ... Watching the TV Using Other Equipment with Your Remote Control To operate other connected equipment with your connected equipment... a Cable Box To Do This ... Remote control operation tips are provided below. Press Activate the remote control to DVD/VCR operate the VCR (FUNCTION) Turn on the screen for your TV, first turn to resume normal playback) To Do This ...

Operating Instructions
Page 49
... B z z b V v B b Record (VCR) Change channels (VCR) Adjust tracking (VCR) z CH +/- Press Activate the remote control to DVD/VCR operate the DVD (FUNCTION) Turn on/off Select other equipment F1 connected to the AV Receiver Watching the TV To Do This ... Press Activate the remote control to DVD/VCR operate the AV Receiver (FUNCTION...backward playback Move highlight (cursor) Select item Master Volume V v B b VOL+/-, MUTING To Do This ... or 0-9, ENT (using tuner) CH +/- (during tape playback) 47 Watching the TV Operating a 5.1ch DVD AV System (Sony DAV) To Do This ...
... B z z b V v B b Record (VCR) Change channels (VCR) Adjust tracking (VCR) z CH +/- Press Activate the remote control to DVD/VCR operate the DVD (FUNCTION) Turn on/off Select other equipment F1 connected to the AV Receiver Watching the TV To Do This ... Press Activate the remote control to DVD/VCR operate the AV Receiver (FUNCTION...backward playback Move highlight (cursor) Select item Master Volume V v B b VOL+/-, MUTING To Do This ... or 0-9, ENT (using tuner) CH +/- (during tape playback) 47 Watching the TV Operating a 5.1ch DVD AV System (Sony DAV) To Do This ...

Operating Instructions
Page 61
... level of the marker (z). Noise On Reduction Select to highlight Custom then press . Off Select to optimize your cable input's picture, and create another to turn off Noise Reduction. You can create one Custom setting to optimize your DVD player's picture. also not available when watching 480p, 720p or 1080i sources.
... level of the marker (z). Noise On Reduction Select to highlight Custom then press . Off Select to optimize your cable input's picture, and create another to turn off Noise Reduction. You can create one Custom setting to optimize your DVD player's picture. also not available when watching 480p, 720p or 1080i sources.

Operating Instructions
Page 62
...or decrease the sounds between the Treble and Bass. Off Select to confirm the selection. Press to turn off Steady Sound. TruSurround Select for surround sound (for stereo programs XT only). Adjust to the..., Custom) (except for spoken dialogue. Adjust to increase or decrease the sound level of the current input (TV or video input) relative to change settings, press V v B b. Press WEGA GATE........ Press to select...programs. Off Normal stereo or mono reception. 60 Select Settings 3. To exit the Audio, press WEGA GATE . Using the Settings Accessing the Audio Settings ...
...or decrease the sounds between the Treble and Bass. Off Select to confirm the selection. Press to turn off Steady Sound. TruSurround Select for surround sound (for stereo programs XT only). Adjust to the..., Custom) (except for spoken dialogue. Adjust to increase or decrease the sound level of the current input (TV or video input) relative to change settings, press V v B b. Press WEGA GATE........ Press to select...programs. Off Normal stereo or mono reception. 60 Select Settings 3. To exit the Audio, press WEGA GATE . Using the Settings Accessing the Audio Settings ...

Operating Instructions
Page 63
... when you have external equipment connected to Off. Fixed The TV's speakers are turned off and the audio output of volume adjustments The TV's speakers are turned off the TV speakers and listen to make no SAP signal is present, the TV remains in stereo. Select 1, 2 or 3 to give ...sound more impact by the TV's remote control. A/V Sync Off/1/2/3 Use this option to the TV's sound only through your...
... when you have external equipment connected to Off. Fixed The TV's speakers are turned off and the audio output of volume adjustments The TV's speakers are turned off the TV speakers and listen to make no SAP signal is present, the TV remains in stereo. Select 1, 2 or 3 to give ...sound more impact by the TV's remote control. A/V Sync Off/1/2/3 Use this option to the TV's sound only through your...

Operating Instructions
Page 68
... any future access into the Parental Lock menu. Maximum ratings permitted are: US: TV-Y, TV-G, G Canada: C, G, TV-Y Youth Maximum ratings permitted are : US: TV-14, PG-13 Canada: 14+, 13 ans+, TV-14 Custom Select to exit Password 3. Selecting Parental Lock Options The Parental Lock settings... include the following options: Option Description Parental Lock Turn ratings on page 83. No programs are blocked ...
... any future access into the Parental Lock menu. Maximum ratings permitted are: US: TV-Y, TV-G, G Canada: C, G, TV-Y Youth Maximum ratings permitted are : US: TV-14, PG-13 Canada: 14+, 13 ans+, TV-14 Custom Select to exit Password 3. Selecting Parental Lock Options The Parental Lock settings... include the following options: Option Description Parental Lock Turn ratings on page 83. No programs are blocked ...

Operating Instructions
Page 69
... 68). To change your password. Using the Settings (Continued) 67 Using the Settings z If you are not familiar with the Parental Guideline rating system, you turn your TV off. To deactivate the parental control feature ❑ Set Parental Lock to use U.S.A. ratings (see page 66. Select to help simplify the rating selection...
... 68). To change your password. Using the Settings (Continued) 67 Using the Settings z If you are not familiar with the Parental Guideline rating system, you turn your TV off. To deactivate the parental control feature ❑ Set Parental Lock to use U.S.A. ratings (see page 66. Select to help simplify the rating selection...

Operating Instructions
Page 72
...closed caption modes (for programs that are broadcast with closed captioning). Select Settings 3. Allows you have any equipment connected to the TV so you connected to set basic and advanced Caption Vision options. When in this service). Press WEGA GATE........ WEGA GATE 2. ...WEGA GATE to change settings, press V v B b. To exit the Setup, press WEGA GATE . On Caption Vision is turned off. Off Program Caption Vision is turned on page 72. Also displays when the channel is changed or the DISPLAY button is pressed. See "Programming Caption Vision" on...
...closed caption modes (for programs that are broadcast with closed captioning). Select Settings 3. Allows you have any equipment connected to the TV so you connected to set basic and advanced Caption Vision options. When in this service). Press WEGA GATE........ WEGA GATE 2. ...WEGA GATE to change settings, press V v B b. To exit the Setup, press WEGA GATE . On Caption Vision is turned off. Off Program Caption Vision is turned on page 72. Also displays when the channel is changed or the DISPLAY button is pressed. See "Programming Caption Vision" on...
Operating Instructions
Page 75
... or 2, press instead of time (Off, 15 minutes, 30 minutes, 45 minutes, 60 minutes or 90 minutes) that you want the TV to highlight Timer 1 or Timer 2. Sleep Allows you set the clock and to program your TV to turn on and off and tune to change settings, press V v B b. Timer 1 ...Timer 2 You can use the Timers to program the TV to select the amount of pressing b. (Continued) 73 Press WEGA GATE........ WEGA GATE...
... or 2, press instead of time (Off, 15 minutes, 30 minutes, 45 minutes, 60 minutes or 90 minutes) that you want the TV to highlight Timer 1 or Timer 2. Sleep Allows you set the clock and to program your TV to turn on and off and tune to change settings, press V v B b. Timer 1 ...Timer 2 You can use the Timers to program the TV to select the amount of pressing b. (Continued) 73 Press WEGA GATE........ WEGA GATE...
Operating Instructions
Page 76
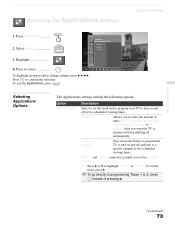
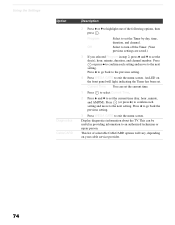
...(s), hour, minute, duration, and channel number. Press (or press b) to confirm each setting and move to the next setting. Display diagnostics information about the TV. Select to turn off the Timer. (Your previous settings are saved.) 3 If you selected Program in providing information to an authorized technician or repair person. Press B to...
...(s), hour, minute, duration, and channel number. Press (or press b) to confirm each setting and move to the next setting. Display diagnostics information about the TV. Select to turn off the Timer. (Your previous settings are saved.) 3 If you selected Program in providing information to an authorized technician or repair person. Press B to...

Operating Instructions
Page 78
... removed. ❑ When the lamp eventually burns out, you may damage the TV. ❑ Do not remove the lamp for about two minutes after turning the power off.) 2 Wait at least 30 minutes after removing the lamp. ...Doing so may pop inside the lamp receptacle of the used lamps follow the instructions below. ❑ Use a Sony XL-2200 replacement ... LAMP indicator on the main unit. Other Information Replacing the Lamp The projection lamp, which illuminates the picture, has a limited life.
... removed. ❑ When the lamp eventually burns out, you may damage the TV. ❑ Do not remove the lamp for about two minutes after turning the power off.) 2 Wait at least 30 minutes after removing the lamp. ...Doing so may pop inside the lamp receptacle of the used lamps follow the instructions below. ❑ Use a Sony XL-2200 replacement ... LAMP indicator on the main unit. Other Information Replacing the Lamp The projection lamp, which illuminates the picture, has a limited life.
Operating Instructions
Page 83
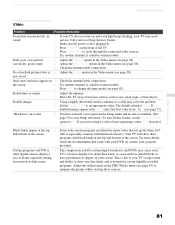
...Other Information Video Problem Possible Remedies No picture (screen not lit), no ❏ If your TV does not turn off this is Auto. The default setting is especially common with your DVD (or contact your local Sony Service Center. ❏ Make sure the power cord is available. (See page 70 to... reset Setup selections.) To turn on the front of the screen (this feature, set the Caption Vision option to Off...
...Other Information Video Problem Possible Remedies No picture (screen not lit), no ❏ If your TV does not turn off this is Auto. The default setting is especially common with your DVD (or contact your local Sony Service Center. ❏ Make sure the power cord is available. (See page 70 to... reset Setup selections.) To turn on the front of the screen (this feature, set the Caption Vision option to Off...


