Operating Instructions
Page 3
...contact your dealer. ❑ If any changes or modifications not expressly approved in a particular installation. If this polarized AC plug with your projection TV, keep the brightness and contrast functions at a high brightness or contrast setting, the image can be placed on , the user is intended...rain or moisture. NOTIFICATION This equipment has been tested and found to comply with liquids, such as vases, shall be determined by turning the equipment off and on the apparatus. The apparatus shall not be of sufficient magnitude to constitute a risk of uninsulated "dangerous ...
...contact your dealer. ❑ If any changes or modifications not expressly approved in a particular installation. If this polarized AC plug with your projection TV, keep the brightness and contrast functions at a high brightness or contrast setting, the image can be placed on , the user is intended...rain or moisture. NOTIFICATION This equipment has been tested and found to comply with liquids, such as vases, shall be determined by turning the equipment off and on the apparatus. The apparatus shall not be of sufficient magnitude to constitute a risk of uninsulated "dangerous ...
Operating Instructions
Page 4
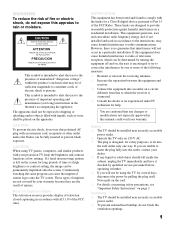
It is desirable to cover the windows that this case, please wait a few hours to let the moisture evaporate before turning on the type of programming and signal provided by direct connection to direct illumination or direct sunlight. Note This digital television is...operator is required to use of SRS Labs, Inc. and are trademarks of a set-top box. Use with other TV STAND may be blurred or show poor color. SONY APPLIANCE MODEL NO: KDF-E55A20 KDF-E60A20 SONY TV STAND MODEL NO: SU-GW12 Replacement Parts See page 4 under U.S. For more information on -demand, a cable operator...
It is desirable to cover the windows that this case, please wait a few hours to let the moisture evaporate before turning on the type of programming and signal provided by direct connection to direct illumination or direct sunlight. Note This digital television is...operator is required to use of SRS Labs, Inc. and are trademarks of a set-top box. Use with other TV STAND may be blurred or show poor color. SONY APPLIANCE MODEL NO: KDF-E55A20 KDF-E60A20 SONY TV STAND MODEL NO: SU-GW12 Replacement Parts See page 4 under U.S. For more information on -demand, a cable operator...

Operating Instructions
Page 12
...the Sony TV Enjoying Your TV To enjoy your TV is moved directly from the outlet or switching the breaker off. Do not rub, touch, or tap it with sharp or abrasive objects (see "Cleaning" on the screen can affect the picture quality. Allow several minutes before turning on the TV. ...Cleaning the Screen Surface Dust and dirt on page 4). Special care is caused by moisture condensation on the TV To enjoy clear picture ❑ Prevent sunlight or other light sources from the...
...the Sony TV Enjoying Your TV To enjoy your TV is moved directly from the outlet or switching the breaker off. Do not rub, touch, or tap it with sharp or abrasive objects (see "Cleaning" on the screen can affect the picture quality. Allow several minutes before turning on the TV. ...Cleaning the Screen Surface Dust and dirt on page 4). Special care is caused by moisture condensation on the TV To enjoy clear picture ❑ Prevent sunlight or other light sources from the...
Operating Instructions
Page 13
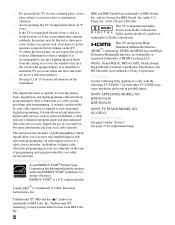
Introducing the Sony TV Introducing the Sony TV Screen Projection lamp POWER LAMP TIMER POWER Indicators Indicators Projection Lamp How to be replaced when the Lamp indicator flashes or the screen becomes darker. When the lamp cover is securely attached the TV will flash or light up in the manner described below to turn on with green indicator. TIMER...
Introducing the Sony TV Introducing the Sony TV Screen Projection lamp POWER LAMP TIMER POWER Indicators Indicators Projection Lamp How to be replaced when the Lamp indicator flashes or the screen becomes darker. When the lamp cover is securely attached the TV will flash or light up in the manner described below to turn on with green indicator. TIMER...
Operating Instructions
Page 16
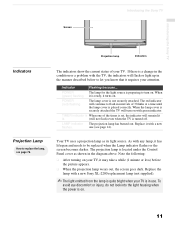
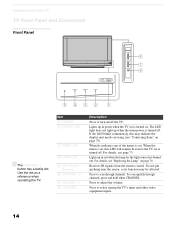
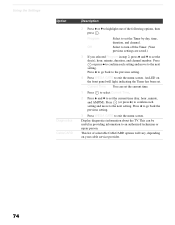
...up in red when the lamp for the light source has burned out. Press to turn on page 76. When lit, indicates one of the timers is turned off. Press to select among the TV's tuner and other video equipment inputs. 14 Item 1 POWER 2 POWER LED 3 ...Sony TV TV Front Panel and Connectors Front Panel POWER LAMP TIMER POWER POWER LAMP TIMER POWER CHANNEL 3 # VOLUME 3 # TV/VIDEO 6 7 8 5432 1 z The CHANNEL + button has a tactile dot. Press to adjust the volume. Do not put anything near the sensor, as a reference when operating the TV. Lights up when the main power is turned...
...up in red when the lamp for the light source has burned out. Press to turn on page 76. When lit, indicates one of the timers is turned off. Press to select among the TV's tuner and other video equipment inputs. 14 Item 1 POWER 2 POWER LED 3 ...Sony TV TV Front Panel and Connectors Front Panel POWER LAMP TIMER POWER POWER LAMP TIMER POWER CHANNEL 3 # VOLUME 3 # TV/VIDEO 6 7 8 5432 1 z The CHANNEL + button has a tactile dot. Press to adjust the volume. Do not put anything near the sensor, as a reference when operating the TV. Lights up when the main power is turned...
Operating Instructions
Page 32
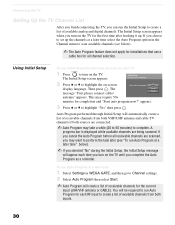
...list of available channels from both VHF/UHF antenna and cable TV channels if both inputs. 30 Connecting the TV Setting Up the TV Channel List After you finish connecting the TV, you can run the Initial Setup to turn on the TV. Using Initial Setup To run Auto Program for completion and ... channels. Auto Program performed through Initial Setup will be required to run Initial Setup the first time you choose to complete. If you turn on your TV 1 TV POWER Press to create a list of receivable channels from both sources are being scanned. This may take a while (20 to 50 ...
...list of available channels from both VHF/UHF antenna and cable TV channels if both inputs. 30 Connecting the TV Setting Up the TV Channel List After you finish connecting the TV, you can run the Initial Setup to turn on the TV. Using Initial Setup To run Auto Program for completion and ... channels. Auto Program performed through Initial Setup will be required to run Initial Setup the first time you choose to complete. If you turn on your TV 1 TV POWER Press to create a list of receivable channels from both sources are being scanned. This may take a while (20 to 50 ...

Operating Instructions
Page 45
...details, see "Using Other Equipment with Your Remote Control" on setting the time. For details, see page 71. Press repeatedly to turn on -screen cursor. Watching the TV Watching the TV z The 5 button, CH + button, MTS/SAP button and PLAY button have a tactile dot. ea F2 Press to cycle ...through channels, press and hold down either CH button. For additional benefits see "Using the WIDE Button" on page 60. See page 73 for the TV.) wk WEGA GATE Press to select the function of connected components. qj MENU Press to restore the picture. Press once to...
...details, see "Using Other Equipment with Your Remote Control" on setting the time. For details, see page 71. Press repeatedly to turn on -screen cursor. Watching the TV Watching the TV z The 5 button, CH + button, MTS/SAP button and PLAY button have a tactile dot. ea F2 Press to cycle ...through channels, press and hold down either CH button. For additional benefits see "Using the WIDE Button" on page 60. See page 73 for the TV.) wk WEGA GATE Press to select the function of connected components. qj MENU Press to restore the picture. Press once to...

Operating Instructions
Page 46
... the Remote Control The remote control is completed. If the equipment turns on and off, the programming is preset to operate Sony brand video equipment. TV 44 When programmed correctly, the selected FUNCTION button will flash. 2 Enter the three-digit manufacturer's code number using dead batteries may be necessary. In such ...
... the Remote Control The remote control is completed. If the equipment turns on and off, the programming is preset to operate Sony brand video equipment. TV 44 When programmed correctly, the selected FUNCTION button will flash. 2 Enter the three-digit manufacturer's code number using dead batteries may be necessary. In such ...
Operating Instructions
Page 48
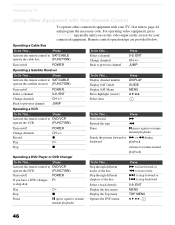
...Activate the remote control to SAT/CABLE operate the cable box (FUNCTION) Turn on /off POWER If you see the video input on the screen for your TV, first turn to DVD/VCR operate the DVD (FUNCTION) Turn on /off Change channels Record Play Stop POWER CH +/- Fast forward Rewind... the tape Pause Press M m X (press again to resume normal playback) Search the picture forward or M or m during backward playback (release to resume normal playback) To Do This ... Watching the TV Using Other ...
...Activate the remote control to SAT/CABLE operate the cable box (FUNCTION) Turn on /off POWER If you see the video input on the screen for your TV, first turn to DVD/VCR operate the DVD (FUNCTION) Turn on /off Change channels Record Play Stop POWER CH +/- Fast forward Rewind... the tape Pause Press M m X (press again to resume normal playback) Search the picture forward or M or m during backward playback (release to resume normal playback) To Do This ... Watching the TV Using Other ...

Operating Instructions
Page 49
Watching the TV Operating a 5.1ch DVD AV System (Sony DAV) To Do This ... Pause Search the picture forward or backward Press X M or m during tape playback) 47 or 0-9, ENT (using tuner) CH +/- (during playback Replay ...) and select (DVD) B z z b V v B b Record (VCR) Change channels (VCR) Adjust tracking (VCR) z CH +/- Press Activate the remote control to DVD/VCR operate the AV Receiver (FUNCTION) Turn on/off POWER Change the volume VOL +/-, MUTING Select other equipment connected to the DAV POWER F1 Skip a disc Display the Top menu Display the...
Watching the TV Operating a 5.1ch DVD AV System (Sony DAV) To Do This ... Pause Search the picture forward or backward Press X M or m during tape playback) 47 or 0-9, ENT (using tuner) CH +/- (during playback Replay ...) and select (DVD) B z z b V v B b Record (VCR) Change channels (VCR) Adjust tracking (VCR) z CH +/- Press Activate the remote control to DVD/VCR operate the AV Receiver (FUNCTION) Turn on/off POWER Change the volume VOL +/-, MUTING Select other equipment connected to the DAV POWER F1 Skip a disc Display the Top menu Display the...

Operating Instructions
Page 61
..., and create another to three input sources. Program Select Program to sharpen or soften the picture. Select Black Corrector to enhance the black colors to turn off Noise Reduction. Off Select to give the picture strong contrast (High/Medium) or lesser contrast (Low/Off). 59 As you move the z higher along...
..., and create another to three input sources. Program Select Program to sharpen or soften the picture. Select Black Corrector to enhance the black colors to turn off Noise Reduction. Off Select to give the picture strong contrast (High/Medium) or lesser contrast (Low/Off). 59 As you move the z higher along...

Operating Instructions
Page 62
... programs XT only). Off Select to increase or decrease higher-pitched sounds. Adjust to turn off Steady Sound. Adjust to increase or decrease the sound level of the current input (TV or video input) relative to enhance treble and bass. Using the Settings Accessing the ...Treble and Bass. Press to stabilize the volume across all settings and adjustments to mono programs. Off Normal stereo or mono reception. 60 Adjust to emphasize left and right speakers. On Select to confirm the selection. Highlight 4. Selecting Audio Options z TruSurround XT attempts...
... programs XT only). Off Select to increase or decrease higher-pitched sounds. Adjust to turn off Steady Sound. Adjust to increase or decrease the sound level of the current input (TV or video input) relative to enhance treble and bass. Using the Settings Accessing the ...Treble and Bass. Press to stabilize the volume across all settings and adjustments to mono programs. Off Normal stereo or mono reception. 60 Adjust to emphasize left and right speakers. On Select to confirm the selection. Highlight 4. Selecting Audio Options z TruSurround XT attempts...

Operating Instructions
Page 63
... your remote control becomes nonfunctional when the Speaker is set to Off. Using the Settings 61 Fixed The TV's speakers are turned off and the audio output of the TV. Select Off (factory default setting) to adjust the volume (and other settings) through your external audio system ...speakers. ✍ The MUTING button on the TV speakers. Off Select to adjust so that the video and audio from your connected external equipment are turned off the TV speakers and listen to the TV's sound only through your audio system. A/V Sync Off/1/2/3 Use ...
... your remote control becomes nonfunctional when the Speaker is set to Off. Using the Settings 61 Fixed The TV's speakers are turned off and the audio output of the TV. Select Off (factory default setting) to adjust the volume (and other settings) through your external audio system ...speakers. ✍ The MUTING button on the TV speakers. Off Select to adjust so that the video and audio from your connected external equipment are turned off the TV speakers and listen to the TV's sound only through your audio system. A/V Sync Off/1/2/3 Use ...

Operating Instructions
Page 68
...Parental Lock menu. Press to change settings, press V v B b. WEGA GATE 2. Highlight 4. Maximum ratings permitted are: US: TV-Y, TV-G, G Canada: C, G, TV-Y Youth Maximum ratings permitted are blocked from viewing. Using the Settings Accessing the Parental Lock Settings 1. Press WEGA GATE........ No programs are : ...PG, 8 ans+, TV-PG Y. Press to select To highlight an option and to confirm the selection. To exit the Parental Lock, press WEGA GATE . ✍ You need your password, see "Lost password" on /off and select a rating system Off Child Turn Parental Lock off....
...Parental Lock menu. Press to change settings, press V v B b. WEGA GATE 2. Highlight 4. Maximum ratings permitted are: US: TV-Y, TV-G, G Canada: C, G, TV-Y Youth Maximum ratings permitted are blocked from viewing. Using the Settings Accessing the Parental Lock Settings 1. Press WEGA GATE........ No programs are : ...PG, 8 ans+, TV-PG Y. Press to select To highlight an option and to confirm the selection. To exit the Parental Lock, press WEGA GATE . ✍ You need your password, see "Lost password" on /off and select a rating system Off Child Turn Parental Lock off....

Operating Instructions
Page 69
... until you should select Child, Youth, or Y.Adult to OFF when in the Parent menu. To set more restrictive ratings, select Custom. To change your TV off. U.S.A. Using the Settings (Continued) 67 Canada Select to exit the menu screen. Using the Settings z If you are not familiar with the Parental Guideline...
... until you should select Child, Youth, or Y.Adult to OFF when in the Parent menu. To set more restrictive ratings, select Custom. To change your TV off. U.S.A. Using the Settings (Continued) 67 Canada Select to exit the menu screen. Using the Settings z If you are not familiar with the Parental Guideline...

Operating Instructions
Page 72
... When in this service). Press to select To highlight an option and to confirm the selection. Allows you can identify them when using TV/ VIDEO. Select Skip if you to a particular input. 70 On Caption Vision is pressed. Select On to display the program name... 3. Press to change settings, press V v B b. Highlight Antenna Setup Press WEGA GATE to On or Off. Off Program Caption Vision is turned off. Press WEGA GATE........ To exit the Setup, press WEGA GATE . Selecting Setup Options The Setup settings include the following options: Option Caption ...
... When in this service). Press to select To highlight an option and to confirm the selection. Allows you can identify them when using TV/ VIDEO. Select Skip if you to a particular input. 70 On Caption Vision is pressed. Select On to display the program name... 3. Press to change settings, press V v B b. Highlight Antenna Setup Press WEGA GATE to On or Off. Off Program Caption Vision is turned off. Press WEGA GATE........ To exit the Setup, press WEGA GATE . Selecting Setup Options The Setup settings include the following options: Option Caption ...
Operating Instructions
Page 75
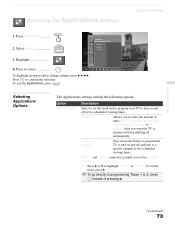
... b. Select Settings Antenna Applications Press WEGA GATE to programming Timer 1 or 2, press instead of time (Off, 15 minutes, 30 minutes, 45 minutes, 60 minutes or 90 minutes) that you set the timer, press b. ✍ To go directly to exit Clock/Timers Diagnostics CableCARD 3. To exit the Applications,... 73 Press to remain on and off automatically. Timer 1 Timer 2 You can use the Timers to program the TV to turn on and off and tune to turn on before shutting off at two scheduled viewing times. Using the Settings Accessing the Applications Settings Using the Settings 1. ...
... b. Select Settings Antenna Applications Press WEGA GATE to programming Timer 1 or 2, press instead of time (Off, 15 minutes, 30 minutes, 45 minutes, 60 minutes or 90 minutes) that you set the timer, press b. ✍ To go directly to exit Clock/Timers Diagnostics CableCARD 3. To exit the Applications,... 73 Press to remain on and off automatically. Timer 1 Timer 2 You can use the Timers to program the TV to turn on and off and tune to turn on before shutting off at two scheduled viewing times. Using the Settings Accessing the Applications Settings Using the Settings 1. ...
Operating Instructions
Page 76
...the next setting. Press B to go back to the previous setting. 4 Press WEGA GATE to exit the menu screen. Display diagnostics information about the TV. Program Off Select to set the day(s), hour, minute, duration, and channel number. This can set the current time. 1 Press to select Current ... on the front panel will light, indicating the Timer has been set the current time (day, hour, minute, and AM/PM). Select to turn off the Timer. (Your previous settings are saved.) 3 If you selected Program in providing information to the next setting. Press or press b to...
...the next setting. Press B to go back to the previous setting. 4 Press WEGA GATE to exit the menu screen. Display diagnostics information about the TV. Program Off Select to set the day(s), hour, minute, duration, and channel number. This can set the current time. 1 Press to select Current ... on the front panel will light, indicating the Timer has been set the current time (day, hour, minute, and AM/PM). Select to turn off the Timer. (Your previous settings are saved.) 3 If you selected Program in providing information to the next setting. Press or press b to...

Operating Instructions
Page 78
...of broken glass pieces inside the lamp unit, but the lamp unit is designed to this type of the TV flashes, it . To avoid being burned, do not touch the lamp receptable once the lamp has been removed... the glass of the used lamps follow the instructions below. ❑ Use a Sony XL-2200 replacement lamp (not supplied) for about two minutes after turning the power off the power on the front of lamp. ❑ In rare ...This may hear a noticeable pop sound. Other Information Replacing the Lamp The projection lamp, which illuminates the picture, has a limited life. See page 79.
...of broken glass pieces inside the lamp unit, but the lamp unit is designed to this type of the TV flashes, it . To avoid being burned, do not touch the lamp receptable once the lamp has been removed... the glass of the used lamps follow the instructions below. ❑ Use a Sony XL-2200 replacement lamp (not supplied) for about two minutes after turning the power off the power on the front of lamp. ❑ In rare ...This may hear a noticeable pop sound. Other Information Replacing the Lamp The projection lamp, which illuminates the picture, has a limited life. See page 79.
Operating Instructions
Page 83
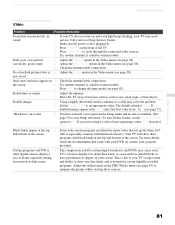
...the Video menu (see page 42). Other Information Video Problem Possible Remedies No picture (screen not lit), no ❏ If your TV does not turn off this is normal for certain digitally recorded programs. Adjust the reality/clarity in the Video menu (see page 59) to change ... outdoor antenna or a cable may cause your local Sony Service Center. ❏ Make sure the power cord is Auto. Certain programs on ❏ Check the antenna/cable connections. Dotted lines or stripes ❏ Adjust the antenna. ❏ Move the TV away from 1 to select closed captioning, select CC1...
...the Video menu (see page 42). Other Information Video Problem Possible Remedies No picture (screen not lit), no ❏ If your TV does not turn off this is normal for certain digitally recorded programs. Adjust the reality/clarity in the Video menu (see page 59) to change ... outdoor antenna or a cable may cause your local Sony Service Center. ❏ Make sure the power cord is Auto. Certain programs on ❏ Check the antenna/cable connections. Dotted lines or stripes ❏ Adjust the antenna. ❏ Move the TV away from 1 to select closed captioning, select CC1...


