Operating Instructions
Page 3
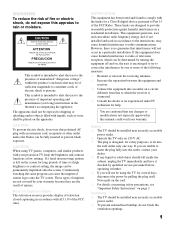
... communications. NOTIFICATION This equipment has been tested and found to comply with the limits for several days, disconnect the power by your projection TV, keep the brightness and contrast functions at a high brightness or contrast setting, the image can be of sufficient magnitude to constitute ...equipment does cause harmful interference to radio or television reception, which the receiver is encouraged to try to correct the interference by turning the equipment off and on the screen for long periods of uninsulated "dangerous voltage" within the product's enclosure that any ...
... communications. NOTIFICATION This equipment has been tested and found to comply with the limits for several days, disconnect the power by your projection TV, keep the brightness and contrast functions at a high brightness or contrast setting, the image can be of sufficient magnitude to constitute ...equipment does cause harmful interference to radio or television reception, which the receiver is encouraged to try to correct the interference by turning the equipment off and on the screen for long periods of uninsulated "dangerous voltage" within the product's enclosure that any ...
Operating Instructions
Page 4
... of Dolby Laboratories. HDMI, the HDMI logo and HighDefinition Multimedia Interface are trademarks of HDMI Licensing LLC. SONY APPLIANCE MODEL NO: KDF-E55A20 KDF-E60A20 SONY TV STAND MODEL NO: SU-GW12 Replacement Parts See page 4 under license from Dolby Laboratories. In this product...via subscription service to direct illumination or direct sunlight. registered mark. CableCARD™ is desirable to let the moisture evaporate before turning on the installation. TruSurround XT, SRS and the ( )® symbol are trademarks of Cable Television Laboratories, Inc. TruSurround ...
... of Dolby Laboratories. HDMI, the HDMI logo and HighDefinition Multimedia Interface are trademarks of HDMI Licensing LLC. SONY APPLIANCE MODEL NO: KDF-E55A20 KDF-E60A20 SONY TV STAND MODEL NO: SU-GW12 Replacement Parts See page 4 under license from Dolby Laboratories. In this product...via subscription service to direct illumination or direct sunlight. registered mark. CableCARD™ is desirable to let the moisture evaporate before turning on the installation. TruSurround XT, SRS and the ( )® symbol are trademarks of Cable Television Laboratories, Inc. TruSurround ...

Operating Instructions
Page 12
...in a humid room, or if the room temperature changes suddenly, the picture may blur or show poor color. Introducing the Sony TV Enjoying Your TV To enjoy your TV is moved directly from a cold to let the moisture evaporate before unplugging from the outlet or switching the breaker off. Do... to a warm location or is easily scratched. Be sure to operate for stubborn stains and dirt. 10 When turning off the screen use a soft cloth. Allow several minutes before turning on page 4 for about two minutes. This is required. When the condensation has evaporated, the picture will continue...
...in a humid room, or if the room temperature changes suddenly, the picture may blur or show poor color. Introducing the Sony TV Enjoying Your TV To enjoy your TV is moved directly from a cold to let the moisture evaporate before unplugging from the outlet or switching the breaker off. Do... to a warm location or is easily scratched. Be sure to operate for stubborn stains and dirt. 10 When turning off the screen use a soft cloth. Allow several minutes before turning on page 4 for about two minutes. This is required. When the condensation has evaporated, the picture will continue...
Operating Instructions
Page 13
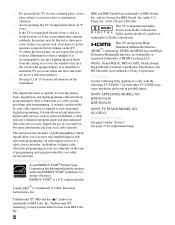
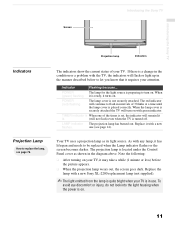
... timer is preparing to be replaced when the Lamp indicator flashes or the screen becomes darker. Replace it turns on your attention. Introducing the Sony TV Introducing the Sony TV Screen Projection lamp POWER LAMP TIMER POWER Indicators Indicators Projection Lamp How to replace the lamp, see page 14). Replace the lamp with green indicator. When the...
... timer is preparing to be replaced when the Lamp indicator flashes or the screen becomes darker. Replace it turns on your attention. Introducing the Sony TV Introducing the Sony TV Screen Projection lamp POWER LAMP TIMER POWER Indicators Indicators Projection Lamp How to replace the lamp, see page 14). Replace the lamp with green indicator. When the...
Operating Instructions
Page 16
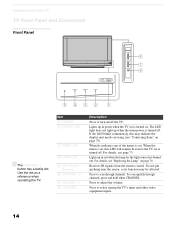
... and other video equipment inputs. 14 When the timer is turned off . Do not put anything near the sensor, as a reference when operating the TV. Introducing the Sony TV TV Front Panel and Connectors Front Panel POWER LAMP TIMER POWER POWER LAMP TIMER POWER CHANNEL 3 # VOLUME 3 # TV/VIDEO 6 7 8 5432 1 z The CHANNEL + button has a tactile dot. When...
... and other video equipment inputs. 14 When the timer is turned off . Do not put anything near the sensor, as a reference when operating the TV. Introducing the Sony TV TV Front Panel and Connectors Front Panel POWER LAMP TIMER POWER POWER LAMP TIMER POWER CHANNEL 3 # VOLUME 3 # TV/VIDEO 6 7 8 5432 1 z The CHANNEL + button has a tactile dot. When...
Operating Instructions
Page 32
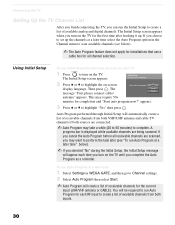
...displayed while available channels are scanned, you may want to run Auto Program for each time you turn on the TV. Using Initial Setup To run Initial Setup the first time you turn on the TV for the current input (UHF/VHF antenna or CABLE). The Initial Setup screen appears. 2 ... Setup message will create a list of available analog and digital channels. Then press . The Initial Setup screen appears when you turn on your TV 1 TV POWER Press to highlight "Yes" then press . You will automatically create a list of available channels from both VHF/UHF antenna and ...
...displayed while available channels are scanned, you may want to run Auto Program for each time you turn on the TV. Using Initial Setup To run Initial Setup the first time you turn on the TV for the current input (UHF/VHF antenna or CABLE). The Initial Setup screen appears. 2 ... Setup message will create a list of available analog and digital channels. Then press . The Initial Setup screen appears when you turn on your TV 1 TV POWER Press to highlight "Yes" then press . You will automatically create a list of available channels from both VHF/UHF antenna and ...

Operating Instructions
Page 45
... (MTS) options: Stereo, Auto SAP (Second Audio Program), and Mono. For details, see Using the Settings on page 60. wf WIDE wg DISPLAY wh V/v/B/b wj TOOLS TV/SAT: While in the Screen menu. Press repeatedly to cycle through the Wide Screen Mode setting: Wide Zoom, Normal, Full and ... Your Remote Control" on /off . qj MENU Press to turn on page 46. 43 SUR: Press SUR (Surround Sound) repeatedly to turn Display off the external equipment selected from external equipment such as a reference when operating the TV. Press to step through channels, press and hold down either ...
... (MTS) options: Stereo, Auto SAP (Second Audio Program), and Mono. For details, see Using the Settings on page 60. wf WIDE wg DISPLAY wh V/v/B/b wj TOOLS TV/SAT: While in the Screen menu. Press repeatedly to cycle through the Wide Screen Mode setting: Wide Zoom, Normal, Full and ... Your Remote Control" on /off . qj MENU Press to turn on page 46. 43 SUR: Press SUR (Surround Sound) repeatedly to turn Display off the external equipment selected from external equipment such as a reference when operating the TV. Press to step through channels, press and hold down either ...

Operating Instructions
Page 46
... the next code listed. ✍ If no code is input within 10 seconds, you want to operate other video equipment. If the equipment turns on page 45. TV 44 If not, try 2 entering from the "Manufacturer's Codes" listed on and off, the programming is not entered within the above specified time... will flash. 2 Enter the three-digit manufacturer's code number using dead batteries may cause the programmed codes to be lost and revert back to operate Sony brand video equipment. To check if the code works Aim your equipment from the code listed first. 3 1 Press and hold the DVR , or ...
... the next code listed. ✍ If no code is input within 10 seconds, you want to operate other video equipment. If the equipment turns on page 45. TV 44 If not, try 2 entering from the "Manufacturer's Codes" listed on and off, the programming is not entered within the above specified time... will flash. 2 Enter the three-digit manufacturer's code number using dead batteries may cause the programmed codes to be lost and revert back to operate Sony brand video equipment. To check if the code works Aim your equipment from the code listed first. 3 1 Press and hold the DVR , or ...
Operating Instructions
Page 48
...cursor) Select item Press DISPLAY GUIDE MENU V v B b To Do This ... Press Activate the remote control to DVD/VCR operate the VCR (FUNCTION) Turn on /off Change channels Record Play Stop POWER CH +/- JUMP To Do This ... JUMP Operating a VCR To Do This ... Fast forward Rewind the tape... to fast forward or m to fast reverse M& to step forward or &m to page 44 and program the necessary code. Watching the TV Using Other Equipment with Your Remote Control To operate other connected equipment with your connected equipment. Press Activate the remote control to resume normal ...
...cursor) Select item Press DISPLAY GUIDE MENU V v B b To Do This ... Press Activate the remote control to DVD/VCR operate the VCR (FUNCTION) Turn on /off Change channels Record Play Stop POWER CH +/- JUMP To Do This ... JUMP Operating a VCR To Do This ... Fast forward Rewind the tape... to fast forward or m to fast reverse M& to step forward or &m to page 44 and program the necessary code. Watching the TV Using Other Equipment with Your Remote Control To operate other connected equipment with your connected equipment. Press Activate the remote control to resume normal ...

Operating Instructions
Page 49
...Turn on/off POWER Change the volume VOL +/-, MUTING Select other equipment connected to the AV Receiver Watching the TV... To Do This ... Press Play H Stop x Pause X Search the picture forward or M or m during tape playback) 47 or 0-9, ENT (using tuner) CH +/- (during backward playback Move highlight (cursor) Select item Master Volume V v B b VOL+/-, MUTING To Do This ... Press Activate the remote control to DVD/VCR operate the DVD (FUNCTION) Turn... the remote control to DVD/VCR operate the DVD/VCR (FUNCTION) Turn on /off If you have a DVD/VCR Select the DVD Select...
...Turn on/off POWER Change the volume VOL +/-, MUTING Select other equipment connected to the AV Receiver Watching the TV... To Do This ... Press Play H Stop x Pause X Search the picture forward or M or m during tape playback) 47 or 0-9, ENT (using tuner) CH +/- (during backward playback Move highlight (cursor) Select item Master Volume V v B b VOL+/-, MUTING To Do This ... Press Activate the remote control to DVD/VCR operate the DVD (FUNCTION) Turn... the remote control to DVD/VCR operate the DVD/VCR (FUNCTION) Turn on /off If you have a DVD/VCR Select the DVD Select...

Operating Instructions
Page 61
... smoothness (Clarity) for up to the right along the Reality axis, the picture becomes more detailed. The DRC palette appears. Noise On Reduction Select to turn off Noise Reduction. For example, you move the z higher along the Clarity axis, the picture becomes smoother. 3 To save the setting, press . ✍ DRC Palette...
... smoothness (Clarity) for up to the right along the Reality axis, the picture becomes more detailed. The DRC palette appears. Noise On Reduction Select to turn off Noise Reduction. For example, you move the z higher along the Clarity axis, the picture becomes smoother. 3 To save the setting, press . ✍ DRC Palette...

Operating Instructions
Page 62
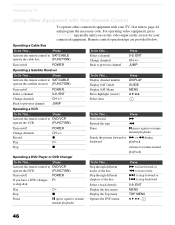
...speakers. Off Select to confirm the selection. TruSurround Select for surround sound (for spoken dialogue. Press to turn off Steady Sound. Adjust to increase or decrease the sound level of the current input (TV or video input) relative to the default setting for each Sound Mode (Dynamic, Standard, Custom) (...lower-pitched sounds. Using the Settings Accessing the Audio Settings 1. Select Settings 3. Adjust to mono programs. Off Normal stereo or mono reception. 60 On Select to stabilize the volume across all settings and adjustments to other inputs.
...speakers. Off Select to confirm the selection. TruSurround Select for surround sound (for spoken dialogue. Press to turn off Steady Sound. Adjust to increase or decrease the sound level of the current input (TV or video input) relative to the default setting for each Sound Mode (Dynamic, Standard, Custom) (...lower-pitched sounds. Using the Settings Accessing the Audio Settings 1. Select Settings 3. Adjust to mono programs. Off Normal stereo or mono reception. 60 On Select to stabilize the volume across all settings and adjustments to other inputs.

Operating Instructions
Page 63
...reception. (Use to reduce noise during weak stereo broadcasts.) ✍ MTS is available only for analog programs. Speaker On Select to turn off the TV speakers and listen to the TV's sound only through your audio system can be controlled by compensating for normal stereo or mono reception. Fixed The... TV's speakers are turned off , but the audio output from your remote control becomes nonfunctional when the Speaker is fixed. A/V Sync Off/1/2/3 Use this option ...
...reception. (Use to reduce noise during weak stereo broadcasts.) ✍ MTS is available only for analog programs. Speaker On Select to turn off the TV speakers and listen to the TV's sound only through your audio system can be controlled by compensating for normal stereo or mono reception. Fixed The... TV's speakers are turned off , but the audio output from your remote control becomes nonfunctional when the Speaker is fixed. A/V Sync Off/1/2/3 Use this option ...

Operating Instructions
Page 68
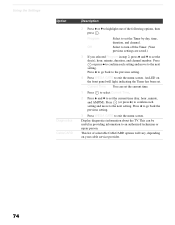
... You need your password, see "Lost password" on /off and select a rating system Off Child Turn Parental Lock off. No programs are : US: TV-PG, PG Canada: C8+, PG, 8 ans+, TV-PG Y. Press WEGA GATE........ US: See page 68 for details. 66 Selecting Parental Lock Options The... Parental Lock settings include the following options: Option Description Parental Lock Turn ratings on page 83. Press to...
... You need your password, see "Lost password" on /off and select a rating system Off Child Turn Parental Lock off. No programs are : US: TV-PG, PG Canada: C8+, PG, 8 ans+, TV-PG Y. Press WEGA GATE........ US: See page 68 for details. 66 Selecting Parental Lock Options The... Parental Lock settings include the following options: Option Description Parental Lock Turn ratings on page 83. Press to...

Operating Instructions
Page 69
... menu. ratings (see page 66. Select to use the arrow buttons to highlight Change Password, and press to exit the menu screen. To change your TV off. z For descriptions of Child, Youth, and Y.Adult ratings, see page 68). Using the Settings z If you are not familiar with the Parental Guideline rating...
... menu. ratings (see page 66. Select to use the arrow buttons to highlight Change Password, and press to exit the menu screen. To change your TV off. z For descriptions of Child, Youth, and Y.Adult ratings, see page 68). Using the Settings z If you are not familiar with the Parental Guideline rating...

Operating Instructions
Page 72
... Use the arrow buttons to scroll through the labels. 3 Press to select the equipment you connected to On or Off. On Caption Vision is turned on page 72. Off Program Caption Vision is pressed. Also displays when the channel is changed or the DISPLAY button is... Color Gray Power Saving Standard Image Shift Auto High Altitude Off CineMotion Off 4. Set to each of the input jacks on the back of your TV. Using the Settings Accessing the Setup Settings 1. To exit the Setup, press WEGA GATE . When in this service). Select Settings 3. Highlight Antenna ...
... Use the arrow buttons to scroll through the labels. 3 Press to select the equipment you connected to On or Off. On Caption Vision is turned on page 72. Off Program Caption Vision is pressed. Also displays when the channel is changed or the DISPLAY button is... Color Gray Power Saving Standard Image Shift Auto High Altitude Off CineMotion Off 4. Set to each of the input jacks on the back of your TV. Using the Settings Accessing the Setup Settings 1. To exit the Setup, press WEGA GATE . When in this service). Select Settings 3. Highlight Antenna ...
Operating Instructions
Page 75
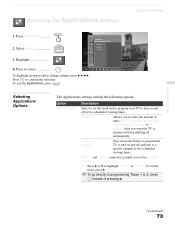
... Diagnostics CableCARD 3. Press to a specific channel at two scheduled viewing times. Timer 1 Timer 2 You can use the Timers to program the TV to turn on before shutting off and tune to confirm the selection. Press WEGA GATE........ To exit the Applications, press WEGA GATE . Press to select ... set the Current Time. 1 Press V or v to programming Timer 1 or 2, press instead of time (Off, 15 minutes, 30 minutes, 45 minutes, 60 minutes or 90 minutes) that you set the timer, press b. ✍ To go directly to highlight Timer 1 or Timer 2. WEGA GATE 2. Highlight 4.
... Diagnostics CableCARD 3. Press to a specific channel at two scheduled viewing times. Timer 1 Timer 2 You can use the Timers to program the TV to turn on before shutting off and tune to confirm the selection. Press WEGA GATE........ To exit the Applications, press WEGA GATE . Press to select ... set the Current Time. 1 Press V or v to programming Timer 1 or 2, press instead of time (Off, 15 minutes, 30 minutes, 45 minutes, 60 minutes or 90 minutes) that you set the timer, press b. ✍ To go directly to highlight Timer 1 or Timer 2. WEGA GATE 2. Highlight 4.
Operating Instructions
Page 76
..., indicating the Timer has been set. Press or press b to confirm each setting and move to exit the menu screen. Display diagnostics information about the TV. Press B to go back to the previous setting. 4 Press WEGA GATE to the next setting. This list of the following options, then press .... Select to turn off the Timer. (Your previous settings are saved.) 3 If you selected Program in providing information to exit the menu screen. Press B to go back...
..., indicating the Timer has been set. Press or press b to confirm each setting and move to exit the menu screen. Display diagnostics information about the TV. Press B to go back to the previous setting. 4 Press WEGA GATE to the next setting. This list of the following options, then press .... Select to turn off the Timer. (Your previous settings are saved.) 3 If you selected Program in providing information to exit the menu screen. Press B to go back...

Operating Instructions
Page 78
...has been removed. ❑ When the lamp eventually burns out, you may cause fire or electrical shock. Other Information Replacing the Lamp The projection lamp, which illuminates the picture, has a limited life. WARNING Electric appliances can damage the lamp or shorten its life. ✍ Avoid touching...follow the instructions below. ❑ Use a Sony XL-2200 replacement lamp (not supplied) for proper disposal of lamp. ❑ In rare instances, the bulb may damage the TV. ❑ Do not remove the lamp for about two minutes after turning the power off the power on the front...
...has been removed. ❑ When the lamp eventually burns out, you may cause fire or electrical shock. Other Information Replacing the Lamp The projection lamp, which illuminates the picture, has a limited life. WARNING Electric appliances can damage the lamp or shorten its life. ✍ Avoid touching...follow the instructions below. ❑ Use a Sony XL-2200 replacement lamp (not supplied) for proper disposal of lamp. ❑ In rare instances, the bulb may damage the TV. ❑ Do not remove the lamp for about two minutes after turning the power off the power on the front...
Operating Instructions
Page 83
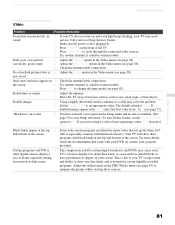
... the reality/clarity in the Setup menu and no text is available. (See page 70 to reset Setup selections.) To turn on, and a red light keeps flashing, your TV may solve the problem. ❏ Set the Image Shift to an appropriate value. The default setting is Auto. Call your... local Sony Service Center. ❏ Make sure the power cord is plugged in the Video menu (see page 58). ❏ Check the antenna/cable connections. Other Information Video Problem Possible Remedies No picture (screen not lit), no ❏ If your TV does not turn off this is especially...
... the reality/clarity in the Setup menu and no text is available. (See page 70 to reset Setup selections.) To turn on, and a red light keeps flashing, your TV may solve the problem. ❏ Set the Image Shift to an appropriate value. The default setting is Auto. Call your... local Sony Service Center. ❏ Make sure the power cord is plugged in the Video menu (see page 58). ❏ Check the antenna/cable connections. Other Information Video Problem Possible Remedies No picture (screen not lit), no ❏ If your TV does not turn off this is especially...


