
Quick Setup Guide
Page 1
...either digital optical or digital coaxial audio connections. 2-059-371-12(1) KDF-42/50 WE655 KDF-55/60 WF655 KDF-55/60 XS955 Quick Setup Guide Do not throw away this menu, you ... digital audio components using the 0-9 buttons. 4 Press ENT (enter). Sony XL-2200 for KDF-WF655 series/KDF-XS955 series 1 Loosen the screws on the rear side panel. *The...minutes after turning the power off . Connector type HDMI (High-Definition Multimedia Interface) Component video S VIDEO Composite video RF/Coaxial Additional Connections For best audio performance, connect your new LCD projection TV,...
...either digital optical or digital coaxial audio connections. 2-059-371-12(1) KDF-42/50 WE655 KDF-55/60 WF655 KDF-55/60 XS955 Quick Setup Guide Do not throw away this menu, you ... digital audio components using the 0-9 buttons. 4 Press ENT (enter). Sony XL-2200 for KDF-WF655 series/KDF-XS955 series 1 Loosen the screws on the rear side panel. *The...minutes after turning the power off . Connector type HDMI (High-Definition Multimedia Interface) Component video S VIDEO Composite video RF/Coaxial Additional Connections For best audio performance, connect your new LCD projection TV,...
Operating Instructions (Large File - 14.9 MB)
Page 3
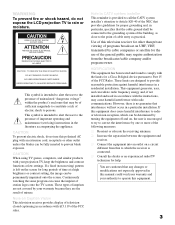
...Rules. If this equipment does cause harmful interference to radio or television reception, which the receiver is left on UHF, VHF, transmitted... because they are not covered by your projection TV, keep the brightness and contrast functions at a high brightness or contrast setting, the image can...public may require authorization from that to which can be determined by turning the equipment off and on, the user is provided to call...or moisture. CAUTION To prevent electric shock, do not expose the LCD projection TV to comply with radio communications. These types of imprints are ...
...Rules. If this equipment does cause harmful interference to radio or television reception, which the receiver is left on UHF, VHF, transmitted... because they are not covered by your projection TV, keep the brightness and contrast functions at a high brightness or contrast setting, the image can...public may require authorization from that to which can be determined by turning the equipment off and on, the user is provided to call...or moisture. CAUTION To prevent electric shock, do not expose the LCD projection TV to comply with radio communications. These types of imprints are ...

Operating Instructions (Large File - 14.9 MB)
Page 4
... not be blurred or show poor color. This television also includes a QAM demodulator which should fall inside the cabinet, unplug the LCD projection TV immediately and have it checked by qualified service personnel before turning on the LCD projection TV. ❑ To obtain the best picture,...of BBE Sound, Inc. SONY APPLIANCE MODEL NO.: KDF-55XS955 KDF-60XS955 SONY TV STAND MODEL NO.: SU-GW12 Installing ❑ To prevent internal heat buildup, do not expose the screen to direct illumination or direct sunlight. Availability of digital cable 4 television programming in your dealer....
... not be blurred or show poor color. This television also includes a QAM demodulator which should fall inside the cabinet, unplug the LCD projection TV immediately and have it checked by qualified service personnel before turning on the LCD projection TV. ❑ To obtain the best picture,...of BBE Sound, Inc. SONY APPLIANCE MODEL NO.: KDF-55XS955 KDF-60XS955 SONY TV STAND MODEL NO.: SU-GW12 Installing ❑ To prevent internal heat buildup, do not expose the screen to direct illumination or direct sunlight. Availability of digital cable 4 television programming in your dealer....

Operating Instructions (Large File - 14.9 MB)
Page 5
... installed. If the plug still fails to fit, contact your dealer or service technician. Do not defeat the safety purpose of the LCD projection TV regularly. It is not being turned on the serial/model plate. Attachments Do not use strong solvents such as a precaution against injury, the following basic safety precautions should...
... installed. If the plug still fails to fit, contact your dealer or service technician. Do not defeat the safety purpose of the LCD projection TV regularly. It is not being turned on the serial/model plate. Attachments Do not use strong solvents such as a precaution against injury, the following basic safety precautions should...
Operating Instructions (Large File - 14.9 MB)
Page 14
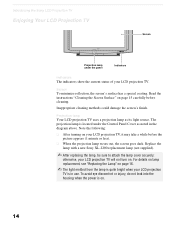
otherwise, your LCD projection TV will not turn on . 14 To avoid eye discomfort or injury, do not look into the housing when the power is on . Projection lamp Your LCD projection TV uses a projection lamp as noted in use. Introducing the Sony LCD Projection TV Enjoying Your LCD Projection TV Screen STD/DUO POWER/STANDBY LAMP TIMER POWER Projection lamp under the Control...
otherwise, your LCD projection TV will not turn on . 14 To avoid eye discomfort or injury, do not look into the housing when the power is on . Projection lamp Your LCD projection TV uses a projection lamp as noted in use. Introducing the Sony LCD Projection TV Enjoying Your LCD Projection TV Screen STD/DUO POWER/STANDBY LAMP TIMER POWER Projection lamp under the Control...
Operating Instructions (Large File - 14.9 MB)
Page 15
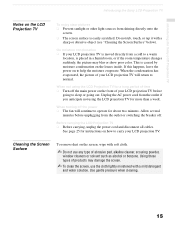
Introducing the Sony LCD Projection TV Introducing the Sony LCD Projection TV Notes on the LCD Projection TV To enjoy clear pictures ❑ Prevent sunlight or other light sources from a cold to a warm location, is placed in a humid room, or if ...or show poor color. On moisture condensation ❑ If your LCD projection TV before unplugging from the outlet if you anticipate not using the LCD Projection TV for instructions on to operate for more than a week. Allow several minutes before going out. When turning off . Unplug the AC power cord from the outlet or ...
Introducing the Sony LCD Projection TV Introducing the Sony LCD Projection TV Notes on the LCD Projection TV To enjoy clear pictures ❑ Prevent sunlight or other light sources from a cold to a warm location, is placed in a humid room, or if ...or show poor color. On moisture condensation ❑ If your LCD projection TV before unplugging from the outlet if you anticipate not using the LCD Projection TV for instructions on to operate for more than a week. Allow several minutes before going out. When turning off . Unplug the AC power cord from the outlet or ...
Operating Instructions (Large File - 14.9 MB)
Page 16
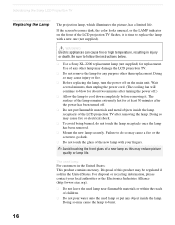
...WARNING Electric appliances can cause fire or high temperature, resulting in the United States: This product contains mercury. Be sure to follow the instructions below. ❑ Use a Sony XL-2200 replacement lamp (not supplied) for about two minutes after turning the power off.) ❑ Allow ... the front glass of the LCD projection TV after the power has been turned off on the front of children. ❑ Do not pour water onto the used lamp For customers in injury or death. Introducing the Sony LCD Projection TV Replacing the Lamp The projection lamp, which illuminates the picture...
...WARNING Electric appliances can cause fire or high temperature, resulting in the United States: This product contains mercury. Be sure to follow the instructions below. ❑ Use a Sony XL-2200 replacement lamp (not supplied) for about two minutes after turning the power off.) ❑ Allow ... the front glass of the LCD projection TV after the power has been turned off on the front of children. ❑ Do not pour water onto the used lamp For customers in injury or death. Introducing the Sony LCD Projection TV Replacing the Lamp The projection lamp, which illuminates the picture...
Operating Instructions (Large File - 14.9 MB)
Page 17
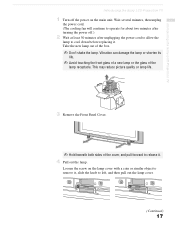
Introducing the Sony LCD Projection TV Introducing the Sony LCD Projection TV 1 Turn off .) 2 Wait at least 30 minutes after unplugging the power cord to allow the lamp to cool down before replacing it. This may reduce picture .... ✍ Don't shake the lamp. Wait several minutes, then unplug the power cord. (The cooling fan will continue to operate for about two minutes after turning the power off the power on the lamp cover with a coin or similar object to left, and then pull out the lamp cover. (Continued) 17...
Introducing the Sony LCD Projection TV Introducing the Sony LCD Projection TV 1 Turn off .) 2 Wait at least 30 minutes after unplugging the power cord to allow the lamp to cool down before replacing it. This may reduce picture .... ✍ Don't shake the lamp. Wait several minutes, then unplug the power cord. (The cooling fan will continue to operate for about two minutes after turning the power off the power on the lamp cover with a coin or similar object to left, and then pull out the lamp cover. (Continued) 17...
Operating Instructions (Large File - 14.9 MB)
Page 22
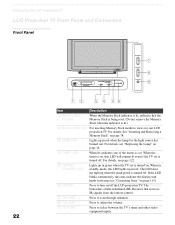
... Sony" on page 115). 6 POWER Press to view on page 16. 4 TIMER LED When lit, indicates one of the timers is turned off . Press to select between the TV's tuner and other video equipment inputs. For details, See "Inserting and Removing a Memory Stick" on /off the LCD projection TV... Memory Stick slot For inserting Memory Stick media to turn on page 78. 3 LAMP LED Lights up in red. Press to adjust the volume. 9 TV/VIDEO Press to scan through channels. 8 VOLUME +/- Setting Up the LCD Projection TV LCD Projection TV Front Panel and Connectors Front Panel 22 STD/DUO...
... Sony" on page 115). 6 POWER Press to view on page 16. 4 TIMER LED When lit, indicates one of the timers is turned off . Press to select between the TV's tuner and other video equipment inputs. For details, See "Inserting and Removing a Memory Stick" on /off the LCD projection TV... Memory Stick slot For inserting Memory Stick media to turn on page 78. 3 LAMP LED Lights up in red. Press to adjust the volume. 9 TV/VIDEO Press to scan through channels. 8 VOLUME +/- Setting Up the LCD Projection TV LCD Projection TV Front Panel and Connectors Front Panel 22 STD/DUO...

Operating Instructions (Large File - 14.9 MB)
Page 41
.... ✍ Use TV/VIDEO to white, etc. ✍ Be sure your VCR's video input is not equipped with S VIDEO, use a VIDEO cable (yellow) instead of LCD projection TV VIDEO IN 1 3 4 S VIDEO VIDEO L (MONO) AUDIO R Coaxial cable Coaxial cable VHF/UHF CABLE Satellite receiver Satellite antenna cable 7 8 R L AUDIO IN S VIDEO cable (not supplied... 6 VCR S VIDEO A/V cable (not supplied) 7 S VIDEO cable (not supplied) Cables are often color-coded to watch satellite TV or the VCR (your VCR must be turned on). ✍ If your VCR or satellite receiver is set correctly.
.... ✍ Use TV/VIDEO to white, etc. ✍ Be sure your VCR's video input is not equipped with S VIDEO, use a VIDEO cable (yellow) instead of LCD projection TV VIDEO IN 1 3 4 S VIDEO VIDEO L (MONO) AUDIO R Coaxial cable Coaxial cable VHF/UHF CABLE Satellite receiver Satellite antenna cable 7 8 R L AUDIO IN S VIDEO cable (not supplied... 6 VCR S VIDEO A/V cable (not supplied) 7 S VIDEO cable (not supplied) Cables are often color-coded to watch satellite TV or the VCR (your VCR must be turned on). ✍ If your VCR or satellite receiver is set correctly.
Operating Instructions (Large File - 14.9 MB)
Page 52
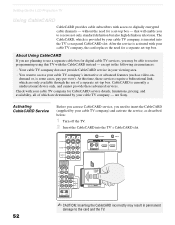
... ✍ CAUTION: Inserting the CableCARD incorrectly may be able to receive not only standard definition but also high definition television. Check with your cable TV company - demand or, is inserted into the TV's CableCARD... area. ❑ You want to the card and the TV. Setting Up the LCD Projection TV Using CableCARD CableCARD provides cable subscribers with the CableCARD instead - At this TV ...(such as described below: 1 Turn off the TV. 2 Insert the CableCARD into the TV's rear panel CableCARD slot. not Sony. without the need to digitally encrypted cable channels ...
... ✍ CAUTION: Inserting the CableCARD incorrectly may be able to receive not only standard definition but also high definition television. Check with your cable TV company - demand or, is inserted into the TV's CableCARD... area. ❑ You want to the card and the TV. Setting Up the LCD Projection TV Using CableCARD CableCARD provides cable subscribers with the CableCARD instead - At this TV ...(such as described below: 1 Turn off the TV. 2 Insert the CableCARD into the TV's rear panel CableCARD slot. not Sony. without the need to digitally encrypted cable channels ...
Operating Instructions (Large File - 14.9 MB)
Page 53
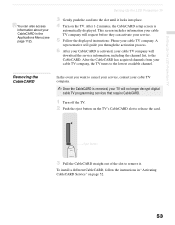
... digital cable TV programming services that require CableCARD. 1 Turn off the TV. 2 Push the eject button on the TV. To install a different CableCARD, follow the instructions in the Applications Menu (see page 112). Setting Up the LCD Projection TV z You can activate your service. 5 Follow the...Eject button 3 Pull the CableCARD straight out of the slot to the lowest available channel. Setting Up the LCD Projection TV 3 Gently push the card into place. 4 Turn on the TV's CableCARD slot to the CableCARD. This screen includes information your cable TV company will request before...
... digital cable TV programming services that require CableCARD. 1 Turn off the TV. 2 Push the eject button on the TV. To install a different CableCARD, follow the instructions in the Applications Menu (see page 112). Setting Up the LCD Projection TV z You can activate your service. 5 Follow the...Eject button 3 Pull the CableCARD straight out of the slot to the lowest available channel. Setting Up the LCD Projection TV 3 Gently push the card into place. 4 Turn on the TV's CableCARD slot to the CableCARD. This screen includes information your cable TV company will request before...
Operating Instructions (Large File - 14.9 MB)
Page 54
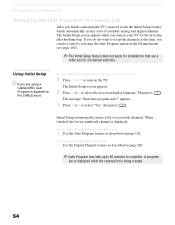
...Initial Setup automatically creates a list of available analog and digital channels. To run Auto Program again at this time, you turn on your TV 1 Press POWER to turn on your TV for the first time after hooking it later by selecting the Auto Program option in the Channel menu (see... Channel feature as described on page 102. The message "Start auto program now?" Setting Up the LCD Projection TV Setting Up the LCD Projection TV Channel List After you finish connecting the TV, you turn on the TV. the CABLE input. The Initial Setup screen appears when you need to run Initial...
...Initial Setup automatically creates a list of available analog and digital channels. To run Auto Program again at this time, you turn on your TV 1 Press POWER to turn on your TV for the first time after hooking it later by selecting the Auto Program option in the Channel menu (see... Channel feature as described on page 102. The message "Start auto program now?" Setting Up the LCD Projection TV Setting Up the LCD Projection TV Channel List After you finish connecting the TV, you turn on the TV. the CABLE input. The Initial Setup screen appears when you need to run Initial...
Operating Instructions (Large File - 14.9 MB)
Page 56
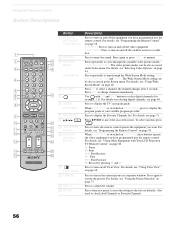
... video equipment. For details, see page 71. 8 V/v/B/b w; For details, see "Using Wide Screen Mode" on page 66. 4 0-9, ENT Press 0-9 to turn on page 58. When FUNCTION is switched on and off the equipment you have programmed into the remote control. X: Pause x: Stop m: Fast-Reverse N: Play M:... Function" on page 94. For details, see "Programming the Remote Control" on page 60. qf RESET Press when in the Screen menu. Press ENT to change channels immediately. 5 Use with Your LCD Projection TV Remote Control" on page 58. For details on selecting digital channels, see "Using...
... video equipment. For details, see page 71. 8 V/v/B/b w; For details, see "Using Wide Screen Mode" on page 66. 4 0-9, ENT Press 0-9 to turn on page 58. When FUNCTION is switched on and off the equipment you have programmed into the remote control. X: Pause x: Stop m: Fast-Reverse N: Play M:... Function" on page 94. For details, see "Programming the Remote Control" on page 60. qf RESET Press when in the Screen menu. Press ENT to change channels immediately. 5 Use with Your LCD Projection TV Remote Control" on page 58. For details on selecting digital channels, see "Using...
Operating Instructions (Large File - 14.9 MB)
Page 57
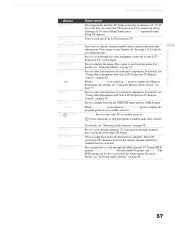
... 60 or 90) that was selected. Using the Remote Control Using the Remote Control Button qg SLEEP qh POWER (GREEN) qj DISPLAY qk TV/VIDEO ql MENU w; Press to display the program guide of connected components. When FUNCTION is switched on TV, press to turn Display off the LCD projection TV.... For details, see "Using the Menus" on page 98. Press once to jump back and forth between the current channel and the last channel that you want the LCD projection TV to select the function of your LCD projection TV's video inputs....
... 60 or 90) that was selected. Using the Remote Control Using the Remote Control Button qg SLEEP qh POWER (GREEN) qj DISPLAY qk TV/VIDEO ql MENU w; Press to display the program guide of connected components. When FUNCTION is switched on TV, press to turn Display off the LCD projection TV.... For details, see "Using the Menus" on page 98. Press once to jump back and forth between the current channel and the last channel that you want the LCD projection TV to select the function of your LCD projection TV's video inputs....

Operating Instructions (Large File - 14.9 MB)
Page 60
JUMP DISPLAY GUIDE MENU V v B b 60 For operating video equipment, press TV/VIDEO repeatedly till you see the video input on the screen for your LCD projection TV remote control, first turn to page 59 and program the necessary code. Activate the remote control to operate the satellite receiver Turn on /off Select a channel Change channels Back...
JUMP DISPLAY GUIDE MENU V v B b 60 For operating video equipment, press TV/VIDEO repeatedly till you see the video input on the screen for your LCD projection TV remote control, first turn to page 59 and program the necessary code. Activate the remote control to operate the satellite receiver Turn on /off Select a channel Change channels Back...

Operating Instructions (Large File - 14.9 MB)
Page 61
...backward x M m X M or m during playback (release to step forward or CH - Activate the remote control to operate the DVD Turn on /off If you have a DVD changer, to skip disk Play Press DVD/VCR (FUNCTION) DVD/VCR (POWER) F1 N Stop ... m to step backward CH + to resume normal playback) To Do This ... Activate the remote control to operate the DAV Turn on /off Select other equipment connected to the DAV Skip a disk Display the DVD menu Display the menu (Setup) Press DVD... Control Operating a VCR Operating a DVD Player or DVD Changer Operating a 5.1ch DVD AV System (SONY DAV) To Do This ...
...backward x M m X M or m during playback (release to step forward or CH - Activate the remote control to operate the DVD Turn on /off If you have a DVD changer, to skip disk Play Press DVD/VCR (FUNCTION) DVD/VCR (POWER) F1 N Stop ... m to step backward CH + to resume normal playback) To Do This ... Activate the remote control to operate the DAV Turn on /off Select other equipment connected to the DAV Skip a disk Display the DVD menu Display the menu (Setup) Press DVD... Control Operating a VCR Operating a DVD Player or DVD Changer Operating a 5.1ch DVD AV System (SONY DAV) To Do This ...

Operating Instructions (Large File - 14.9 MB)
Page 62
...playback) TOP MENU (DVD) N (DVD) Stop x (DVD) Pause X (DVD) Step through different tracks of a video disc backward Operating an AV Receiver To Do This ... Turn on /off Change the volume Press DVD/VCR (POWER) VOL +/-, MUTING 62 Press Activate the remote control to DVD/VCR (FUNCTION) opearate the DVD/VCR... or HDD/DVD Turn on /off DVD/VCR (POWER) If you have a DVD/VCR combo component, Select the DVD F1 Select the VCR F2 If you have a ...
...playback) TOP MENU (DVD) N (DVD) Stop x (DVD) Pause X (DVD) Step through different tracks of a video disc backward Operating an AV Receiver To Do This ... Turn on /off Change the volume Press DVD/VCR (POWER) VOL +/-, MUTING 62 Press Activate the remote control to DVD/VCR (FUNCTION) opearate the DVD/VCR... or HDD/DVD Turn on /off DVD/VCR (POWER) If you have a DVD/VCR combo component, Select the DVD F1 Select the VCR F2 If you have a ...
Operating Instructions (Large File - 14.9 MB)
Page 63
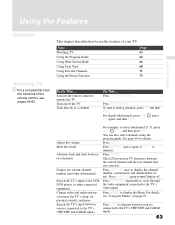
...sound Alternate back and forth between two channels Display the current channel number (and other information) Switch the TV's input to operate the TV Turn on page 93. Activate the remote control to the VCR, DVD player, or other connected equipment Change video and audio options, customize the...Page 63 64 66 68 71 73 To Do This ... For digital subchannels, press 0-9, , press 0-9 again, and then ENT. Press VOL +/-. The LCD projection TV alternates between sources connected to the TV's VHF/UHF and CABLE inputs For example, to a channel Do This ... Press MENU to analog channels, ...
...sound Alternate back and forth between two channels Display the current channel number (and other information) Switch the TV's input to operate the TV Turn on page 93. Activate the remote control to the VCR, DVD player, or other connected equipment Change video and audio options, customize the...Page 63 64 66 68 71 73 To Do This ... For digital subchannels, press 0-9, , press 0-9 again, and then ENT. Press VOL +/-. The LCD projection TV alternates between sources connected to the TV's VHF/UHF and CABLE inputs For example, to a channel Do This ... Press MENU to analog channels, ...

Operating Instructions (Large File - 14.9 MB)
Page 73
... use this feature to write down information such as phone numbers, recipes, etc. ✍ The Freeze feature is displayed on the screen, press FREEZE. 2 The LCD projection TV switches to Twin View mode and displays the "frozen" picture on the right, while the current program continues on the left. Current program in... is not available if you are in progress Call 555-1234 Frozen picture 3 To cancel and return to normal viewing, press FREEZE again (or just turn to another channel). 73
... use this feature to write down information such as phone numbers, recipes, etc. ✍ The Freeze feature is displayed on the screen, press FREEZE. 2 The LCD projection TV switches to Twin View mode and displays the "frozen" picture on the right, while the current program continues on the left. Current program in... is not available if you are in progress Call 555-1234 Frozen picture 3 To cancel and return to normal viewing, press FREEZE again (or just turn to another channel). 73


