Operating Instructions
Page 3
...radio or television reception, which can be connected to the grounding system of the building, as practical. Use of this polarized AC plug with your projection TV, keep the brightness and contrast functions at a high brightness or contrast setting, the image can be determined by turning the ...not use of the general public may cause harmful interference with radio communications. CAUTION To prevent electric shock, do not expose the LCD projection TV to prevent blade exposure. CAUTION RISK OF ELECTRIC SHOCK DO NOT OPEN ATTENTION RISQUE DE CHOC ELECTRIQUE, NE PAS OUVRIR PRECAUCION...
...radio or television reception, which can be connected to the grounding system of the building, as practical. Use of this polarized AC plug with your projection TV, keep the brightness and contrast functions at a high brightness or contrast setting, the image can be determined by turning the ...not use of the general public may cause harmful interference with radio communications. CAUTION To prevent electric shock, do not expose the LCD projection TV to prevent blade exposure. CAUTION RISK OF ELECTRIC SHOCK DO NOT OPEN ATTENTION RISQUE DE CHOC ELECTRIQUE, NE PAS OUVRIR PRECAUCION...
Operating Instructions
Page 4
... of Cable Television Laboratories, Inc. Never pull on the cord. ❑ For details concerning safety precautions, see "Important Safeguards" on page 5. This TV incorporates HighDefinition Multimedia Interface (HDMI™) technology. SONY APPLIANCE MODEL NO.: KDF-42WE655 KDF-50WE655 KDF-55WF655 KDF-60WF655 SONY TV STAND MODEL NO.: SU-GW11 (for KDF-42WE655/KDF-50WE655) SU-GW12 (for KDF-55WF655/KDF-60WF655) SU-GW1...
... of Cable Television Laboratories, Inc. Never pull on the cord. ❑ For details concerning safety precautions, see "Important Safeguards" on page 5. This TV incorporates HighDefinition Multimedia Interface (HDMI™) technology. SONY APPLIANCE MODEL NO.: KDF-42WE655 KDF-50WE655 KDF-55WF655 KDF-60WF655 SONY TV STAND MODEL NO.: SU-GW11 (for KDF-42WE655/KDF-50WE655) SU-GW12 (for KDF-55WF655/KDF-60WF655) SU-GW1...
Operating Instructions
Page 5
.... Consult qualified service personnel. ❑ Unplug the AC power cord when cleaning this manual for future reference. Important Safeguards Before using the LCD projection TV for a long period of time, it may be necessary to clean the inside of mild soap and warm water. Grounding or Polarization... any kind on the serial/model plate. Carefully observe and comply with a three-wire grounding type plug (a plug having one way. Always turn the set . Do not defeat the safety purpose of the grounding plug. Use Power Sources This set should be operated only from a TV...
.... Consult qualified service personnel. ❑ Unplug the AC power cord when cleaning this manual for future reference. Important Safeguards Before using the LCD projection TV for a long period of time, it may be necessary to clean the inside of mild soap and warm water. Grounding or Polarization... any kind on the serial/model plate. Carefully observe and comply with a three-wire grounding type plug (a plug having one way. Always turn the set . Do not defeat the safety purpose of the grounding plug. Use Power Sources This set should be operated only from a TV...
Operating Instructions
Page 14
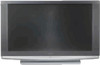
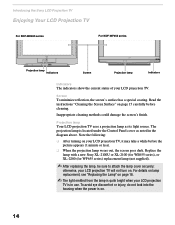
...be sure to attach the lamp cover securely; Introducing the Sony LCD Projection TV Enjoying Your LCD Projection TV For KDF-WE655 series For KDF-WF655 series POWER STANDBY TIMER LAMP Projection lamp Indicators Screen Projection lamp LAMP STD/DUO PRO POWER TIMER POWER/STANDBY Indicators ... your LCD projection TV is located under the Control Panel cover as its light source. Read the instructions "Cleaning the Screen Surface" on . Projection lamp Your LCD projection TV uses a projection lamp as noted in use. Note the following: ❑ After turning on your LCD projection TV...
...be sure to attach the lamp cover securely; Introducing the Sony LCD Projection TV Enjoying Your LCD Projection TV For KDF-WE655 series For KDF-WF655 series POWER STANDBY TIMER LAMP Projection lamp Indicators Screen Projection lamp LAMP STD/DUO PRO POWER TIMER POWER/STANDBY Indicators ... your LCD projection TV is located under the Control Panel cover as its light source. Read the instructions "Cleaning the Screen Surface" on . Projection lamp Your LCD projection TV uses a projection lamp as noted in use. Note the following: ❑ After turning on your LCD projection TV...
Operating Instructions
Page 15
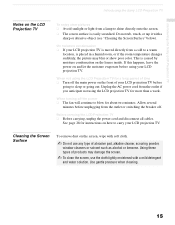
...damage the screen. ✍ To clean the screen, use any type of time ❑ Turn off the main power on and let the moisture evaporate before using the LCD projection TV for about two minutes. Unplug the AC power cord from the outlet if you anticipate.... Before carrying the LCD Projection TV ❑ Before carrying, unplug the power cord and disconnect all cables. Cleaning the Screen Surface To remove dust on the lenses inside. Introducing the Sony LCD Projection TV Introducing the Sony LCD Projection TV Notes on how to carry your LCD projection TV before unplugging from...
...damage the screen. ✍ To clean the screen, use any type of time ❑ Turn off the main power on and let the moisture evaporate before using the LCD projection TV for about two minutes. Unplug the AC power cord from the outlet if you anticipate.... Before carrying the LCD Projection TV ❑ Before carrying, unplug the power cord and disconnect all cables. Cleaning the Screen Surface To remove dust on the lenses inside. Introducing the Sony LCD Projection TV Introducing the Sony LCD Projection TV Notes on how to carry your LCD projection TV before unplugging from...
Operating Instructions
Page 16
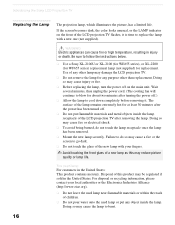
...The cooling fan will continue to blow for at least 30 minutes after the power has been turned off .) ❑ Allow the lamp to burst. 16 Introducing the Sony LCD Projection TV Replacing the Lamp The projection lamp, which illuminates the picture, has a limited life. The surface of the new lamp ... receptacle once the lamp has been removed. ❑ Mount the new lamp securely. WARNING Electric appliances can cause fire or high temperature, resulting in the United States: This product contains mercury. The used lamp or put flammable materials and metal objects inside the lamp...
...The cooling fan will continue to blow for at least 30 minutes after the power has been turned off .) ❑ Allow the lamp to burst. 16 Introducing the Sony LCD Projection TV Replacing the Lamp The projection lamp, which illuminates the picture, has a limited life. The surface of the new lamp ... receptacle once the lamp has been removed. ❑ Mount the new lamp securely. WARNING Electric appliances can cause fire or high temperature, resulting in the United States: This product contains mercury. The used lamp or put flammable materials and metal objects inside the lamp...
Operating Instructions
Page 17
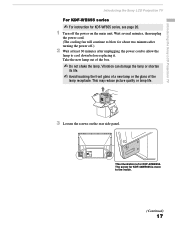
... allow the lamp to the inside. (Continued) 17 Take the new lamp out of the lamp receptacle. The screw for KDF-50WE655. This illustration is for KDF-42WE655 is more to cool down before replacing it. This may reduce picture quality or lamp life. 3 Loosen the screws... the glass of the box. ✍ Do not shake the lamp. Introducing the Sony LCD Projection TV Introducing the Sony LCD Projection TV For KDF-WE655 series ✍ For instruction for KDF-WF655 series, see page 20. 1 Turn off .) 2 Wait at least 30 minutes after turning the power off the power on the rear side panel.
... allow the lamp to the inside. (Continued) 17 Take the new lamp out of the lamp receptacle. The screw for KDF-50WE655. This illustration is for KDF-42WE655 is more to cool down before replacing it. This may reduce picture quality or lamp life. 3 Loosen the screws... the glass of the box. ✍ Do not shake the lamp. Introducing the Sony LCD Projection TV Introducing the Sony LCD Projection TV For KDF-WE655 series ✍ For instruction for KDF-WF655 series, see page 20. 1 Turn off .) 2 Wait at least 30 minutes after turning the power off the power on the rear side panel.
Operating Instructions
Page 20
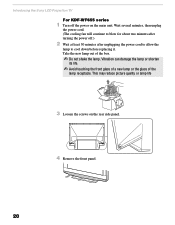
Wait several minutes, then unplug the power cord. (The cooling fan will continue to blow for about two minutes after turning the power off the power on the rear side panel. 20 4 Remove the front panel. STD/DUO PRO POWER Vibration can damage the lamp or .... ✍ Do not shake the lamp. This may reduce picture quality or lamp life 3 Loosen the screws on the main unit. Introducing the Sony LCD Projection TV For KDF-WF655 series 1 Turn off .) 2 Wait at least 30 minutes after unplugging the power cord to allow the lamp to cool down before replacing it. Take the...
Wait several minutes, then unplug the power cord. (The cooling fan will continue to blow for about two minutes after turning the power off the power on the rear side panel. 20 4 Remove the front panel. STD/DUO PRO POWER Vibration can damage the lamp or .... ✍ Do not shake the lamp. This may reduce picture quality or lamp life 3 Loosen the screws on the main unit. Introducing the Sony LCD Projection TV For KDF-WF655 series 1 Turn off .) 2 Wait at least 30 minutes after unplugging the power cord to allow the lamp to cool down before replacing it. Take the...

Operating Instructions
Page 25
... Setting Up the LCD Projection TV Item Description 1 Memory Stick slot For inserting Memory Stick media to select between the TV's tuner and other video equipment inputs. 25 For details, see "Contacting Sony" on page 16. 7 (IR) Infrared Receiver Receives IR signals from the remote control. 8 CHANNEL +/- If... servicing (see "Replacing the Lamp" on page 119). 5 TIMER LED When lit, indicates one of the timers is turned on your LCD projection TV. When the timer is set is turned off . TV/VIDEO Press to view on . q; When in standby mode, the LED lights up in red. For...
... Setting Up the LCD Projection TV Item Description 1 Memory Stick slot For inserting Memory Stick media to select between the TV's tuner and other video equipment inputs. 25 For details, see "Contacting Sony" on page 16. 7 (IR) Infrared Receiver Receives IR signals from the remote control. 8 CHANNEL +/- If... servicing (see "Replacing the Lamp" on page 119). 5 TIMER LED When lit, indicates one of the timers is turned on your LCD projection TV. When the timer is set is turned off . TV/VIDEO Press to view on . q; When in standby mode, the LED lights up in red. For...
Operating Instructions
Page 45
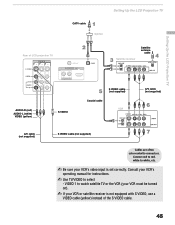
VIDEO 1 to watch satellite TV or the VCR (your VCR must be turned on). ✍ If your VCR or satellite receiver is set correctly. Consult your VCR's video input is not equipped with S VIDEO, use a VIDEO cable (yellow) instead of LCD projection TV VIDEO IN 1 3 4 S VIDEO VIDEO L (MONO) AUDIO R VHF/UHF 7 R L AUDIO IN AUDIO... red to red, white to white, etc. ✍ Be sure your VCR's operating manual for instructions. ✍ Use TV/VIDEO to connectors. Setting Up the LCD Projection TV Setting Up the LCD Projection TV CATV cable Splitter Rear of the S VIDEO cable. 45
VIDEO 1 to watch satellite TV or the VCR (your VCR must be turned on). ✍ If your VCR or satellite receiver is set correctly. Consult your VCR's video input is not equipped with S VIDEO, use a VIDEO cable (yellow) instead of LCD projection TV VIDEO IN 1 3 4 S VIDEO VIDEO L (MONO) AUDIO R VHF/UHF 7 R L AUDIO IN AUDIO... red to red, white to white, etc. ✍ Be sure your VCR's operating manual for instructions. ✍ Use TV/VIDEO to connectors. Setting Up the LCD Projection TV Setting Up the LCD Projection TV CATV cable Splitter Rear of the S VIDEO cable. 45
Operating Instructions
Page 56
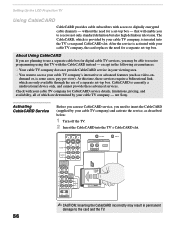
...such as described below: 1 Turn off the TV. 2 Insert the CableCARD into the TV's rear panel CableCARD slot. not Sony. that will enable you may result in your viewing area. ❑ You want to receive not only standard definition but also high definition television. except in the following circumstances...pricing, and availability, all of a separate set -top box - CableCARD is some cases, pay-per-view). Setting Up the LCD Projection TV Using CableCARD CableCARD provides cable subscribers with access to insert the CableCARD (supplied by your cable TV company) and activate the ...
...such as described below: 1 Turn off the TV. 2 Insert the CableCARD into the TV's rear panel CableCARD slot. not Sony. that will enable you may result in your viewing area. ❑ You want to receive not only standard definition but also high definition television. except in the following circumstances...pricing, and availability, all of a separate set -top box - CableCARD is some cases, pay-per-view). Setting Up the LCD Projection TV Using CableCARD CableCARD provides cable subscribers with access to insert the CableCARD (supplied by your cable TV company) and activate the ...

Operating Instructions
Page 57
...TV company. ✍ Once the CableCARD is removed, your TV will no longer decrypt digital cable TV programming services that require CableCARD. 1 Turn off the TV. 2 Push the eject button on the TV's CableCARD slot to the CableCARD. Removing the CableCARD In the event you through ... to release the card. Setting Up the LCD Projection TV z You can activate your service. 5 Follow the displayed instructions: Phone your CableCARD in "Activating CableCARD Service" on page 56. 57 Setting Up the LCD Projection TV 3 Gently push the card into place. 4 Turn on the TV. Eject button 3 Pull the...
...TV company. ✍ Once the CableCARD is removed, your TV will no longer decrypt digital cable TV programming services that require CableCARD. 1 Turn off the TV. 2 Push the eject button on the TV's CableCARD slot to the CableCARD. Removing the CableCARD In the event you through ... to release the card. Setting Up the LCD Projection TV z You can activate your service. 5 Follow the displayed instructions: Phone your CableCARD in "Activating CableCARD Service" on page 56. 57 Setting Up the LCD Projection TV 3 Gently push the card into place. 4 Turn on the TV. Eject button 3 Pull the...

Operating Instructions
Page 58
...now?" To add individual digital channels ❑ Use the Digital Channels feature as described on the TV. The Initial Setup screens appear when you turn on page 106. Program is being created. 58 To run the Initial Setup feature, which automatically creates a list of receivable channels. Then ...; Auto Program may take up . the CABLE input. 2 Press V or v to select "Yes", then press only. Setting Up the LCD Projection TV Setting Up the LCD Projection TV Channel List After you finish connecting the TV, you need to run Auto Program again at this time, you can do it...
...now?" To add individual digital channels ❑ Use the Digital Channels feature as described on the TV. The Initial Setup screens appear when you turn on page 106. Program is being created. 58 To run the Initial Setup feature, which automatically creates a list of receivable channels. Then ...; Auto Program may take up . the CABLE input. 2 Press V or v to select "Yes", then press only. Setting Up the LCD Projection TV Setting Up the LCD Projection TV Channel List After you finish connecting the TV, you need to run Auto Program again at this time, you can do it...

Operating Instructions
Page 60
... Stop m: Fast-Reverse N: Play M: Fast-Forward z: Record by pressing z and N qa Press to turn on and off Twin View. qs FREEZE Press to clear Label Channels or Favorite Channels. 60 Also used to freeze the current picture in the Screen menu. The video picture modes can be also... "Using Wide Screen Mode" on page 64. SAT/CABLE: Press to turn on page 62. WIDE MODE Press repeatedly to select a channel: the channel changes after 2 seconds. Press ENT to change channels immediately. 5 Use with Your LCD Projection TV Remote Control" on page 70. 4 0-9, ENT Press 0-9 to ...
... Stop m: Fast-Reverse N: Play M: Fast-Forward z: Record by pressing z and N qa Press to turn on and off Twin View. qs FREEZE Press to clear Label Channels or Favorite Channels. 60 Also used to freeze the current picture in the Screen menu. The video picture modes can be also... "Using Wide Screen Mode" on page 64. SAT/CABLE: Press to turn on page 62. WIDE MODE Press repeatedly to select a channel: the channel changes after 2 seconds. Press ENT to change channels immediately. 5 Use with Your LCD Projection TV Remote Control" on page 70. 4 0-9, ENT Press 0-9 to ...

Operating Instructions
Page 61
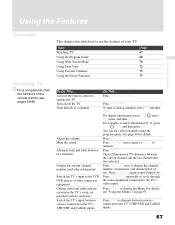
... guide of connected components. Press again to select the function of your LCD projection TV's video inputs. Press to display channel number, label, current time and other information. Press again to change between two channels. Press to turn on page 64. Press to cycle through channels. Press repeatedly to scan...scan quickly through channels, press and hold down either CH button. The MTS setting can be also accessed in minutes (15, 30, 45, 60 or 90) that was selected. To cancel Sleep Timer, press SLEEP repeatedly until the TV displays the time in the Audio menu.
... guide of connected components. Press again to select the function of your LCD projection TV's video inputs. Press to display channel number, label, current time and other information. Press again to change between two channels. Press to turn on page 64. Press to cycle through channels. Press repeatedly to scan...scan quickly through channels, press and hold down either CH button. The MTS setting can be also accessed in minutes (15, 30, 45, 60 or 90) that was selected. To cancel Sleep Timer, press SLEEP repeatedly until the TV displays the time in the Audio menu.
Operating Instructions
Page 64
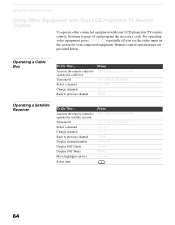
...FUNCTION) SAT/CABLE (POWER) 0-9, ENT CH +/- Activate the remote control to operate the satellite receiver Turn on the screen for your LCD projection TV remote control, first turn to previous channel Display channel number Display SAT Guide Display SAT Menu Move highlight (cursor) Select item ... +/- Activate the remote control to operate the cable box Turn on/off Select a channel Change channels Back to page 63 and program the necessary code. Using the Remote Control Using Other Equipment with Your LCD Projection TV Remote Control To operate other connected equipment with your ...
...FUNCTION) SAT/CABLE (POWER) 0-9, ENT CH +/- Activate the remote control to operate the satellite receiver Turn on the screen for your LCD projection TV remote control, first turn to previous channel Display channel number Display SAT Guide Display SAT Menu Move highlight (cursor) Select item ... +/- Activate the remote control to operate the cable box Turn on/off Select a channel Change channels Back to page 63 and program the necessary code. Using the Remote Control Using Other Equipment with Your LCD Projection TV Remote Control To operate other connected equipment with your ...

Operating Instructions
Page 65
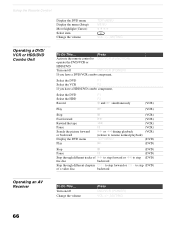
Activate the remote control to operate the VCR Turn on /off If you have a DVD changer, to skip disk Play Press DVD/VCR (FUNCTION) DVD/VCR (POWER) F1 N ... m to step backward CH + to step forward or CH - Activate the remote control to operate the DVD Turn on /off Select other equipment connected to operate the DAV Turn on/off Change channels Record Press DVD/VCR (FUNCTION) DVD/VCR (POWER) CH +/- to resume normal playback)...Using the Remote Control Using the Remote Control Operating a VCR Operating a DVD Player or DVD Changer Operating a 5.1ch DVD AV System (SONY DAV) To Do This ...
Activate the remote control to operate the VCR Turn on /off If you have a DVD changer, to skip disk Play Press DVD/VCR (FUNCTION) DVD/VCR (POWER) F1 N ... m to step backward CH + to step forward or CH - Activate the remote control to operate the DVD Turn on /off Select other equipment connected to operate the DAV Turn on/off Change channels Record Press DVD/VCR (FUNCTION) DVD/VCR (POWER) CH +/- to resume normal playback)...Using the Remote Control Using the Remote Control Operating a VCR Operating a DVD Player or DVD Changer Operating a 5.1ch DVD AV System (SONY DAV) To Do This ...
Operating Instructions
Page 66
to step forward or CH - Turn on /off Change the volume Press DVD/VCR (POWER) VOL +/-, MUTING 66 Using the Remote Control Display the DVD menu Display the menu (Setup) Move .../ VCR or HDD/DVD Combo Unit To Do This ... Press Activate the remote control to DVD/VCR (FUNCTION) operate the DVD/VCR or HDD/DVD Turn on /off DVD/VCR (POWER) If you have a DVD/VCR combo component, Select the DVD F1 Select the VCR F2 If you have a HDD/DVD...
to step forward or CH - Turn on /off Change the volume Press DVD/VCR (POWER) VOL +/-, MUTING 66 Using the Remote Control Display the DVD menu Display the menu (Setup) Move .../ VCR or HDD/DVD Combo Unit To Do This ... Press Activate the remote control to DVD/VCR (FUNCTION) operate the DVD/VCR or HDD/DVD Turn on /off DVD/VCR (POWER) If you have a DVD/VCR combo component, Select the DVD F1 Select the VCR F2 If you have a HDD/DVD...
Operating Instructions
Page 67
... current channel and the last channel that was selected. You can also select channels using the program guide. The LCD projection TV alternates between sources connected to operate the TV Turn on page 97. Activate the remote control to the TV's VHF/UHF and CABLE inputs. 67 For digital subchannels..., press 0-9, , press 0-9 again, and then ENT. Press DISPLAY again to turn Display off the TV Tune directly to a channel Adjust the volume Mute the sound Alternate back and forth between sources connected to use the features...
... current channel and the last channel that was selected. You can also select channels using the program guide. The LCD projection TV alternates between sources connected to operate the TV Turn on page 97. Activate the remote control to the TV's VHF/UHF and CABLE inputs. 67 For digital subchannels..., press 0-9, , press 0-9 again, and then ENT. Press DISPLAY again to turn Display off the TV Tune directly to a channel Adjust the volume Mute the sound Alternate back and forth between sources connected to use the features...
Operating Instructions
Page 77
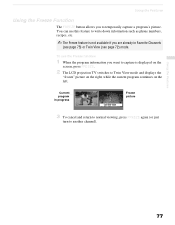
... use this feature to write down information such as phone numbers, recipes, etc. ✍ The Freeze feature is displayed on the screen, press FREEZE. 2 The LCD projection TV switches to Twin View mode and displays the "frozen" picture on the right, while the current program continues on the left. Current program in... not available if you are already in progress Call 555-1234 Frozen picture 3 To cancel and return to normal viewing, press FREEZE again (or just turn to another channel). 77
... use this feature to write down information such as phone numbers, recipes, etc. ✍ The Freeze feature is displayed on the screen, press FREEZE. 2 The LCD projection TV switches to Twin View mode and displays the "frozen" picture on the right, while the current program continues on the left. Current program in... not available if you are already in progress Call 555-1234 Frozen picture 3 To cancel and return to normal viewing, press FREEZE again (or just turn to another channel). 77


