
Product Brochure (jh1jh3 v2174)
Page 5
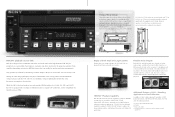
... --- 'Single-Cable' Transmission of Video, Audio and Time Code When equipped with the optional HKJ-101 i.LINK interface board, both the J-H1 and J-H3 can output HDCAM-originated content to a computer display, at XGA resolution. (As the pixel count of Sony used only to compatible DV-based nonlinear editors. J-H1/J-H3 Laptop PC *i.LINK is the Sony Tele-File system, a non...
... --- 'Single-Cable' Transmission of Video, Audio and Time Code When equipped with the optional HKJ-101 i.LINK interface board, both the J-H1 and J-H3 can output HDCAM-originated content to a computer display, at XGA resolution. (As the pixel count of Sony used only to compatible DV-based nonlinear editors. J-H1/J-H3 Laptop PC *i.LINK is the Sony Tele-File system, a non...

Product Brochure (jh1jh3 v2174)
Page 6
... response Analog audio response Cue audio response Supplied accessories Power requirements Power consumption Operating temperature Storage temperature Humidity Weight Dimensions (W x H x D) Tape speed HDCAM Playback time Fast forward / Rewind time Search speed Shuttle mode Jog mode Servo lock time Load/unload time Digital HD video Digital SD Video Analog HD video Analog SD video Computer display i.LINK (Optional) Timecode Audio monitoring Headphone RS-232C RS-422 Wireless remote EXT SYNC Output level Bandwidth S/N ratio...
... response Analog audio response Cue audio response Supplied accessories Power requirements Power consumption Operating temperature Storage temperature Humidity Weight Dimensions (W x H x D) Tape speed HDCAM Playback time Fast forward / Rewind time Search speed Shuttle mode Jog mode Servo lock time Load/unload time Digital HD video Digital SD Video Analog HD video Analog SD video Computer display i.LINK (Optional) Timecode Audio monitoring Headphone RS-232C RS-422 Wireless remote EXT SYNC Output level Bandwidth S/N ratio...
Product Brochure (jh1 brochure)
Page 3
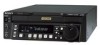
... existing J Series standard-definition compact players, both large and small size cassettes. HDCAMTM playback on the desks of VTRs. A headphone jack is automatically muted for off-speed playback and non-data playback. primarily used in two models - the J-H1 and the J-H3. The J-H3 has the additional capability to playback 1080/23.98, 24P formats to 1080/59.94 and 525...
... existing J Series standard-definition compact players, both large and small size cassettes. HDCAMTM playback on the desks of VTRs. A headphone jack is automatically muted for off-speed playback and non-data playback. primarily used in two models - the J-H1 and the J-H3. The J-H3 has the additional capability to playback 1080/23.98, 24P formats to 1080/59.94 and 525...

Product Brochure (jh1 brochure)
Page 4
... of Video, Audio, and Time Code When equipped with an RGB computer display interface, both SDTV professional and consumer monitors. With this capability, HDCAM-originated content can output HDCAM-originated content to a Tele-File label (option: MLB-1M-100) via an RS-232C cable. It also allows a direct connection to a PC* running JZ-1 Videocassette logging Software to the J-H1...
... of Video, Audio, and Time Code When equipped with an RGB computer display interface, both SDTV professional and consumer monitors. With this capability, HDCAM-originated content can output HDCAM-originated content to a Tele-File label (option: MLB-1M-100) via an RS-232C cable. It also allows a direct connection to a PC* running JZ-1 Videocassette logging Software to the J-H1...

Product Brochure (jh1 brochure)
Page 5
... jack (x 2): -10 dBu at 1kHz, reference level ) Less than 2 % (T.H.D. Reproduction in whole or in part without notice. J-H1/J-H3 Specifications General Input/Output HD analog response XGA analog response SD composite response Analog audio response Cue audio response Supplied accessories Power requirements Power consumption Operating temperature Storage temperature Humidity Mass Dimensions (W x H x D) Tape speed HDCAM Playback time Fast forward / Rewind time Search speed Shuttle mode Jog mode Servo lock time Load/unload time Digital...
... jack (x 2): -10 dBu at 1kHz, reference level ) Less than 2 % (T.H.D. Reproduction in whole or in part without notice. J-H1/J-H3 Specifications General Input/Output HD analog response XGA analog response SD composite response Analog audio response Cue audio response Supplied accessories Power requirements Power consumption Operating temperature Storage temperature Humidity Mass Dimensions (W x H x D) Tape speed HDCAM Playback time Fast forward / Rewind time Search speed Shuttle mode Jog mode Servo lock time Load/unload time Digital...

Product Manual (JH1 / JH3 manual)
Page 3
Replace only with both the EMC Directive (89/336/EEC) and the Low Voltage Directive (73/23/EEC) issued by the manufacturer. CAUTION The unit is not disconnected from the AC power source (mains) as long as it is intended for use of the above Power Cord / Appliance Connector / Plug, please consult a qualified service personnel. For the customers in the following European...
Replace only with both the EMC Directive (89/336/EEC) and the Low Voltage Directive (73/23/EEC) issued by the manufacturer. CAUTION The unit is not disconnected from the AC power source (mains) as long as it is intended for use of the above Power Cord / Appliance Connector / Plug, please consult a qualified service personnel. For the customers in the following European...

Product Manual (JH1 / JH3 manual)
Page 6
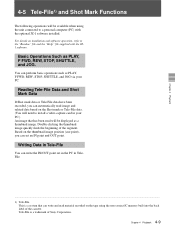
...4-2-3 Playback in Shuttle Mode 4-4 4-3 Superimposed Character Information 4-5 4-4 Using the Remote Commander 4-7 • Before using the Remote Commander 4-7 • How to change the lithium battery 4-7 • Setting menu 4-7 • Operating the Remote Commander 4-8 4-5 Tele-File and Shot Mark Functions 4-9 5-1 Menu System Configuration 5-1 5-2 Menu Operations 5-2 5-3 Basic Menu 5-7 5-4 Extended Menu 5-10 6-1 Removing a Cassette When Tape Slack Occurs 6-1 6-2 Head Cleaning 6-1 6-3 Moisture Condensation 6-2 6-4 Error Messages 6-3 6-5 Digital Hours Meter 6-4 Specifications...
...4-2-3 Playback in Shuttle Mode 4-4 4-3 Superimposed Character Information 4-5 4-4 Using the Remote Commander 4-7 • Before using the Remote Commander 4-7 • How to change the lithium battery 4-7 • Setting menu 4-7 • Operating the Remote Commander 4-8 4-5 Tele-File and Shot Mark Functions 4-9 5-1 Menu System Configuration 5-1 5-2 Menu Operations 5-2 5-3 Basic Menu 5-7 5-4 Extended Menu 5-10 6-1 Removing a Cassette When Tape Slack Occurs 6-1 6-2 Head Cleaning 6-1 6-3 Moisture Condensation 6-2 6-4 Error Messages 6-3 6-5 Digital Hours Meter 6-4 Specifications...

Product Manual (JH1 / JH3 manual)
Page 7
... does not have a dynamic tracking function, the tape may be used through the system frequency setting) Audio (J-H3 only) Video • Compatible with HDSDI SMPTE 292M output (HD digital video/audio 4ch) (J-H3 only) • Compatible with SDI SMPTE 259M output (component digital video/audio 4ch) (J-H3 only) • Equipped with a time code output connector as a Control (CTL) track Time code track standard feature (J-H3 only...
... does not have a dynamic tracking function, the tape may be used through the system frequency setting) Audio (J-H3 only) Video • Compatible with HDSDI SMPTE 292M output (HD digital video/audio 4ch) (J-H3 only) • Compatible with SDI SMPTE 259M output (component digital video/audio 4ch) (J-H3 only) • Equipped with a time code output connector as a Control (CTL) track Time code track standard feature (J-H3 only...

Product Manual (JH1 / JH3 manual)
Page 8
... including audio level, time code, user bits, error messages, and setup menu information in 23.98PsF is being played back. Time code multiplexed to pull down signal output • The value of the time code multiplexed to the current settings and operating status of the user's bits area is determined by the time code preset using the supplied vertical installation stands. MSB: The first bit of the tens digit of the hour The second bit of...
... including audio level, time code, user bits, error messages, and setup menu information in 23.98PsF is being played back. Time code multiplexed to pull down signal output • The value of the time code multiplexed to the current settings and operating status of the user's bits area is determined by the time code preset using the supplied vertical installation stands. MSB: The first bit of the tens digit of the hour The second bit of...

Product Manual (JH1 / JH3 manual)
Page 11
... your browser window. Preparations The following . 1 Insert the CD-ROM disc in the United States and/or other countries. 1-5 Chapter 1 Overview Contact a Sony service representative. ... • MMX and Pentium are registered trademarks of videocassette players (English, Japanese, French, and German versions). A PDF file containing the operation manual opens. Note You can purchase a new CD-ROM disc if you want to access the...
... your browser window. Preparations The following . 1 Insert the CD-ROM disc in the United States and/or other countries. 1-5 Chapter 1 Overview Contact a Sony service representative. ... • MMX and Pentium are registered trademarks of videocassette players (English, Japanese, French, and German versions). A PDF file containing the operation manual opens. Note You can purchase a new CD-ROM disc if you want to access the...

Product Manual (JH1 / JH3 manual)
Page 13
... in playback or the remaining tape time is displayed in PF2 KEY SELECT, basic menu item 022 of the setup menu, to make a setting so that is controlled simultaneously. Set AUDIO MONITOR OUTPUT LEVEL, extended menu item 114, on page 5-5. 6 PHONES (headphones) jack and control knob Connect stereo headphones with an impedance of 8 ohms to the PF-2 button as the factory default setting. The underline for setup menu operations and settings. Press the SET/MENU button while holding down...
... in playback or the remaining tape time is displayed in PF2 KEY SELECT, basic menu item 022 of the setup menu, to make a setting so that is controlled simultaneously. Set AUDIO MONITOR OUTPUT LEVEL, extended menu item 114, on page 5-5. 6 PHONES (headphones) jack and control knob Connect stereo headphones with an impedance of 8 ohms to the PF-2 button as the factory default setting. The underline for setup menu operations and settings. Press the SET/MENU button while holding down...
Product Manual (JH1 / JH3 manual)
Page 14
...) or STOP CODE points. computed from among ALL, MONO, and STEREO. a) The LTC/VITC button switches between LTC and VITC. 6 CTL RESET button Press this button to reset a CTL value displayed in the FL display area. ...1) Shot marks If you use Shot marks, you can insert REC START markers or Shot markers in the user bits area in advance for easy editing. Chapter 2 Location and Function of Parts 3 AU...
...) or STOP CODE points. computed from among ALL, MONO, and STEREO. a) The LTC/VITC button switches between LTC and VITC. 6 CTL RESET button Press this button to reset a CTL value displayed in the FL display area. ...1) Shot marks If you use Shot marks, you can insert REC START markers or Shot markers in the user bits area in advance for easy editing. Chapter 2 Location and Function of Parts 3 AU...

Product Manual (JH1 / JH3 manual)
Page 15
... display area, an audio monitor display area and a number of the CTL/ TC/UB button or LTC/VITC button. Time data display area Normally this indicator is lit, an error message appears in the time data display area. • Cassette-in indicator q: This lights when a cassette is also used to the selection of indicators. When this displays a CTL count, time code value, or user bit value according to display error messages and the setup...
... display area, an audio monitor display area and a number of the CTL/ TC/UB button or LTC/VITC button. Time data display area Normally this indicator is lit, an error message appears in the time data display area. • Cassette-in indicator q: This lights when a cassette is also used to the selection of indicators. When this displays a CTL count, time code value, or user bit value according to display error messages and the setup...
Product Manual (JH1 / JH3 manual)
Page 16
..." indicator lights in the FL display area. 2 JOG dial Turn this button to toggle between jog mode and shuttle mode when using the JOG/SHUTTLE dial Playback mode Operations and functions Jog Press the JOG/SHUTTLE button once to +21 times normal speed. Turn the dial clockwise for forward playback and counterclockwise for reverse playback. m: REW (rewind) indicator B: PLAY indicator When AUTO TRACKING (the automatic tape loading function) is from -21 to...
..." indicator lights in the FL display area. 2 JOG dial Turn this button to toggle between jog mode and shuttle mode when using the JOG/SHUTTLE dial Playback mode Operations and functions Jog Press the JOG/SHUTTLE button once to +21 times normal speed. Turn the dial clockwise for forward playback and counterclockwise for reverse playback. m: REW (rewind) indicator B: PLAY indicator When AUTO TRACKING (the automatic tape loading function) is from -21 to...

Product Manual (JH1 / JH3 manual)
Page 17
...; Reference video signals are using STILL TIMER extended menu item 501 of the setup menu) in the Stop mode, you are detected (J-H3 only). In standby mode, the drum rotates and the tape sticks to display UMID data on the monitor. 4 F FWD (fast forward) button To start playback, press this button. Chapter 2 Location and Function of Parts 2-1 Control Panel 2-1-3 Tape Transport Control Section 1 EJECT button 2 REW button 3 PLAY button 4 F FWD button 5 STOP button 6 STANDBY on/off by...
...; Reference video signals are using STILL TIMER extended menu item 501 of the setup menu) in the Stop mode, you are detected (J-H3 only). In standby mode, the drum rotates and the tape sticks to display UMID data on the monitor. 4 F FWD (fast forward) button To start playback, press this button. Chapter 2 Location and Function of Parts 2-1 Control Panel 2-1-3 Tape Transport Control Section 1 EJECT button 2 REW button 3 PLAY button 4 F FWD button 5 STOP button 6 STANDBY on/off by...

Product Manual (JH1 / JH3 manual)
Page 19
... on which nonlinear editing software is installed. If you intend to connect multiple DV devices, refer to the manuals of them. • The i.LINK (DV) output of this unit is automatically set to this unit, though, the auto dubbing function and editing function will not be set to the setting of the AU MON SEL button on the control panel. D3 output connector...
... on which nonlinear editing software is installed. If you intend to connect multiple DV devices, refer to the manuals of them. • The i.LINK (DV) output of this unit is automatically set to this unit, though, the auto dubbing function and editing function will not be set to the setting of the AU MON SEL button on the control panel. D3 output connector...

Product Manual (JH1 / JH3 manual)
Page 24
... PLAY button indicator B flashes. For details of the tape The tape is automatically rewound, and stops. (When AUTO REWIND, extended menu item 125, is turned. To stop turning the JOG dial. It is the default setting.) 4-3 Chapter 4 Playback Use the following procedure to carry out playback in jog mode, stop playback Press the STOP button. The factory setting for the auto-tracking is ±1 times normal speed. For details on page 3-2. The playback speed range is on (AUTO...
... PLAY button indicator B flashes. For details of the tape The tape is automatically rewound, and stops. (When AUTO REWIND, extended menu item 125, is turned. To stop turning the JOG dial. It is the default setting.) 4-3 Chapter 4 Playback Use the following procedure to carry out playback in jog mode, stop playback Press the STOP button. The factory setting for the auto-tracking is ±1 times normal speed. For details on page 3-2. The playback speed range is on (AUTO...

Product Manual (JH1 / JH3 manual)
Page 27
... STANDBY OFF STOP F.FWD REW PLAY PLAY LOCK JOG STILL JOG FWD JOG REV SHUTTLE STILL SHUTTLE (Speed) Operation mode Cassette is divided into two blocks, A and B. • Block A: displays the operation mode. • Block B: displays the servo lock status or tape speed. Standby off mode Stop mode Fast forward mode Rewind mode Playback mode (servo unlocked) Playback mode (servo locked) A still picture in jog mode Jog mode in forward direction Jog mode in reverse direction A still picture in shuttle mode Shuttle mode Chapter 4 Playback 4-6 Chapter 4 Playback
... STANDBY OFF STOP F.FWD REW PLAY PLAY LOCK JOG STILL JOG FWD JOG REV SHUTTLE STILL SHUTTLE (Speed) Operation mode Cassette is divided into two blocks, A and B. • Block A: displays the operation mode. • Block B: displays the servo lock status or tape speed. Standby off mode Stop mode Fast forward mode Rewind mode Playback mode (servo unlocked) Playback mode (servo locked) A still picture in jog mode Jog mode in forward direction Jog mode in reverse direction A still picture in shuttle mode Shuttle mode Chapter 4 Playback 4-6 Chapter 4 Playback
Product Manual (JH1 / JH3 manual)
Page 30
... the tape using the unit connected to the "Readme" file and the "Help" file supplied with the optional JZ-1 software installed. Based on the thumbnail image position (cue point), you can perform basic operations such as PLAY, F FWD, REW, STOP, SHUTTLE, and JOG via your PC.) An image that can set an IN point and OUT point. Double-clicking the thumbnail image quickly...
... the tape using the unit connected to the "Readme" file and the "Help" file supplied with the optional JZ-1 software installed. Based on the thumbnail image position (cue point), you can perform basic operations such as PLAY, F FWD, REW, STOP, SHUTTLE, and JOG via your PC.) An image that can set an IN point and OUT point. Double-clicking the thumbnail image quickly...
Product Manual (JH1 / JH3 manual)
Page 41
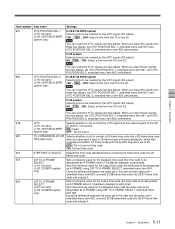
...-speed playback), which was originally recorded in 24-frame mode with the system frequency set in extended menu item 624, converts 23.98-frame time code into two places, set VITC POSITION SEL-1, extended menu item 601, and VITC POSITION SEL-2, extended menu item 602, beforehand. 619 VITC Selects whether or not to insert the VITC signal into 25- Chapter 5 Setup Menu Item number...
...-speed playback), which was originally recorded in 24-frame mode with the system frequency set in extended menu item 624, converts 23.98-frame time code into two places, set VITC POSITION SEL-1, extended menu item 601, and VITC POSITION SEL-2, extended menu item 602, beforehand. 619 VITC Selects whether or not to insert the VITC signal into 25- Chapter 5 Setup Menu Item number...


