Operation Guide
Page 6
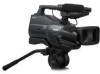
... EVF block "Memory Stick" (You cannot use with "Memory Stick" compatible equipment Be sure to insert the "Memory Stick Duo" into the Memory Stick Duo Adaptor. When using a "Memory Stick Duo" with your camcorder.) LCD panel Battery pack • You cannot use any type of memory card except "Memory Stick Duo." 6 Microphone Viewfinder "Memory Stick Duo" (This size can be used with your camcorder.) • "Memory Stick PRO Duo...
... EVF block "Memory Stick" (You cannot use with "Memory Stick" compatible equipment Be sure to insert the "Memory Stick Duo" into the Memory Stick Duo Adaptor. When using a "Memory Stick Duo" with your camcorder.) LCD panel Battery pack • You cannot use any type of memory card except "Memory Stick Duo." 6 Microphone Viewfinder "Memory Stick Duo" (This size can be used with your camcorder.) • "Memory Stick PRO Duo...
Operation Guide
Page 9
.../Editing Dubbing to VCR or DVD/HDD recorders 62 Recording pictures from a VCR ....65 Dubbing pictures from the "Memory Stick Duo 67 Marking images on the "Memory Stick Duo" with the RING 25 Recording in dark places (NightShot 25 Adjusting the exposure for backlit subjects 26 Recording in...Using the menu items .......... 36 Menu items 37 CAMERA SET menu 39 Settings to adjust your camcorder to a "Memory Stick Duo 67 Deleting recorded pictures from a tape to the recording conditions MEMORY SET menu 46 Settings for editing or playing back in various modes STANDARD SET menu .........53...
.../Editing Dubbing to VCR or DVD/HDD recorders 62 Recording pictures from a VCR ....65 Dubbing pictures from the "Memory Stick Duo 67 Marking images on the "Memory Stick Duo" with the RING 25 Recording in dark places (NightShot 25 Adjusting the exposure for backlit subjects 26 Recording in...Using the menu items .......... 36 Menu items 37 CAMERA SET menu 39 Settings to adjust your camcorder to a "Memory Stick Duo 67 Deleting recorded pictures from a tape to the recording conditions MEMORY SET menu 46 Settings for editing or playing back in various modes STANDARD SET menu .........53...
Operation Guide
Page 10
... a tape to a computer 74 Troubleshooting Troubleshooting 77 Warning indicators and messages 85 Self-diagnosis display/Warning indicators 85 Additional Information Using your camcorder abroad ...... 88 Maintenance and precautions ...... 89 Usable cassette tapes 89 About the "Memory Stick 90 About the "InfoLITHIUM" battery pack 92 About i.LINK 93 About x.v.Color 94 On using your...
... a tape to a computer 74 Troubleshooting Troubleshooting 77 Warning indicators and messages 85 Self-diagnosis display/Warning indicators 85 Additional Information Using your camcorder abroad ...... 88 Maintenance and precautions ...... 89 Usable cassette tapes 89 About the "Memory Stick 90 About the "InfoLITHIUM" battery pack 92 About i.LINK 93 About x.v.Color 94 On using your...
Operation Guide
Page 18
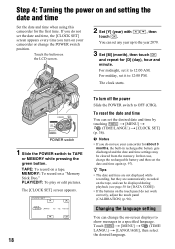
... time, the [CLOCK SET] screen appears every time you do not work correctly, adjust the touch panel (CALIBRATION) (p. 96). TAPE: To record on a "Memory Stick Duo." MEMORY: To record on a tape. PLAY/EDIT: To play or edit pictures. In that case, charge the rechargeable battery and then set any year up to... time settings may be displayed during playback (see page 58 for [DATA CODE]). • If the buttons on the touch panel do not use your camcorder or change the on-screen displays to the year 2079. 3 Set [M] (month), then touch and repeat for [D] (day), hour and minute. Touch the ...
... time, the [CLOCK SET] screen appears every time you do not work correctly, adjust the touch panel (CALIBRATION) (p. 96). TAPE: To record on a "Memory Stick Duo." MEMORY: To record on a tape. PLAY/EDIT: To play or edit pictures. In that case, charge the rechargeable battery and then set any year up to... time settings may be displayed during playback (see page 58 for [DATA CODE]). • If the buttons on the touch panel do not use your camcorder or change the on-screen displays to the year 2079. 3 Set [M] (month), then touch and repeat for [D] (day), hour and minute. Touch the ...
Operation Guide
Page 20
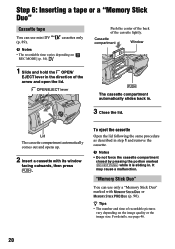
For details, see page 46. 20 "Memory Stick Duo" You can use only a "Memory Stick Duo" marked with its window facing outwards, then press . Step 6: Inserting a tape or a "Memory Stick Duo" Cassette tape You can use mini DV (p. 89). OPEN/EJECT lever The cassette compartment automatically slides back in the direction of the arrow and ...
For details, see page 46. 20 "Memory Stick Duo" You can use only a "Memory Stick Duo" marked with its window facing outwards, then press . Step 6: Inserting a tape or a "Memory Stick Duo" Cassette tape You can use mini DV (p. 89). OPEN/EJECT lever The cassette compartment automatically slides back in the direction of the arrow and ...

Operation Guide
Page 21
... a "Memory Stick Duo" Lightly push the "Memory Stick Duo" in once. Getting Started 1 Open the jack cover. 2 Insert the "Memory Stick Duo" into the slot in the wrong direction, the "Memory Stick Duo," the "Memory Stick Duo" slot, or image data may be careful that the "Memory Stick Duo" does not pop out and drop. 21 Do not shake or knock your camcorder...
... a "Memory Stick Duo" Lightly push the "Memory Stick Duo" in once. Getting Started 1 Open the jack cover. 2 Insert the "Memory Stick Duo" into the slot in the wrong direction, the "Memory Stick Duo," the "Memory Stick Duo" slot, or image data may be careful that the "Memory Stick Duo" does not pop out and drop. 21 Do not shake or knock your camcorder...

Operation Guide
Page 23
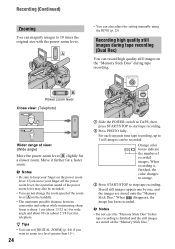
Recording still images Still images are recorded on a "Memory Stick Duo" Touch . To delete the picture, touch t [YES]. Continued , 23 To record high quality still images during tape recording (Dual Rec) See page 24 for ... of recordable pictures. Recording/Playback Press and hold PHOTO lightly to adjust the focus, then press it fully to MEMORY while pressing the green button. To check the latest recording on the "Memory Stick Duo." Beep min 6.1M Shutter click min 6.1M P-MENU P-MENU Flashing bLights up A shutter sound is heard. z Tips •...
Recording still images Still images are recorded on a "Memory Stick Duo" Touch . To delete the picture, touch t [YES]. Continued , 23 To record high quality still images during tape recording (Dual Rec) See page 24 for ... of recordable pictures. Recording/Playback Press and hold PHOTO lightly to adjust the focus, then press it fully to MEMORY while pressing the green button. To check the latest recording on the "Memory Stick Duo." Beep min 6.1M Shutter click min 6.1M P-MENU P-MENU Flashing bLights up A shutter sound is heard. z Tips •...
Operation Guide
Page 24
...not change the zoom speed of the zoom lever A on the "Memory Stick Duo" during tape recording (Dual Rec) You can record high quality still images on the handdle. • The minimum possible distance between camcorder and subject while maintaining sharp focus is finished and the still images ...are stored onto the "Memory Stick Duo." When recording is finished, the color changes to orange. 3 Press START/STOP to...
...not change the zoom speed of the zoom lever A on the "Memory Stick Duo" during tape recording (Dual Rec) You can record high quality still images on the handdle. • The minimum possible distance between camcorder and subject while maintaining sharp focus is finished and the still images ...are stored onto the "Memory Stick Duo." When recording is finished, the color changes to orange. 3 Press START/STOP to...

Operation Guide
Page 27
... displayed instead of a tape is not being played. Toggles Play or Pause as you cannot find [VOLUME] in various modes ([ VAR.SPD PB], p. 52). when a "Memory Stick Duo" with recorded images is inserted and To adjust the sound volume Touch t [VOLUME], then / to start P-MENU Stop** Rewind/Fast forward * Playback automatically stops...
... displayed instead of a tape is not being played. Toggles Play or Pause as you cannot find [VOLUME] in various modes ([ VAR.SPD PB], p. 52). when a "Memory Stick Duo" with recorded images is inserted and To adjust the sound volume Touch t [VOLUME], then / to start P-MENU Stop** Rewind/Fast forward * Playback automatically stops...

Operation Guide
Page 28
B A A Previous/Next 6 pictures B The picture displayed before switching to the index screen display * is displayed. 60min 6.1M 10/10 MEMORY PLAY Switches the playback media* Previous/Next P-MENU Go to the index screen To view pictures in other folders, touch / , then touch (p. 48). Playback (Continued) ... Index screen Touch . t t [PB FOLDER], select a folder with 28 Touch one of the pictures to back to the single display mode. To display pictures on a "Memory Stick Duo" on the tape playback screen.
B A A Previous/Next 6 pictures B The picture displayed before switching to the index screen display * is displayed. 60min 6.1M 10/10 MEMORY PLAY Switches the playback media* Previous/Next P-MENU Go to the index screen To view pictures in other folders, touch / , then touch (p. 48). Playback (Continued) ... Index screen Touch . t t [PB FOLDER], select a folder with 28 Touch one of the pictures to back to the single display mode. To display pictures on a "Memory Stick Duo" on the tape playback screen.

Operation Guide
Page 36
Unavailable items will be grayed out. If the desired item is not displayed on a "Memory Stick Duo" PLAY/EDIT: settings for frequently used menu items are not added to select the item, then touch (The process in step 2). 3 Select the desired ... t [MENU]. 2 Select the desired menu. Using the Menu Using the menu items 1 Slide the POWER switch to hide the menu screen. TAPE: settings on a tape MEMORY: settings on the screen, touch / until the item is the same as you decide not to change the setting, touch to return to select the...
Unavailable items will be grayed out. If the desired item is not displayed on a "Memory Stick Duo" PLAY/EDIT: settings for frequently used menu items are not added to select the item, then touch (The process in step 2). 3 Select the desired ... t [MENU]. 2 Select the desired menu. Using the Menu Using the menu items 1 Slide the POWER switch to hide the menu screen. TAPE: settings on a tape MEMORY: settings on the screen, touch / until the item is the same as you decide not to change the setting, touch to return to select the...

Operation Guide
Page 44
... zooming factor. z Tips • IRE represents the screen brightness. To cancel the count down, touch [RESET]. The [HISTOGRAM] will not be recorded on a tape or "Memory Stick Duo." 80 Pixels Darker Brighter Brightness 44 z Tips • The left area on the screen. B OFF Up to 10 × zoom is performed optically. 20...
... zooming factor. z Tips • IRE represents the screen brightness. To cancel the count down, touch [RESET]. The [HISTOGRAM] will not be recorded on a tape or "Memory Stick Duo." 80 Pixels Darker Brighter Brightness 44 z Tips • The left area on the screen. B OFF Up to 10 × zoom is performed optically. 20...

Operation Guide
Page 46
... 415 550 980 1250 850 2000 1100 2600 1650 3950 2250 5200 3350 8000 4500 10000 46 MEMORY SET menu Settings for the "Memory Stick Duo" The default settings are selected. Capacity of the "Memory Stick Duo" (MB) and the number of images to be set only when the POWER switch is... set to MEMORY. The indicators in relatively clear quality. See page 36 for the maximum number of recordable ...
... 415 550 980 1250 850 2000 1100 2600 1650 3950 2250 5200 3350 8000 4500 10000 46 MEMORY SET menu Settings for the "Memory Stick Duo" The default settings are selected. Capacity of the "Memory Stick Duo" (MB) and the number of images to be set only when the POWER switch is... set to MEMORY. The indicators in relatively clear quality. See page 36 for the maximum number of recordable ...

Operation Guide
Page 47
...factory, and does not require formatting at the following settings: Top: [FINE] is selected for image quality. • When using a "Memory Stick Duo" made by Sony Corporation. b Notes • Do not do any of the following while [ Formatting...] is replaced with another . ALL ERASE Deletes all.... - The number of Sony's ClearVid CMOS sensor and image processing system (new Enhanced Imaging Processor) allows for still image resolution equivalent to [ 1.2M] in HDV format, [ 0.2M] in DV format (16:9) and [VGA (0.3M)] in sequence even if the "Memory Stick Duo" is selected for image...
...factory, and does not require formatting at the following settings: Top: [FINE] is selected for image quality. • When using a "Memory Stick Duo" made by Sony Corporation. b Notes • Do not do any of the following while [ Formatting...] is replaced with another . ALL ERASE Deletes all.... - The number of Sony's ClearVid CMOS sensor and image processing system (new Enhanced Imaging Processor) allows for still image resolution equivalent to [ 1.2M] in HDV format, [ 0.2M] in DV format (16:9) and [VGA (0.3M)] in sequence even if the "Memory Stick Duo" is selected for image...

Operation Guide
Page 48
... then touch . 48 b Notes • You cannot delete the created folders using your camcorder. REC FOLDER (Recording folder) Select the folder to be set as the number of recordable pictures on a "Memory Stick Duo." When 9,999 images are saved in the 101MSDCF folder. • Once you record...the default setting, pictures are stored in a folder, the same folder will have to format the "Memory Stick Duo" (p. 47), or delete them using your computer. • The number of folders increases. MEMORY SET menu (Continued) NEW FOLDER You can create a new folder (102MSDCF to 999MSDCF) on...
... then touch . 48 b Notes • You cannot delete the created folders using your camcorder. REC FOLDER (Recording folder) Select the folder to be set as the number of recordable pictures on a "Memory Stick Duo." When 9,999 images are saved in the 101MSDCF folder. • Once you record...the default setting, pictures are stored in a folder, the same folder will have to format the "Memory Stick Duo" (p. 47), or delete them using your computer. • The number of folders increases. MEMORY SET menu (Continued) NEW FOLDER You can create a new folder (102MSDCF to 999MSDCF) on...

Operation Guide
Page 49
...OFF] in , the picture gradually changes from color to observe the movement of clouds or the changes in step 1. See page 36 for details on a "Memory Stick Duo," or in a folder (slide show only once, select [OFF]. 5 Touch [END] t [START]. STBY Fading out WHITE FADER REC Fading in ...appear when the items are played back in [PB FOLDER] (p. 48) are selected. menu Special effects on pictures or additional functions on the "Memory Stick Duo" at a selected interval. The fader indicator stops flashing and disappears when the fade is useful to black and white. To cancel before ...
...OFF] in , the picture gradually changes from color to observe the movement of clouds or the changes in step 1. See page 36 for details on a "Memory Stick Duo," or in a folder (slide show only once, select [OFF]. 5 Touch [END] t [START]. STBY Fading out WHITE FADER REC Fading in ...appear when the items are played back in [PB FOLDER] (p. 48) are selected. menu Special effects on pictures or additional functions on the "Memory Stick Duo" at a selected interval. The fader indicator stops flashing and disappears when the fade is useful to black and white. To cancel before ...

Operation Guide
Page 50
... back a movie with a sepia hue to [AUTO]. b Notes • You cannot change to another digital effect while recording pictures on the "Memory Stick Duo" . • If you cannot use [D.EFFECT] setting. Only the original pictures can save pictures edited using [D.EFFECT], you set [CINEMA EFECT... [SPOT METER] and [EXPOSURE] return to pictures. z Tips • You can be output. • While using special effects on a "Memory Stick Duo" (p. 67) or record them on a still image memorized by adjusting the image quality. TRAIL When recording/playback, trailing after images are not ...
... back a movie with a sepia hue to [AUTO]. b Notes • You cannot change to another digital effect while recording pictures on the "Memory Stick Duo" . • If you cannot use [D.EFFECT] setting. Only the original pictures can save pictures edited using [D.EFFECT], you set [CINEMA EFECT... [SPOT METER] and [EXPOSURE] return to pictures. z Tips • You can be output. • While using special effects on a "Memory Stick Duo" (p. 67) or record them on a still image memorized by adjusting the image quality. TRAIL When recording/playback, trailing after images are not ...

Operation Guide
Page 51
... movie (The default setting is useful to a picture during tape recording only. PICT.EFFECT (Picture effect) You can save pictures edited using special effects on a "Memory Stick Duo" (p. 67) or record them on the [SMTH SLW REC] screen. appears. MOSAIC* [3sec AFTER] [3sec BEFORE] Pictures appear mosaic-patterned. * Available during recording or...
... movie (The default setting is useful to a picture during tape recording only. PICT.EFFECT (Picture effect) You can save pictures edited using special effects on a "Memory Stick Duo" (p. 67) or record them on the [SMTH SLW REC] screen. appears. MOSAIC* [3sec AFTER] [3sec BEFORE] Pictures appear mosaic-patterned. * Available during recording or...

Operation Guide
Page 52
... format are not output from frame playback). To cancel [SMTH SLW REC], select [END]. B Memory Stick Select this to a PictBridge compatible printer (p. 69) using this when you connect the camcorder to a PictBridge compatible printer to print out directly (p. 69). 52 EDIT/PLAY menu Settings for editing... import them to the computer. PICT.APPLI. You can also connect the camcorder to view pictures on a "Memory Stick Duo" on selecting menu items. VAR.SPD PB (Various speed playback) You can connect the camcorder to a personal computer with a USB cable and import pictures to the ...
... format are not output from frame playback). To cancel [SMTH SLW REC], select [END]. B Memory Stick Select this to a PictBridge compatible printer (p. 69) using this when you connect the camcorder to a PictBridge compatible printer to print out directly (p. 69). 52 EDIT/PLAY menu Settings for editing... import them to the computer. PICT.APPLI. You can also connect the camcorder to view pictures on a "Memory Stick Duo" on selecting menu items. VAR.SPD PB (Various speed playback) You can connect the camcorder to a personal computer with a USB cable and import pictures to the ...

Operation Guide
Page 58
... appear. V-OUT/PANEL Shows displays such as the time code on the TV screen, LCD screen, and in situations such as the time code on a "Memory Stick Duo" are played back. • In the DATE/TIME data display, the date and time are displayed in the viewfinder. OFF Cancels the beeping sound...
... appear. V-OUT/PANEL Shows displays such as the time code on the TV screen, LCD screen, and in situations such as the time code on a "Memory Stick Duo" are played back. • In the DATE/TIME data display, the date and time are displayed in the viewfinder. OFF Cancels the beeping sound...


