Operation Guide
Page 3
... sure the service technician has used replacement parts specified by the manufacturer. If the set has been subject to lightning and power-line surges. Improper adjustment of the set. Refer all servicing to normal operation. - Power-Cord Protection Route the power cord so that have fallen into the set. - Accessories Do not place the set , ask the service technician to perform routine safety checks (as opening or removing covers may...
... sure the service technician has used replacement parts specified by the manufacturer. If the set has been subject to lightning and power-line surges. Improper adjustment of the set. Refer all servicing to normal operation. - Power-Cord Protection Route the power cord so that have fallen into the set. - Accessories Do not place the set , ask the service technician to perform routine safety checks (as opening or removing covers may...
Operation Guide
Page 7
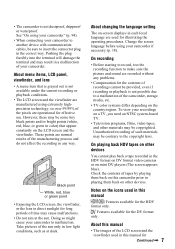
... recording or playback is not dustproof, dripproof or waterproof. Change the screen language before using extremely highprecision technology, so over 99.99% of such materials may be contrary to make sure the picture and sound are used in this manual • The images of the sun only in the HDV format on DV format video cameras or on other materials may be copyrighted. About changing the language setting...
... recording or playback is not dustproof, dripproof or waterproof. Change the screen language before using extremely highprecision technology, so over 99.99% of such materials may be contrary to make sure the picture and sound are used in this manual • The images of the sun only in the HDV format on DV format video cameras or on other materials may be copyrighted. About changing the language setting...
Operation Guide
Page 9
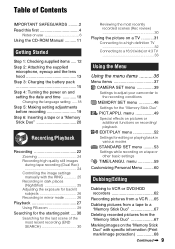
... use 6 Using the CD-ROM Manual .......... 11 Getting Started Step 1: Checking supplied items ..... 12 Step 2: Attaching the supplied microphone, eyecup and the lens hood 13 Step 3: Charging the battery pack 15 Step 4: Turning the power on and setting the date and time 18 Changing the language setting ......18 Step 5: Making setting adjustments before recording 19 Step 6: Inserting a tape or a "Memory Stick Duo 20 Recording/Playback Recording 22 Zooming 24 Recording high quality still images during tape recording (Dual Rec 24 Controlling the image settings manually with specific...
... use 6 Using the CD-ROM Manual .......... 11 Getting Started Step 1: Checking supplied items ..... 12 Step 2: Attaching the supplied microphone, eyecup and the lens hood 13 Step 3: Charging the battery pack 15 Step 4: Turning the power on and setting the date and time 18 Changing the language setting ......18 Step 5: Making setting adjustments before recording 19 Step 6: Inserting a tape or a "Memory Stick Duo 20 Recording/Playback Recording 22 Zooming 24 Recording high quality still images during tape recording (Dual Rec 24 Controlling the image settings manually with specific...
Operation Guide
Page 16
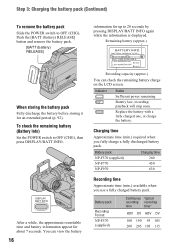
... is displayed. Replace the battery with a fully charged one, or charge the battery. Indicator Status Sufficient power remaining Battery low, recording/ playback will stop soon. To check the remaining battery (Battery Info) Set the POWER switch to OFF (CHG). Battery pack Recording Format NP-F570 (supplied) Continuous Typical recording recording time time* HDV DV HDV DV 180 190 95 105 200 205 105 115 Step 3: Charging the battery pack (Continued) To remove the battery pack Slide the POWER switch to...
... is displayed. Replace the battery with a fully charged one, or charge the battery. Indicator Status Sufficient power remaining Battery low, recording/ playback will stop soon. To check the remaining battery (Battery Info) Set the POWER switch to OFF (CHG). Battery pack Recording Format NP-F570 (supplied) Continuous Typical recording recording time time* HDV DV HDV DV 180 190 95 105 200 205 105 115 Step 3: Charging the battery pack (Continued) To remove the battery pack Slide the POWER switch to...
Operation Guide
Page 18
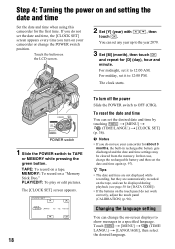
.... Touch t [MENU] t (TIME/ LANGU.) t [LANGUAGE], then select the desired language. Touch the button on the LCD screen. 2 Set [Y] (year) with touch . / , then You can set it to 12:00 AM. The [CLOCK SET] screen appears. Changing the language setting You can be cleared from the memory. The clock starts. POWER switch 1 Slide the POWER switch to show messages in rechargeable battery gets discharged and the date and time settings may be displayed during playback (see page...
.... Touch t [MENU] t (TIME/ LANGU.) t [LANGUAGE], then select the desired language. Touch the button on the LCD screen. 2 Set [Y] (year) with touch . / , then You can set it to 12:00 AM. The [CLOCK SET] screen appears. Changing the language setting You can be cleared from the memory. The clock starts. POWER switch 1 Slide the POWER switch to show messages in rechargeable battery gets discharged and the date and time settings may be displayed during playback (see page...
Operation Guide
Page 25
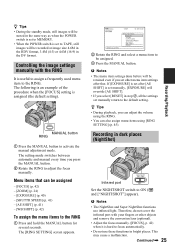
... you select [RESET] in step 2, all the settings set manually return to the default setting. The setting mode switches between automatic and manual every time you set other objects and remove the conversion lens (optional). • Adjust the focus manually ([FOCUS], p. 42) when it is hard to focus automatically. • Do not use infrared light. MANUAL button RING 1 Press the MANUAL button to ON ( and ["NIGHTSHOT"] appear). z Tips • During playback, you can adjust the volume using the RING...
... you select [RESET] in step 2, all the settings set manually return to the default setting. The setting mode switches between automatic and manual every time you set other objects and remove the conversion lens (optional). • Adjust the focus manually ([FOCUS], p. 42) when it is hard to focus automatically. • Do not use infrared light. MANUAL button RING 1 Press the MANUAL button to ON ( and ["NIGHTSHOT"] appear). z Tips • During playback, you can adjust the volume using the RING...

Operation Guide
Page 29
... i.LINK output will not be adjusted with the power zoom lever. 1 Play back the picture you want to magnify. 2 Magnify the picture with T (Telephoto). 3 Touch the screen at the point you want to 5 times in the center of the displayed frame. 4 Adjust the magnification with W (Wide angle)/T (Telephoto). Magnification can magnify images from about 1.1 to 5 times (from the video signal are zoomed. Recording/Playback Using PB zoom You can...
... i.LINK output will not be adjusted with the power zoom lever. 1 Play back the picture you want to magnify. 2 Magnify the picture with T (Telephoto). 3 Touch the screen at the point you want to 5 times in the center of the displayed frame. 4 Adjust the magnification with W (Wide angle)/T (Telephoto). Magnification can magnify images from about 1.1 to 5 times (from the video signal are zoomed. Recording/Playback Using PB zoom You can...

Operation Guide
Page 33
... external device with the HDMI cable. Type Camcorder B Cable HDMI cable (optional) : Signal flow, ( ): Reference pages TV Menu Setting HDMI IN (STANDARD SET) [VCR HDV/DV] t [AUTO] (53) Recording/Playback • Use an HDMI cable with the HDMI logo (on the front cover). • Pictures in the DV format are not output from the HDMI OUT jack, if copyright protection signals are recorded in the pictures. • DV format pictures input to DV format (SD image...
... external device with the HDMI cable. Type Camcorder B Cable HDMI cable (optional) : Signal flow, ( ): Reference pages TV Menu Setting HDMI IN (STANDARD SET) [VCR HDV/DV] t [AUTO] (53) Recording/Playback • Use an HDMI cable with the HDMI logo (on the front cover). • Pictures in the DV format are not output from the HDMI OUT jack, if copyright protection signals are recorded in the pictures. • DV format pictures input to DV format (SD image...
Operation Guide
Page 35
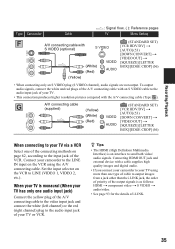
... to output images from a jack other than the i.LINK jack, the order of priority of your TV using the A/V connecting cable. Recording/Playback Type Camcorder Cable : Signal flow, ( ): Reference pages TV Menu Setting A/V connecting cable with the A/V connecting cable (Type ). To output audio signals, connect the white and red plugs of i.LINK. 35 A/V connecting cable (supplied) (Yellow) (White) (Red) (STANDARD SET) [VCR HDV/DV] t [AUTO] (53) [DOWN CONVERT] t [VIDEO OUT] t [SQUEEZE]/[LETTER BOX]/[EDGE CROP] (56) When connecting to LINE (VIDEO 1, VIDEO 2, etc.). Set the input...
... to output images from a jack other than the i.LINK jack, the order of priority of your TV using the A/V connecting cable. Recording/Playback Type Camcorder Cable : Signal flow, ( ): Reference pages TV Menu Setting A/V connecting cable with the A/V connecting cable (Type ). To output audio signals, connect the white and red plugs of i.LINK. 35 A/V connecting cable (supplied) (Yellow) (White) (Red) (STANDARD SET) [VCR HDV/DV] t [AUTO] (53) [DOWN CONVERT] t [VIDEO OUT] t [SQUEEZE]/[LETTER BOX]/[EDGE CROP] (56) When connecting to LINE (VIDEO 1, VIDEO 2, etc.). Set the input...

Operation Guide
Page 36
... button. If the desired item is not displayed on a "Memory Stick Duo" PLAY/EDIT: settings for frequently used menu items are not added to select the menu item. Unavailable items will be grayed out. x To use the short-cuts of Personal Menu On Personal Menu, short-cuts for viewing/editing 2 Touch the LCD screen to Personal Menu. 1 Touch t [MENU]. 2 Select the desired menu. z Tips • You can customize menu...
... button. If the desired item is not displayed on a "Memory Stick Duo" PLAY/EDIT: settings for frequently used menu items are not added to select the menu item. Unavailable items will be grayed out. x To use the short-cuts of Personal Menu On Personal Menu, short-cuts for viewing/editing 2 Touch the LCD screen to Personal Menu. 1 Touch t [MENU]. 2 Select the desired menu. z Tips • You can customize menu...

Operation Guide
Page 50
appears. STILL Records/plays back a movie while superimposing it on VCR or DVD/HDD recorders (p. 62). 50 z Tips • You can be output. • While using special effects on a "Memory Stick Duo" (p. 67) or record them on a still image memorized by adjusting the image quality. CINEMA EFECT (Cinematic effect) You can add a cinematic atmosphere to pictures. TRAIL When recording/playback, trailing after images are not output via the HDV/DV Interface...
appears. STILL Records/plays back a movie while superimposing it on VCR or DVD/HDD recorders (p. 62). 50 z Tips • You can be output. • While using special effects on a "Memory Stick Duo" (p. 67) or record them on a still image memorized by adjusting the image quality. CINEMA EFECT (Cinematic effect) You can add a cinematic atmosphere to pictures. TRAIL When recording/playback, trailing after images are not output via the HDV/DV Interface...

Operation Guide
Page 57
... METER The cumulative operation time of your camcorder will be displayed with 16:9 wide mode LETTER BOX Output signals to a TV that is not recorded. TAPE RUN Display the total hours of tape running , or the total number of the following items. OUTPUT - [VCR HDV/DV](when the POWER switch is set to adjust the color on the tape by cropping the both sides of operation, drum rotation, tape running in...
... METER The cumulative operation time of your camcorder will be displayed with 16:9 wide mode LETTER BOX Output signals to a TV that is not recorded. TAPE RUN Display the total hours of tape running , or the total number of the following items. OUTPUT - [VCR HDV/DV](when the POWER switch is set to adjust the color on the tape by cropping the both sides of operation, drum rotation, tape running in...

Operation Guide
Page 58
... below ) Displays camera setting data. 6 0 min 1 0 : 0 0 : 0 0 : 0 0 60min 2 AUTO 100 AWB F1. 8 9 dB P-MENU 3 6 54 A SteadyShot off B Exposure C White balance D Gain E Shutter speed F Aperture value b Notes • The exposure adjustment value (0EV), a shutter speed, and the aperture value appear when still images on a "Memory Stick Duo" are played back. • In the DATE/TIME data display, the date and time are displayed in the same area. DISP OUTPUT (Display output) B LCD PANEL Shows displays such as the time code on the LCD screen and...
... below ) Displays camera setting data. 6 0 min 1 0 : 0 0 : 0 0 : 0 0 60min 2 AUTO 100 AWB F1. 8 9 dB P-MENU 3 6 54 A SteadyShot off B Exposure C White balance D Gain E Shutter speed F Aperture value b Notes • The exposure adjustment value (0EV), a shutter speed, and the aperture value appear when still images on a "Memory Stick Duo" are played back. • In the DATE/TIME data display, the date and time are displayed in the same area. DISP OUTPUT (Display output) B LCD PANEL Shows displays such as the time code on the LCD screen and...
Operation Guide
Page 65
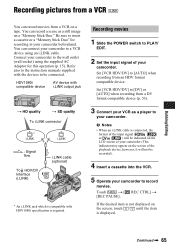
... a cassette into the VCR. 5 Operate your camcorder to record movies. b Notes • When an i.LINK cable is connected, the format of your camcorder. Refer also to your camcorder beforehand. Set [VCR HDV/DV] to [DV] or [AUTO] when recording from a DV format compatible device (p. 53). 3 Connect your VCR as a still image on the LCD screen of the input signal ( or ) will be indicated on a "Memory Stick Duo." Recording movies 1 Slide the POWER switch to [AUTO] when recording from an HDV format compatible device. Dubbing/Editing Recording pictures...
... a cassette into the VCR. 5 Operate your camcorder to record movies. b Notes • When an i.LINK cable is connected, the format of your camcorder. Refer also to your camcorder beforehand. Set [VCR HDV/DV] to [DV] or [AUTO] when recording from a DV format compatible device (p. 53). 3 Connect your VCR as a still image on the LCD screen of the input signal ( or ) will be indicated on a "Memory Stick Duo." Recording movies 1 Slide the POWER switch to [AUTO] when recording from an HDV format compatible device. Dubbing/Editing Recording pictures...

Operation Guide
Page 75
... movies Use the supplied AC Adaptor to obtain AC power (p. 15). 1 Prepare editing software (not provided). 2 Turn on the copying image. 5 Copy images to VCR. 4 Set the menu of your software. Connecting in the opposite order may not support HDV format. Changing [REC FORMAT] setting while connected with an i.LINK cable with the POWER switch set the POWER switch to the computer with your camcorder while connected with an i.LINK cable. The menu settings vary depending on your computer. 3 Insert a tape into your camcorder. Recorded format Format...
... movies Use the supplied AC Adaptor to obtain AC power (p. 15). 1 Prepare editing software (not provided). 2 Turn on the copying image. 5 Copy images to VCR. 4 Set the menu of your software. Connecting in the opposite order may not support HDV format. Changing [REC FORMAT] setting while connected with an i.LINK cable with the POWER switch set the POWER switch to the computer with your camcorder while connected with an i.LINK cable. The menu settings vary depending on your computer. 3 Insert a tape into your camcorder. Recorded format Format...

Operation Guide
Page 81
...) image quality (p. 56). • Play back pictures using the cleaning cassette (optional) (p. 95). The displayed pictures are also connected (p. 31). • Sounds cannot be read. The picture or sound breaks off . • This occurs if the tape or video head is being played. • The data code on the screen. • The tape was recorded without setting the date and time. • A blank section on the picture. Fine patterns flicker, diagonal lines look jagged. • Adjust...
...) image quality (p. 56). • Play back pictures using the cleaning cassette (optional) (p. 95). The displayed pictures are also connected (p. 31). • Sounds cannot be read. The picture or sound breaks off . • This occurs if the tape or video head is being played. • The data code on the screen. • The tape was recorded without setting the date and time. • A blank section on the picture. Fine patterns flicker, diagonal lines look jagged. • Adjust...

Operation Guide
Page 89
...). REC: The cassette can use x When not using END SEARCH (p. 30) before you begin the next recording when you record You cannot record software on your camcorder contains copyright signals, you try to your camcorder that contains copyright control signals for the digital interface, enabling a digital connection with the Cassette Memory function. Your camcorder is a video format developed to record and play back pictures in another video camera connected to record such software. The video bit rate for a long time Remove...
...). REC: The cassette can use x When not using END SEARCH (p. 30) before you begin the next recording when you record You cannot record software on your camcorder contains copyright signals, you try to your camcorder that contains copyright control signals for the digital interface, enabling a digital connection with the Cassette Memory function. Your camcorder is a video format developed to record and play back pictures in another video camera connected to record such software. The video bit rate for a long time Remove...
Operation Guide
Page 90
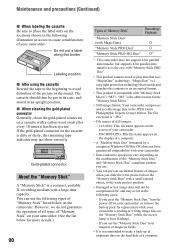
... picture or the sound. If you eject the "Memory Stick Duo," turn the power off on your camcorder, or remove the battery pack for the "Memory Stick Micro." • Still image format: Your camcorder compresses and records image data in the JPEG (Joint Photographic Experts Group) format. x When cleaning the gold-plated connector Generally, clean the gold-plated connector on a cassette with a cotton-wool swab after every 10 times it has been ejected. The file...
... picture or the sound. If you eject the "Memory Stick Duo," turn the power off on your camcorder, or remove the battery pack for the "Memory Stick Micro." • Still image format: Your camcorder compresses and records image data in the JPEG (Joint Photographic Experts Group) format. x When cleaning the gold-plated connector Generally, clean the gold-plated connector on a cassette with a cotton-wool swab after every 10 times it has been ejected. The file...

Operation Guide
Page 108
... (Audio level display 55 A/V connecting cable .....32, 62 A/V OUT jack 31 B BACK LIGHT 26 Battery 15 BEACH 39 BEEP 58 C CALIBRATION 96 CAMERA COLOR 42 CAMERA DATA 58 CAMERA SET menu ...........39 CANDLE 39 Cassette 20, 89 Charging time 16 Cleaning cassette 95 CLOCK SET 18 COLOR BAR 57 COLOR SLOW S (Color Slow Shutter 43, 80, 83 COMPONENT 56 COMPONENT OUT jack ....31 Component video cable ........32 108 Computer 71 CONV.LENS 45 D DATA CODE 18, 58 DATE/TIME 58, 104 Delete pictures 67 DIGITAL ZOOM .......... 44...
... (Audio level display 55 A/V connecting cable .....32, 62 A/V OUT jack 31 B BACK LIGHT 26 Battery 15 BEACH 39 BEEP 58 C CALIBRATION 96 CAMERA COLOR 42 CAMERA DATA 58 CAMERA SET menu ...........39 CANDLE 39 Cassette 20, 89 Charging time 16 Cleaning cassette 95 CLOCK SET 18 COLOR BAR 57 COLOR SLOW S (Color Slow Shutter 43, 80, 83 COMPONENT 56 COMPONENT OUT jack ....31 Component video cable ........32 108 Computer 71 CONV.LENS 45 D DATA CODE 18, 58 DATE/TIME 58, 104 Delete pictures 67 DIGITAL ZOOM .......... 44...

Operation Guide
Page 109
....APPLI. menu ..........59 TRAIL 50 TV 31 TV color systems 88 TWILIGHT 39 U USB SELECT 52 Using abroad 88 V VAR.SPD PB (Various speed playback) .....52 VCR HDV/DV 53 VF B.LIGHT (Viewfinder brightness)........56 VF COLOR 56 VIDEO OUT 56 VOLUME 55 W Warning indicators 85 Warning messages 86 WB SHIFT (White Balance Shift 42 WHITE BAL. (White balance 40, 83 WHITE FADER 49 Windows 71, 72 WORLD TIME 59...
....APPLI. menu ..........59 TRAIL 50 TV 31 TV color systems 88 TWILIGHT 39 U USB SELECT 52 Using abroad 88 V VAR.SPD PB (Various speed playback) .....52 VCR HDV/DV 53 VF B.LIGHT (Viewfinder brightness)........56 VF COLOR 56 VIDEO OUT 56 VOLUME 55 W Warning indicators 85 Warning messages 86 WB SHIFT (White Balance Shift 42 WHITE BAL. (White balance 40, 83 WHITE FADER 49 Windows 71, 72 WORLD TIME 59...


