Operating Instructions
Page 6
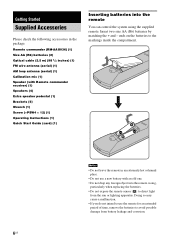
...; Do not drop any foreign object into the remote You can control the system using the supplied remote. Doing so may cause a malfunction. • If you do not intend to use a new battery with Remote commander receiver) (1) Speakers (4) Extra speaker pedestal (1) Brackets (5) Wrench (1) Screw (+PSW4 × 12) (1) Operating Instructions (1) Quick Start Guide (card) (1) Inserting...
...; Do not drop any foreign object into the remote You can control the system using the supplied remote. Doing so may cause a malfunction. • If you do not intend to use a new battery with Remote commander receiver) (1) Speakers (4) Extra speaker pedestal (1) Brackets (5) Wrench (1) Screw (+PSW4 × 12) (1) Operating Instructions (1) Quick Start Guide (card) (1) Inserting...
Operating Instructions
Page 10
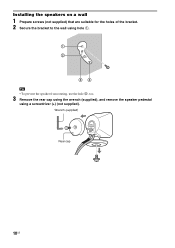
Wrench (supplied) Rear cap 10US Installing the speakers on a wall 1 Prepare screws (not supplied) that are suitable for the holes of the bracket. 2 Secure the bracket to the wall using hole 1. 1 2 34 Tip • To prevent the speaker from rotating, use the hole 2, too. 3 Remove the rear cap using the wrench (supplied), and remove the speaker pedestal using a screwdriver (+) (not supplied).
Wrench (supplied) Rear cap 10US Installing the speakers on a wall 1 Prepare screws (not supplied) that are suitable for the holes of the bracket. 2 Secure the bracket to the wall using hole 1. 1 2 34 Tip • To prevent the speaker from rotating, use the hole 2, too. 3 Remove the rear cap using the wrench (supplied), and remove the speaker pedestal using a screwdriver (+) (not supplied).
Operating Instructions
Page 12
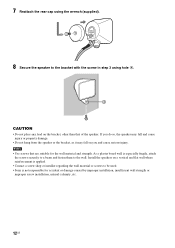
... wall strength or improper screw installation, natural calamity, etc. 12US If you do so, the speaker may fall and cause injury or property damage. • Do not hang from the speaker or the bracket, as it may fall on a vertical and flat wall where reinforcement is applied. • Contact... a screw shop or installer regarding the wall material or screws to the bracket with the screw in step 3 using the wrench (supplied). 8 Secure the speaker to be used. • Sony is especially fragile, attach the screws securely to a beam and fasten them to the wall. ...
... wall strength or improper screw installation, natural calamity, etc. 12US If you do so, the speaker may fall and cause injury or property damage. • Do not hang from the speaker or the bracket, as it may fall on a vertical and flat wall where reinforcement is applied. • Contact... a screw shop or installer regarding the wall material or screws to the bracket with the screw in step 3 using the wrench (supplied). 8 Secure the speaker to be used. • Sony is especially fragile, attach the screws securely to a beam and fasten them to the wall. ...
Operating Instructions
Page 13
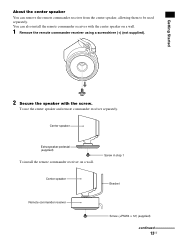
... remote commander receiver separately. Screw in step 1 Center speaker Bracket Remote commander receiver Screw (+PSW4 × 12) (supplied) continued 13US You can remove the remote commander receiver from the center speaker, allowing them to be used separately. Center speaker Extra speaker pedestal (supplied) To install the remote commander receiver on a wall. 1 Remove the remote commander...
... remote commander receiver separately. Screw in step 1 Center speaker Bracket Remote commander receiver Screw (+PSW4 × 12) (supplied) continued 13US You can remove the remote commander receiver from the center speaker, allowing them to be used separately. Center speaker Extra speaker pedestal (supplied) To install the remote commander receiver on a wall. 1 Remove the remote commander...


