
Operating Instructions
Page 2
... plugs, convenience receptacles, and the point where they exit from being walked on the apparatus. The wide blade or the third prong are provided for replacement of the apparatus with dry cloth. 7) Do not block any ventilation openings. When a cart is intended to alert the user to the presence of the...
... plugs, convenience receptacles, and the point where they exit from being walked on the apparatus. The wide blade or the third prong are provided for replacement of the apparatus with dry cloth. 7) Do not block any ventilation openings. When a cart is intended to alert the user to the presence of the...
Operating Instructions
Page 6
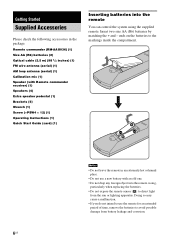
...) (1) Speakers (4) Extra speaker pedestal (1) Brackets (5) Wrench (1) Screw (+PSW4 × 12) (1) Operating Instructions (1) Quick Start Guide (card) (1) Inserting batteries into the remote casing, particularly when replacing the batteries. • Do not expose the remote sensor ( ) to the markings inside the compartment. Remote commander (RM-AAU036) (1) Size AA (R6) batteries (2) Optical cable...(1) AM loop antenna (aerial) (1) Calibration mic (1) Speaker (with an old one. • Do not drop any foreign object into the remote You can control the system using the supplied remote.
...) (1) Speakers (4) Extra speaker pedestal (1) Brackets (5) Wrench (1) Screw (+PSW4 × 12) (1) Operating Instructions (1) Quick Start Guide (card) (1) Inserting batteries into the remote casing, particularly when replacing the batteries. • Do not expose the remote sensor ( ) to the markings inside the compartment. Remote commander (RM-AAU036) (1) Size AA (R6) batteries (2) Optical cable...(1) AM loop antenna (aerial) (1) Calibration mic (1) Speaker (with an old one. • Do not drop any foreign object into the remote You can control the system using the supplied remote.
Operating Instructions
Page 75
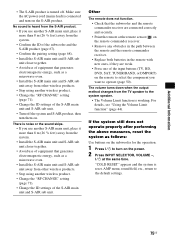
...8 m (26 1/4 feet) away from other wireless products. • Stop using another S-AIR main unit, place it more than 8 m (26 1/4 feet) away from the system. • Confirm the ID of the subwoofer and the S-AIR product (page 67). • Confirm the pairing setting (page 68). • Install the S-AIR main... want to turn on the remote commander receiver. • Remove any obstacles in the path between the remote and the remote commander receiver. • Replace both batteries in the remote with new ones, if they are weak. • Press one of the S-AIR main unit and S-AIR sub unit....
...8 m (26 1/4 feet) away from other wireless products. • Stop using another S-AIR main unit, place it more than 8 m (26 1/4 feet) away from the system. • Confirm the ID of the subwoofer and the S-AIR product (page 67). • Confirm the pairing setting (page 68). • Install the S-AIR main... want to turn on the remote commander receiver. • Remove any obstacles in the path between the remote and the remote commander receiver. • Replace both batteries in the remote with new ones, if they are weak. • Press one of the S-AIR main unit and S-AIR sub unit....

