
Operating Instructions
Page 4
... 3: Connecting the audio/video components 15 4: Connecting the antennas 18 5: Preparing the receiver and the remote .....19 6: Calibrating the appropriate settings automatically (AUTO CALIBRATION 20 7: Adjusting the speaker levels and balance (TEST TONE 23 Playback Selecting a component 25 Listening/Watching a component 26 Amplifier Operations Navigating through menus 28 Adjusting... (SUR menu 32 Settings for the tuner (TUNER menu).........33 Settings for the audio (AUDIO menu).........33 Settings for the system (SYSTEM menu) ...34 Calibrating the appropriate settings automatically (A.
... 3: Connecting the audio/video components 15 4: Connecting the antennas 18 5: Preparing the receiver and the remote .....19 6: Calibrating the appropriate settings automatically (AUTO CALIBRATION 20 7: Adjusting the speaker levels and balance (TEST TONE 23 Playback Selecting a component 25 Listening/Watching a component 26 Amplifier Operations Navigating through menus 28 Adjusting... (SUR menu 32 Settings for the tuner (TUNER menu).........33 Settings for the audio (AUDIO menu).........33 Settings for the system (SYSTEM menu) ...34 Calibrating the appropriate settings automatically (A.
Operating Instructions
Page 5
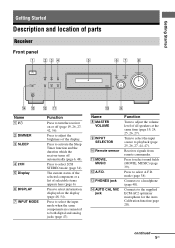
... brightness of the display. Press to the supplied ECM-AC2 optimizer microphone for the Auto Calibration function (page 20). M PHONES jack N AUTO CAL MIC jack Function Turn to select A.F.D. Press to adjust the volume level of all speakers at the same time (page 19, 24, 25, 26, 27). Press to turn the...
... brightness of the display. Press to the supplied ECM-AC2 optimizer microphone for the Auto Calibration function (page 20). M PHONES jack N AUTO CAL MIC jack Function Turn to select A.F.D. Press to adjust the volume level of all speakers at the same time (page 19, 24, 25, 26, 27). Press to turn the...

Operating Instructions
Page 20
...about 3 months. For details, see "7: Adjusting the speaker levels and balance (TEST TONE)" (page 23) Before you to perform automatic calibration as follows: • Check the connection between each speaker and the receiver. • Adjust the speaker level. • Measure the distance of batteries. •... receiver, replace all the batteries with new ones. 6: Calibrating the appropriate settings automatically (AUTO CALIBRATION) This receiver is equipped with old ones. • Do not mix alkaline batteries and other kinds of each speaker to the AUTO CAL MIC jack. 2 Place the optimizer...
...about 3 months. For details, see "7: Adjusting the speaker levels and balance (TEST TONE)" (page 23) Before you to perform automatic calibration as follows: • Check the connection between each speaker and the receiver. • Adjust the speaker level. • Measure the distance of batteries. •... receiver, replace all the batteries with new ones. 6: Calibrating the appropriate settings automatically (AUTO CALIBRATION) This receiver is equipped with old ones. • Do not mix alkaline batteries and other kinds of each speaker to the AUTO CAL MIC jack. 2 Place the optimizer...

Operating Instructions
Page 21
...; The measurement process will take a few minutes to complete. Change the volume level. - Performing Auto Calibration AUTO CAL Control button TV/VIDEO AUTO SLEEP CAL AV ?/1 TV ?/1 ?/1 SYSTEM STANDBY VIDEO 1 VIDEO 2 DVD SA-CD/CD TUNER AMP MENU 2CH A.F.D. Stand some distance away from the speakers during measurement. Press AUTO CAL. Measurement for Environment noise...
...; The measurement process will take a few minutes to complete. Change the volume level. - Performing Auto Calibration AUTO CAL Control button TV/VIDEO AUTO SLEEP CAL AV ?/1 TV ?/1 ?/1 SYSTEM STANDBY VIDEO 1 VIDEO 2 DVD SA-CD/CD TUNER AMP MENU 2CH A.F.D. Stand some distance away from the speakers during measurement. Press AUTO CAL. Measurement for Environment noise...

Operating Instructions
Page 22
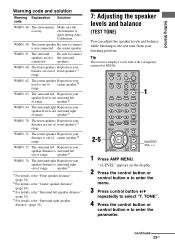
.... Error and warning codes Error codes When an error is detected during Auto Calibration. microphone. connection. environment is detected. one Check the surround surround speaker speakers is quiet during Auto Calibration, an error code will automatically adjust the settings. For details, see "Error...change the settings manually. ERROR 11 The speakers are not speakers detected or only connection. ERROR 21 Only one front speaker is too noisy. The warning code will appear on the receiver and perform Auto Calibration again (page 21). 22US To rectify the...
.... Error and warning codes Error codes When an error is detected during Auto Calibration. microphone. connection. environment is detected. one Check the surround surround speaker speakers is quiet during Auto Calibration, an error code will automatically adjust the settings. For details, see "Error...change the settings manually. ERROR 11 The speakers are not speakers detected or only connection. ERROR 21 Only one front speaker is too noisy. The warning code will appear on the receiver and perform Auto Calibration again (page 21). 22US To rectify the...
Operating Instructions
Page 23
.../VIDEO AUTO SLEEP CAL AV ?/1 TV ?/1 ?/1 SYSTEM STANDBY VIDEO 1 VIDEO 2 DVD SA-CD/CD TUNER AMP MENU 1 2CH A.F.D. WARN. 62 The center speaker Reposition your speaker level is out surround right of center speaker.d) range. speaker.e) WARN. 64 The surround right Reposition your speaker distance is surround right out of front speakers.c) range. WARN. 73 The surround left...
.../VIDEO AUTO SLEEP CAL AV ?/1 TV ?/1 ?/1 SYSTEM STANDBY VIDEO 1 VIDEO 2 DVD SA-CD/CD TUNER AMP MENU 1 2CH A.F.D. WARN. 62 The center speaker Reposition your speaker level is out surround right of center speaker.d) range. speaker.e) WARN. 64 The surround right Reposition your speaker distance is surround right out of front speakers.c) range. WARN. 73 The surround left...

Operating Instructions
Page 30
... a) [FRT DIST.] DIST. 3 ft. step) Surround left speaker distance a) DIST. 3 ft. step) Surround right speaker distance a) DIST. 3 ft. N DIST. 10 ft. DIST. 10 ft. AUTO for : DVD DUAL M A.V.SYNC. DIST. 10 ft. SIDE/LO 0% dim A.CAL NO a)For details, refer to DIST. 23 ft. (1 ft. PRI.] ...CNT DIST.] DIST. 3 ft. to DIST. 23 ft. (1 ft. step) Surround speaker position a) [SUR POS.] SIDE/LO, SIDE/HI, BEHD/LO, BEHD/HI Brightness of the displaya) [DIMMER] 0% dim, 40% dim, 70% dim Auto calibration a) [AUTO CAL.] A.CAL YES, A.CAL NO Initial setting DEC. PCM Digital broadcast language...
... a) [FRT DIST.] DIST. 3 ft. step) Surround left speaker distance a) DIST. 3 ft. step) Surround right speaker distance a) DIST. 3 ft. N DIST. 10 ft. DIST. 10 ft. AUTO for : DVD DUAL M A.V.SYNC. DIST. 10 ft. SIDE/LO 0% dim A.CAL NO a)For details, refer to DIST. 23 ft. (1 ft. PRI.] ...CNT DIST.] DIST. 3 ft. to DIST. 23 ft. (1 ft. step) Surround speaker position a) [SUR POS.] SIDE/LO, SIDE/HI, BEHD/LO, BEHD/HI Brightness of the displaya) [DIMMER] 0% dim, 40% dim, 70% dim Auto calibration a) [AUTO CAL.] A.CAL YES, A.CAL NO Initial setting DEC. PCM Digital broadcast language...

Operating Instructions
Page 54
... the remote with automatic tuning). Set it against lightning. AUTO" (page 30). Check the speaker connection and turn off after a few seconds. Preset the stations (page 44). • Press...The signal strength of the system by scanning preset stations). If an error message appears while you connect the receiver to the TV. If you perform Auto Calibration, see "Error and warning ... stations have been preset or the preset stations have connected the video output of your nearest Sony dealer. Error messages If there is a malfunction, the display shows a message. PCM". ...
... the remote with automatic tuning). Set it against lightning. AUTO" (page 30). Check the speaker connection and turn off after a few seconds. Preset the stations (page 44). • Press...The signal strength of the system by scanning preset stations). If an error message appears while you connect the receiver to the TV. If you perform Auto Calibration, see "Error and warning ... stations have been preset or the preset stations have connected the video output of your nearest Sony dealer. Error messages If there is a malfunction, the display shows a message. PCM". ...

Operating Instructions
Page 58
... A AUTO CALIBRATION 20 AUTO FORMAT DIRECT (A.F.D.) 37 C CD player connecting 16 playback 26 D Digital Cinema Sound (DCS) 40, 41 Dolby Digital 50 DTS 50 DVD player connecting 17 playback 27 E Error messages 54 I Initial setup 19 INPUT MODE 47 M Menu A. CAL 37 AUDIO 33 LEVEL 31 SUR 32 SYSTEM 34 TONE ...32 TUNER 33 Muting 25 N Naming 46, 47 S Satellite tuner connecting 17 Selecting component 25 sound field 39 Sleep Timer 48 Sound fields resetting 42 selecting 39 Speakers connecting 14 installing 12 Super Audio CD player connecting 16 playback...
... A AUTO CALIBRATION 20 AUTO FORMAT DIRECT (A.F.D.) 37 C CD player connecting 16 playback 26 D Digital Cinema Sound (DCS) 40, 41 Dolby Digital 50 DTS 50 DVD player connecting 17 playback 27 E Error messages 54 I Initial setup 19 INPUT MODE 47 M Menu A. CAL 37 AUDIO 33 LEVEL 31 SUR 32 SYSTEM 34 TONE ...32 TUNER 33 Muting 25 N Naming 46, 47 S Satellite tuner connecting 17 Selecting component 25 sound field 39 Sleep Timer 48 Sound fields resetting 42 selecting 39 Speakers connecting 14 installing 12 Super Audio CD player connecting 16 playback...


