
Operating Instructions
Page 4
...Enjoying Surround Sound Enjoying Dolby Digital and DTS Surround sound (AUTO FORMAT DIRECT 37 Selecting a pre-programmed sound field .... 39 Using only the front speakers and sub woofer (2CH STEREO 42 Resetting sound fields to the initial settings 42 Tuner Operations Listening to FM/AM radio 43 Presetting radio stations 44 Other Operation Switching the audio input mode (INPUT MODE 47 Naming inputs 47 Changing the display 48 Using the Sleep Timer 48 Using the Remote Changing button assignments 49 Additional Information Glossary 50 Precautions 51 Troubleshooting 52 Specifications 55...
...Enjoying Surround Sound Enjoying Dolby Digital and DTS Surround sound (AUTO FORMAT DIRECT 37 Selecting a pre-programmed sound field .... 39 Using only the front speakers and sub woofer (2CH STEREO 42 Resetting sound fields to the initial settings 42 Tuner Operations Listening to FM/AM radio 43 Presetting radio stations 44 Other Operation Switching the audio input mode (INPUT MODE 47 Naming inputs 47 Changing the display 48 Using the Sleep Timer 48 Using the Remote Changing button assignments 49 Additional Information Glossary 50 Precautions 51 Troubleshooting 52 Specifications 55...
Operating Instructions
Page 5
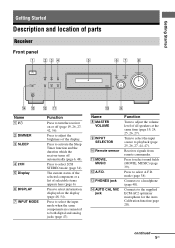
... selected component or a list of the display. Connects to select 2CH STEREO mode (page 34). Receives signals from remote commander. Press to adjust the volume level of all speakers at the same time (page 19, 24, 25, 26, 27). M PHONES jack N AUTO CAL MIC jack Function Turn to select sound fields (MOVIE, MUSIC) (page 39). Turn to select the input source to select information displayed on or off automatically (page 6, 48). Getting Started Getting Started Description and location of parts Receiver...
... selected component or a list of the display. Connects to select 2CH STEREO mode (page 34). Receives signals from remote commander. Press to adjust the volume level of all speakers at the same time (page 19, 24, 25, 26, 27). M PHONES jack N AUTO CAL MIC jack Function Turn to select sound fields (MOVIE, MUSIC) (page 39). Turn to select the input source to select information displayed on or off automatically (page 6, 48). Getting Started Getting Started Description and location of parts Receiver...

Operating Instructions
Page 6
... (Low Frequency Effect) channel and the LFE channel signal is activated (page 29). Note When playing a Dolby Digital format disc, be sure that you have made digital connections and that INPUT MODE is activated. PRO LOGIC" lights up when the Pro Logic II Movie/Music decoder is not set to the PHONES jack. "; PRO LOGIC II" lights up when the receiver applies Pro Logic processing to 2 channel signals in order to tune in radio stations...
... (Low Frequency Effect) channel and the LFE channel signal is activated (page 29). Note When playing a Dolby Digital format disc, be sure that you have made digital connections and that INPUT MODE is activated. PRO LOGIC" lights up when the Pro Logic II Movie/Music decoder is not set to the PHONES jack. "; PRO LOGIC II" lights up when the receiver applies Pro Logic processing to 2 channel signals in order to tune in radio stations...
Operating Instructions
Page 8
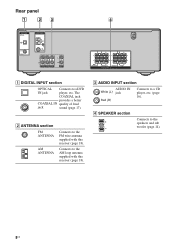
... IN quality of loud jack sound (page 17). C AUDIO INPUT section AUDIO IN White (L) jack Red (R) Connects to the speakers and sub woofer (page 14). 8US D SPEAKER section Connects to a CD player, etc. (page 16). Rear panel 1 23 4 DIGITAL OPTICAL VIDEO 2 IN DVD IN COAXIAL ANTENNA AM L L R R AUDIO IN AUDIO IN AUDIO IN S DVD VIDEO 2 L R AUDIO IN VIDEO 1 RL RL + ++ + SUB WOOFER RL SURROUND SPEAKERS CENTER RL FRONT A DIGITAL INPUT section OPTICAL Connects to the AM loop antenna supplied with this receiver (page 18). Connects to a DVD IN jack player, etc.
... IN quality of loud jack sound (page 17). C AUDIO INPUT section AUDIO IN White (L) jack Red (R) Connects to the speakers and sub woofer (page 14). 8US D SPEAKER section Connects to a CD player, etc. (page 16). Rear panel 1 23 4 DIGITAL OPTICAL VIDEO 2 IN DVD IN COAXIAL ANTENNA AM L L R R AUDIO IN AUDIO IN AUDIO IN S DVD VIDEO 2 L R AUDIO IN VIDEO 1 RL RL + ++ + SUB WOOFER RL SURROUND SPEAKERS CENTER RL FRONT A DIGITAL INPUT section OPTICAL Connects to the AM loop antenna supplied with this receiver (page 18). Connects to a DVD IN jack player, etc.

Operating Instructions
Page 10
... adjust the volume +*/- Then, use the control buttons to perform menu operations. M TV VOL +*/- MASTER VOL Press to enter the value after selecting a channel, disc or track using the numeric buttons. Then, use the control buttons to skips tracks of the VCR or satellite tuner. P TV Q RETURN/ EXIT O R Control buttons < Function Press to perform menu operations. Press to display the menus of the VCR, DVD player, or satellite tuner is displayed on the TV screen. After pressing AMP MENU (D), DVD MENU (J), or MENU...
... adjust the volume +*/- Then, use the control buttons to perform menu operations. M TV VOL +*/- MASTER VOL Press to enter the value after selecting a channel, disc or track using the numeric buttons. Then, use the control buttons to skips tracks of the VCR or satellite tuner. P TV Q RETURN/ EXIT O R Control buttons < Function Press to perform menu operations. Press to display the menus of the VCR, DVD player, or satellite tuner is displayed on the TV screen. After pressing AMP MENU (D), DVD MENU (J), or MENU...

Operating Instructions
Page 11
... to activate the Auto Calibration function. Therefore, depending on the component, the above operation may not be possible or may not work depending on the TV screen of the VCR or satellite tuner. mode. Press TV/VIDEO and TV (P) at the same time to select channel numbers of the satellite tuner or DVD player. CLEAR U Numeric buttons (number 5*) V 2CH W A.F.D. Press to continuous playback, etc. X AUTO CAL Y TV/VIDEO Press to...
... to activate the Auto Calibration function. Therefore, depending on the component, the above operation may not be possible or may not work depending on the TV screen of the VCR or satellite tuner. mode. Press TV/VIDEO and TV (P) at the same time to select channel numbers of the satellite tuner or DVD player. CLEAR U Numeric buttons (number 5*) V 2CH W A.F.D. Press to continuous playback, etc. X AUTO CAL Y TV/VIDEO Press to...

Operating Instructions
Page 17
... DVD VIDEO 2 L R AUDIO IN VIDEO 1 RL RL + ++ + SUB WOOFER RL SURROUND SPEAKERS CENTER RL FRONT C A DVD player/ DVD recorder A Audio cord (not supplied) B Optical digital cord (not supplied) C Coaxial digital cord (supplied) Notes • To input multi channel digital audio from the DVD player, set the digital audio output setting on the receiver's display. For details, refer to connect video components such as DVD player, DVD recorder, satellite tuner or VCR. Tip All the digital audio jacks are compatible with 32 kHz, 44.1 kHz, 48 kHz, and 96 kHz sampling frequencies. 17US...
... DVD VIDEO 2 L R AUDIO IN VIDEO 1 RL RL + ++ + SUB WOOFER RL SURROUND SPEAKERS CENTER RL FRONT C A DVD player/ DVD recorder A Audio cord (not supplied) B Optical digital cord (not supplied) C Coaxial digital cord (supplied) Notes • To input multi channel digital audio from the DVD player, set the digital audio output setting on the receiver's display. For details, refer to connect video components such as DVD player, DVD recorder, satellite tuner or VCR. Tip All the digital audio jacks are compatible with 32 kHz, 44.1 kHz, 48 kHz, and 96 kHz sampling frequencies. 17US...
Operating Instructions
Page 19
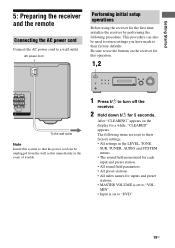
... the receiver for inputs and preset stations. • MASTER VOLUME is set to "VOL MIN". • Input is set to "DVD". 19US Getting Started 5: Preparing the receiver and the remote Connecting the AC power cord Connect the AC power cord to their factory settings. • All settings in the event of trouble. ?/1 AUTO CAL MIC DIMMER SLEEP 2CH A.F.D. This procedure can be unplugged from the wall socket immediately in the LEVEL, TONE, SUR, TUNER, AUDIO and SYSTEM menus. • The sound...
... the receiver for inputs and preset stations. • MASTER VOLUME is set to "VOL MIN". • Input is set to "DVD". 19US Getting Started 5: Preparing the receiver and the remote Connecting the AC power cord Connect the AC power cord to their factory settings. • All settings in the event of trouble. ?/1 AUTO CAL MIC DIMMER SLEEP 2CH A.F.D. This procedure can be unplugged from the wall socket immediately in the LEVEL, TONE, SUR, TUNER, AUDIO and SYSTEM menus. • The sound...

Operating Instructions
Page 20
... (TEST TONE)" (page 23) Before you do not intend to use a new battery with D.C.A.C. (Digital Cinema Auto Calibration) Technology which allows you to perform automatic calibration as follows: • Check the connection between each speaker and the receiver. • Adjust the speaker level. • Measure the distance of each speaker to the AUTO CAL MIC jack. 2 Place the optimizer microphone at your listening position. When the remote no longer operates the receiver, replace...
... (TEST TONE)" (page 23) Before you do not intend to use a new battery with D.C.A.C. (Digital Cinema Auto Calibration) Technology which allows you to perform automatic calibration as follows: • Check the connection between each speaker and the receiver. • Adjust the speaker level. • Measure the distance of each speaker to the AUTO CAL MIC jack. 2 Place the optimizer microphone at your listening position. When the remote no longer operates the receiver, replace...

Operating Instructions
Page 21
... corresponding speaker indicator lights up in the path between the optimizer microphone and the speakers. • When you face the speaker towards the optimizer microphone, you will be maintained. • You cannot select Auto Calibration when the headphone is because test signals are registered. Change the volume level. - Notes • Auto Calibration cannot detect the sub woofer. Performing Auto Calibration AUTO CAL Control button TV/VIDEO AUTO SLEEP CAL AV ?/1 TV ?/1 ?/1 SYSTEM STANDBY VIDEO 1 VIDEO 2 DVD SA-CD/CD TUNER AMP MENU 2CH...
... corresponding speaker indicator lights up in the path between the optimizer microphone and the speakers. • When you face the speaker towards the optimizer microphone, you will be maintained. • You cannot select Auto Calibration when the headphone is because test signals are registered. Change the volume level. - Notes • Auto Calibration cannot detect the sub woofer. Performing Auto Calibration AUTO CAL Control button TV/VIDEO AUTO SLEEP CAL AV ?/1 TV ?/1 ?/1 SYSTEM STANDBY VIDEO 1 VIDEO 2 DVD SA-CD/CD TUNER AMP MENU 2CH...

Operating Instructions
Page 22
... connection. one Check the surround surround speaker speakers is detected. environment is too noisy. connection. You can also change the settings manually 1 Record down the error code. 2 Press the control button. 3 Press ?/1 to turn off the receiver. 4 Rectify the error. To rectify the error 1 Record down the warning code. 2 Press the control button. 3 Press ?/1 to ignore the warning code as the Auto Calibration function will automatically adjust the settings. Error code and remedies Error code Explanation Remedies ERROR 10 The environment Make...
... connection. one Check the surround surround speaker speakers is detected. environment is too noisy. connection. You can also change the settings manually 1 Record down the error code. 2 Press the control button. 3 Press ?/1 to turn off the receiver. 4 Rectify the error. To rectify the error 1 Record down the warning code. 2 Press the control button. 3 Press ?/1 to ignore the warning code as the Auto Calibration function will automatically adjust the settings. Error code and remedies Error code Explanation Remedies ERROR 10 The environment Make...
Operating Instructions
Page 25
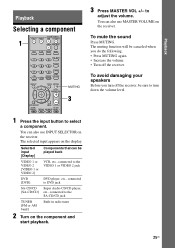
... MODE 56 D.TUNING 89 D.SKIP MEMORY DVD MENU 0/10 ENTER TOOLS MUTING F TV VOL MASTER VOL g f RETURN/EXIT MENU TV CH - The selected input appears on the component and start playback. 3 Press MASTER VOL +/- To avoid damaging your speakers Before you turn down the volume level. 25US Selected input [Display] Components that can be played back VIDEO 1 or VIDEO 2 [VIDEO 1 or VIDEO 2] DVD [DVD] VCR, etc., connected to the VIDEO 1 or VIDEO 2 jack DVD player, etc., connected to DVD jack SA-CD/CD Super Audio...
... MODE 56 D.TUNING 89 D.SKIP MEMORY DVD MENU 0/10 ENTER TOOLS MUTING F TV VOL MASTER VOL g f RETURN/EXIT MENU TV CH - The selected input appears on the component and start playback. 3 Press MASTER VOL +/- To avoid damaging your speakers Before you turn down the volume level. 25US Selected input [Display] Components that can be played back VIDEO 1 or VIDEO 2 [VIDEO 1 or VIDEO 2] DVD [DVD] VCR, etc., connected to the VIDEO 1 or VIDEO 2 jack DVD player, etc., connected to DVD jack SA-CD/CD Super Audio...

Operating Instructions
Page 27
... the DVD player via a digital connection. - If no image is displayed on the receiver. 3 Press DVD. Tips • Select the sound format of the DVD player is displayed. Recommended sound fields: Movie: C.ST.EX Music: CONCERT 1 Turn on the TV and DVD player. 2 Turn on the TV screen, make sure that an image of the DVD player is connected to multi channel sound. - Be sure the digital audio output of the disc to be played, if necessary. • You can also use INPUT SELECTOR...
... the DVD player via a digital connection. - If no image is displayed on the receiver. 3 Press DVD. Tips • Select the sound format of the DVD player is displayed. Recommended sound fields: Movie: C.ST.EX Music: CONCERT 1 Turn on the TV and DVD player. 2 Turn on the TV screen, make sure that an image of the DVD player is connected to multi channel sound. - Be sure the digital audio output of the disc to be played, if necessary. • You can also use INPUT SELECTOR...

Operating Instructions
Page 29
... COMP. STD, EFCT. Menu [Display] LEVEL (31) [1-LEVEL] TONE (32) [2-TONE] SUR (32) [3-SUR] TUNER (33) [4-TUNER] Parameters [Display] Test tonea) [T. SELCT] Effect levela) [EFFECT] FM station receiving modea) [FM MODE] Naming preset stationsa) [NAME IN] Settings Initial setting T. Amplifier Operations Overview of the menus The following options are available in each menu. L +1 to SW +10 dB (1 dB step) SW 0 dB COMP. OFF, COMP. MIN, EFCT. MAX EFCT. R +8 BALANCE...
... COMP. STD, EFCT. Menu [Display] LEVEL (31) [1-LEVEL] TONE (32) [2-TONE] SUR (32) [3-SUR] TUNER (33) [4-TUNER] Parameters [Display] Test tonea) [T. SELCT] Effect levela) [EFFECT] FM station receiving modea) [FM MODE] Naming preset stationsa) [NAME IN] Settings Initial setting T. Amplifier Operations Overview of the menus The following options are available in each menu. L +1 to SW +10 dB (1 dB step) SW 0 dB COMP. OFF, COMP. MIN, EFCT. MAX EFCT. R +8 BALANCE...

Operating Instructions
Page 30
... A.CAL NO a)For details, refer to DIST. 23 ft. (1 ft. A. step) Surround right speaker distance a) DIST. 3 ft. to the page in the parentheses. 30US PCM for : VIDEO 2; to DIST. 23 ft. [SL DIST. ] (1 ft. to DIST. 23 ft. (1 ft. Menu [Display] AUDIO (33) [5-AUDIO] SYSTEM (34) [6-SYSTEM] A. AUTO, DEC. to DIST. 23 ft. [SR DIST.] (1 ft. AUTO for : DVD DUAL M A.V.SYNC. DIST. 10 ft.
... A.CAL NO a)For details, refer to DIST. 23 ft. (1 ft. A. step) Surround right speaker distance a) DIST. 3 ft. to the page in the parentheses. 30US PCM for : VIDEO 2; to DIST. 23 ft. [SL DIST. ] (1 ft. to DIST. 23 ft. (1 ft. Menu [Display] AUDIO (33) [5-AUDIO] SYSTEM (34) [6-SYSTEM] A. AUTO, DEC. to DIST. 23 ft. [SR DIST.] (1 ft. AUTO for : DVD DUAL M A.V.SYNC. DIST. 10 ft.

Operating Instructions
Page 34
... of inputs. buttons. • This parameter is minimized. • A.V.SYNC. SYSTEM menu parameters x FRT DIST. (Front speakers distance) Lets you set the distance from your listening position (B). 34US x A.V. x NAME IN (Naming inputs) Lets you want to listen to the front speakers (A). Y (Yes) (Delay time: 68 ms) The audio output is delayed so that the time gap between the front speakers. Settings for Dolby Digital sources. • DUAL M/S (Main/Sub) Sound...
... of inputs. buttons. • This parameter is minimized. • A.V.SYNC. SYSTEM menu parameters x FRT DIST. (Front speakers distance) Lets you set the distance from your listening position (B). 34US x A.V. x NAME IN (Naming inputs) Lets you want to listen to the front speakers (A). Y (Yes) (Delay time: 68 ms) The audio output is delayed so that the time gap between the front speakers. Settings for Dolby Digital sources. • DUAL M/S (Main/Sub) Sound...

Operating Instructions
Page 41
... the playback signal. • When listening with sound fields that the sound is a unique sound reproduction technology for home theater developed by looking at home. The CINEMA STUDIO EX modes consist of the following three elements. • Virtual Multi Dimension Creates 5 sets of virtual speakers from the surround speakers. • This function does not work for enjoying the exciting and powerful sound of DVD software, etc., by Sony, in your home. Tip...
... the playback signal. • When listening with sound fields that the sound is a unique sound reproduction technology for home theater developed by looking at home. The CINEMA STUDIO EX modes consist of the following three elements. • Virtual Multi Dimension Creates 5 sets of virtual speakers from the surround speakers. • This function does not work for enjoying the exciting and powerful sound of DVD software, etc., by Sony, in your home. Tip...
Operating Instructions
Page 52
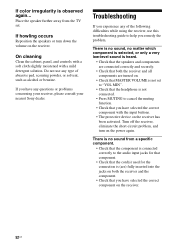
.... On cleaning Clean the cabinet, panel, and controls with a soft cloth slightly moistened with the input buttons. • The protective device on the receiver. 52US If color irregularity is not set . Do not use this troubleshooting guide to the audio input jacks for that component. • Check that the cord(s) used for the connection is (are) fully inserted into the jacks on . • Check that MASTER VOLUME is observed again...
.... On cleaning Clean the cabinet, panel, and controls with a soft cloth slightly moistened with the input buttons. • The protective device on the receiver. 52US If color irregularity is not set . Do not use this troubleshooting guide to the audio input jacks for that component. • Check that the cord(s) used for the connection is (are) fully inserted into the jacks on . • Check that MASTER VOLUME is observed again...

Operating Instructions
Page 53
... signals with alcohol. you have connected to both the receiver and the component. There is no sound from the center/ surround speakers. • Select a CINEMA STUDIO EX mode (page 40). • Adjust the speaker level (page 23). There is no sound, or only a very lowlevel sound is on both the L and R jacks of this receiver, check the audio setting (settings for the sources from COAXIAL or OPTICAL input jack). • Check that the INPUT MODE is not set...
... signals with alcohol. you have connected to both the receiver and the component. There is no sound from the center/ surround speakers. • Select a CINEMA STUDIO EX mode (page 40). • Adjust the speaker level (page 23). There is no sound, or only a very lowlevel sound is on both the L and R jacks of this receiver, check the audio setting (settings for the sources from COAXIAL or OPTICAL input jack). • Check that the INPUT MODE is not set...

Operating Instructions
Page 54
... direct tuning). • No stations have been preset or the preset stations have connected the video output of your nearest Sony dealer. Preset the stations (page 44). • Press DISPLAY repeatedly on the receiver so that the antennas are weak. • Make sure you perform Auto Calibration, see "Error and warning codes" (page 22) to "DEC. DEC. Remote control The remote does not function. • Point the remote at the remote sensor on the receiver. • Remove any problem...
... direct tuning). • No stations have been preset or the preset stations have connected the video output of your nearest Sony dealer. Preset the stations (page 44). • Press DISPLAY repeatedly on the receiver so that the antennas are weak. • Make sure you perform Auto Calibration, see "Error and warning codes" (page 22) to "DEC. DEC. Remote control The remote does not function. • Point the remote at the remote sensor on the receiver. • Remove any problem...


