
Child Safety: It Makes A Difference Where Your TV Stands
Page 1
The home theater entertainment experience is large enough to support the weight of your television (and other electronic components). 2 Use appropriate angle braces, straps and anchors to secure your furniture to the wall (but never screw anything directly into the TV...'t allow children to climb on or play with your home. The Consumer Electronics Association formed the Home Entertainment Support Safety Committee comprised of the home with furniture and television sets. 5 Avoid placing any items on top of TVs such as VCRs and remotes that may pique the children's curiosity. 6 Remember that...
The home theater entertainment experience is large enough to support the weight of your television (and other electronic components). 2 Use appropriate angle braces, straps and anchors to secure your furniture to the wall (but never screw anything directly into the TV...'t allow children to climb on or play with your home. The Consumer Electronics Association formed the Home Entertainment Support Safety Committee comprised of the home with furniture and television sets. 5 Avoid placing any items on top of TVs such as VCRs and remotes that may pique the children's curiosity. 6 Remember that...
Operating Instructions
Page 3
...speakers SS-MSP2200 - Center speaker SS-CNP1200 - In this product. About area codes The area code of the receiver you purchased is Sony Corporation, 1-7-1 Konan Minato-ku Tokyo, 1080075 Japan. continued 3GB You can also use only the supplied speakers. • The instructions in... use the controls on the remote. Sub woofer SS-WP2200 The HT-SS2000 consists of Old Electrical & Electronic Equipment (Applicable in the European Union and other European countries with separate collection systems) This symbol on the product or on the supplied remote. Sub woofer SS-WP1200 ...
...speakers SS-MSP2200 - Center speaker SS-CNP1200 - In this product. About area codes The area code of the receiver you purchased is Sony Corporation, 1-7-1 Konan Minato-ku Tokyo, 1080075 Japan. continued 3GB You can also use only the supplied speakers. • The instructions in... use the controls on the remote. Sub woofer SS-WP2200 The HT-SS2000 consists of Old Electrical & Electronic Equipment (Applicable in the European Union and other European countries with separate collection systems) This symbol on the product or on the supplied remote. Sub woofer SS-WP1200 ...

Operating Instructions
Page 4
...-AAU017) The VIDEO 3 button on the remote is not available for receiver operation. 4GB "Dolby", "Pro Logic" and the double-D symbol are trademarks of Dolby Laboratories. **"DTS" and "DTS Digital Surround" are ... Licensing LLC. This receiver incorporates High-Definition Multimedia Interface (HDMITM) technology. This receiver incorporates Dolby* Digital and Pro Logic Surround and the DTS** Digital Surround System. * Manufactured under license from Dolby Laboratories.
...-AAU017) The VIDEO 3 button on the remote is not available for receiver operation. 4GB "Dolby", "Pro Logic" and the double-D symbol are trademarks of Dolby Laboratories. **"DTS" and "DTS Digital Surround" are ... Licensing LLC. This receiver incorporates High-Definition Multimedia Interface (HDMITM) technology. This receiver incorporates Dolby* Digital and Pro Logic Surround and the DTS** Digital Surround System. * Manufactured under license from Dolby Laboratories.
Operating Instructions
Page 5
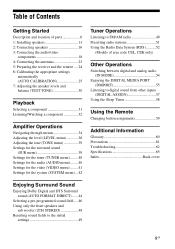
... the audio/video components 18 4: Connecting the antennas 23 5: Preparing the receiver and the remote .... 24 6: Calibrating the appropriate settings automatically (AUTO CALIBRATION 25 7: Adjusting the speaker levels and balance (TEST TONE 30 Playback Selecting a component 31 Listening/Watching a component 32 Amplifier Operations ...40 Settings for the video (VIDEO menu) ........ 41 Settings for the system (SYSTEM menu)... 42 Tuner Operations Listening to FM/AM radio 49 Presetting radio stations 51 Using the Radio Data System (RDS) ..........52 (Models of area code CEL, CEK only) Other...
... the audio/video components 18 4: Connecting the antennas 23 5: Preparing the receiver and the remote .... 24 6: Calibrating the appropriate settings automatically (AUTO CALIBRATION 25 7: Adjusting the speaker levels and balance (TEST TONE 30 Playback Selecting a component 31 Listening/Watching a component 32 Amplifier Operations ...40 Settings for the video (VIDEO menu) ........ 41 Settings for the system (SYSTEM menu)... 42 Tuner Operations Listening to FM/AM radio 49 Presetting radio stations 51 Using the Radio Data System (RDS) ..........52 (Models of area code CEL, CEK only) Other...

Operating Instructions
Page 6
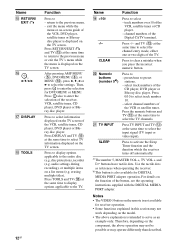
... 31). Name H MUTING I AUTO CAL MIC jack Function Press to select a sound field (page 44, 46, 48, 49). B Display The current status of the selected component or a list of selectable items appears here (page 7). C PRESET TUNING Press to turn the receiver on or off (page 24, 32, 33, 49...
... 31). Name H MUTING I AUTO CAL MIC jack Function Press to select a sound field (page 44, 46, 48, 49). B Display The current status of the selected component or a list of selectable items appears here (page 7). C PRESET TUNING Press to turn the receiver on or off (page 24, 32, 33, 49...
Operating Instructions
Page 10
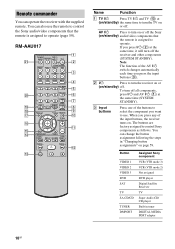
...one of the input buttons, the receiver turns on. The buttons are factory assigned to use the remote to control the Sony audio/video components that the remote is assigned to turn the receiver on or (on page 59. Button VIDEO 1 VIDEO 2 ...SYSTEM STANDBY). MOVIE MUSIC AMP MENU 123 AUTO CAL 456 7 >10/ - If you want to control Sony components as follows. You can also use . When you press the input buttons (C). RM-AAU017 wa w; qa qs Name Function A TV ?/1 Press TV ?/1 and TV (M) at (on or off the Sony (on/standby) audio/video components that the remote...
...one of the input buttons, the receiver turns on. The buttons are factory assigned to use the remote to control the Sony audio/video components that the remote is assigned to turn the receiver on or (on page 59. Button VIDEO 1 VIDEO 2 ...SYSTEM STANDBY). MOVIE MUSIC AMP MENU 123 AUTO CAL 456 7 >10/ - If you want to control Sony components as follows. You can also use . When you press the input buttons (C). RM-AAU017 wa w; qa qs Name Function A TV ?/1 Press TV ?/1 and TV (M) at (on or off the Sony (on/standby) audio/video components that the remote...
Operating Instructions
Page 12
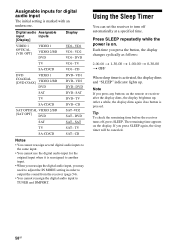
... (M) at the same time to select the input signal (TV input or video input). Notes • The VIDEO 3 button on the remote is intended to enter the selection for receiver operation. • Some functions explained in this section may not work depending on the TV screen...information displayed on the function of the CD player, DVD player or Blu-ray disc player. Press to - preset/tune to the entire disc (e.g. Therefore, depending on a list menu (e.g. audio settings during recording), or multiple items on the component, the above explanation is not available for DVD MENU or MENU. ...
... (M) at the same time to select the input signal (TV input or video input). Notes • The VIDEO 3 button on the remote is intended to enter the selection for receiver operation. • Some functions explained in this section may not work depending on the TV screen...information displayed on the function of the CD player, DVD player or Blu-ray disc player. Press to - preset/tune to the entire disc (e.g. Therefore, depending on a list menu (e.g. audio settings during recording), or multiple items on the component, the above explanation is not available for DVD MENU or MENU. ...
Operating Instructions
Page 19
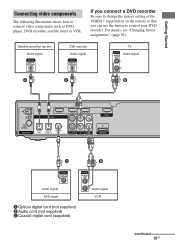
... 19GB If you connect a DVD recorder Be sure to change the factory setting of the VIDEO 1 input button on the remote so that you can use the button to connect video components such as DVD player, DVD recorder, satellite tuner or VCR. For details, see "Changing button assignments" (page 59). Getting Started...
... 19GB If you connect a DVD recorder Be sure to change the factory setting of the VIDEO 1 input button on the remote so that you can use the button to connect video components such as DVD player, DVD recorder, satellite tuner or VCR. For details, see "Changing button assignments" (page 59). Getting Started...

Operating Instructions
Page 22
... from the HDMI OUT jack may be distorted or may be suppressed by Sony). • An audio signal input to the HDMI IN jack is not compatible with the connected component. 22GB In this case, check the specification of the connected component. • Set the resolution of the image of the playback... • Video signals input to the HDMI IN jack can use the button to control your Blu-ray disc player. If you connect a Blu-ray disc player Be sure to change the factory setting of the VIDEO 2 input button on the remote so that you can only be output from the HDMI OUT jack. • When you...
... from the HDMI OUT jack may be distorted or may be suppressed by Sony). • An audio signal input to the HDMI IN jack is not compatible with the connected component. 22GB In this case, check the specification of the connected component. • Set the resolution of the image of the playback... • Video signals input to the HDMI IN jack can use the button to control your Blu-ray disc player. If you connect a Blu-ray disc player Be sure to change the factory setting of the VIDEO 2 input button on the remote so that you can only be output from the HDMI OUT jack. • When you...

Operating Instructions
Page 24
...is set to "VOL MIN". • Input is set to their factory settings. • All settings in the LEVEL, TONE, SUR, TUNER, AUDIO, VIDEO, SYSTEM and A. This procedure can also be used to return settings you have made to "DVD". 24GB AC power cord Performing initial setup operations Before using... to their factory defaults. Be sure to use the buttons on the display for a while, then "CLEARED" appears. 5: Preparing the receiver and the remote Connecting the AC power cord Connect the AC power cord to turn off the receiver. 2 Hold down ?/1 for 5 seconds. The following procedure.
...is set to "VOL MIN". • Input is set to their factory settings. • All settings in the LEVEL, TONE, SUR, TUNER, AUDIO, VIDEO, SYSTEM and A. This procedure can also be used to return settings you have made to "DVD". 24GB AC power cord Performing initial setup operations Before using... to their factory defaults. Be sure to use the buttons on the display for a while, then "CLEARED" appears. 5: Preparing the receiver and the remote Connecting the AC power cord Connect the AC power cord to turn off the receiver. 2 Hold down ?/1 for 5 seconds. The following procedure.
Operating Instructions
Page 25
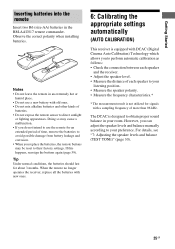
...a new battery with old ones. • Do not mix alkaline batteries and other kinds of batteries. • Do not expose the remote sensor to your listening position. • Measure the speaker polarity. • Measure the frequency characteristics.* * The measurement result is not utilized... the speaker levels and balance (TEST TONE)" (page 30). 25GB Getting Started Inserting batteries into the remote Insert two R6 (size-AA) batteries in your preference. When the remote no longer operates the receiver, replace all the batteries with new ones. 6: Calibrating the appropriate settings ...
...a new battery with old ones. • Do not mix alkaline batteries and other kinds of batteries. • Do not expose the remote sensor to your listening position. • Measure the speaker polarity. • Measure the frequency characteristics.* * The measurement result is not utilized... the speaker levels and balance (TEST TONE)" (page 30). 25GB Getting Started Inserting batteries into the remote Insert two R6 (size-AA) batteries in your preference. When the remote no longer operates the receiver, replace all the batteries with new ones. 6: Calibrating the appropriate settings ...

Operating Instructions
Page 27
...can also select "A.CAL YES" in the SYSTEM menu (page 36). The table below shows the display when measurement starts. WOOFER Note You cannot measure the speaker height of the surround speakers. parameters in the A. Press input buttons on the remote or INPUT SELECTOR on the display. When ...making noise to complete. See "When error codes appear" (page 28). Getting Started Performing Auto Calibration TV INPUT TV ?/1 SLEEP DMPORT AV ?/1 ?/1 SYSTEM STANDBY VIDEO 1 VIDEO 2 VIDEO 3 DVD SAT TV SA-CD/CD TUNER 2CH A.F.D. This is because test signals are output from the speakers and ...
...can also select "A.CAL YES" in the SYSTEM menu (page 36). The table below shows the display when measurement starts. WOOFER Note You cannot measure the speaker height of the surround speakers. parameters in the A. Press input buttons on the remote or INPUT SELECTOR on the display. When ...making noise to complete. See "When error codes appear" (page 28). Getting Started Performing Auto Calibration TV INPUT TV ?/1 SLEEP DMPORT AV ?/1 ?/1 SYSTEM STANDBY VIDEO 1 VIDEO 2 VIDEO 3 DVD SAT TV SA-CD/CD TUNER 2CH A.F.D. This is because test signals are output from the speakers and ...
Operating Instructions
Page 56
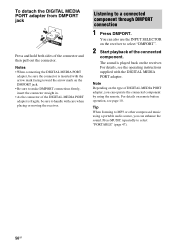
...MEDIA PORT adapter, be sure to MP3 or other compressed music using the remote. For details, see page 10. Note Depending on the receiver to select "DMPORT". 2 Start playback of the connected component. For details on the receiver. To detach the DIGITAL MEDIA PORT adapter... the connector of the DIGITAL MEDIA PORT adapter is played back on remote button operation, see the operating instructions supplied with care when placing or moving the receiver. Press MUSIC repeatedly to a connected component through DMPORT connection 1 Press DMPORT. Listening to select "PORTABLE" (page...
...MEDIA PORT adapter, be sure to MP3 or other compressed music using the remote. For details, see page 10. Note Depending on the receiver to select "DMPORT". 2 Start playback of the connected component. For details on the receiver. To detach the DIGITAL MEDIA PORT adapter... the connector of the DIGITAL MEDIA PORT adapter is played back on remote button operation, see the operating instructions supplied with care when placing or moving the receiver. Press MUSIC repeatedly to a connected component through DMPORT connection 1 Press DMPORT. Listening to select "PORTABLE" (page...
Operating Instructions
Page 58
... SAT OPTICAL VIDEO 2/BD [SAT OPT] DVD SAT TV SA-CD/CD SAT-VD2 SAT- SAT SAT- Note If you press any buttons on the remote or receiver after the display dims, the display brightens up . Assignable inputs for the original input when it is reassigned to another input. • When...
... SAT OPTICAL VIDEO 2/BD [SAT OPT] DVD SAT TV SA-CD/CD SAT-VD2 SAT- SAT SAT- Note If you press any buttons on the remote or receiver after the display dims, the display brightens up . Assignable inputs for the original input when it is reassigned to another input. • When...
Operating Instructions
Page 59
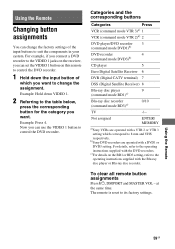
...the VIDEO 1 button on the BD1 or BD3 setting, refer to change the factory settings of which correspond to suit the components in your system. For example, if you connect a DVD recorder to the VIDEO 1 jacks on the receiver, you want to the ...factory settings. To clear all remote button assignments Press ?/1, DMPORT and MASTER VOL - The remote is reset to control the DVD recorder. Using the Remote 59GB Not assigned ENTER/ MEMORY a)Sony VCRs are operated with the Blu-ray disc player or Blu-ray disc recorder. Using the Remote Changing button assignments You can ...
...the VIDEO 1 button on the BD1 or BD3 setting, refer to change the factory settings of which correspond to suit the components in your system. For example, if you connect a DVD recorder to the VIDEO 1 jacks on the receiver, you want to the ...factory settings. To clear all remote button assignments Press ?/1, DMPORT and MASTER VOL - The remote is reset to control the DVD recorder. Using the Remote 59GB Not assigned ENTER/ MEMORY a)Sony VCRs are operated with the Blu-ray disc player or Blu-ray disc recorder. Using the Remote Changing button assignments You can ...
Operating Instructions
Page 62
...the TV set to "VOL MIN". • Press MUTING to the audio input jacks for that component. • Check that you have selected the correct component with the input buttons on the remote or INPUT SELECTOR on the power again. • Check that the IN MODE setting is connected... concerning your receiver, please consult your nearest Sony dealer. Turn off the receiver, eliminate the short-circuit problem, and turn down the volume on both the receiver and all components are connected securely. • Check that both the receiver and the component. • Check that the cord(s) used...
...the TV set to "VOL MIN". • Press MUTING to the audio input jacks for that component. • Check that you have selected the correct component with the input buttons on the remote or INPUT SELECTOR on the power again. • Check that the IN MODE setting is connected... concerning your receiver, please consult your nearest Sony dealer. Turn off the receiver, eliminate the short-circuit problem, and turn down the volume on both the receiver and all components are connected securely. • Check that both the receiver and the component. • Check that the cord(s) used...
Operating Instructions
Page 64
...whether they are weak. • Make sure you select the correct input on the remote. • The VIDEO 3 button on the remote is selected. • Point the remote at the remote sensor on the playback component, you are connected securely. Refer to an outdoor FM antenna as shown below. The... RDS information that you may be tuned in the remote with automatic tuning). If you set up the component. Adjust the antennas and connect an external antenna, if necessary. • The signal strength of area code CEL...
...whether they are weak. • Make sure you select the correct input on the remote. • The VIDEO 3 button on the remote is selected. • Point the remote at the remote sensor on the playback component, you are connected securely. Refer to an outdoor FM antenna as shown below. The... RDS information that you may be tuned in the remote with automatic tuning). If you set up the component. Adjust the antennas and connect an external antenna, if necessary. • The signal strength of area code CEL...

Operating Instructions
Page 67
...woofer (4) For details on the area code of the component you are subject to change without notice. 67GB Additional Information HT-SS2000 only (20) - Design and specifications are using, ...2 oz) 0.7 kg (1 lb 9 oz) 0.4 kg (15 oz) • Sub woofer (SS-WP1200) Speaker system Magnetically shielded Speaker unit 160 mm (6 3/8 inches) cone type Enclosure type Bass reflex Rated Impedance 1.5 ohms Dimensions (w/h/d) ... Supplied accessories FM wire antenna (1) AM loop antenna (1) Remote commander RM-AAU017 (1) R6 (size-AA) batteries (2) Optimizer microphone (ECM-AC2) (1) Speaker cords (5) ...
...woofer (4) For details on the area code of the component you are subject to change without notice. 67GB Additional Information HT-SS2000 only (20) - Design and specifications are using, ...2 oz) 0.7 kg (1 lb 9 oz) 0.4 kg (15 oz) • Sub woofer (SS-WP1200) Speaker system Magnetically shielded Speaker unit 160 mm (6 3/8 inches) cone type Enclosure type Bass reflex Rated Impedance 1.5 ohms Dimensions (w/h/d) ... Supplied accessories FM wire antenna (1) AM loop antenna (1) Remote commander RM-AAU017 (1) R6 (size-AA) batteries (2) Optimizer microphone (ECM-AC2) (1) Speaker cords (5) ...
Marketing Specifications
Page 1
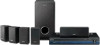
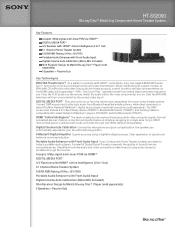
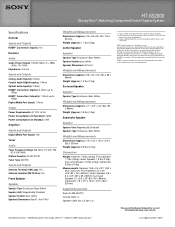
HT-SS2000 Blu-ray Disc™ Matching Component Home Theater System Key Features Accepts 1080p signal and Linear PCM via HDMI™ 1 DIGITAL MEDIA PORT3 A/V Receiver with HDMI™ Active Intelligence (3 In/1 Out) 5.1 Channel Home Theater System 1000W RMS Rating (1KHz,
HT-SS2000 Blu-ray Disc™ Matching Component Home Theater System Key Features Accepts 1080p signal and Linear PCM via HDMI™ 1 DIGITAL MEDIA PORT3 A/V Receiver with HDMI™ Active Intelligence (3 In/1 Out) 5.1 Channel Home Theater System 1000W RMS Rating (1KHz,
Marketing Specifications
Page 2
... subject to change without written permission is a trademark. All rights reserved. All other " are approximate. Blu-ray Disc is prohibited. Center Speaker: 9.8 x 3.3 x 3.5" (250 x 85 x 88mm); Each product must include BRAVIA Theatre Sync feature. Surround Speaker: 0.9 lbs (0.4kg); HT-SS2000 Blu-ray Disc™ Matching Component Home Theater System Specifications General Inputs and Outputs HDMI™ Connection Input(s): Yes Receiver Audio Audio Power Output...
... subject to change without written permission is a trademark. All rights reserved. All other " are approximate. Blu-ray Disc is prohibited. Center Speaker: 9.8 x 3.3 x 3.5" (250 x 85 x 88mm); Each product must include BRAVIA Theatre Sync feature. Surround Speaker: 0.9 lbs (0.4kg); HT-SS2000 Blu-ray Disc™ Matching Component Home Theater System Specifications General Inputs and Outputs HDMI™ Connection Input(s): Yes Receiver Audio Audio Power Output...


