Operating Instructions
Page 5
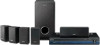
... Presetting radio stations 51 Using the Radio Data System (RDS) ..........52 (Models of area code CEL, CEK only) Other Operations Switching between digital and analog audio (IN MODE 54 Enjoying the DIGITAL MEDIA PORT (DMPORT 55 Listening to digital sound from other inputs (DIGITAL ASSIGN 57 Using the Sleep Timer 58 Using the Remote Changing button assignments 59 Additional Information Glossary 60 Precautions 61 Troubleshooting 62 Specifications 65 Index Back cover Enjoying Surround Sound Enjoying Dolby Digital and DTS Surround sound (AUTO FORMAT DIRECT) ...... 44 Selecting...
... Presetting radio stations 51 Using the Radio Data System (RDS) ..........52 (Models of area code CEL, CEK only) Other Operations Switching between digital and analog audio (IN MODE 54 Enjoying the DIGITAL MEDIA PORT (DMPORT 55 Listening to digital sound from other inputs (DIGITAL ASSIGN 57 Using the Sleep Timer 58 Using the Remote Changing button assignments 59 Additional Information Glossary 60 Precautions 61 Troubleshooting 62 Specifications 65 Index Back cover Enjoying Surround Sound Enjoying Dolby Digital and DTS Surround sound (AUTO FORMAT DIRECT) ...... 44 Selecting...

Operating Instructions
Page 7
... presetting radio stations, see page 51. DIGITAL Lights up when dynamic range compression is decoding Dolby Digital signals. Lights up when receiver is activated (page 35). Lights up when IN MODE is set to "AUTO IN" and the source signal is a digital signal being reproduced. Lights up when IN MODE is set to "AUTO IN" and the source signal is a digital signal being played back. continued 7GB The letters (L, C, R, etc.) indicate the channels being input through the OPT IN jack...
... presetting radio stations, see page 51. DIGITAL Lights up when dynamic range compression is decoding Dolby Digital signals. Lights up when receiver is activated (page 35). Lights up when IN MODE is set to "AUTO IN" and the source signal is a digital signal being reproduced. Lights up when IN MODE is set to "AUTO IN" and the source signal is a digital signal being played back. continued 7GB The letters (L, C, R, etc.) indicate the channels being input through the OPT IN jack...
Operating Instructions
Page 9
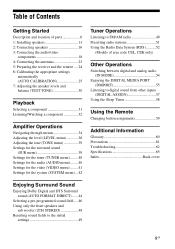
...output to a DVD player, etc. Speaker jack FRONT R (Front right speaker) FRONT L (Front left speaker) SUR R (Surround right speaker) SUR L (Surround left speaker) CENTER (Center speaker) SUBWOOFER (Sub woofer) Color Red White Grey Blue Green Purple D AUDIO INPUT section AUDIO IN White (L) jack Red (R) Connects to speakers (page 16). C SPEAKERS section Connects to a Super Audio CD player, CD player, etc. (page 18, 19). 9GB Getting Started Rear panel 1 2 3 AM SAT IN DVD IN VIDEO 2/BD IN OUT DIGITAL L L HDMI ANTENNA OPT IN OPT IN COAX IN SAT VIDEO 1 DVD R R AUDIO...
...output to a DVD player, etc. Speaker jack FRONT R (Front right speaker) FRONT L (Front left speaker) SUR R (Surround right speaker) SUR L (Surround left speaker) CENTER (Center speaker) SUBWOOFER (Sub woofer) Color Red White Grey Blue Green Purple D AUDIO INPUT section AUDIO IN White (L) jack Red (R) Connects to speakers (page 16). C SPEAKERS section Connects to a Super Audio CD player, CD player, etc. (page 18, 19). 9GB Getting Started Rear panel 1 2 3 AM SAT IN DVD IN VIDEO 2/BD IN OUT DIGITAL L L HDMI ANTENNA OPT IN OPT IN COAX IN SAT VIDEO 1 DVD R R AUDIO...
Operating Instructions
Page 11
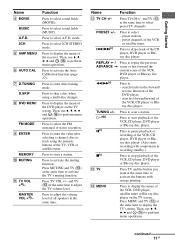
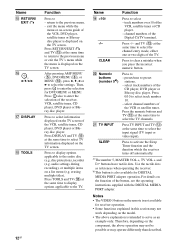
... DVD player on the TV screen. Press TV and the button you want at the same time to select sound fields (MOVIE). Function Press to select preset TV channels. mode. Press to display the menu of the DVD player. - preset stations. - start playback of all speakers at the same time to adjust the volume level of the VCR, CD player, DVD player or Blu-ray disc player. Press to activate the Auto Calibration function (page 27). Press to select - Press to select sound fields (MUSIC...
... DVD player on the TV screen. Press TV and the button you want at the same time to select sound fields (MOVIE). Function Press to select preset TV channels. mode. Press to display the menu of the DVD player. - preset stations. - start playback of all speakers at the same time to adjust the volume level of the VCR, CD player, DVD player or Blu-ray disc player. Press to activate the Auto Calibration function (page 27). Press to select - Press to select sound fields (MUSIC...
Operating Instructions
Page 12
... on a list menu (e.g. Press to select - audio settings during recording), or multiple items on the function of the VCR, satellite tuner, CD player, DVD player or Bluray disc player. Press to select information displayed on the component, the above explanation is not available for DIGITAL MEDIA PORT adapter operation. Press -/-- select track numbers of the Digital CATV terminal. channel numbers of the CD player, DVD player or Blu-ray disc player. Press to select the input signal (TV input or video input). Press TV INPUT and TV...
... on a list menu (e.g. Press to select - audio settings during recording), or multiple items on the function of the VCR, satellite tuner, CD player, DVD player or Bluray disc player. Press to select information displayed on the component, the above explanation is not available for DIGITAL MEDIA PORT adapter operation. Press -/-- select track numbers of the Digital CATV terminal. channel numbers of the CD player, DVD player or Blu-ray disc player. Press to select the input signal (TV input or video input). Press TV INPUT and TV...

Operating Instructions
Page 18
... Audio CD player/ CD player page 18 Video components • DVD player/DVD recorder • Blu-ray disc player • Satellite tuner/Set-top box • VCR • TV page 19 Components with HDMI jack page 21 Connecting audio components The following illustration shows how to connect audio components such as Super Audio CD player or CD player. Component to be connected" below for the pages which describe how to connect the audio/video components. Super Audio CD player/ CD player Audio signal A AM SAT IN DVD IN V DIGITAL L ANTENNA OPT...
... Audio CD player/ CD player page 18 Video components • DVD player/DVD recorder • Blu-ray disc player • Satellite tuner/Set-top box • VCR • TV page 19 Components with HDMI jack page 21 Connecting audio components The following illustration shows how to connect audio components such as Super Audio CD player or CD player. Component to be connected" below for the pages which describe how to connect the audio/video components. Super Audio CD player/ CD player Audio signal A AM SAT IN DVD IN V DIGITAL L ANTENNA OPT...

Operating Instructions
Page 20
... this receiver. To output sound from the DVD player, set the digital audio output setting on the DVD player. Notes • You cannot do recording on the DVD recorder or VCR via this receiver does not have analog audio input jack for DVD, connect your DVD player to the operating instructions supplied with the DVD recorder or VCR. • To input multi channel digital audio from the front left/right speakers and sub woofer only, press 2CH. • When connecting optical digital cords, insert the plugs straight...
... this receiver. To output sound from the DVD player, set the digital audio output setting on the DVD player. Notes • You cannot do recording on the DVD recorder or VCR via this receiver does not have analog audio input jack for DVD, connect your DVD player to the operating instructions supplied with the DVD recorder or VCR. • To input multi channel digital audio from the front left/right speakers and sub woofer only, press 2CH. • When connecting optical digital cords, insert the plugs straight...
Operating Instructions
Page 21
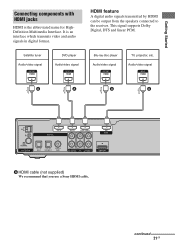
... signal supports Dolby Digital, DTS and linear PCM. continued 21GB It is the abbreviated name for HighDefinition Multimedia Interface. Satellite tuner Audio/video signal DVD player Audio/video signal Blu-ray disc player Audio/video signal TV, projector, etc. HDMI feature A digital audio signals transmitted by HDMI can be output from the speakers connected to the receiver. Audio/video signal A A A A AM SAT IN DVD IN VIDEO 2/BD IN OUT DIGITAL L L HDMI ANTENNA OPT IN OPT IN COAX IN SAT VIDEO 1 DVD R R AUDIO IN AUDIO IN AUDIO IN SA-CD/CD TV VIDEO 1 DMPORT A HDMI cable...
... signal supports Dolby Digital, DTS and linear PCM. continued 21GB It is the abbreviated name for HighDefinition Multimedia Interface. Satellite tuner Audio/video signal DVD player Audio/video signal Blu-ray disc player Audio/video signal TV, projector, etc. HDMI feature A digital audio signals transmitted by HDMI can be output from the speakers connected to the receiver. Audio/video signal A A A A AM SAT IN DVD IN VIDEO 2/BD IN OUT DIGITAL L L HDMI ANTENNA OPT IN OPT IN COAX IN SAT VIDEO 1 DVD R R AUDIO IN AUDIO IN AUDIO IN SA-CD/CD TV VIDEO 1 DMPORT A HDMI cable...

Operating Instructions
Page 22
... receiver. In this case, check the specification of the connected component. • Set the resolution of the image of the playback component to 720p or 1080i when you output 96 kHz multi channel sound over a HDMI connection. • We do not recommend using a HDMI-DVI conversion cable. If you cannot play back multi channel software, set "AUDIO" to "TV+AMP" in the VIDEO menu (page 41). If you connect a Blu-ray disc player Be sure to change the factory setting of the VIDEO 2 input button...
... receiver. In this case, check the specification of the connected component. • Set the resolution of the image of the playback component to 720p or 1080i when you output 96 kHz multi channel sound over a HDMI connection. • We do not recommend using a HDMI-DVI conversion cable. If you cannot play back multi channel software, set "AUDIO" to "TV+AMP" in the VIDEO menu (page 41). If you connect a Blu-ray disc player Be sure to change the factory setting of the VIDEO 2 input button...
Operating Instructions
Page 26
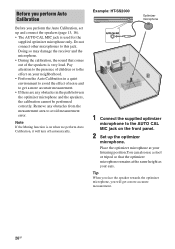
... jack. Before you perform Auto Calibration Before you will turn off automatically. Doing so may damage the receiver and the microphone. • During the calibration, the sound that the optimizer microphone remains at the same height as your neighborhood. • Perform the Auto Calibration in the path between the optimizer microphone and the speakers, the calibration cannot be performed correctly. Example: HT-SS2000 PRESET TUNING SOUND FIELD MASTER VOLUME MUTING AUTO CAL MIC...
... jack. Before you perform Auto Calibration Before you will turn off automatically. Doing so may damage the receiver and the microphone. • During the calibration, the sound that the optimizer microphone remains at the same height as your neighborhood. • Perform the Auto Calibration in the path between the optimizer microphone and the speakers, the calibration cannot be performed correctly. Example: HT-SS2000 PRESET TUNING SOUND FIELD MASTER VOLUME MUTING AUTO CAL MIC...

Operating Instructions
Page 27
... D.TUNING 89 D.SKIP MEMORY DVD MENU 0/10 ENTER FM MODE DISPLAY TOOLS MUTING F TV VOL MASTER VOL G g f RETURN/EXIT MENU ?/1 switch Input buttons AMP MENU AUTO CAL MUTING MASTER VOL +/- Measurement for Speaker existance Speaker gain, distance, frequency response Sub woofer gain and distance Display TONE T.S.P. Tip When Auto Calibration starts: - This is because test signals are output from the speakers and the listening position to get a more accurate measurement. Press input buttons on the remote or INPUT SELECTOR on the display...
... D.TUNING 89 D.SKIP MEMORY DVD MENU 0/10 ENTER FM MODE DISPLAY TOOLS MUTING F TV VOL MASTER VOL G g f RETURN/EXIT MENU ?/1 switch Input buttons AMP MENU AUTO CAL MUTING MASTER VOL +/- Measurement for Speaker existance Speaker gain, distance, frequency response Sub woofer gain and distance Display TONE T.S.P. Tip When Auto Calibration starts: - This is because test signals are output from the speakers and the listening position to get a more accurate measurement. Press input buttons on the remote or INPUT SELECTOR on the display...
Operating Instructions
Page 31
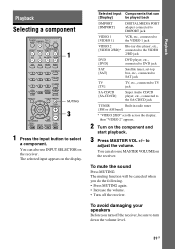
... the input button to adjust the volume. To mute the sound Press MUTING. To avoid damaging your speakers Before you do the following. • Press MUTING again. • Increase the volume. • Turn off the receiver, be played back DMPORT [DMPORT] DIGITAL MEDIA PORT adapter connected to DMPORT jack VIDEO 1 [VIDEO 1] VCR, etc., connected to the VIDEO 1 jack VIDEO 2 Blu-ray disc player, etc., [VIDEO 2/BD]* connected to the VIDEO 2/BD jack DVD [DVD] DVD player, etc., connected to DVD jack SAT [SAT] Satellite tuner, set-top box, etc., connected...
... the input button to adjust the volume. To mute the sound Press MUTING. To avoid damaging your speakers Before you do the following. • Press MUTING again. • Increase the volume. • Turn off the receiver, be played back DMPORT [DMPORT] DIGITAL MEDIA PORT adapter connected to DMPORT jack VIDEO 1 [VIDEO 1] VCR, etc., connected to the VIDEO 1 jack VIDEO 2 Blu-ray disc player, etc., [VIDEO 2/BD]* connected to the VIDEO 2/BD jack DVD [DVD] DVD player, etc., connected to DVD jack SAT [SAT] Satellite tuner, set-top box, etc., connected...

Operating Instructions
Page 33
... disc. 7 Adjust to multi channel sound. - Recommended sound fields: Movie: C.ST.EX Music: CONCERT 3 PRESET TUNING SOUND FIELD MASTER VOLUME MUTING AUTO CAL MIC 7 1 Turn on the TV and DVD player. 2 Turn on this receiver is connected to select "DVD". 4 Switch the input of the TV so that the video output of the DVD is set up the DVD player. Refer to suit the movie/music. Be sure this receiver to the TV. 5 Set up properly. Be sure the digital audio output of the disc to be played...
... disc. 7 Adjust to multi channel sound. - Recommended sound fields: Movie: C.ST.EX Music: CONCERT 3 PRESET TUNING SOUND FIELD MASTER VOLUME MUTING AUTO CAL MIC 7 1 Turn on the TV and DVD player. 2 Turn on this receiver is connected to select "DVD". 4 Switch the input of the TV so that the video output of the DVD is set up the DVD player. Refer to suit the movie/music. Be sure this receiver to the TV. 5 Set up properly. Be sure the digital audio output of the disc to be played...
Operating Instructions
Page 59
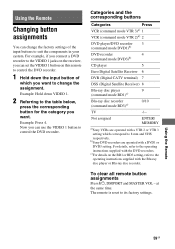
... remote is reset to the operating instructions supplied with a DVD1 or DVD3 setting. Categories and the corresponding buttons Categories Press VCR (command mode VTR 3)a) 1 VCR (command mode VTR 2)a) 2 DVD player/DVD recorder 3 (command mode DVD1)b) DVD recorder 4 (command mode DVD3)b) CD player 5 Euro Digital Satellite Receiver 6 DVR (Digital CATV terminal) 7 DSS (Digital Satellite Receiver) 8 Blu-ray disc player 9 (command mode BD1)c) Blu-ray disc recorder 0/10 (command mode BD3)c) TV -/-- Using the Remote Changing button assignments You can change the factory settings...
... remote is reset to the operating instructions supplied with a DVD1 or DVD3 setting. Categories and the corresponding buttons Categories Press VCR (command mode VTR 3)a) 1 VCR (command mode VTR 2)a) 2 DVD player/DVD recorder 3 (command mode DVD1)b) DVD recorder 4 (command mode DVD3)b) CD player 5 Euro Digital Satellite Receiver 6 DVR (Digital CATV terminal) 7 DSS (Digital Satellite Receiver) 8 Blu-ray disc player 9 (command mode BD1)c) Blu-ray disc recorder 0/10 (command mode BD3)c) TV -/-- Using the Remote Changing button assignments You can change the factory settings...
Operating Instructions
Page 62
... receiver, use any questions or problems concerning your receiver, please consult your nearest Sony dealer. Turn off the receiver, eliminate the short-circuit problem, and turn down the volume on the power again. • Check that the IN MODE setting is correct. Place the speaker further away from a specific component. • Check that the component is (are) fully inserted into the jacks on both the receiver and all components are connected...
... receiver, use any questions or problems concerning your receiver, please consult your nearest Sony dealer. Turn off the receiver, eliminate the short-circuit problem, and turn down the volume on the power again. • Check that the IN MODE setting is correct. Place the speaker further away from a specific component. • Check that the component is (are) fully inserted into the jacks on both the receiver and all components are connected...

Operating Instructions
Page 63
... source sound input to the HDMI jack on the playback component, you may need to set or fluorescent light. • Move your audio components away from the TV. • The plugs and jacks are connected securely. Refer to the operating instructions supplied with alcohol. There is not output from the TV speaker. • Check the setting of HDMI AUDIO in Dolby Digital or DTS format. • When connecting the DVD player, etc., to the digital input jacks of this receiver when...
... source sound input to the HDMI jack on the playback component, you may need to set or fluorescent light. • Move your audio components away from the TV. • The plugs and jacks are connected securely. Refer to the operating instructions supplied with alcohol. There is not output from the TV speaker. • Check the setting of HDMI AUDIO in Dolby Digital or DTS format. • When connecting the DVD player, etc., to the digital input jacks of this receiver when...
Operating Instructions
Page 66
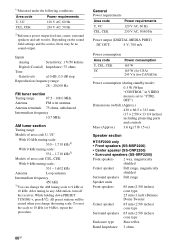
...: 5 V, 700 mA Power consumption Area code Power consumption U, CEL, CEK 165 W UC 165 W (for USA) 245 VA (for front, center, surround speakers and sub woofer. While holding down PRESET TUNING +, press ?/1. 1)Measured under the following conditions: Area code Power requirements U, UC 120 V AC, 60 Hz CEL, CEK 230 V AC, 50 Hz 2)Reference power output for CANADA) Power consumption (during standby mode) 0.3 W (When "CONTROL" in any AM station, turn off the receiver.
...: 5 V, 700 mA Power consumption Area code Power consumption U, CEL, CEK 165 W UC 165 W (for USA) 245 VA (for front, center, surround speakers and sub woofer. While holding down PRESET TUNING +, press ?/1. 1)Measured under the following conditions: Area code Power requirements U, UC 120 V AC, 60 Hz CEL, CEK 230 V AC, 50 Hz 2)Reference power output for CANADA) Power consumption (during standby mode) 0.3 W (When "CONTROL" in any AM station, turn off the receiver.
Operating Instructions
Page 68
...tuner/Set-top box connecting 19 Selecting component 31 sound field 46 Sleep Timer 58 Sound fields resetting 49 selecting 46 Speakers connecting 16 installing 13 Super Audio CD player connecting 18 playback 32 T TEST TONE 30 Tuner connecting 23 Tuning automatically 49 directly 50 to preset stations 52 TV connecting 19 V VCR connecting 19 (1) Sony Corporation Printed in Malaysia Index Numerics 2 channel 48 2CH STEREO 48 5.1 channel 13 A AUTO CALIBRATION 25 AUTO FORMAT DIRECT (A.F.D.) 44 B Blu-ray disc player connecting 21 C CD player connecting 18 playback 32 D DIGITAL ASSIGN 57 Digital Cinema...
...tuner/Set-top box connecting 19 Selecting component 31 sound field 46 Sleep Timer 58 Sound fields resetting 49 selecting 46 Speakers connecting 16 installing 13 Super Audio CD player connecting 18 playback 32 T TEST TONE 30 Tuner connecting 23 Tuning automatically 49 directly 50 to preset stations 52 TV connecting 19 V VCR connecting 19 (1) Sony Corporation Printed in Malaysia Index Numerics 2 channel 48 2CH STEREO 48 5.1 channel 13 A AUTO CALIBRATION 25 AUTO FORMAT DIRECT (A.F.D.) 44 B Blu-ray disc player connecting 21 C CD player connecting 18 playback 32 D DIGITAL ASSIGN 57 Digital Cinema...
Marketing Specifications
Page 1
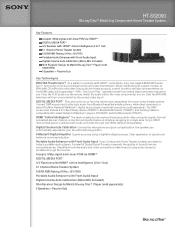
HT-SS2000 Blu-ray Disc™ Matching Component Home Theater System Key Features Accepts 1080p signal and Linear PCM via HDMI™ 1 DIGITAL MEDIA PORT3 A/V Receiver with HDMI™ Active Intelligence (3 In/1 Out) 5.1 Channel Home Theater System 1000W RMS Rating (1KHz,
HT-SS2000 Blu-ray Disc™ Matching Component Home Theater System Key Features Accepts 1080p signal and Linear PCM via HDMI™ 1 DIGITAL MEDIA PORT3 A/V Receiver with HDMI™ Active Intelligence (3 In/1 Out) 5.1 Channel Home Theater System 1000W RMS Rating (1KHz,
Marketing Specifications
Page 2
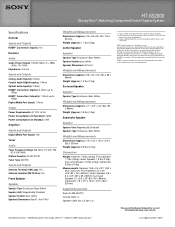
HT-SS2000 Blu-ray Disc™ Matching Component Home Theater System Specifications General Inputs and Outputs HDMI™ Connection Input(s): Yes Receiver Audio Audio Power Output: 1000W (143w x 5 + 285w (1KHz, 10% THD)) Impedance: 3 ohms Inputs and Outputs Analog Audio Input(s): 3 (Rear) Coaxial Audio Digital Input(s): 1 (Rear) Optical Audio Input(s): 2 (Rear) HDMI™ Connection Input(s): 3 (Rear) up to 1080p HDMI™ Connection Output(s): 1 (Rear) up to owners manual for current information at www.sony.com/dn Sony Electronics Inc. • 16530 Via Esprillo • San Diego, CA...
HT-SS2000 Blu-ray Disc™ Matching Component Home Theater System Specifications General Inputs and Outputs HDMI™ Connection Input(s): Yes Receiver Audio Audio Power Output: 1000W (143w x 5 + 285w (1KHz, 10% THD)) Impedance: 3 ohms Inputs and Outputs Analog Audio Input(s): 3 (Rear) Coaxial Audio Digital Input(s): 1 (Rear) Optical Audio Input(s): 2 (Rear) HDMI™ Connection Input(s): 3 (Rear) up to 1080p HDMI™ Connection Output(s): 1 (Rear) up to owners manual for current information at www.sony.com/dn Sony Electronics Inc. • 16530 Via Esprillo • San Diego, CA...


