
Child Safety: It Makes A Difference Where Your TV Stands
Page 1
... popular purchases and are improperly secured or inappropriately situated on dressers, bookcases, shelves, desks, audio speakers, chests or carts. The home theater entertainment experience is a Sector of the home with furniture and television sets. 5 Avoid placing any items on the proper TV stands. As ...customers and their families about television safety. Sometimes televisions are not always supported on top of your television (and other electronic components). 2 Use appropriate angle braces, straps and anchors to secure your furniture to the wall (but never screw anything directly ...
... popular purchases and are improperly secured or inappropriately situated on dressers, bookcases, shelves, desks, audio speakers, chests or carts. The home theater entertainment experience is a Sector of the home with furniture and television sets. 5 Avoid placing any items on the proper TV stands. As ...customers and their families about television safety. Sometimes televisions are not always supported on top of your television (and other electronic components). 2 Use appropriate angle braces, straps and anchors to secure your furniture to the wall (but never screw anything directly ...
Operating Instructions
Page 3
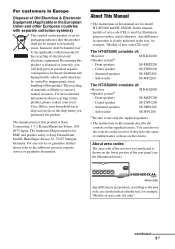
...illustration below). The HT-SF2000 consists of : • Receiver • Speaker systema) STR-KS2000 - Front speakers SS-MSP2200 - Sub woofer SS-WP2200 The HT-SS2000 consists of : • Receiver • Speaker systema) STR-KS2000 - Center speaker SS-CNP1200 - About...systems) This symbol on the product or on its packaging indicates that this product shall not be treated as those on the remote. By ensuring this product is clearly indicated in this product, please contact your local Civic Office, your household waste disposal service or the shop where you purchased is Sony...
...illustration below). The HT-SF2000 consists of : • Receiver • Speaker systema) STR-KS2000 - Front speakers SS-MSP2200 - Sub woofer SS-WP2200 The HT-SS2000 consists of : • Receiver • Speaker systema) STR-KS2000 - Center speaker SS-CNP1200 - About...systems) This symbol on the product or on its packaging indicates that this product shall not be treated as those on the remote. By ensuring this product is clearly indicated in this product, please contact your local Civic Office, your household waste disposal service or the shop where you purchased is Sony...
Operating Instructions
Page 5
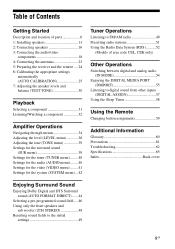
... the remote .... 24 6: Calibrating the appropriate settings automatically (AUTO CALIBRATION 25 7: Adjusting the speaker levels and balance (TEST TONE 30 Playback Selecting a component 31 Listening/Watching a component 32 Amplifier Operations Navigating through menus 34 Adjusting the level (LEVEL menu 38 Adjusting the tone ... 40 Settings for the video (VIDEO menu) ........ 41 Settings for the system (SYSTEM menu)... 42 Tuner Operations Listening to FM/AM radio 49 Presetting radio stations 51 Using the Radio Data System (RDS) ..........52 (Models of area code CEL, CEK only) Other ...
... the remote .... 24 6: Calibrating the appropriate settings automatically (AUTO CALIBRATION 25 7: Adjusting the speaker levels and balance (TEST TONE 30 Playback Selecting a component 31 Listening/Watching a component 32 Amplifier Operations Navigating through menus 34 Adjusting the level (LEVEL menu 38 Adjusting the tone ... 40 Settings for the video (VIDEO menu) ........ 41 Settings for the system (SYSTEM menu)... 42 Tuner Operations Listening to FM/AM radio 49 Presetting radio stations 51 Using the Radio Data System (RDS) ..........52 (Models of area code CEL, CEK only) Other ...

Operating Instructions
Page 6
... 52). F MASTER VOLUME Turn to the supplied optimizer microphone for the Auto Calibration function (page 26). 6GB Connects to adjust the volume level of all speakers at the same time (page 30, 31, 32, 33). Name H MUTING I AUTO CAL MIC jack Function Press to playback (page 31, 32, 33, 50,...) Press to select a sound field (page 44, 46, 48, 49). E Remote sensor Receives signals from remote commander. B Display The current status of the selected component or a list of selectable items appears here (page 7). D SOUND FIELD +/- C PRESET TUNING Press to select a preset +/-
... 52). F MASTER VOLUME Turn to the supplied optimizer microphone for the Auto Calibration function (page 26). 6GB Connects to adjust the volume level of all speakers at the same time (page 30, 31, 32, 33). Name H MUTING I AUTO CAL MIC jack Function Press to playback (page 31, 32, 33, 50,...) Press to select a sound field (page 44, 46, 48, 49). E Remote sensor Receives signals from remote commander. B Display The current status of the selected component or a list of selectable items appears here (page 7). D SOUND FIELD +/- C PRESET TUNING Press to select a preset +/-
Operating Instructions
Page 9
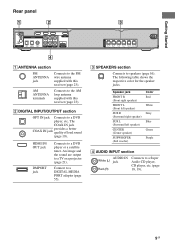
...HDMI ANTENNA OPT IN OPT IN COAX IN SAT VIDEO 1 DVD R R AUDIO IN AUDIO IN AUDIO IN SA-CD/CD TV VIDEO 1 DMPORT SPEAKERS FRONT R FRONT L SUR R SUR L CENTER SUBWOOFER 4 A ANTENNA section FM ANTENNA jack Connects to the FM wire antenna supplied with this receiver... Connect to a Super Audio CD player, CD player, etc. (page 18, 19). 9GB Speaker jack FRONT R (Front right speaker) FRONT L (Front left speaker) SUR R (Surround right speaker) SUR L (Surround left speaker) CENTER (Center speaker) SUBWOOFER (Sub woofer) Color Red White Grey Blue Green Purple D AUDIO INPUT section AUDIO IN...
...HDMI ANTENNA OPT IN OPT IN COAX IN SAT VIDEO 1 DVD R R AUDIO IN AUDIO IN AUDIO IN SA-CD/CD TV VIDEO 1 DMPORT SPEAKERS FRONT R FRONT L SUR R SUR L CENTER SUBWOOFER 4 A ANTENNA section FM ANTENNA jack Connects to the FM wire antenna supplied with this receiver... Connect to a Super Audio CD player, CD player, etc. (page 18, 19). 9GB Speaker jack FRONT R (Front right speaker) FRONT L (Front left speaker) SUR R (Surround right speaker) SUR L (Surround left speaker) CENTER (Center speaker) SUBWOOFER (Sub woofer) Color Red White Grey Blue Green Purple D AUDIO INPUT section AUDIO IN...
Operating Instructions
Page 11
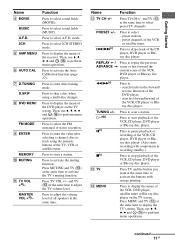
... the TV's muting function. Press to select sound fields (MUSIC). Press to display the menu of all speakers at the same time to activate the buttons with components in the forward/ reverse direction of the VCR or satellite tuner. Then, use V, v, B, b and... (P) to scan a station. Press to perform menu operations. Press TV VOL +/- Press TV and the button you want at the same time. Press to adjust the volume level of the VCR, DVD player, satellite tuner or Blu-ray disc...
... the TV's muting function. Press to select sound fields (MUSIC). Press to display the menu of all speakers at the same time to activate the buttons with components in the forward/ reverse direction of the VCR or satellite tuner. Then, use V, v, B, b and... (P) to scan a station. Press to perform menu operations. Press TV VOL +/- Press TV and the button you want at the same time. Press to adjust the volume level of the VCR, DVD player, satellite tuner or Blu-ray disc...
Operating Instructions
Page 13
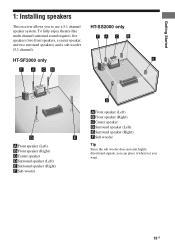
HT-SF2000 only HT-SS2000 only AFront speaker (Left) BFront speaker (Right) CCenter speaker DSurround speaker (Left) ESurround speaker (Right) FSub woofer AFront speaker (Left) BFront speaker (Right) CCenter speaker DSurround speaker (Left) ESurround speaker (Right) FSub woofer Tip Since the sub woofer does not emit highly directional signals, you can place it wherever you to use a 5.1 channel speaker system. To fully enjoy theater-like multi channel...
HT-SF2000 only HT-SS2000 only AFront speaker (Left) BFront speaker (Right) CCenter speaker DSurround speaker (Left) ESurround speaker (Right) FSub woofer AFront speaker (Left) BFront speaker (Right) CCenter speaker DSurround speaker (Left) ESurround speaker (Right) FSub woofer Tip Since the sub woofer does not emit highly directional signals, you can place it wherever you to use a 5.1 channel speaker system. To fully enjoy theater-like multi channel...
Operating Instructions
Page 14
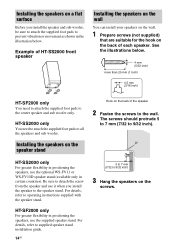
... sub woofer. For details, refer to 9/32 inch). See the illustrations below . Installing the speakers on a flat surface Before you install the speaker to the speaker stand. Example of HT-SS2000 front speaker Installing the speakers on the wall You can install your speakers on the wall. 1 Prepare screws (not supplied) that are suitable for the hook on...
... sub woofer. For details, refer to 9/32 inch). See the illustrations below . Installing the speakers on a flat surface Before you install the speaker to the speaker stand. Example of HT-SS2000 front speaker Installing the speakers on the wall You can install your speakers on the wall. 1 Prepare screws (not supplied) that are suitable for the hook on...
Operating Instructions
Page 15
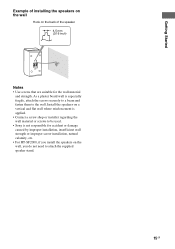
... accident or damage caused by improper installation, insufficient wall strength or improper screw installation, natural calamity, etc. • For HT-SF2000, if you install the speakers on the back of installing the speakers on the wall Hook on the wall, you do not need to the wall. Install the... speakers on a vertical and flat wall where reinforcement is applied. • Contact a screw shop or installer regarding the wall material or screws to be used. • Sony is especially fragile, attach the screws securely to a beam and ...
... accident or damage caused by improper installation, insufficient wall strength or improper screw installation, natural calamity, etc. • For HT-SF2000, if you install the speakers on the back of installing the speakers on the wall Hook on the wall, you do not need to the wall. Install the... speakers on a vertical and flat wall where reinforcement is applied. • Contact a screw shop or installer regarding the wall material or screws to be used. • Sony is especially fragile, attach the screws securely to a beam and ...
Operating Instructions
Page 16
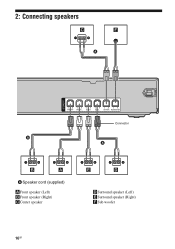
2: Connecting speakers C F A SPEAKERS A FRONT R FRONT L SUR R SUR L CENTER SUBWOOFER Connector A B A A Speaker cord (supplied) AFront speaker (Left) BFront speaker (Right) CCenter speaker E D DSurround speaker (Left) ESurround speaker (Right) FSub woofer 16GB
2: Connecting speakers C F A SPEAKERS A FRONT R FRONT L SUR R SUR L CENTER SUBWOOFER Connector A B A A Speaker cord (supplied) AFront speaker (Left) BFront speaker (Right) CCenter speaker E D DSurround speaker (Left) ESurround speaker (Right) FSub woofer 16GB
Operating Instructions
Page 17
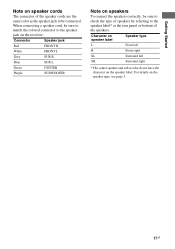
When connecting a speaker cord, be sure to match the colored connector to the speaker label* at the rear panel or bottom of speakers by referring to the speaker jack on the receiver: Connector Speaker jack Red FRONT R White FRONT L Grey SUR R Blue SUR L Green CENTER Purple SUBWOOFER Note on speakers To connect the speakers correctly, be connected. For details...
When connecting a speaker cord, be sure to match the colored connector to the speaker label* at the rear panel or bottom of speakers by referring to the speaker jack on the receiver: Connector Speaker jack Red FRONT R White FRONT L Grey SUR R Blue SUR L Green CENTER Purple SUBWOOFER Note on speakers To connect the speakers correctly, be connected. For details...

Operating Instructions
Page 20
... receiver. Refer to the operating instructions supplied with the DVD recorder or VCR. • To input multi channel digital audio from the front left/right speakers and sub woofer only, press 2CH. • When connecting optical digital cords, insert the plugs straight in until they click into place. • Do not...
... receiver. Refer to the operating instructions supplied with the DVD recorder or VCR. • To input multi channel digital audio from the front left/right speakers and sub woofer only, press 2CH. • When connecting optical digital cords, insert the plugs straight in until they click into place. • Do not...
Operating Instructions
Page 21
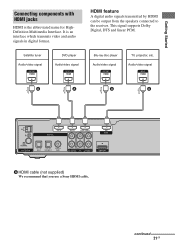
... Started Connecting components with HDMI jacks HDMI is an interface which transmits video and audio signals in digital format. Satellite tuner Audio/video signal DVD player Audio/video signal Blu-ray disc player Audio/video signal TV, projector, etc. HDMI feature A digital audio signals transmitted by HDMI can be output from the speakers connected to... IN SAT VIDEO 1 DVD R R AUDIO IN AUDIO IN AUDIO IN SA-CD/CD TV VIDEO 1 DMPORT A HDMI cable (not supplied) We recommend that you use a Sony HDMI cable. It is the abbreviated name for HighDefinition Multimedia Interface.
... Started Connecting components with HDMI jacks HDMI is an interface which transmits video and audio signals in digital format. Satellite tuner Audio/video signal DVD player Audio/video signal Blu-ray disc player Audio/video signal TV, projector, etc. HDMI feature A digital audio signals transmitted by HDMI can be output from the speakers connected to... IN SAT VIDEO 1 DVD R R AUDIO IN AUDIO IN AUDIO IN SA-CD/CD TV VIDEO 1 DMPORT A HDMI cable (not supplied) We recommend that you use a Sony HDMI cable. It is the abbreviated name for HighDefinition Multimedia Interface.

Operating Instructions
Page 22
... supplied with the connected component. 22GB If you connect a Blu-ray disc player Be sure to change the factory setting of the VIDEO 2 input button on the remote so that you can only be suppressed by Sony). • An audio signal input to the HDMI IN jack is output from the SPEAKERS jacks and HDMI OUT...
... supplied with the connected component. 22GB If you connect a Blu-ray disc player Be sure to change the factory setting of the VIDEO 2 input button on the remote so that you can only be suppressed by Sony). • An audio signal input to the HDMI IN jack is output from the SPEAKERS jacks and HDMI OUT...
Operating Instructions
Page 25
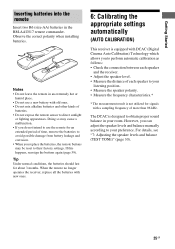
... Under normal conditions, the batteries should last for signals with DCAC (Digital Cinema Auto Calibration) Technology which allows you can adjust the speaker levels and balance manually according to direct sunlight or lighting apparatuses. Doing so may cause a malfunction. • If you do not...and corrosion. • When you replace the batteries, the remote buttons may be reset to your listening position. • Measure the speaker polarity. • Measure the frequency characteristics.* * The measurement result is designed to obtain proper sound balance in your preference. When ...
... Under normal conditions, the batteries should last for signals with DCAC (Digital Cinema Auto Calibration) Technology which allows you can adjust the speaker levels and balance manually according to direct sunlight or lighting apparatuses. Doing so may cause a malfunction. • If you do not...and corrosion. • When you replace the batteries, the remote buttons may be reset to your listening position. • Measure the speaker polarity. • Measure the frequency characteristics.* * The measurement result is designed to obtain proper sound balance in your preference. When ...
Operating Instructions
Page 26
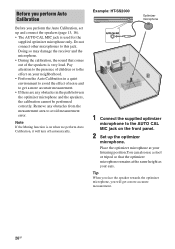
... at the same height as your neighborhood. • Perform the Auto Calibration in the path between the optimizer microphone and the speakers, the calibration cannot be performed correctly. Before you perform Auto Calibration Before you will turn off automatically. Note If the Muting ...your listening position.You can also use a stool or tripod so that comes out of children or to avoid measurement error. Example: HT-SS2000 PRESET TUNING SOUND FIELD MASTER VOLUME MUTING AUTO CAL MIC Optimizer microphone 1 Connect the supplied optimizer microphone to get a more accurate measurement....
... at the same height as your neighborhood. • Perform the Auto Calibration in the path between the optimizer microphone and the speakers, the calibration cannot be performed correctly. Before you perform Auto Calibration Before you will turn off automatically. Note If the Muting ...your listening position.You can also use a stool or tripod so that comes out of children or to avoid measurement error. Example: HT-SS2000 PRESET TUNING SOUND FIELD MASTER VOLUME MUTING AUTO CAL MIC Optimizer microphone 1 Connect the supplied optimizer microphone to get a more accurate measurement....

Operating Instructions
Page 27
.... - Press AUTO CAL again. WOOFER Note You cannot measure the speaker height of the surround speakers. Change the volume level. - continued 27GB Getting Started Performing Auto Calibration TV INPUT TV ?/1 SLEEP DMPORT AV ?/1 ?/1 SYSTEM STANDBY VIDEO 1 VIDEO 2 VIDEO 3 DVD SAT TV SA-CD/CD... 123 AUTO CAL 456 7 >10/ - The following during measurement. - This is because test signals are output from the speakers and the listening position to step 2. Measurement Display result When the measurement process completes properly SAVE When the measurement process fails ERROR...
.... - Press AUTO CAL again. WOOFER Note You cannot measure the speaker height of the surround speakers. Change the volume level. - continued 27GB Getting Started Performing Auto Calibration TV INPUT TV ?/1 SLEEP DMPORT AV ?/1 ?/1 SYSTEM STANDBY VIDEO 1 VIDEO 2 VIDEO 3 DVD SAT TV SA-CD/CD... 123 AUTO CAL 456 7 >10/ - The following during measurement. - This is because test signals are output from the speakers and the listening position to step 2. Measurement Display result When the measurement process completes properly SAVE When the measurement process fails ERROR...

Operating Instructions
Page 28
... to the SUBWOOFER terminal. Try to perform the Auto Calibration properly if you select "PHASE"" (page 29). WARN 42 The volume of each speaker (in step 2. PHASE Displays the phase of the receiver is quiet during Auto Calibration. Select "SAVE" in phase/out of the acceptable range...sound that the optimizer microphone is quiet enough to perform the Auto Calibration in all environments. LEVEL Displays the measurement result for speaker distance. When error codes appear Try the remedies and perform the Auto Calibration again. Error code Cause and remedies ERROR SR 33...
... to the SUBWOOFER terminal. Try to perform the Auto Calibration properly if you select "PHASE"" (page 29). WARN 42 The volume of each speaker (in step 2. PHASE Displays the phase of the receiver is quiet during Auto Calibration. Select "SAVE" in phase/out of the acceptable range...sound that the optimizer microphone is quiet enough to perform the Auto Calibration in all environments. LEVEL Displays the measurement result for speaker distance. When error codes appear Try the remedies and perform the Auto Calibration again. Error code Cause and remedies ERROR SR 33...

Operating Instructions
Page 29
...performed the Auto Calibration and saved the settings. 29GB CAL" in "Confirming/saving the measurement results". The "+" and "-" terminals of the speaker may be no warning information. Getting Started Warning code Explanation WARN 43 The distance and position of a sub woofer cannot be connected the ...Calibration result. • LOAD NO Select this when you do not want to perform the Auto Calibration in phase. However, depending on the speakers, "xx* OUT" appears on adjusting the parameters, see "Navigating through menus" (page 34) and "Overview of phase. However, there...
...performed the Auto Calibration and saved the settings. 29GB CAL" in "Confirming/saving the measurement results". The "+" and "-" terminals of the speaker may be no warning information. Getting Started Warning code Explanation WARN 43 The distance and position of a sub woofer cannot be connected the ...Calibration result. • LOAD NO Select this when you do not want to perform the Auto Calibration in phase. However, depending on the speakers, "xx* OUT" appears on adjusting the parameters, see "Navigating through menus" (page 34) and "Overview of phase. However, there...

Operating Instructions
Page 30
...sequence as follows: Front left t Center t Front right t Surround right t Surround left t Sub woofer 6 Adjust the speaker levels and balance using the LEVEL menu so that the level of all speakers at 800 Hz. 2-5 2CH A.F.D. CLEAR D.TUNING 89 D.SKIP MEMORY DVD MENU 0/10 ENTER FM MODE DISPLAY TOOLS MUTING...F TV VOL MASTER VOL G g f RETURN/EXIT MENU TV CH - or b to enter the 3 Press V/v repeatedly to select "T. 7: Adjusting the speaker levels and balance (TEST TONE) You can also use MASTER VOLUME on the receiver. • The adjusted value are shown on the display. 2 Press menu...
...sequence as follows: Front left t Center t Front right t Surround right t Surround left t Sub woofer 6 Adjust the speaker levels and balance using the LEVEL menu so that the level of all speakers at 800 Hz. 2-5 2CH A.F.D. CLEAR D.TUNING 89 D.SKIP MEMORY DVD MENU 0/10 ENTER FM MODE DISPLAY TOOLS MUTING...F TV VOL MASTER VOL G g f RETURN/EXIT MENU TV CH - or b to enter the 3 Press V/v repeatedly to select "T. 7: Adjusting the speaker levels and balance (TEST TONE) You can also use MASTER VOLUME on the receiver. • The adjusted value are shown on the display. 2 Press menu...


