

Operating Guide
Page 3
... appliance, and keep this can result in cabinet, unless proper ventilation is exposed to the plugs, receptacles, and the point where the cord exits from battery power, or other similar surface. - Accessories Do not place the set . Ventilation The slots and openings in the cabinet are provided for cleaning the exterior...
... appliance, and keep this can result in cabinet, unless proper ventilation is exposed to the plugs, receptacles, and the point where the cord exits from battery power, or other similar surface. - Accessories Do not place the set . Ventilation The slots and openings in the cabinet are provided for cleaning the exterior...
Operating Guide
Page 5
... adjustments or performance of Conformity Trade Name: SONY Model No.: HDR-UX20 Responsible Party:Sony Electronics Inc. If you call upon your Sony dealer regarding recycling of Conformity Trade Name: SONY Model No.: HDR-UX10 Responsible Party:Sony Electronics Inc. Regulatory Information Declaration of rechargeable batteries, call : Sony Customer Information Center 1-800-222-SONY (7669). Continued , 5 Record the serial number in...
... adjustments or performance of Conformity Trade Name: SONY Model No.: HDR-UX20 Responsible Party:Sony Electronics Inc. If you call upon your Sony dealer regarding recycling of Conformity Trade Name: SONY Model No.: HDR-UX10 Responsible Party:Sony Electronics Inc. Regulatory Information Declaration of rechargeable batteries, call : Sony Customer Information Center 1-800-222-SONY (7669). Continued , 5 Record the serial number in...
Operating Guide
Page 6
... equipment generates, uses, and can be able to remove the disc from that you use Sony discs or discs with marks listed below. If this before operating your camcorder. * Depending on the place you may cause harmful interference to Subpart B of Part 15... above may apply. See www.dtsc.ca.gov/hazardouswaste/perchlorate Perchlorate Material: Lithium battery contains perchlorate. 6 Notes on use in accordance with a computer connected (stored on a circuit different from your camcorder. Types of operations guides. - Connect the equipment into an outlet on the supplied...
... equipment generates, uses, and can be able to remove the disc from that you use Sony discs or discs with marks listed below. If this before operating your camcorder. * Depending on the place you may cause harmful interference to Subpart B of Part 15... above may apply. See www.dtsc.ca.gov/hazardouswaste/perchlorate Perchlorate Material: Lithium battery contains perchlorate. 6 Notes on use in accordance with a computer connected (stored on a circuit different from your camcorder. Types of operations guides. - Connect the equipment into an outlet on the supplied...

Operating Guide
Page 7
...into the terminal will damage the terminal and may result in your camcorder" (p. 131). • To prevent the media from being broken or recorded images from the camcorder. - These points are both referred to remove the battery pack or AC Adaptor from being lost, do not do the ... or vibration to insert the connector plug in any type of a "Memory Stick PRO Duo." Viewfinder LCD screen Battery • The camcorder is lit or flashing: - See "About handling of your camcorder.) • "Memory Stick PRO Duo" and "Memory Stick PRO-HG Duo" are normal results of the (Movie...
...into the terminal will damage the terminal and may result in your camcorder" (p. 131). • To prevent the media from being broken or recorded images from the camcorder. - These points are both referred to remove the battery pack or AC Adaptor from being lost, do not do the ... or vibration to insert the connector plug in any type of a "Memory Stick PRO Duo." Viewfinder LCD screen Battery • The camcorder is lit or flashing: - See "About handling of your camcorder.) • "Memory Stick PRO Duo" and "Memory Stick PRO-HG Duo" are normal results of the (Movie...
Operating Guide
Page 10
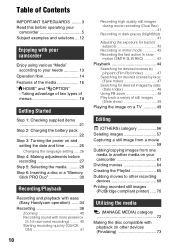
... 21 Step 2: Charging the battery pack 22 Step 3: Turning the power on and setting the date and time 25 Changing the language setting ..... 26 Step 4: Making adjustments before operating your camcorder 5 Subject examples and solutions ... 12 Enjoying with your camcorder Enjoy using various "Media" ...the media ......... 28 Step 6: Inserting a disc or a "Memory Stick PRO Duo 30 Recording/Playback Recording and playback with ease (Easy Handycam operation) ...... 34 Recording 38 Zooming 40 Recording sound with playback on other devices (Finalizing 73 motion (SMTH SLW REC 42 Playback 44...
... 21 Step 2: Charging the battery pack 22 Step 3: Turning the power on and setting the date and time 25 Changing the language setting ..... 26 Step 4: Making adjustments before operating your camcorder 5 Subject examples and solutions ... 12 Enjoying with your camcorder Enjoy using various "Media" ...the media ......... 28 Step 6: Inserting a disc or a "Memory Stick PRO Duo 30 Recording/Playback Recording and playback with ease (Easy Handycam operation) ...... 34 Recording 38 Zooming 40 Recording sound with playback on other devices (Finalizing 73 motion (SMTH SLW REC 42 Playback 44...
Operating Guide
Page 11
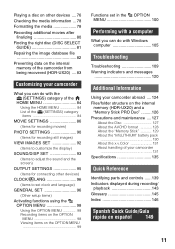
... and messages 120 Additional Information Using your camcorder abroad ....124 Files/folder structure on the internal memory (HDR-UX20) and a "Memory Stick PRO Duo" .........126 Precautions and maintenance ....127 About the Disc 127 About the AVCHD format 128 About the "Memory Stick 129 About the "InfoLITHIUM" battery pack 130 About the x.v.Color 131 About...
... and messages 120 Additional Information Using your camcorder abroad ....124 Files/folder structure on the internal memory (HDR-UX20) and a "Memory Stick PRO Duo" .........126 Precautions and maintenance ....127 About the Disc 127 About the AVCHD format 128 About the "Memory Stick 129 About the "InfoLITHIUM" battery pack 130 About the x.v.Color 131 About...

Operating Guide
Page 21
...(1) (p. 142) A button-type lithium battery is already installed. 21 AC Adaptor (1) (p. 22) Rechargeable battery pack NP-FH60 (1) (p. 22) Power cord (Mains lead) (1) (p. 22) CD-ROM "Handycam Application Software" (1) (p. 105) - ...Picture Motion Browser (Software) - Getting Started Step 1: Checking supplied items Make sure that item supplied. The number in the parentheses indicates the number of that you have the following items supplied with your camcorder...
...(1) (p. 142) A button-type lithium battery is already installed. 21 AC Adaptor (1) (p. 22) Rechargeable battery pack NP-FH60 (1) (p. 22) Power cord (Mains lead) (1) (p. 22) CD-ROM "Handycam Application Software" (1) (p. 105) - ...Picture Motion Browser (Software) - Getting Started Step 1: Checking supplied items Make sure that item supplied. The number in the parentheses indicates the number of that you have the following items supplied with your camcorder...
Operating Guide
Page 22
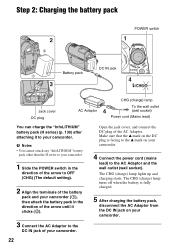
...the DC plug is fully charged. 5 After charging the battery pack, disconnect the AC Adaptor from the DC IN jack on your camcorder. b Notes • You cannot attach any "InfoLITHIUM" battery pack other than the H series to your camcorder. 1 Slide the POWER switch in the direction of ... of the battery pack and your camcorder (1), then attach the battery pack in the direction of the arrow until it to your camcorder. 22 The CHG (charge) lamp turns off when the battery is facing to the v mark on your camcorder. Step 2: Charging the battery pack POWER switch Battery pack DC IN...
...the DC plug is fully charged. 5 After charging the battery pack, disconnect the AC Adaptor from the DC IN jack on your camcorder. b Notes • You cannot attach any "InfoLITHIUM" battery pack other than the H series to your camcorder. 1 Slide the POWER switch in the direction of ... of the battery pack and your camcorder (1), then attach the battery pack in the direction of the arrow until it to your camcorder. 22 The CHG (charge) lamp turns off when the battery is facing to the v mark on your camcorder. Step 2: Charging the battery pack POWER switch Battery pack DC IN...

Operating Guide
Page 23
... a power source from the DC IN jack holding both the camcorder and the DC plug. "HD" stands for high definition image quality, and "SD" stands for about 7 seconds. Continued , 23 Remaining battery (approx.) Getting Started b Notes • When you fully charge a fully discharged battery pack. Recording capacity (approx.) Charging time Approximate time (min...
... a power source from the DC IN jack holding both the camcorder and the DC plug. "HD" stands for high definition image quality, and "SD" stands for about 7 seconds. Continued , 23 Remaining battery (approx.) Getting Started b Notes • When you fully charge a fully discharged battery pack. Recording capacity (approx.) Charging time Approximate time (min...

Operating Guide
Page 24
When the media is set to the internal memory (HDR-UX20) or the "Memory Stick PRO Duo": Battery pack LCD panel opened * LCD panel closed . 24 Available Playback time Approximate time (min.) available when you repeat recording start/stop, turning the power ...stands for high definition image quality, and "SD" stands for standard image quality. Step 2: Charging the battery pack (Continued) When the media is set to the internal memory (HDR-UX20) or the "Memory Stick PRO Duo": Battery pack Continuous recording time Typical recording time* Image quality HD SD HD SD NP-FH50 70 90...
When the media is set to the internal memory (HDR-UX20) or the "Memory Stick PRO Duo": Battery pack LCD panel opened * LCD panel closed . 24 Available Playback time Approximate time (min.) available when you repeat recording start/stop, turning the power ...stands for high definition image quality, and "SD" stands for standard image quality. Step 2: Charging the battery pack (Continued) When the media is set to the internal memory (HDR-UX20) or the "Memory Stick PRO Duo": Battery pack Continuous recording time Typical recording time* Image quality HD SD HD SD NP-FH50 70 90...

Operating Guide
Page 25
...lamp lights up. (Movie): To record movies (Still): To record still images When turning your camcorder on your camcorder or change the POWER switch position. Getting Started • The power will not be supplied from the battery as long as between a wall and furniture. • Do not short-circuit the DC ...plug of the AC Adaptor or battery terminal with your camcorder. Continued , 25 If you do not recommend using an NP-FH30, which only allows short recording and playback times, with any malfunction occurs while...
...lamp lights up. (Movie): To record movies (Still): To record still images When turning your camcorder on your camcorder or change the POWER switch position. Getting Started • The power will not be supplied from the battery as long as between a wall and furniture. • Do not short-circuit the DC ...plug of the AC Adaptor or battery terminal with your camcorder. Continued , 25 If you do not recommend using an NP-FH30, which only allows short recording and playback times, with any malfunction occurs while...
Operating Guide
Page 26
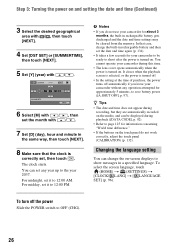
... CODE], p. 92). • Refer to page 125 for your camcorder to 12:00 AM. For midday, set , then touch . b Notes • If you leave your camcorder for approximately 5 minutes, to show messages in rechargeable battery gets discharged and the date and time settings may be ready to ...OFF (CHG). 26 In that the clock is turned on -screen displays to save battery power ([A.SHUT OFF], p. 97). To ...
... CODE], p. 92). • Refer to page 125 for your camcorder to 12:00 AM. For midday, set , then touch . b Notes • If you leave your camcorder for approximately 5 minutes, to show messages in rechargeable battery gets discharged and the date and time settings may be ready to ...OFF (CHG). 26 In that the clock is turned on -screen displays to save battery power ([A.SHUT OFF], p. 97). To ...
Operating Guide
Page 27
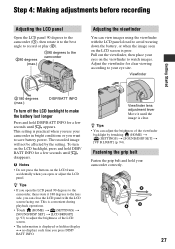
...Tips • You can adjust the brightness of the LCD screen. • The information is poor. To turn off the LCD backlight to make the battery last longer Press and hold your camcorder in bright conditions or you want to the lens side, you open the LCD panel 90 degrees to the... camcorder, then rotate it 180 degrees to save battery power. Step 4: Making adjustments before recording Adjusting the LCD panel Open the LCD panel 90 degrees to the camcorder (1), then rotate it to the best angle to record or play (2)....
...Tips • You can adjust the brightness of the LCD screen. • The information is poor. To turn off the LCD backlight to make the battery last longer Press and hold your camcorder in bright conditions or you want to the lens side, you open the LCD panel 90 degrees to the... camcorder, then rotate it 180 degrees to save battery power. Step 4: Making adjustments before recording Adjusting the LCD panel Open the LCD panel 90 degrees to the camcorder (1), then rotate it to the best angle to record or play (2)....

Operating Guide
Page 33
...; If you force the "Memory Stick PRO Duo" into the slot in once and slide out it alongside the camcorder body. To remove the battery pack or AC Adaptor - To shake or knock your camcorder - To eject the "Memory Stick PRO Duo" Open the LCD panel and Memory Stick Duo cover, then lightly...) b Notes • Numbers in minutes. Capacity of a "Memory Stick PRO Duo" and the available recording time of when using a "Memory Stick PRO Duo" made by Sony Corporation.
...; If you force the "Memory Stick PRO Duo" into the slot in once and slide out it alongside the camcorder body. To remove the battery pack or AC Adaptor - To shake or knock your camcorder - To eject the "Memory Stick PRO Duo" Open the LCD panel and Memory Stick Duo cover, then lightly...) b Notes • Numbers in minutes. Capacity of a "Memory Stick PRO Duo" and the available recording time of when using a "Memory Stick PRO Duo" made by Sony Corporation.

Operating Guide
Page 38
... available recording time and memory usage of the media by touching (or E) t (MANAGE MEDIA) t [MEDIA INFO] (p. 78). (HOME) D 38 HDR-UX10: HDR-UX20: Movie: Disc Movie: Internal memory Still image: "Memory Stick PRO Duo" Still image: Internal memory (HOME) E Lens cover Opens automatically when the power...to the internal memory (HDR-UX20) or the "Memory Stick" (p. 28), the next movie file is created automatically. Also, do not remove the battery or AC Adaptor. Do not apply shock or vibration to your camcorder, see page 6. • You can use with your camcorder, and do not eject...
... available recording time and memory usage of the media by touching (or E) t (MANAGE MEDIA) t [MEDIA INFO] (p. 78). (HOME) D 38 HDR-UX10: HDR-UX20: Movie: Disc Movie: Internal memory Still image: "Memory Stick PRO Duo" Still image: Internal memory (HOME) E Lens cover Opens automatically when the power...to the internal memory (HDR-UX20) or the "Memory Stick" (p. 28), the next movie file is created automatically. Also, do not remove the battery or AC Adaptor. Do not apply shock or vibration to your camcorder, see page 6. • You can use with your camcorder, and do not eject...

Operating Guide
Page 41
...; Remove the conversion lens (optional). • Adjust the focus manually ([FOCUS], p. 100) when it is compared during recording, and the battery power can record still images during recording standby in dark places to set on the media set the NIGHTSHOT switch to focus automatically. •... port You can record high quality still images by about 1 second. While the Sleep mode is set , the power consumption of the camcorder is reduced by pressing PHOTO while recording a movie. Recording in bright places. Recording/Playback Starting recording quickly (QUICK ON) If you press...
...; Remove the conversion lens (optional). • Adjust the focus manually ([FOCUS], p. 100) when it is compared during recording, and the battery power can record still images during recording standby in dark places to set on the media set the NIGHTSHOT switch to focus automatically. •... port You can record high quality still images by about 1 second. While the Sleep mode is set , the power consumption of the camcorder is reduced by pressing PHOTO while recording a movie. Recording in bright places. Recording/Playback Starting recording quickly (QUICK ON) If you press...

Operating Guide
Page 58
... screen to be deleted in the Playlist (p. 65), the movie is deleted also from the Playlist. • Even if you delete unnecessary movies from your camcorder while deleting the images on the media, format the media (p. 78). The selected still image is included in advance (p. 29). 1 Touch (HOME) t (...the still image on a disc when performing the following operations after recording: - b Notes • Do not remove the battery pack or the AC Adaptor from your camcorder while deleting movies. • Do not eject the "Memory Stick PRO Duo" from the disc, the remaining disc capacity may...
... screen to be deleted in the Playlist (p. 65), the movie is deleted also from the Playlist. • Even if you delete unnecessary movies from your camcorder while deleting the images on the media, format the media (p. 78). The selected still image is included in advance (p. 29). 1 Touch (HOME) t (...the still image on a disc when performing the following operations after recording: - b Notes • Do not remove the battery pack or the AC Adaptor from your camcorder while deleting movies. • Do not eject the "Memory Stick PRO Duo" from the disc, the remaining disc capacity may...

Operating Guide
Page 64
...is set to the internal memory (HDR-UX20) or the "Memory Stick PRO Duo," the movies added to the Playlist will not be divided even after the original movies are divided. • Do not remove the battery pack or the AC Adaptor from your camcorder selects the dividing point based on your... camcorder are divided. • A slight difference may occur from the point where you touch and the actual...
...is set to the internal memory (HDR-UX20) or the "Memory Stick PRO Duo," the movies added to the Playlist will not be divided even after the original movies are divided. • Do not remove the battery pack or the AC Adaptor from your camcorder selects the dividing point based on your... camcorder are divided. • A slight difference may occur from the point where you touch and the actual...

Operating Guide
Page 66
... confirm. Touch the movie on the playback screen by using (OPTION) menu. • You can save the Playlist to a disc on your camcorder while adding a movie to the Playlist on the LCD screen to the Playlist screen. Playing the Playlist Set the desired media for the SD (... [PLAYLIST EDIT]. 2 Touch [ ERASE]/[ ERASE]/ [ ERASE]. Touch to return to the previous screen. b Notes • Do not remove the battery pack or the AC Adaptor from your camcorder while adding a movie to the Playlist. • Do not eject the "Memory Stick PRO Duo" from the list. b Notes • For the...
... confirm. Touch the movie on the playback screen by using (OPTION) menu. • You can save the Playlist to a disc on your camcorder while adding a movie to the Playlist on the LCD screen to the Playlist screen. Playing the Playlist Set the desired media for the SD (... [PLAYLIST EDIT]. 2 Touch [ ERASE]/[ ERASE]/ [ ERASE]. Touch to return to the previous screen. b Notes • Do not remove the battery pack or the AC Adaptor from your camcorder while adding a movie to the Playlist. • Do not eject the "Memory Stick PRO Duo" from the list. b Notes • For the...
Operating Guide
Page 82
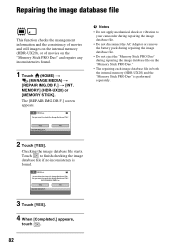
...mechanical shock or vibration to finish checking the image database file if no inconsistency is performed separately. 2 Touch [YES]. MEMORY] (HDR-UX20) or [MEMORY STICK]. Repairing the image database file This function checks the management information and the consistency of movies and still images ...the internal memory (HDR-UX20) and the "Memory Stick PRO Duo" is found . 1 Touch (HOME) t (MANAGE MEDIA) t [REPAIR IMG.DB F.] t [INT. Touch to your camcorder during repairing the image database file. • Do not disconnect the AC Adaptor or remove the battery pack during repairing ...
...mechanical shock or vibration to finish checking the image database file if no inconsistency is performed separately. 2 Touch [YES]. MEMORY] (HDR-UX20) or [MEMORY STICK]. Repairing the image database file This function checks the management information and the consistency of movies and still images ...the internal memory (HDR-UX20) and the "Memory Stick PRO Duo" is found . 1 Touch (HOME) t (MANAGE MEDIA) t [REPAIR IMG.DB F.] t [INT. Touch to your camcorder during repairing the image database file. • Do not disconnect the AC Adaptor or remove the battery pack during repairing ...


