Operating Instructions
Page 2
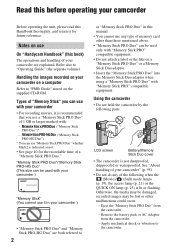
...Stick" (You cannot use it is lit or flashing. Types of "Memory Stick" you use any of the following parts. Remove the battery pack or AC Adaptor from the camcorder - "Memory Stick PRO Duo"/"Memory Stick PRO-HG Duo" (This size can be lost or other than those mentioned above. •...; "Memory Stick PRO Duo" can use On "Handycam Handbook" (this Handbook thoroughly, and retain it for the recordable time of a "Memory Stick ...
...Stick" (You cannot use it is lit or flashing. Types of "Memory Stick" you use any of the following parts. Remove the battery pack or AC Adaptor from the camcorder - "Memory Stick PRO Duo"/"Memory Stick PRO-HG Duo" (This size can be lost or other than those mentioned above. •...; "Memory Stick PRO Duo" can use On "Handycam Handbook" (this Handbook thoroughly, and retain it for the recordable time of a "Memory Stick ...
Operating Instructions
Page 5
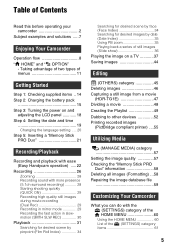
...1: Checking supplied items ..14 Step 2: Charging the battery pack 15 Step 3: Turning the power on and ...Memory Stick PRO Duo 21 Recording/Playback Recording and playback with ease (Easy Handycam operation) .....22 Recording 26 Zooming 28 Recording sound with more presence (5....(OTHERS) category 45 Deleting images 46 Capturing a still image from a movie (HDR-TG1E 47 Dividing a movie 48 Creating the Playlist 49 Dubbing to other devices 52 Printing... (Formatting) ...58 Repairing the image database file 59 Customizing Your Camcorder What you can do with the (SETTINGS) category of the HOME...
...1: Checking supplied items ..14 Step 2: Charging the battery pack 15 Step 3: Turning the power on and ...Memory Stick PRO Duo 21 Recording/Playback Recording and playback with ease (Easy Handycam operation) .....22 Recording 26 Zooming 28 Recording sound with more presence (5....(OTHERS) category 45 Deleting images 46 Capturing a still image from a movie (HDR-TG1E 47 Dividing a movie 48 Creating the Playlist 49 Dubbing to other devices 52 Printing... (Formatting) ...58 Repairing the image database file 59 Customizing Your Camcorder What you can do with the (SETTINGS) category of the HOME...

Operating Instructions
Page 6
... MENU 73 Functions set in the OPTION MENU 74 Troubleshooting Troubleshooting 79 Warning indicators and messages 86 Additional Information Using your camcorder abroad ...... 89 Files/folder structure on the "Memory Stick PRO Duo 91 Maintenance and precautions ...... 92 About the AVCHD... format 92 About the "Memory Stick 92 About the "InfoLITHIUM" battery pack 93 About x.v.Color 94 About handling of your camcorder 95 6 Quick Reference Identifying parts and controls ....... 99 Indicators displayed during recording/ playback 103 Glossary 105...
... MENU 73 Functions set in the OPTION MENU 74 Troubleshooting Troubleshooting 79 Warning indicators and messages 86 Additional Information Using your camcorder abroad ...... 89 Files/folder structure on the "Memory Stick PRO Duo 91 Maintenance and precautions ...... 92 About the AVCHD... format 92 About the "Memory Stick 92 About the "InfoLITHIUM" battery pack 93 About x.v.Color 94 About handling of your camcorder 95 6 Quick Reference Identifying parts and controls ....... 99 Indicators displayed during recording/ playback 103 Glossary 105...

Operating Instructions
Page 14
Power cord (Mains lead) (1) (p. 15) Rechargeable battery pack (1) (p. 15, 93) NP-FH50 Handycam Station (1) (p. 15, 102) Component A/V cable (1) (p. 39) A/V connecting cable (1) (p. 39, 52) 21-pin adaptor (p. 42) For the model with your camcorder. Handycam Handbook (This Handbook) "Operating Guide" (1) 14 Getting Started Step 1: ... USB adaptor cap are attached to the USB cable (short) beforehand. PMB Guide - Wrist strap (1) (p. 101) CD-ROM "Handycam Application Software" (1) - Picture Motion Browser (Software) - The number in the parentheses indicates the number of that you have the ...
Power cord (Mains lead) (1) (p. 15) Rechargeable battery pack (1) (p. 15, 93) NP-FH50 Handycam Station (1) (p. 15, 102) Component A/V cable (1) (p. 39) A/V connecting cable (1) (p. 39, 52) 21-pin adaptor (p. 42) For the model with your camcorder. Handycam Handbook (This Handbook) "Operating Guide" (1) 14 Getting Started Step 1: ... USB adaptor cap are attached to the USB cable (short) beforehand. PMB Guide - Wrist strap (1) (p. 101) CD-ROM "Handycam Application Software" (1) - Picture Motion Browser (Software) - The number in the parentheses indicates the number of that you have the ...
Operating Instructions
Page 15
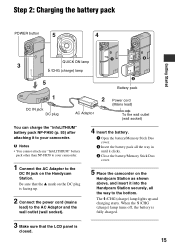
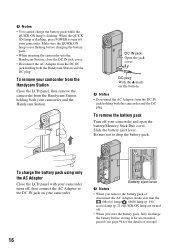
... Adaptor and the wall outlet (wall socket). 4 Insert the battery. 1 Open the battery/Memory Stick Duo cover. 2 Insert the battery pack all the way in until it to your camcorder. 1 Connect the AC Adaptor to the DC IN jack on the Handycam Station as shown above, and insert it into the... Power cord (Mains lead) To the wall outlet (wall socket) You can charge the "InfoLITHIUM" battery pack NP-FH50 (p. 93) after attaching it clicks. 3 Close the battery/Memory Stick Duo cover. 5 Place the camcorder on the Handycam Station. Be sure that the LCD panel is facing up and charging starts.
... Adaptor and the wall outlet (wall socket). 4 Insert the battery. 1 Open the battery/Memory Stick Duo cover. 2 Insert the battery pack all the way in until it to your camcorder. 1 Connect the AC Adaptor to the DC IN jack on the Handycam Station as shown above, and insert it into the... Power cord (Mains lead) To the wall outlet (wall socket) You can charge the "InfoLITHIUM" battery pack NP-FH50 (p. 93) after attaching it clicks. 3 Close the battery/Memory Stick Duo cover. 5 Place the camcorder on the Handycam Station. Be sure that the LCD panel is facing up and charging starts.
Operating Instructions
Page 16
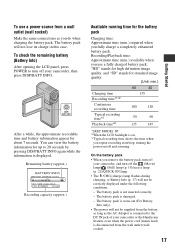
... your camcorder and open the battery/Memory Stick Duo cover. Slide the battery eject lever. To charge the battery pack using only the AC Adaptor Close the LCD panel with your camcorder. Battery eject lever b Notes • When you store the battery pack, fully discharge the battery before charging the battery pack. • When inserting the camcorder into the Handycam Station...
... your camcorder and open the battery/Memory Stick Duo cover. Slide the battery eject lever. To charge the battery pack using only the AC Adaptor Close the LCD panel with your camcorder. Battery eject lever b Notes • When you store the battery pack, fully discharge the battery before charging the battery pack. • When inserting the camcorder into the Handycam Station...
Operating Instructions
Page 17
...socket). 17 Getting Started To use a fully charged battery pack. On the battery pack • When you do when charging the battery pack. "HD" stands for high definition image quality, and "SD" stands for up to turn off your camcorder or the Handycam Station, even when the power cord (mains lead) ...is connected to the DC IN jack of your camcorder, then press DISP/BATT INFO. The battery pack will not be supplied from the battery as long as the AC Adaptor is disconnected...
...socket). 17 Getting Started To use a fully charged battery pack. On the battery pack • When you do when charging the battery pack. "HD" stands for high definition image quality, and "SD" stands for up to turn off your camcorder or the Handycam Station, even when the power cord (mains lead) ...is connected to the DC IN jack of your camcorder, then press DISP/BATT INFO. The battery pack will not be supplied from the battery as long as the AC Adaptor is disconnected...
Operating Instructions
Page 18
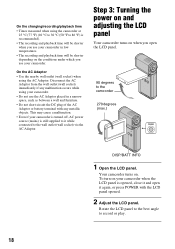
... on when you use your camcorder. • Do not use your camcorder in a narrow space, such as between a wall and furniture. • Do not short-circuit the DC plug of the AC Adaptor or battery terminal with the LCD panel opened. 2 Adjust the LCD panel. Rotate the LCD panel to the best angle... to the camcorder 270 degrees (max.) DISP/BATT INFO 1 Open the LCD panel. On the charging/recording/playback...
... on when you use your camcorder. • Do not use your camcorder in a narrow space, such as between a wall and furniture. • Do not short-circuit the DC plug of the AC Adaptor or battery terminal with the LCD panel opened. 2 Adjust the LCD panel. Rotate the LCD panel to the best angle... to the camcorder 270 degrees (max.) DISP/BATT INFO 1 Open the LCD panel. On the charging/recording/playback...
Operating Instructions
Page 19
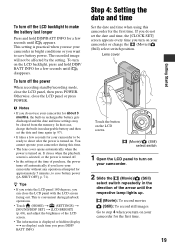
... a few seconds until appears. This setting is practical when you use your camcorder in rechargeable battery gets discharged and the date and time settings may be affected by the setting. This is convenient during this camcorder for the first time. The recorded image will not be cleared from the ...LCD panel, then press POWER. It closes when the playback screen is selected, or the power is turned on your camcorder. 2 Slide the (Movie)/ (Still) select switch repeatedly in rechargeable battery and then set the date and time, the [CLOCK SET] screen appears every time you turn on your...
... a few seconds until appears. This setting is practical when you use your camcorder in rechargeable battery gets discharged and the date and time settings may be affected by the setting. This is convenient during this camcorder for the first time. The recorded image will not be cleared from the ...LCD panel, then press POWER. It closes when the playback screen is selected, or the power is turned on your camcorder. 2 Slide the (Movie)/ (Still) select switch repeatedly in rechargeable battery and then set the date and time, the [CLOCK SET] screen appears every time you turn on your...
Operating Instructions
Page 21
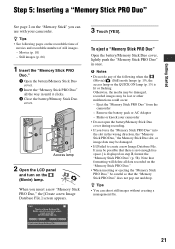
... on step 3, format the "Memory Stick PRO Duo" (p. 58). Movies (p. 10) - z Tips • You can use with your camcorder • Do not open the battery/Memory Stick Duo cover during recording. • If you force the "Memory Stick PRO Duo" into the slot in once. When you insert...following pages on the (Movie) lamp. b Notes • Do not do any of still images. - Eject the "Memory Stick PRO Duo" from the camcorder - Getting Started Step 5: Inserting a "Memory Stick PRO Duo" See page 2 on the "Memory Stick" you can shoot still images without creating a management ...
... on step 3, format the "Memory Stick PRO Duo" (p. 58). Movies (p. 10) - z Tips • You can use with your camcorder • Do not open the battery/Memory Stick Duo cover during recording. • If you force the "Memory Stick PRO Duo" into the slot in once. When you insert...following pages on the (Movie) lamp. b Notes • Do not do any of still images. - Eject the "Memory Stick PRO Duo" from the camcorder - Getting Started Step 5: Inserting a "Memory Stick PRO Duo" See page 2 on the "Memory Stick" you can shoot still images without creating a management ...

Operating Instructions
Page 26
...p. 34). • You can capture still images from recorded movies (HDR-TG1E) (p. 47). • You can switch the shooting mode by pressing PHOTO D ([Dual Rec], p. 29). • A frame is shown on . Do not apply shock or vibration to your camcorder, see page 2. • You can check the recordable time and ...) t [MOVIE] or 26 z Tips • For types of recordable images, see page 10 and 66. • You can use in your camcorder, and do not remove the battery or AC Adaptor. • When a movie file exceeds 2 GB, the next movie file is stored in the index. START/STOP B (Movie) ...
...p. 34). • You can capture still images from recorded movies (HDR-TG1E) (p. 47). • You can switch the shooting mode by pressing PHOTO D ([Dual Rec], p. 29). • A frame is shown on . Do not apply shock or vibration to your camcorder, see page 2. • You can check the recordable time and ...) t [MOVIE] or 26 z Tips • For types of recordable images, see page 10 and 66. • You can use in your camcorder, and do not remove the battery or AC Adaptor. • When a movie file exceeds 2 GB, the next movie file is stored in the index. START/STOP B (Movie) ...

Operating Instructions
Page 29
... the (Movie) lamp is lit, the size of the subject appears on . z Tips • During sleep mode, the battery is consumed at about half that you close the LCD panel, the camcorder goes to sleep mode (power saving mode) instead of turning off automatically if you do not operate your... frames on the detected faces are completely stored on before movie recording is displayed. You can also record with [SMTH SLW REC] (p. 30), your camcorder for a certain period during sleep mode. You cannot record still images while is finished and the still images are not displayed (p. 65). 29 z ...
... the (Movie) lamp is lit, the size of the subject appears on . z Tips • During sleep mode, the battery is consumed at about half that you close the LCD panel, the camcorder goes to sleep mode (power saving mode) instead of turning off automatically if you do not operate your... frames on the detected faces are completely stored on before movie recording is displayed. You can also record with [SMTH SLW REC] (p. 30), your camcorder for a certain period during sleep mode. You cannot record still images while is finished and the still images are not displayed (p. 65). 29 z ...

Operating Instructions
Page 46
.... • Important data should be deleted. To delete all movies at one time. • You can delete an image on the playback screen from your camcorder using a computer. Deleting movies You can select up to the previous screen. 3 Touch t [YES] t . 46 It may damage the media. • When ...ALL]/ [ DELETE ALL] t [YES] t [YES] t . z Tips • You can increase the free space on the selected date are deleted. • Do not remove the battery pack or the AC Adaptor, or eject "Memory Stick PRO Duo" from (OPTION) MENU. • To delete all images recorded in the "Memory Stick PRO...
.... • Important data should be deleted. To delete all movies at one time. • You can delete an image on the playback screen from your camcorder using a computer. Deleting movies You can select up to the previous screen. 3 Touch t [YES] t . 46 It may damage the media. • When ...ALL]/ [ DELETE ALL] t [YES] t [YES] t . z Tips • You can increase the free space on the selected date are deleted. • Do not remove the battery pack or the AC Adaptor, or eject "Memory Stick PRO Duo" from (OPTION) MENU. • To delete all images recorded in the "Memory Stick PRO...

Operating Instructions
Page 49
.... The selected movie is a list showing thumbnails of the movie you edit or delete the movies added to the Playlist. It may occur from your camcorder selects the dividing point based on the LCD screen to the previous screen. 4 Touch t [YES] t . 49 The Playlist is marked with HD (high ... even if you want to create, play, or edit a Playlist before the operation (p. 57). Editing Creating the Playlist • Do not remove the battery pack or the AC Adaptor, or eject the "Memory Stick PRO Duo" from the point where you touch and the actual dividing point, as your...
.... The selected movie is a list showing thumbnails of the movie you edit or delete the movies added to the Playlist. It may occur from your camcorder selects the dividing point based on the LCD screen to the previous screen. 4 Touch t [YES] t . 49 The Playlist is marked with HD (high ... even if you want to create, play, or edit a Playlist before the operation (p. 57). Editing Creating the Playlist • Do not remove the battery pack or the AC Adaptor, or eject the "Memory Stick PRO Duo" from the point where you touch and the actual dividing point, as your...
Operating Instructions
Page 50
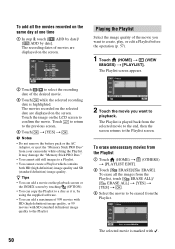
... using the supplied software. • You can copy the Playlist to a disc as it is highlighted. b Notes • Do not remove the battery pack or the AC Adaptor, or eject the "Memory Stick PRO Duo" from the Playlist. The selected movie is played back from the Playlist 1 ...] t . To add all the images from the Playlist, touch [ ERASE ALL]/ [ ERASE ALL] t [YES] t [YES] t . 3 Select the movie to be erased from your camcorder while editing the Playlist. To erase unnecessary movies from the selected movie to the end, then the screen returns to the Playlist screen. Playing the...
... using the supplied software. • You can copy the Playlist to a disc as it is highlighted. b Notes • Do not remove the battery pack or the AC Adaptor, or eject the "Memory Stick PRO Duo" from the Playlist. The selected movie is played back from the Playlist 1 ...] t . To add all the images from the Playlist, touch [ ERASE ALL]/ [ ERASE ALL] t [YES] t [YES] t . 3 Select the movie to be erased from your camcorder while editing the Playlist. To erase unnecessary movies from the selected movie to the end, then the screen returns to the Playlist screen. Playing the...

Operating Instructions
Page 59
... information and the consistency of movies/ still images in the "Memory Stick PRO Duo," and repairs any inconsistencies found , touch to your camcorder, and do not disconnect the AC Adaptor. • Do not attempt the following operations when [Executing...] is activated, do not remove... the AC Adaptor or the battery pack, or eject "Memory Stick PRO Duo" from your camcorder during the operation. 59 b Notes • Do not apply mechanical shock or vibration to finish the operation. 3 Touch...
... information and the consistency of movies/ still images in the "Memory Stick PRO Duo," and repairs any inconsistencies found , touch to your camcorder, and do not disconnect the AC Adaptor. • Do not attempt the following operations when [Executing...] is activated, do not remove... the AC Adaptor or the battery pack, or eject "Memory Stick PRO Duo" from your camcorder during the operation. 59 b Notes • Do not apply mechanical shock or vibration to finish the operation. 3 Touch...
Operating Instructions
Page 64
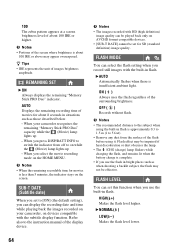
...if heat discoloration or dust obscures the lamp. • The /CHG (charge) lamp flickers while charging the flash, and remains lit when the battery charge is complete. • If you use the built-in flash is about 8 seconds in situations such as when shooting a backlit subject, ... of movies for SD (standard definition) image quality. REMAINING SET B ON Always displays the remaining "Memory Stick PRO Duo" indicator. When your camcorder, on devices compatible with HD (high definition) image quality can select the flash setting when you select the movie recording mode on the screen....
...if heat discoloration or dust obscures the lamp. • The /CHG (charge) lamp flickers while charging the flash, and remains lit when the battery charge is complete. • If you use the built-in flash is about 8 seconds in situations such as when shooting a backlit subject, ... of movies for SD (standard definition) image quality. REMAINING SET B ON Always displays the remaining "Memory Stick PRO Duo" indicator. When your camcorder, on devices compatible with HD (high definition) image quality can select the flash setting when you select the movie recording mode on the screen....
Operating Instructions
Page 69
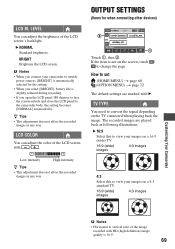
... / to convert the signal depending on a 16:9 (wide) TV. 16:9 (wide) images 4:3 images 4:3 Select this to view your camcorder to vertical ratio of the image recorded with / . The recorded images are marked with B. BRIGHT Brightens the LCD screen. TV TYPE You need... SETTINGS (Items for the setting. • When you select [BRIGHT], battery life is slightly reduced during recording. • If you connect your images on a 4:3 standard TV. 16:9 (wide) images 4:3 images Customizing Your Camcorder b Notes • Horizontal to outside power sources, [BRIGHT] is automatically...
... / to convert the signal depending on a 16:9 (wide) TV. 16:9 (wide) images 4:3 images 4:3 Select this to view your camcorder to vertical ratio of the image recorded with / . The recorded images are marked with B. BRIGHT Brightens the LCD screen. TV TYPE You need... SETTINGS (Items for the setting. • When you select [BRIGHT], battery life is slightly reduced during recording. • If you connect your images on a 4:3 standard TV. 16:9 (wide) images 4:3 images Customizing Your Camcorder b Notes • Horizontal to outside power sources, [BRIGHT] is automatically...
Operating Instructions
Page 71
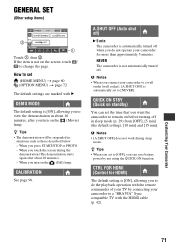
...about 10 minutes). - When you do the playback operation with the remote commander of your camcorder to [NEVER]. NEVER The camcorder is automatically turned off . A.SHUT OFF (Auto shut off) B 5 min The camcorder is not automatically turned off when you touch the screen during sleep mode. QUICK ON STBY ...OFF] is [ON], allowing you want the camcorder to remain on before turning off in sleep mode (p. 29) from [OFF], [5 min] (the default setting), [10 min] and [15 min]. b Notes • When you turn on standby) You can save battery power by connecting your TV by not using the...
...about 10 minutes). - When you do the playback operation with the remote commander of your camcorder to [NEVER]. NEVER The camcorder is automatically turned off . A.SHUT OFF (Auto shut off) B 5 min The camcorder is not automatically turned off when you touch the screen during sleep mode. QUICK ON STBY ...OFF] is [ON], allowing you want the camcorder to remain on before turning off in sleep mode (p. 29) from [OFF], [5 min] (the default setting), [10 min] and [15 min]. b Notes • When you turn on standby) You can save battery power by connecting your TV by not using the...
Operating Instructions
Page 77
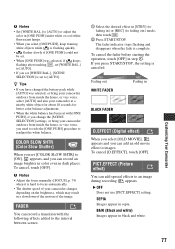
...[D.EFFECT], touch [OFF]. FADER You can record a transition with [ONE PUSH], if you change the [SCENE SELECTION] settings, or bring your camcorder outdoors from inside the house, or vice versa, you can add an old movie effect to readjust the white balance. PICT.EFFECT (Picture effect)...then touch . 2 Press START/STOP. appears. B&W (Black and white) Images appear in black and white. 77 z Tips • If you have changed the battery pack while [AUTO] was selected, if keeps flashing after touching , set [WHITE BAL.] to [AUTO]. • If you set [WHITE BAL.], [SCENE SELECTION...
...[D.EFFECT], touch [OFF]. FADER You can record a transition with [ONE PUSH], if you change the [SCENE SELECTION] settings, or bring your camcorder outdoors from inside the house, or vice versa, you can add an old movie effect to readjust the white balance. PICT.EFFECT (Picture effect)...then touch . 2 Press START/STOP. appears. B&W (Black and white) Images appear in black and white. 77 z Tips • If you have changed the battery pack while [AUTO] was selected, if keeps flashing after touching , set [WHITE BAL.] to [AUTO]. • If you set [WHITE BAL.], [SCENE SELECTION...


