Operating Guide
Page 4
...the serial number in the U.S.A. Model No. Address: 16530 Via Esprillo, San Diego, CA 92127 U.S.A. Notes HDR-TG1 is subject to be used with the Handycam Station Model DCRA-C230 and AC Adaptor Model AC-L200/L200B. For more information regarding this device must accept..., including interference that may not cause harmful interference, and (2) this product. Regulatory Information Declaration of Conformity Trade Name: SONY Model No.: HDR-TG1 Responsible Party: Sony Electronics Inc. Otherwise, fire or injury may call toll free 1800-822- 8837, or visit http://www.rbrc.org/...
...the serial number in the U.S.A. Model No. Address: 16530 Via Esprillo, San Diego, CA 92127 U.S.A. Notes HDR-TG1 is subject to be used with the Handycam Station Model DCRA-C230 and AC Adaptor Model AC-L200/L200B. For more information regarding this device must accept..., including interference that may not cause harmful interference, and (2) this product. Regulatory Information Declaration of Conformity Trade Name: SONY Model No.: HDR-TG1 Responsible Party: Sony Electronics Inc. Otherwise, fire or injury may call toll free 1800-822- 8837, or visit http://www.rbrc.org/...

Operating Guide
Page 5
... (short) E beforehand. special handling may apply, See www.dtsc.ca.gov/hazardouswaste/perchlorate Perchlorate Material: Lithium battery contains perchlorate. US 5 Handycam Handbook (PDF) • "Operating Guide" (This manual) (1) US A B C D E F G * The Dedicated USB Terminal ... adaptor cap G are the supplied quantity. • "Memory Stick PRO Duo" 4 GB (1) • AC Adaptor (1) • Power cord (Mains lead) (1) • Handycam Station (1) A • Component A/V cable (1) B • A/V connecting cable (1) C • USB cable (long) (1) D • USB cable (short) (1) E...
... (short) E beforehand. special handling may apply, See www.dtsc.ca.gov/hazardouswaste/perchlorate Perchlorate Material: Lithium battery contains perchlorate. US 5 Handycam Handbook (PDF) • "Operating Guide" (This manual) (1) US A B C D E F G * The Dedicated USB Terminal ... adaptor cap G are the supplied quantity. • "Memory Stick PRO Duo" 4 GB (1) • AC Adaptor (1) • Power cord (Mains lead) (1) • Handycam Station (1) A • Component A/V cable (1) B • A/V connecting cable (1) C • USB cable (long) (1) D • USB cable (short) (1) E...
Operating Guide
Page 7
... still camera, and therefore may appear different from the actual images of the LCD screen. • Design and specifications of your camcorder and accessories are subject to change without notice. • The screenshots are from Windows Vista. IMPORTANT SAFEGUARDS..........2 Read this manual for...of each local language are captured using your camcorder may vary depending on -screen displays in the camcorder using a computer. About this manual • The images of Contents When the camcorder is connected to a computer • Do not try to "Handycam Handbook" (PDF) and "PMB Guide."...
... still camera, and therefore may appear different from the actual images of the LCD screen. • Design and specifications of your camcorder and accessories are subject to change without notice. • The screenshots are from Windows Vista. IMPORTANT SAFEGUARDS..........2 Read this manual for...of each local language are captured using your camcorder may vary depending on -screen displays in the camcorder using a computer. About this manual • The images of Contents When the camcorder is connected to a computer • Do not try to "Handycam Handbook" (PDF) and "PMB Guide."...

Operating Guide
Page 8
...plug is facing up and charging starts. b Notes • You cannot attach any "InfoLITHIUM" battery pack other than NP-FH50 to your camcorder. Remove the camcorder from the Handycam Station. The /CHG (charge) lamp turns off when the battery pack is closed. 4 Insert the battery. 1 Open the battery/Memory...the wall outlet (wall socket) You can charge the "InfoLITHIUM" battery pack NP-FH50 after attaching it to your camcorder. 1 Connect the AC Adaptor to the DC IN jack on the Handycam Station as shown above, and insert it clicks. 3 Close the battery/Memory Stick Duo cover. 5 Place the...
...plug is facing up and charging starts. b Notes • You cannot attach any "InfoLITHIUM" battery pack other than NP-FH50 to your camcorder. Remove the camcorder from the Handycam Station. The /CHG (charge) lamp turns off when the battery pack is closed. 4 Insert the battery. 1 Open the battery/Memory...the wall outlet (wall socket) You can charge the "InfoLITHIUM" battery pack NP-FH50 after attaching it to your camcorder. 1 Connect the AC Adaptor to the DC IN jack on the Handycam Station as shown above, and insert it clicks. 3 Close the battery/Memory Stick Duo cover. 5 Place the...

Operating Guide
Page 10
...of the wall outlet (wall socket) [b]. Disconnect the AC Adaptor from the wall outlet (wall socket). On using your camcorder. • Do not use your camcorder or the Handycam Station, even when the power cord (mains lead) is connected to 86°F) is recommended). • The available ... the DC plug of the AC Adaptor or battery terminal with any countries/ regions using the AC Adaptor supplied with your camcorder. AC-L200/L200B [a] [b] US See "Handycam Handbook" (PDF) for details. 10 On the charging/recording/playback time • Times measured when using the AC Adaptor...
...of the wall outlet (wall socket) [b]. Disconnect the AC Adaptor from the wall outlet (wall socket). On using your camcorder. • Do not use your camcorder or the Handycam Station, even when the power cord (mains lead) is connected to 86°F) is recommended). • The available ... the DC plug of the AC Adaptor or battery terminal with any countries/ regions using the AC Adaptor supplied with your camcorder. AC-L200/L200B [a] [b] US See "Handycam Handbook" (PDF) for details. 10 On the charging/recording/playback time • Times measured when using the AC Adaptor...
Operating Guide
Page 14
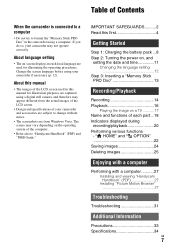
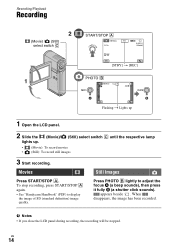
... beside . b Notes • If you close the LCD panel during recording, the recording will be stopped. To stop recording, press START/STOP A again. • See "Handycam Handbook" (PDF) to adjust the focus A (a beep sounds), then press it fully B (a shutter click sounds). Recording/Playback Recording (Movie) / (Still) select switch C START/STOP A [STBY...
... beside . b Notes • If you close the LCD panel during recording, the recording will be stopped. To stop recording, press START/STOP A again. • See "Handycam Handbook" (PDF) to adjust the focus A (a beep sounds), then press it fully B (a shutter click sounds). Recording/Playback Recording (Movie) / (Still) select switch C START/STOP A [STBY...

Operating Guide
Page 15
... B during movie recording. • When a movie file exceeds 2 GB, the next movie file is created automatically. • The maximum recordable time of Sony "Memory Stick PRO Duo" is as follows with recording mode [HD SP] (the default setting); 1 GB: approx. 15 minutes 2 GB: approx. 30... • When measuring "Memory Stick PRO Duo" capacity, 1 GB equals 1 billion bytes, a portion of your camcorder (p. 20). • You can capture still images from recorded movies. See "Handycam Handbook" (PDF) for data management. • Check the number of recordable still images on the LCD screen of...
... B during movie recording. • When a movie file exceeds 2 GB, the next movie file is created automatically. • The maximum recordable time of Sony "Memory Stick PRO Duo" is as follows with recording mode [HD SP] (the default setting); 1 GB: approx. 15 minutes 2 GB: approx. 30... • When measuring "Memory Stick PRO Duo" capacity, 1 GB equals 1 billion bytes, a portion of your camcorder (p. 20). • You can capture still images from recorded movies. See "Handycam Handbook" (PDF) for data management. • Check the number of recordable still images on the LCD screen of...
Operating Guide
Page 17
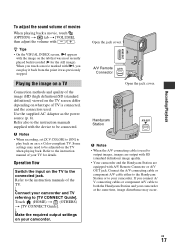
... Refer also to the instruction manuals supplied with A/V Remote Connector or A/V OUT jack. Handycam Station b Notes • When the A/V connecting cable is connected, and the connectors used to your camcorder. r Make the required output settings on the TV when playing back. Connect the ... output images, images are output with SD (standard definition) image quality. • Your camcorder and the Handycam Station are equipped with the device to the connected jack. Refer to both the Handycam Station and your TV for the still image). If you touch a movie marked with /...
... Refer also to the instruction manuals supplied with A/V Remote Connector or A/V OUT jack. Handycam Station b Notes • When the A/V connecting cable is connected, and the connectors used to your camcorder. r Make the required output settings on the TV when playing back. Connect the ... output images, images are output with SD (standard definition) image quality. • Your camcorder and the Handycam Station are equipped with the device to the connected jack. Refer to both the Handycam Station and your TV for the still image). If you touch a movie marked with /...

Operating Guide
Page 18
...about 1.1 to 5 times the original size (Playback zoom). • When you touch the screen during playback zoom, the point you do not operate your camcorder for easy recording/playback. Touch (HOME) t (SETTINGS) t [PHOTO SETTINGS] t [FLASH MODE] to initialize all the settings including the clock setting. ...from about 1 second (QUICK ON). To cancel, press EASY again. US 18 Name and functions of the settings are explained here. Handycam Station Recording/Playback A Flash The flash will be displayed in the default setting. The flashing stops and the power turns off automatically ...
...about 1.1 to 5 times the original size (Playback zoom). • When you touch the screen during playback zoom, the point you do not operate your camcorder for easy recording/playback. Touch (HOME) t (SETTINGS) t [PHOTO SETTINGS] t [FLASH MODE] to initialize all the settings including the clock setting. ...from about 1 second (QUICK ON). To cancel, press EASY again. US 18 Name and functions of the settings are explained here. Handycam Station Recording/Playback A Flash The flash will be displayed in the default setting. The flashing stops and the power turns off automatically ...

Operating Guide
Page 19
... G DISP/BATT INFO button You can switch the screen display when you press DISP/BATT INFO while the power is on your camcorder when you attach your camcorder to the Handycam Station. When you press it after you open the LCD panel and press POWER to other devices K HDMI OUT jack Connect with...
... G DISP/BATT INFO button You can switch the screen display when you press DISP/BATT INFO while the power is on your camcorder when you attach your camcorder to the Handycam Station. When you press it after you open the LCD panel and press POWER to other devices K HDMI OUT jack Connect with...

Operating Guide
Page 21
... SteadyShot off EXPOSURE/ SPOT METER TELE MACRO ZEBRA X.V.COLOR Face Index FACE DETECTION z Tips • Indicators and their positions are not displayed while recording. See "Handycam Handbook" (PDF) for details. • The recording date and time are recorded automatically on the LCD screens Following indicators appear during playback. Recording/Playback Indicators... PRO Duo." They are approximate and differ from what you can check them as [DATA CODE] during recording/playback to indicate the settings of your camcorder. However, you actually see. US 21
... SteadyShot off EXPOSURE/ SPOT METER TELE MACRO ZEBRA X.V.COLOR Face Index FACE DETECTION z Tips • Indicators and their positions are not displayed while recording. See "Handycam Handbook" (PDF) for details. • The recording date and time are recorded automatically on the LCD screens Following indicators appear during playback. Recording/Playback Indicators... PRO Duo." They are approximate and differ from what you can check them as [DATA CODE] during recording/playback to indicate the settings of your camcorder. However, you actually see. US 21

Operating Guide
Page 22
... apply the selected item, touch [YES]. Press (OPTION) to display the menu items you want to learn about. For details of the menu items, see "Handycam Handbook" (PDF) (p. 27). (HOME) To see the explanation of (HELP) turns orange. (OPTION) Using the HOME MENU You can change in the current recording/playback...
... apply the selected item, touch [YES]. Press (OPTION) to display the menu items you want to learn about. For details of the menu items, see "Handycam Handbook" (PDF) (p. 27). (HOME) To see the explanation of (HELP) turns orange. (OPTION) Using the HOME MENU You can change in the current recording/playback...

Operating Guide
Page 23
... SET]/ [SUMMERTIME], [ LANGUAGE SET]* GENERAL SET [DEMO MODE], [CALIBRATION], [A.SHUT OFF], [QUICK ON STBY], [CTRL FOR HDMI] * You can set these items also during Easy Handycam operation. ** The menu name is changed to [SOUND SETTINGS] during Easy Handycam operation. US 23 Recording/Playback • The (OPTION) MENU cannot be used during Easy...
... SET]/ [SUMMERTIME], [ LANGUAGE SET]* GENERAL SET [DEMO MODE], [CALIBRATION], [A.SHUT OFF], [QUICK ON STBY], [CTRL FOR HDMI] * You can set these items also during Easy Handycam operation. ** The menu name is changed to [SOUND SETTINGS] during Easy Handycam operation. US 23 Recording/Playback • The (OPTION) MENU cannot be used during Easy...
Operating Guide
Page 24
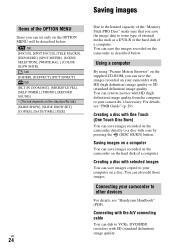
... For details, see "PMB Guide" (p. 29). You can save the images recorded on the camcorder as a DVD-R or the hard disk of a computer. You can also edit those images. For details, see "Handycam Handbook" (PDF). Creating a disc with selected images You can set only on the OPTION MENU... will be described below . Saving images Items of the OPTION MENU Items you can save images copied to your computer on a disc. You can dub to your camcorder, if necessary. ...
... For details, see "PMB Guide" (p. 29). You can save the images recorded on the camcorder as a DVD-R or the hard disk of a computer. You can also edit those images. For details, see "Handycam Handbook" (PDF). Creating a disc with selected images You can set only on the OPTION MENU... will be described below . Saving images Items of the OPTION MENU Items you can save images copied to your computer on a disc. You can dub to your camcorder, if necessary. ...

Operating Guide
Page 27
To use . http://guide.d-imaging.sony.co.jp/mac/ms/us/ Installing and viewing "Handycam Handbook" (PDF) To view "Handycam Handbook" (PDF), you need to your camcorder, see the following operations. - z Tips • For Macintosh users, follow the steps below. 1 Turn on the computer. 2 Place the CD-ROM (...screen for details. When the installation is printed on the desktop of your computer. • The model name of your Handycam is completed, the short-cut icon of your camcorder and its side surface. 5 Click [Exit] t [Exit], then remove the CD-ROM from the disc drive of your...
To use . http://guide.d-imaging.sony.co.jp/mac/ms/us/ Installing and viewing "Handycam Handbook" (PDF) To view "Handycam Handbook" (PDF), you need to your camcorder, see the following operations. - z Tips • For Macintosh users, follow the steps below. 1 Turn on the computer. 2 Place the CD-ROM (...screen for details. When the installation is printed on the desktop of your computer. • The model name of your Handycam is completed, the short-cut icon of your camcorder and its side surface. 5 Click [Exit] t [Exit], then remove the CD-ROM from the disc drive of your...
Operating Guide
Page 29
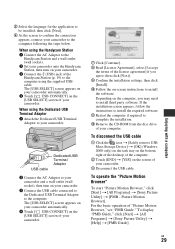
...] screen of the license agreement] if you may need to install the software. To display "PMB Guide," click [Start] t [All Programs] t [Sony Picture Utility] t [Help] t [PMB Guide]. Enjoying with a computer 5 Select the language for the application to be installed, then click [Next]. ...] screen appears on your camcorder automatically. 4 Touch [ USB CONNECT] on the [USB SELECT] screen of your camcorder. 7 Click [Continue]. 8 Read [License Agreement], select [I accept the terms of your camcorder and a wall outlet (wall socket), then turn on the screen of the Handycam Station (p. 19) to ...
...] screen of the license agreement] if you may need to install the software. To display "PMB Guide," click [Start] t [All Programs] t [Sony Picture Utility] t [Help] t [PMB Guide]. Enjoying with a computer 5 Select the language for the application to be installed, then click [Next]. ...] screen appears on your camcorder automatically. 4 Touch [ USB CONNECT] on the [USB SELECT] screen of your camcorder. 7 Click [Continue]. 8 Read [License Agreement], select [I accept the terms of your camcorder and a wall outlet (wall socket), then turn on the screen of the Handycam Station (p. 19) to ...

Operating Guide
Page 31
...; Connect the plug of your computer. If the functions still do not work correctly. • Finish "Picture Motion Browser" and restart your camcorder, see "Handycam Handbook" (PDF) and for a long time. You cannot make new recording during this period. • The "Memory Stick PRO Duo" is...lamp (p. 14). • You cannot record images in an orderly manner (p. 27). If the problem persists, disconnect the power source and contact your Sony dealer. • For the symptoms of the AC Adaptor to install "Picture Motion Browser." • Install "Picture Motion Browser" in sleep mode....
...; Connect the plug of your computer. If the functions still do not work correctly. • Finish "Picture Motion Browser" and restart your camcorder, see "Handycam Handbook" (PDF) and for a long time. You cannot make new recording during this period. • The "Memory Stick PRO Duo" is...lamp (p. 14). • You cannot record images in an orderly manner (p. 27). If the problem persists, disconnect the power source and contact your Sony dealer. • For the symptoms of the AC Adaptor to install "Picture Motion Browser." • Install "Picture Motion Browser" in sleep mode....

Operating Guide
Page 32
... Battery power is low. • The temperature of your camcorder and leave it and operate your Sony dealer or local authorized Sony service facility. Format the "Memory Stick PRO Duo" with your Sony dealer or local authorized Sony service facility. However, note that you cannot service has occurred... on another device. • There is something wrong with both hands. Hold the camcorder steady with the flash. • The amount of "Memory Stick" you have tried a couple of the Handycam Station or your camcorder, see page 6. • No "Memory Stick PRO Duo" is inserted (p. 13...
... Battery power is low. • The temperature of your camcorder and leave it and operate your Sony dealer or local authorized Sony service facility. Format the "Memory Stick PRO Duo" with your Sony dealer or local authorized Sony service facility. However, note that you cannot service has occurred... on another device. • There is something wrong with both hands. Hold the camcorder steady with the flash. • The amount of "Memory Stick" you have tried a couple of the Handycam Station or your camcorder, see page 6. • No "Memory Stick PRO Duo" is inserted (p. 13...

Operating Guide
Page 35
... rechargeable battery pack attached Mass (approx.): 240 g (8 oz) main unit only 300 g (10 oz) including the supplied rechargeable battery pack, and a "Memory Stick PRO Duo" Handycam Station DCRA-C230 Input/Output connectors A/V OUT jack: Component/video and audio output jack USB jack: mini-B Dedicated USB Terminal Adaptor Input/Output connectors USB...
... rechargeable battery pack attached Mass (approx.): 240 g (8 oz) main unit only 300 g (10 oz) including the supplied rechargeable battery pack, and a "Memory Stick PRO Duo" Handycam Station DCRA-C230 Input/Output connectors A/V OUT jack: Component/video and audio output jack USB jack: mini-B Dedicated USB Terminal Adaptor Input/Output connectors USB...
Operating Guide
Page 36
On trademarks • "Handycam" and are registered trademarks of Sony Corporation. • "AVCHD" and "AVCHD" logotype are not mentioned in each case in this manual. in the United States and/or other countries. US 36 All other countries. • Macintosh and Mac OS are registered trademarks of their respective companies. and Sony Corporation. •...
On trademarks • "Handycam" and are registered trademarks of Sony Corporation. • "AVCHD" and "AVCHD" logotype are not mentioned in each case in this manual. in the United States and/or other countries. US 36 All other countries. • Macintosh and Mac OS are registered trademarks of their respective companies. and Sony Corporation. •...


