Operating Guide
Page 2
... presence of electrical power supplied to rain or moisture. Overloading Do not overload wall outlets, extension cords or convenience receptacles beyond their capacity, since this manual for future reference. WARNING To reduce fire or shock hazard, do not expose the unit to your home, consult your protection, please read these safety...
... presence of electrical power supplied to rain or moisture. Overloading Do not overload wall outlets, extension cords or convenience receptacles beyond their capacity, since this manual for future reference. WARNING To reduce fire or shock hazard, do not expose the unit to your home, consult your protection, please read these safety...
Operating Guide
Page 4
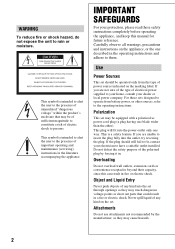
...Part 15 of rechargeable batteries, call : Sony Customer Information Center 1-800222-SONY (7669). Otherwise, fire or injury may cause undesired operation. Refer to operate this manual thoroughly, and retain it for the FCC related matters only. HDR-HC9 Serial No. The number below . Battery... number in this manual could void your authority to these numbers whenever you call your used with Part 15 of Conformity Trade Name: SONY Model No.: HDR-HC9 Responsible Party: Sony Electronics Inc. Regulatory Information Declaration of the FCC Rules. Notes HDR-HC9 is for future ...
...Part 15 of rechargeable batteries, call : Sony Customer Information Center 1-800222-SONY (7669). Otherwise, fire or injury may cause undesired operation. Refer to operate this manual thoroughly, and retain it for the FCC related matters only. HDR-HC9 Serial No. The number below . Battery... number in this manual could void your authority to these numbers whenever you call your used with Part 15 of Conformity Trade Name: SONY Model No.: HDR-HC9 Responsible Party: Sony Electronics Inc. Regulatory Information Declaration of the FCC Rules. Notes HDR-HC9 is for future ...
Operating Guide
Page 5
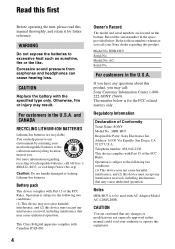
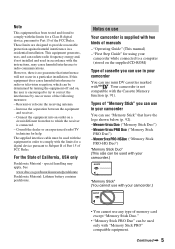
...cable must be determined by one or more of manuals - Consult the dealer or an experienced radio/TV technician for help. Types of "Memory Stick" you can use in your camcorder You can use Your camcorder is supplied with two kinds of the following ...will not occur in a residential installation. "Operating Guide" (This manual) - special handling may cause harmful interference to provide reasonable protection against harmful interference in a particular installation. "First Step Guide" for using your camcorder.) • You cannot use mini DV cassettes marked with . ...
...cable must be determined by one or more of manuals - Consult the dealer or an experienced radio/TV technician for help. Types of "Memory Stick" you can use in your camcorder You can use Your camcorder is supplied with two kinds of the following ...will not occur in a residential installation. "Operating Guide" (This manual) - special handling may cause harmful interference to provide reasonable protection against harmful interference in a particular installation. "First Step Guide" for using your camcorder.) • You cannot use mini DV cassettes marked with . ...
Operating Guide
Page 7
...; The images of the LCD screen and the viewfinder used in this camcorder prior to playing them back on this manual for illustration purposes are captured using a digital still camera, and therefore may be contrary to the copyright laws. On playing back HDV ...tapes on other devices You cannot play back a tape recorded in Germany, and Sony Corporation, and produces superior images. It adopts the MTF measurement system for your camcorder...
...; The images of the LCD screen and the viewfinder used in this camcorder prior to playing them back on this manual for illustration purposes are captured using a digital still camera, and therefore may be contrary to the copyright laws. On playing back HDV ...tapes on other devices You cannot play back a tape recorded in Germany, and Sony Corporation, and produces superior images. It adopts the MTF measurement system for your camcorder...
Operating Guide
Page 8
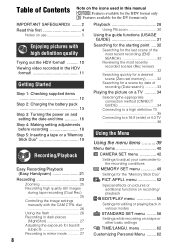
... a tape or a "Memory Stick Duo 19 Recording/Playback Easy Recording/Playback (Easy Handycam 21 Recording 23 Zooming 25 Recording high quality still images during tape recording (Dual Rec 25 Controlling the image settings manually with the CAM CTRL dial 26 Using the flash 26 Recording in dark places (NightShot... (wide) or 4:3 TV 36 Using the Menu Using the menu items ..........39 Menu items 40 CAMERA SET menu 42 Settings to adjust your camcorder to the recording conditions MEMORY SET menu 49 Settings for a scene by date of the most recent recording (END SEARCH 32 Reviewing the most ...
... a tape or a "Memory Stick Duo 19 Recording/Playback Easy Recording/Playback (Easy Handycam 21 Recording 23 Zooming 25 Recording high quality still images during tape recording (Dual Rec 25 Controlling the image settings manually with the CAM CTRL dial 26 Using the flash 26 Recording in dark places (NightShot... (wide) or 4:3 TV 36 Using the Menu Using the menu items ..........39 Menu items 40 CAMERA SET menu 42 Settings to adjust your camcorder to the recording conditions MEMORY SET menu 49 Settings for a scene by date of the most recent recording (END SEARCH 32 Reviewing the most ...
Operating Guide
Page 12
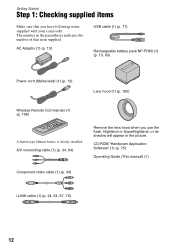
... SuperNightshot, or its shadow will appear in the parentheses indicates the number of that you have following items supplied with your camcorder. CD-ROM "Handycam Application Software" (1) (p. 75) Operating Guide (This manual) (1) Component video cable (1) (p. 34) i.LINK cable (1) (p. 34, 64, 67, 75) 12 AC Adaptor (1) (p. 13) USB cable (1) (p. 71) Rechargeable battery pack NP...
... SuperNightshot, or its shadow will appear in the parentheses indicates the number of that you have following items supplied with your camcorder. CD-ROM "Handycam Application Software" (1) (p. 75) Operating Guide (This manual) (1) Component video cable (1) (p. 34) i.LINK cable (1) (p. 34, 64, 67, 75) 12 AC Adaptor (1) (p. 13) USB cable (1) (p. 71) Rechargeable battery pack NP...

Operating Guide
Page 22
...Handycam operation Press EASY C again. x Unavailable buttons during Easy Handycam During Easy Handycam operation, the following buttons/dial are unavailable. [Invalid during Easy Handycam operation] may appear if operations not available during Easy Handycam... automatically (p. 40). • is not displayed during Easy Handycam operation. • Cancel Easy Handycam operation if you want to add any effects or settings to...to rewind, then touch to the images. x Adjustable menu settings during Easy Handycam are attempted. • . (back light) button (p. 27) • Pressing and holding ...
...Handycam operation Press EASY C again. x Unavailable buttons during Easy Handycam During Easy Handycam operation, the following buttons/dial are unavailable. [Invalid during Easy Handycam operation] may appear if operations not available during Easy Handycam... automatically (p. 40). • is not displayed during Easy Handycam operation. • Cancel Easy Handycam operation if you want to add any effects or settings to...to rewind, then touch to the images. x Adjustable menu settings during Easy Handycam are attempted. • . (back light) button (p. 27) • Pressing and holding ...
Operating Guide
Page 26
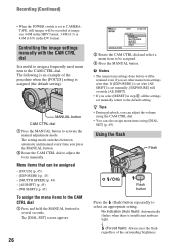
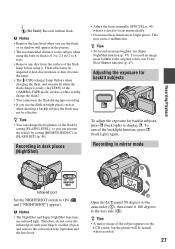
... (Auto flash): Automatically flashes when there is useful to assign a frequently used menu item to adjust the focus manually. MANUAL button CAM CTRL dial 1 Press the MANUAL button to select an appropriate setting. Using the flash Flash Flash button Press the (flash) button repeatedly to activate... the procedure when the [FOCUS] setting is an example of the surrounding brightness. Menu items that . Controlling the image settings manually with the CAM CTRL dial It is insufficient ambient light. The following is assigned (the default setting). z Tips • During playback...
... (Auto flash): Automatically flashes when there is useful to assign a frequently used menu item to adjust the focus manually. MANUAL button CAM CTRL dial 1 Press the MANUAL button to select an appropriate setting. Using the flash Flash Flash button Press the (flash) button repeatedly to activate... the procedure when the [FOCUS] setting is an example of the surrounding brightness. Menu items that . Controlling the image settings manually with the CAM CTRL dial It is insufficient ambient light. The following is assigned (the default setting). z Tips • During playback...
Operating Guide
Page 27
z Tips • You can prevent the redeye by setting [REDEYE REDUC], in dark places (NightShot) • Adjust the focus manually ([FOCUS], p. 45) when it 180 degrees to the lens side (2). To record an image more faithful to 8 feet). • Remove any dust from the surface ...; Do not use the flash in bright places. This may be effective. Recording in [FLASH SET] (p. 46). Open the LCD panel 90 degrees to the camcorder (1), then rotate it is ready. (In [STBY] of the subject appears on the LCD screen, but the picture will appear in the picture. • The...
z Tips • You can prevent the redeye by setting [REDEYE REDUC], in dark places (NightShot) • Adjust the focus manually ([FOCUS], p. 45) when it 180 degrees to the lens side (2). To record an image more faithful to 8 feet). • Remove any dust from the surface ...; Do not use the flash in bright places. This may be effective. Recording in [FLASH SET] (p. 46). Open the LCD panel 90 degrees to the camcorder (1), then rotate it is ready. (In [STBY] of the subject appears on the LCD screen, but the picture will appear in the picture. • The...
Operating Guide
Page 28
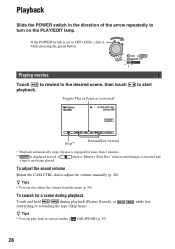
... • You can also adjust the volume from the menu (p. 58). Toggles Play or Pause as you touch* 60min 60min GUIDE to adjust the volume manually (p. 26). If the POWER switch is inserted and To adjust the sound volume Rotate the CAM CTRL dial to start P-MENU Stop** Rewind/Fast forward...
... • You can also adjust the volume from the menu (p. 58). Toggles Play or Pause as you touch* 60min 60min GUIDE to adjust the volume manually (p. 26). If the POWER switch is inserted and To adjust the sound volume Rotate the CAM CTRL dial to start P-MENU Stop** Rewind/Fast forward...

Operating Guide
Page 34
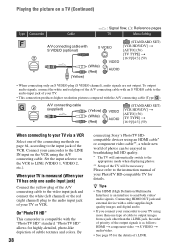
... TV 1 Touch [TV] t [HD TV]. 2 Select the TV input jacks with / , then touch . 3 Check the output setting details, then touch . 4 Connect your camcorder and TV, referring to the picture on the screen. HDV/DV COMPONENT OUT A/V OUT 4 1 2 Lift up the bottom of the jack cover, then rotate in... on the LCD screen. An example of the connection. • When recording, set automatically. 1 Touch [GUIDE]. 2 Touch [CNNECT GUIDE]. 3 Connect your camcorder and TV according to the instruction manuals supplied with an i.LINK cable. • Pictures recorded in the direction of the arrow.
... TV 1 Touch [TV] t [HD TV]. 2 Select the TV input jacks with / , then touch . 3 Check the output setting details, then touch . 4 Connect your camcorder and TV, referring to the picture on the screen. HDV/DV COMPONENT OUT A/V OUT 4 1 2 Lift up the bottom of the jack cover, then rotate in... on the LCD screen. An example of the connection. • When recording, set automatically. 1 Touch [GUIDE]. 2 Touch [CNNECT GUIDE]. 3 Connect your camcorder and TV according to the instruction manuals supplied with an i.LINK cable. • Pictures recorded in the direction of the arrow.
Operating Guide
Page 36
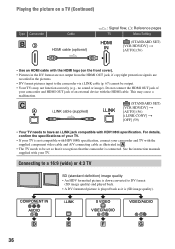
... [i.LINK CONV] t [OFF] (59) • Your TV needs to have an i.LINK jack compatible with HDV1080i specification. See the instruction manuals supplied with your camcorder and HDMI OUT jack of an external device with the HDMI cable. Connecting to a 16:9 (wide) or 4:3 TV SD (standard definition) ...quality) and played back. • A DV formatted picture is played back as illustrated in the pictures. • DV format pictures input to the camcorder via i.LINK cable (p. 67) cannot be set so that it is connected. COMPONENT IN AUDIO i.LINK S VIDEO VIDEO/AUDIO VIDEO/AUDIO D E...
... [i.LINK CONV] t [OFF] (59) • Your TV needs to have an i.LINK jack compatible with HDV1080i specification. See the instruction manuals supplied with your camcorder and HDMI OUT jack of an external device with the HDMI cable. Connecting to a 16:9 (wide) or 4:3 TV SD (standard definition) ...quality) and played back. • A DV formatted picture is played back as illustrated in the pictures. • DV format pictures input to the camcorder via i.LINK cable (p. 67) cannot be set so that it is connected. COMPONENT IN AUDIO i.LINK S VIDEO VIDEO/AUDIO VIDEO/AUDIO D E...
Operating Guide
Page 37
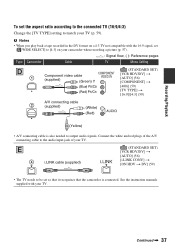
...] (59) [TV TYPE] t [16:9]/[4:3] (59) 2 A/V connecting cable (supplied) (White) (Red) (Yellow) • A/V connecting cable is connected. See the instruction manuals supplied with the 16:9 signal, set so that it recognizes that the camcorder is also needed to output audio signals. b Notes • When you play back a tape recorded in the DV format...
...] (59) [TV TYPE] t [16:9]/[4:3] (59) 2 A/V connecting cable (supplied) (White) (Red) (Yellow) • A/V connecting cable is connected. See the instruction manuals supplied with the 16:9 signal, set so that it recognizes that the camcorder is also needed to output audio signals. b Notes • When you play back a tape recorded in the DV format...
Operating Guide
Page 38
...colors. "PhotoTV HD" allows for highly-detailed, photo-like depiction of the TV will automatically switch to your TV or VCR. By 38 connecting Sony's PhotoTV HDcompatible devices using more than one type of cable to output images from a jack other than the i.LINK jack, the order of priority... of the output signals is compatible with a cable supplies high quality images and digital audio. • If you connect your camcorder to the instruction manual of the VCR. Please refer to your TV using an HDMI cable* or component video cable**, a whole new world of photos can ...
...colors. "PhotoTV HD" allows for highly-detailed, photo-like depiction of the TV will automatically switch to your TV or VCR. By 38 connecting Sony's PhotoTV HDcompatible devices using more than one type of cable to output images from a jack other than the i.LINK jack, the order of priority... of the output signals is compatible with a cable supplies high quality images and digital audio. • If you connect your camcorder to the instruction manual of the VCR. Please refer to your TV using an HDMI cable* or component video cable**, a whole new world of photos can ...
Operating Guide
Page 43
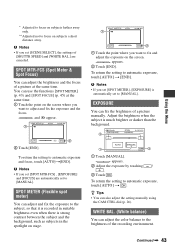
... at the same time. 1 Touch the point on the screen. SPOT MTR·FCS (Spot Meter & Spot Focus) You can adjust the color balance to [MANUAL]. and 9 appear. 1 2 2 Touch [END]. To return the setting to focus on subjects a short distance away. appears. 2 Adjust the exposure by touching...White balance) You can adjust the brightness and the focus of [SHUTTR SPEED] and [WHITE BAL.] are automatically set to the brightness of a picture manually. Using the Menu * Adjusted to focus on subjects farther away only. ** Adjusted not to automatic exposure, touch [AUTO] t [END]. b ...
... at the same time. 1 Touch the point on the screen. SPOT MTR·FCS (Spot Meter & Spot Focus) You can adjust the color balance to [MANUAL]. and 9 appear. 1 2 2 Touch [END]. To return the setting to focus on subjects a short distance away. appears. 2 Adjust the exposure by touching...White balance) You can adjust the brightness and the focus of [SHUTTR SPEED] and [WHITE BAL.] are automatically set to the brightness of a picture manually. Using the Menu * Adjusted to focus on subjects farther away only. ** Adjusted not to automatic exposure, touch [AUTO] t [END]. b ...

Operating Guide
Page 44
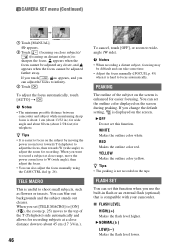
... white balance. Under video lamps in the memory, the indicator stops flashing. SHARPNESS You can manually adjust and fix the shutter speed for the following recording conditions: - B AUTO Select to CAMERAMEMORY. MANUAL( ) Adjust the shutter speed using / . flashes quickly. Soften Sharpen SHUTTR SPEED You can...second when the POWER switch is set to CAMERA-TAPE, and between 1/4 and 1/500 second when the POWER switch is appropriately adjusted for your camcorder outdoors from inside the house, or vice versa, you will be set. • When [ONE PUSH] was selected, if keeps flashing ...
... white balance. Under video lamps in the memory, the indicator stops flashing. SHARPNESS You can manually adjust and fix the shutter speed for the following recording conditions: - B AUTO Select to CAMERAMEMORY. MANUAL( ) Adjust the shutter speed using / . flashes quickly. Soften Sharpen SHUTTR SPEED You can...second when the POWER switch is set to CAMERA-TAPE, and between 1/4 and 1/500 second when the POWER switch is appropriately adjusted for your camcorder outdoors from inside the house, or vice versa, you will be set. • When [ONE PUSH] was selected, if keeps flashing ...

Operating Guide
Page 45
...8226; When the shutter speed is set between 1/725 to 1/10000 second, still images cannot be lost. z Tips • You can also adjust the setting manually using (dark)/ (bright). and the setting value appear when [AE SHIFT] is set to 1/30 second in dark places. z Tips • Touch if... subject is black or the light is dim. • You can adjust the automatic exposure level to [AUTO]. • You can also adjust the setting manually using the CAM CTRL dial (p. 26). To adjust the focus automatically, touch [AUTO] t [END]. AUTOSLW SHTR (Auto slow shutter) When you set [...
...8226; When the shutter speed is set between 1/725 to 1/10000 second, still images cannot be lost. z Tips • You can also adjust the setting manually using (dark)/ (bright). and the setting value appear when [AE SHIFT] is set to 1/30 second in dark places. z Tips • Touch if... subject is black or the light is dim. • You can adjust the automatic exposure level to [AUTO]. • You can also adjust the setting manually using the CAM CTRL dial (p. 26). To adjust the focus automatically, touch [AUTO] t [END]. AUTOSLW SHTR (Auto slow shutter) When you set [...
Operating Guide
Page 46
...). RED Makes the outline color red. FLASH SET You can also adjust the focus manually using the CAM CTRL dial (p. 26). B NORMAL( ) LOW( ) Makes the flash level lower. b Notes • The minimum possible distance between camcorder and subject while maintaining sharp focus is about 1 cm (about 13/32 in.) ...for wide angle and about 80 cm (about 45 cm (17 3/4 in flash or an external flash (optional) that is compatible with your camcorder. You can blur out backgrounds and the subject stands out clearer. B OFF Do not set the outline color displayed on the screen. You can...
...). RED Makes the outline color red. FLASH SET You can also adjust the focus manually using the CAM CTRL dial (p. 26). B NORMAL( ) LOW( ) Makes the flash level lower. b Notes • The minimum possible distance between camcorder and subject while maintaining sharp focus is about 1 cm (about 13/32 in.) ...for wide angle and about 80 cm (about 45 cm (17 3/4 in flash or an external flash (optional) that is compatible with your camcorder. You can blur out backgrounds and the subject stands out clearer. B OFF Do not set the outline color displayed on the screen. You can...
Operating Guide
Page 47
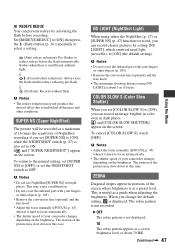
...of your fingers or other objects (p. 105). • Remove the conversion lens (optional) and the lens hood. • Adjust the focus manually ([FOCUS], p. 45) when it is hard to reduce redeye before recording. ZEBRA Diagonal stripes appear in bright places. b Notes • Adjust the focus... infrared light (invisible), to OFF. To cancel [COLOR SLOW S], touch [OFF]. b Notes • Do not cover the infrared port with your camcorder changes depending on the brightness. and [COLOR SLOW SHUTTER] appear on the screen. Continued , 47 Using the Menu The motion of your fingers or ...
...of your fingers or other objects (p. 105). • Remove the conversion lens (optional) and the lens hood. • Adjust the focus manually ([FOCUS], p. 45) when it is hard to reduce redeye before recording. ZEBRA Diagonal stripes appear in bright places. b Notes • Adjust the focus... infrared light (invisible), to OFF. To cancel [COLOR SLOW S], touch [OFF]. b Notes • Do not cover the infrared port with your camcorder changes depending on the brightness. and [COLOR SLOW SHUTTER] appear on the screen. Continued , 47 Using the Menu The motion of your fingers or ...

Operating Guide
Page 57
...recording format. B 16:9 WIDE Records pictures in the full screen for playback (p. 59). REC FORMAT You can select the aspect ratio according to the instruction manuals supplied with high quality). x REC MODE (Recording mode) B SP (SP) Records in the DV format. a DV signal is output as it is ...in the 16-bit mode (1 stereo sound with your TV. x AUDIO MIX During tape playback, you can monitor the sound recorded by other camcorders or VCRs. • When you output the recording picture using audio dubbing or 4ch microphone recording. Using the Menu b Notes • Disconnect...
...recording format. B 16:9 WIDE Records pictures in the full screen for playback (p. 59). REC FORMAT You can select the aspect ratio according to the instruction manuals supplied with high quality). x REC MODE (Recording mode) B SP (SP) Records in the DV format. a DV signal is output as it is ...in the 16-bit mode (1 stereo sound with your TV. x AUDIO MIX During tape playback, you can monitor the sound recorded by other camcorders or VCRs. • When you output the recording picture using audio dubbing or 4ch microphone recording. Using the Menu b Notes • Disconnect...


