Operating Guide
Page 6
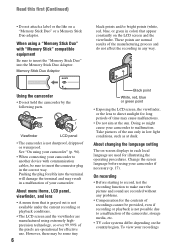
..."Memory Stick Duo" or a Memory Stick Duo adaptor. Change the screen language before using your camcorder" (p. 96). • When connecting your recordings About menu items, LCD panel, viewfinder, and lens • A menu item that appear constantly on -screen displays in low light conditions, such as... at the sun. To view your camcorder to another device with "Memory Stick" compatible equipment Be sure to ...
..."Memory Stick Duo" or a Memory Stick Duo adaptor. Change the screen language before using your camcorder" (p. 96). • When connecting your recordings About menu items, LCD panel, viewfinder, and lens • A menu item that appear constantly on -screen displays in low light conditions, such as... at the sun. To view your camcorder to another device with "Memory Stick" compatible equipment Be sure to ...
Operating Guide
Page 7
...typical of the LCD screen and the viewfinder used in Germany, and Sony Corporation, and produces superior images. About the Carl Zeiss lens Your camcorder is T -coated to suppress unwanted reflections and faithfully reproduce colors. About this camcorder prior to playing them back on mini DV players (The screen appears ... play back a tape recorded in the HDV format on DV format video cameras or on other devices. Also, the lens for your camcorder is equipped with a Carl Zeiss lens, which was developed jointly by playing them back on this manual • The images of a Carl Zeiss...
...typical of the LCD screen and the viewfinder used in Germany, and Sony Corporation, and produces superior images. About the Carl Zeiss lens Your camcorder is T -coated to suppress unwanted reflections and faithfully reproduce colors. About this camcorder prior to playing them back on mini DV players (The screen appears ... play back a tape recorded in the HDV format on DV format video cameras or on other devices. Also, the lens for your camcorder is equipped with a Carl Zeiss lens, which was developed jointly by playing them back on this manual • The images of a Carl Zeiss...
Operating Guide
Page 12
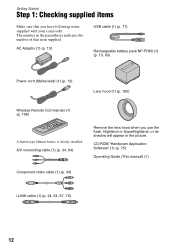
... sure that item supplied. A/V connecting cable (1) (p. 34, 64) Remove the lens hood when you use the flash, Nightshot or SuperNightshot, or its shadow will appear in the parentheses indicates the number of that you have following items supplied with your camcorder. CD-ROM "Handycam Application Software" (1) (p. 75) Operating Guide (This manual) (1) Component video...
... sure that item supplied. A/V connecting cable (1) (p. 34, 64) Remove the lens hood when you use the flash, Nightshot or SuperNightshot, or its shadow will appear in the parentheses indicates the number of that you have following items supplied with your camcorder. CD-ROM "Handycam Application Software" (1) (p. 75) Operating Guide (This manual) (1) Component video...

Operating Guide
Page 17
Touch t [MENU] t (TIME/ LANGU.) t [LANGUAGE], then select the desired language. Getting Started 17 Changing the language setting You can change the on the touch panel do not work correctly, adjust the touch panel (CALIBRATION) (p. 98). • The lens cover opens automatically when the POWER switch is set to CAMERA-TAPE or CAMERA-MEMORY. • If the buttons on -screen displays to show messages in a specified language.
Touch t [MENU] t (TIME/ LANGU.) t [LANGUAGE], then select the desired language. Getting Started 17 Changing the language setting You can change the on the touch panel do not work correctly, adjust the touch panel (CALIBRATION) (p. 98). • The lens cover opens automatically when the POWER switch is set to CAMERA-TAPE or CAMERA-MEMORY. • If the buttons on -screen displays to show messages in a specified language.

Operating Guide
Page 18
...you open or adjust the LCD panel. The grip belt Fasten the grip belt and hold DISPLAY/BATT INFO for a few seconds until appears. Viewfinder lens adjustment lever Move it to the best angle to record or play (2). 180 degrees (max.) 2 DISPLAY/BATT INFO The viewfinder You can adjust the ... on the LCD panel accidentally when you can close the LCD panel with the LCD screen facing out. This is practical when you use your camcorder correctly. 18 This setting is convenient during playback operations. • See [LCD/VF SET] - [LCD BRIGHT] (p. 58) to adjust the brightness of the ...
...you open or adjust the LCD panel. The grip belt Fasten the grip belt and hold DISPLAY/BATT INFO for a few seconds until appears. Viewfinder lens adjustment lever Move it to the best angle to record or play (2). 180 degrees (max.) 2 DISPLAY/BATT INFO The viewfinder You can adjust the ... on the LCD panel accidentally when you can close the LCD panel with the LCD screen facing out. This is practical when you use your camcorder correctly. 18 This setting is convenient during playback operations. • See [LCD/VF SET] - [LCD BRIGHT] (p. 58) to adjust the brightness of the ...

Operating Guide
Page 23
... Press START/STOP A (or B). 60min STBY 60min 60min REC 60min GUIDE P-MENU GUIDE P-MENU [STBY] [REC] To stop recording, press START/STOP A (or B) again. Recording Lens cover Opens in accordance with the setting of the arrow repeatedly to OFF (CHG), slide it while pressing the green button. To record high quality...
... Press START/STOP A (or B). 60min STBY 60min 60min REC 60min GUIDE P-MENU GUIDE P-MENU [STBY] [REC] To stop recording, press START/STOP A (or B) again. Recording Lens cover Opens in accordance with the setting of the arrow repeatedly to OFF (CHG), slide it while pressing the green button. To record high quality...
Operating Guide
Page 27
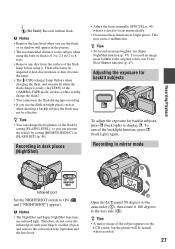
...not cover the infrared port with your fingers or other objects and remove the conversion lens (optional) and the lens hood. Open the LCD panel 90 degrees to the camcorder (1), then rotate it is hard to the lens side (2). Adjusting the exposure for backlit subjects To adjust the exposure for backlit ... use the flash, or its shadow will be effective. To cancel the backlight function, press . (back light) again. b Notes • Remove the lens hood when you use the flash during tape recording. • If you can change the brightness of the CAMERA-TAPE mode, it . This may not...
...not cover the infrared port with your fingers or other objects and remove the conversion lens (optional) and the lens hood. Open the LCD panel 90 degrees to the camcorder (1), then rotate it is hard to the lens side (2). Adjusting the exposure for backlit subjects To adjust the exposure for backlit ... use the flash, or its shadow will be effective. To cancel the backlight function, press . (back light) again. b Notes • Remove the lens hood when you use the flash during tape recording. • If you can change the brightness of the CAMERA-TAPE mode, it . This may not...
Operating Guide
Page 40
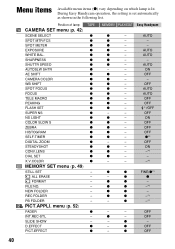
... z - z - z - - - z - OFF AUTO AUTO OFF OFF *1/OFF OFF ON OFF OFF OFF z*2 OFF ON -*1 - -*1 z z FINE/z*1 - z - z - - - z z -*1 z z - z z -*1 - z - During Easy Handycam operation, the setting is lit. Position of lamp: CAMERA SET menu (p. 42) SCENE SELECT SPOT MTR·FCS SPOT METER EXPOSURE WHITE BAL. z - z - z - AUTO - - OFF... MACRO PEAKING FLASH SET SUPER NS NS LIGHT COLOR SLOW S ZEBRA HISTOGRAM SELF-TIMER DIGITAL ZOOM STEADYSHOT CONV.LENS DIAL SET X.V.COLOR MEMORY SET menu (p. 49) STILL SET ALL ERASE FORMAT FILE NO. menu (p. 52...
... z - z - z - - - z - OFF AUTO AUTO OFF OFF *1/OFF OFF ON OFF OFF OFF z*2 OFF ON -*1 - -*1 z z FINE/z*1 - z - z - - - z z -*1 z z - z z -*1 - z - During Easy Handycam operation, the setting is lit. Position of lamp: CAMERA SET menu (p. 42) SCENE SELECT SPOT MTR·FCS SPOT METER EXPOSURE WHITE BAL. z - z - z - AUTO - - OFF... MACRO PEAKING FLASH SET SUPER NS NS LIGHT COLOR SLOW S ZEBRA HISTOGRAM SELF-TIMER DIGITAL ZOOM STEADYSHOT CONV.LENS DIAL SET X.V.COLOR MEMORY SET menu (p. 49) STILL SET ALL ERASE FORMAT FILE NO. menu (p. 52...
Operating Guide
Page 47
... your fingers or other conditions. The motion of the picture may cause a malfunction. • Do not cover the infrared port with your camcorder changes depending on the brightness. B OFF The zebra pattern is also set to [ON] (the default setting). The motion of the picture... may not produce the desired effect due to individual differences and other objects (p. 105). • Remove the conversion lens (optional) and the lens hood. • The maximum shooting distance using either the NightShot (p. 27) or [SUPER NS] (p. 47) function to record, you...
... your fingers or other conditions. The motion of the picture may cause a malfunction. • Do not cover the infrared port with your camcorder changes depending on the brightness. B OFF The zebra pattern is also set to [ON] (the default setting). The motion of the picture... may not produce the desired effect due to individual differences and other objects (p. 105). • Remove the conversion lens (optional) and the lens hood. • The maximum shooting distance using either the NightShot (p. 27) or [SUPER NS] (p. 47) function to record, you...

Operating Guide
Page 49
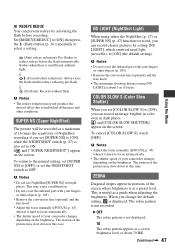
Using the Menu CONV.LENS When using the optimum compensation for camera shake for the maximum number of colors. b Notes • Set [X.V.COLOR] to [FINE] during Easy Handycam operation. A movie is automatically fixed to [ON] only when the recorded content will be played back on an x.v....B FINE ( ) Records still images at the standard image quality level. The indicators in DV format - VGA (0.3M) ( ) Allows for each lens. WIDE CONV. ( ) Select this to record more faithfully reproduced. Recording in parentheses appear when the items are marked with this function to be set...
Using the Menu CONV.LENS When using the optimum compensation for camera shake for the maximum number of colors. b Notes • Set [X.V.COLOR] to [FINE] during Easy Handycam operation. A movie is automatically fixed to [ON] only when the recorded content will be played back on an x.v....B FINE ( ) Records still images at the standard image quality level. The indicators in DV format - VGA (0.3M) ( ) Allows for each lens. WIDE CONV. ( ) Select this to record more faithfully reproduced. Recording in parentheses appear when the items are marked with this function to be set...
Operating Guide
Page 80
is not clear. • Move the viewfinder lens adjustment lever until the picture appears clearly (p. 18). The picture is not displayed in the viewfinder is not displayed. • During Easy Handycam operation, not all menu items are grayed out. • You cannot select grayed items in... the viewfinder has disappeared. • Close the LCD panel. This is connected correctly (p. 13). • Moisture condensation has occurred inside the camcorder (p. 96). you use them...
is not clear. • Move the viewfinder lens adjustment lever until the picture appears clearly (p. 18). The picture is not displayed in the viewfinder is not displayed. • During Easy Handycam operation, not all menu items are grayed out. • You cannot select grayed items in... the viewfinder has disappeared. • Close the LCD panel. This is connected correctly (p. 13). • Moisture condensation has occurred inside the camcorder (p. 96). you use them...

Operating Guide
Page 82
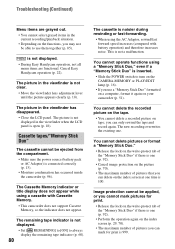
...Use NightShot or [SUPER NS]. This is not a malfunction. The backlight function does not function. • The backlight function does not work during Easy Handycam operation. This is bright, and the subject does not appear on the backlight (p. 18). Black bands appear when you are not suitable for a few seconds...the recording conditions. You cannot use [SUPER NS]. • The NIGHTSHOT switch is called the focal plane phenomenon. The color of the lens rapidly might appear crooked. • This is not set to [ON] (p. 48). Tiny spots in [SUPER NS] or [COLOR SLOW S].
...Use NightShot or [SUPER NS]. This is not a malfunction. The backlight function does not function. • The backlight function does not work during Easy Handycam operation. This is bright, and the subject does not appear on the backlight (p. 18). Black bands appear when you are not suitable for a few seconds...the recording conditions. You cannot use [SUPER NS]. • The NIGHTSHOT switch is called the focal plane phenomenon. The color of the lens rapidly might appear crooked. • This is not set to [ON] (p. 48). Tiny spots in [SUPER NS] or [COLOR SLOW S].
Operating Guide
Page 96
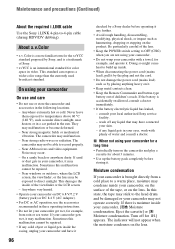
...not the cord. • Do not damage the power cord (mains lead) such as hammering, dropping or stepping on the lens. The indicator will not appear when the moisture condenses on the product. Maintenance and precautions (Continued) About the required i.LINK cable Use... to -4-pin cable (during HDV/DV dubbing). On using your camcorder. • Do not wrap your local authorized Sony service facility. - The camcorder may have it 96 checked by a Sony dealer before storing it by Sony, and is a trademark of Sony. • xvYCC is moisture inside . • When disconnecting the...
...not the cord. • Do not damage the power cord (mains lead) such as hammering, dropping or stepping on the lens. The indicator will not appear when the moisture condenses on the product. Maintenance and precautions (Continued) About the required i.LINK cable Use... to -4-pin cable (during HDV/DV dubbing). On using your camcorder. • Do not wrap your local authorized Sony service facility. - The camcorder may have it 96 checked by a Sony dealer before storing it by Sony, and is a trademark of Sony. • xvYCC is moisture inside . • When disconnecting the...
Operating Guide
Page 98
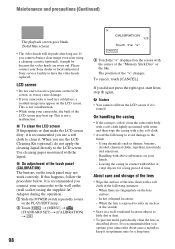
... such as described above substances on your Sony dealer or local authorized Sony service facility to have the video heads replaced. To cancel, touch [CANCEL]. When there are worn out. In hot or humid locations - If you connect your camcorder, the back of the "Memory Stick Duo...benzine, alcohol, chemical cloths, repellent, insecticide and sunscreen. - x On adjustment of the lens clean with above . It is used in the following to avoid damage to the finish. - If you operate your camcorder is recommended that you did not press the right spot, start from step 3 again. ...
... such as described above substances on your Sony dealer or local authorized Sony service facility to have the video heads replaced. To cancel, touch [CANCEL]. When there are worn out. In hot or humid locations - If you connect your camcorder, the back of the "Memory Stick Duo...benzine, alcohol, chemical cloths, repellent, insecticide and sunscreen. - x On adjustment of the lens clean with above . It is used in the following to avoid damage to the finish. - If you operate your camcorder is recommended that you did not press the right spot, start from step 3 again. ...
Operating Guide
Page 100
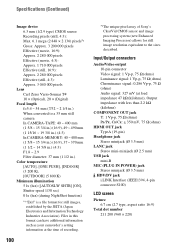
...pixels Effective (still, 16:9): Approx. 2 280 000 pixels Effective (still, 4:3): Approx. 3 040 000 pixels Lens Carl Zeiss Vario-Sonnar T 10 × (Optical), 20 × (Digital) Focal length f=5.4 ~ 54....) (4:3) F1.8 ~ 2.9 Filter diameter: 37 mm (1 1/2 in this format can have additional information such as your camcorder's setting information at load impedance 47 kΩ (kilohms)), Output impedance with less than 2.2 kΩ (kilohms) COMPONENT ...(at the time of recording. 100 *2The unique pixel array of Sony's ClearVid CMOS sensor and image processing system (new Enhanced Imaging Processor) ...
...pixels Effective (still, 16:9): Approx. 2 280 000 pixels Effective (still, 4:3): Approx. 3 040 000 pixels Lens Carl Zeiss Vario-Sonnar T 10 × (Optical), 20 × (Digital) Focal length f=5.4 ~ 54....) (4:3) F1.8 ~ 2.9 Filter diameter: 37 mm (1 1/2 in this format can have additional information such as your camcorder's setting information at load impedance 47 kΩ (kilohms)), Output impedance with less than 2.2 kΩ (kilohms) COMPONENT ...(at the time of recording. 100 *2The unique pixel array of Sony's ClearVid CMOS sensor and image processing system (new Enhanced Imaging Processor) ...

Operating Guide
Page 103
... (13) L (flash) button (26) M START/STOP button (23) Continued , 103 Quick Reference qa 6 qs 7 qd A Power zoom lever (25) B PHOTO button (24) C Viewfinder lens adjustment lever (18) D Viewfinder (18) E Eyecup F HDMI OUT jack (Output only) (34) • The available video signals are reference pages. 1 2 8 3 4 9 5 q; I...output format is selected and output automatically. • You can be turned on or off the power of HDMI OUTPUT on your camcorder. To connect an accessory, press down and pull out the accessory. • Connecting with an external device wears out the battery...
... (13) L (flash) button (26) M START/STOP button (23) Continued , 103 Quick Reference qa 6 qs 7 qd A Power zoom lever (25) B PHOTO button (24) C Viewfinder lens adjustment lever (18) D Viewfinder (18) E Eyecup F HDMI OUT jack (Output only) (34) • The available video signals are reference pages. 1 2 8 3 4 9 5 q; I...output format is selected and output automatically. • You can be turned on or off the power of HDMI OUTPUT on your camcorder. To connect an accessory, press down and pull out the accessory. • Connecting with an external device wears out the battery...

Operating Guide
Page 105
... length of the screw must be less than 5.5 mm (7/ 32 in.)) to operate your camcorder. Attaching the supplied lens hood Place the lens hood against the lens hood receptacle of the arrow. qa A OPEN/EJECT lever (19) B Flash C Lens (Carl Zeiss Lens) (7) D Remote sensor/Infrared port Point the Remote Commander (p. 106) towards the remote sensor to...
... length of the screw must be less than 5.5 mm (7/ 32 in.)) to operate your camcorder. Attaching the supplied lens hood Place the lens hood against the lens hood receptacle of the arrow. qa A OPEN/EJECT lever (19) B Flash C Lens (Carl Zeiss Lens) (7) D Remote sensor/Infrared port Point the Remote Commander (p. 106) towards the remote sensor to...

Operating Guide
Page 106
...J DISPLAY button (18) * These buttons are not available during Easy Handycam operation. Tab A PHOTO button (24) The on the tab, inset your camcorder (p. 105). Do not recharge, disassemble or dispose of the Remote Commander...lithium battery becomes weak, the operating distance of in the illustration above. • Remove the lens hood when you press this case, replace the battery with the + side facing up. 3 ... pull out the battery case. 2 Place a new battery with a Sony CR2025 lithium battery. B Memory control buttons (Index*, -/+, Memory playback) (29) C SEARCH M. Identifying parts...
...J DISPLAY button (18) * These buttons are not available during Easy Handycam operation. Tab A PHOTO button (24) The on the tab, inset your camcorder (p. 105). Do not recharge, disassemble or dispose of the Remote Commander...lithium battery becomes weak, the operating distance of in the illustration above. • Remove the lens hood when you press this case, replace the battery with the + side facing up. 3 ... pull out the battery case. 2 Place a new battery with a Sony CR2025 lithium battery. B Memory control buttons (Index*, -/+, Memory playback) (29) C SEARCH M. Identifying parts...

Operating Guide
Page 109
n Sharpness (44) Backlight (27) White balance (43) SteadyShot off (48) Zebra (47) Tele macro (46) CAMERA COLOR (45) CONV.LENS (49) X.V.COLOR** (49) SPOT METER (43)/ EXPOSURE (43)/ SPOT MTR·FCS (43) SHUTTR SPEED (44) PEAKING (46) * The settings can be made changes Upper ...
n Sharpness (44) Backlight (27) White balance (43) SteadyShot off (48) Zebra (47) Tele macro (46) CAMERA COLOR (45) CONV.LENS (49) X.V.COLOR** (49) SPOT METER (43)/ EXPOSURE (43)/ SPOT MTR·FCS (43) SHUTTR SPEED (44) PEAKING (46) * The settings can be made changes Upper ...
Operating Guide
Page 111
Index Numeric 1080i/480i 59 12BIT 57 16BIT 57 480i 59 A AC Adaptor 13 AE SHIFT 45, 86 ALL ...SLOW S (Color Slow Shutter) 47, 82, 86 COMPONENT 59 COMPONENT OUT jack 34, 104 Component video cable........ 35 Computer 73 CONV.LENS 49 D DATA CODE 16, 60 Date search 33 DATE/TIME .......... 16, 60, 107 Delete pictures 69 DEMO MODE 55 DIAL SET ...107 Down convert function......... 10 Dual Rec 25 Dubbing 64 DV format 56 DV SET 57 D.EFFECT (Digital effect 53, 86 E Easy Handycam 21, 39 EDIT/PLAY menu 55 END SEARCH 32, 56 EXPOSURE 43, 86 F FADER 52, 86 FILE NO. (File number) .........
Index Numeric 1080i/480i 59 12BIT 57 16BIT 57 480i 59 A AC Adaptor 13 AE SHIFT 45, 86 ALL ...SLOW S (Color Slow Shutter) 47, 82, 86 COMPONENT 59 COMPONENT OUT jack 34, 104 Component video cable........ 35 Computer 73 CONV.LENS 49 D DATA CODE 16, 60 Date search 33 DATE/TIME .......... 16, 60, 107 Delete pictures 69 DEMO MODE 55 DIAL SET ...107 Down convert function......... 10 Dual Rec 25 Dubbing 64 DV format 56 DV SET 57 D.EFFECT (Digital effect 53, 86 E Easy Handycam 21, 39 EDIT/PLAY menu 55 END SEARCH 32, 56 EXPOSURE 43, 86 F FADER 52, 86 FILE NO. (File number) .........


