Operating Guide
Page 5
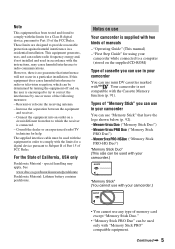
... - PRO Duo") ("Memory Stick - ("Memory Stick PRO-HG Duo") "Memory Stick Duo" (This size can be used in your camcorder while connected to radio communications. Note This equipment has been tested and found to comply with the limits for a Class B digital device, pursuant to... harmful interference to a computer (stored on use mini DV cassettes marked with the Cassette Memory function (p. 91). Your camcorder is connected. - Types of manuals - Connect the equipment into an outlet on a circuit different from that to radio or television reception, which the receiver is not...
... - PRO Duo") ("Memory Stick - ("Memory Stick PRO-HG Duo") "Memory Stick Duo" (This size can be used in your camcorder while connected to radio communications. Note This equipment has been tested and found to comply with the limits for a Class B digital device, pursuant to... harmful interference to a computer (stored on use mini DV cassettes marked with the Cassette Memory function (p. 91). Your camcorder is connected. - Types of manuals - Connect the equipment into an outlet on a circuit different from that to radio or television reception, which the receiver is not...
Operating Guide
Page 6
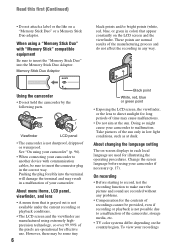
..., and lens • A menu item that appear constantly on the country/region. When using your camcorder" (p. 96). • When connecting your camcorder to another device with "Memory Stick" compatible equipment Be sure to malfunction. To view your camcorder to insert the "Memory Stick Duo" into the terminal will damage the terminal and may result...
..., and lens • A menu item that appear constantly on the country/region. When using your camcorder" (p. 96). • When connecting your camcorder to another device with "Memory Stick" compatible equipment Be sure to malfunction. To view your camcorder to insert the "Memory Stick Duo" into the terminal will damage the terminal and may result...
Operating Guide
Page 8
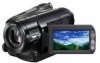
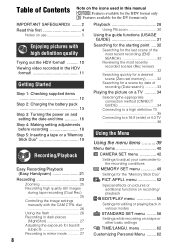
... Making setting adjustments before recording 18 Step 5: Inserting a tape or a "Memory Stick Duo 19 Recording/Playback Easy Recording/Playback (Easy Handycam 21 Recording 23 Zooming 25 Recording high quality still images during tape recording (Dual Rec 25 Controlling the image settings manually with the CAM ... (CNNECT GUIDE 34 Connecting to a high definition TV 35 Connecting to a 16:9 (wide) or 4:3 TV 36 Using the Menu Using the menu items ..........39 Menu items 40 CAMERA SET menu 42 Settings to adjust your camcorder to the recording conditions MEMORY SET menu 49 Settings for ...
... Making setting adjustments before recording 18 Step 5: Inserting a tape or a "Memory Stick Duo 19 Recording/Playback Easy Recording/Playback (Easy Handycam 21 Recording 23 Zooming 25 Recording high quality still images during tape recording (Dual Rec 25 Controlling the image settings manually with the CAM ... (CNNECT GUIDE 34 Connecting to a high definition TV 35 Connecting to a 16:9 (wide) or 4:3 TV 36 Using the Menu Using the menu items ..........39 Menu items 40 CAMERA SET menu 42 Settings to adjust your camcorder to the recording conditions MEMORY SET menu 49 Settings for ...

Operating Guide
Page 10
...moving to the digital video format, you can record important moments in HDV format to SD (standard definition) image quality for the future. Your camcorder's down convert function converts HDV format video to DV for shooting and playing back high definition images on 4:3 aspect ratio TVs when a high ...to the HDV1080i specification as HDV format unless there is a need to a TV or VCR that is connected to specify. The HDV format is a video format for playback or editing when your camcorder is not available. Why shoot in the HDV format High image quality Being HDV format compliant, your...
...moving to the digital video format, you can record important moments in HDV format to SD (standard definition) image quality for the future. Your camcorder's down convert function converts HDV format video to DV for shooting and playing back high definition images on 4:3 aspect ratio TVs when a high ...to the HDV1080i specification as HDV format unless there is a need to a TV or VCR that is connected to specify. The HDV format is a video format for playback or editing when your camcorder is not available. Why shoot in the HDV format High image quality Being HDV format compliant, your...
Operating Guide
Page 11
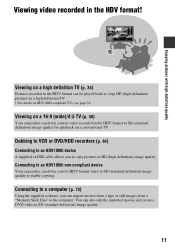
...) image quality. You can import movies from a tape or still images from a "Memory Stick Duo" to the computer. Connecting to an HDV1080i non-compliant device Your camcorder can be played back as crisp HD (high definition) pictures on a high definition TV. • For details on HDV1080i ...recorded in the HDV format can down convert video recorded in the HDV format! Viewing on a 16:9 (wide)/4:3 TV (p. 36) Your camcorder can down convert HDV format video to SD (standard definition) image quality to enable copying. Enjoying pictures with high definition quality Viewing video recorded ...
...) image quality. You can import movies from a tape or still images from a "Memory Stick Duo" to the computer. Connecting to an HDV1080i non-compliant device Your camcorder can be played back as crisp HD (high definition) pictures on a high definition TV. • For details on HDV1080i ...recorded in the HDV format can down convert video recorded in the HDV format! Viewing on a 16:9 (wide)/4:3 TV (p. 36) Your camcorder can down convert HDV format video to SD (standard definition) image quality to enable copying. Enjoying pictures with high definition quality Viewing video recorded ...
Operating Guide
Page 12
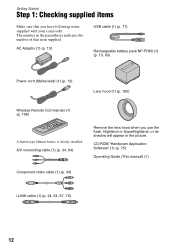
...Handycam Application Software" (1) (p. 75) Operating Guide (This manual) (1) Component video cable (1) (p. 34) i.LINK cable (1) (p. 34, 64, 67, 75) 12 AC Adaptor (1) (p. 13) USB cable (1) (p. 71) Rechargeable battery pack NP-FH60 (1) (p. 13, 93) Power cord (Mains lead) (1) (p. 13) Lens hood (1) (p. 105) Wireless Remote Commander (1) (p. 106) A button-type lithium battery is already installed. A/V connecting... cable (1) (p. 34, 64) Remove the lens hood when you have following items supplied with your camcorder. Getting Started Step 1: ...
...Handycam Application Software" (1) (p. 75) Operating Guide (This manual) (1) Component video cable (1) (p. 34) i.LINK cable (1) (p. 34, 64, 67, 75) 12 AC Adaptor (1) (p. 13) USB cable (1) (p. 71) Rechargeable battery pack NP-FH60 (1) (p. 13, 93) Power cord (Mains lead) (1) (p. 13) Lens hood (1) (p. 105) Wireless Remote Commander (1) (p. 106) A button-type lithium battery is already installed. A/V connecting... cable (1) (p. 34, 64) Remove the lens hood when you have following items supplied with your camcorder. Getting Started Step 1: ...

Operating Guide
Page 13
... starts. The /CHG (charge) lamp turns off when the battery is facing to the v mark on your camcorder. 4 Connect the power cord (mains lead) to the DC IN jack of the arrow until it to a power source ... shown in this case. b Notes • Disconnect the AC Adaptor from the DC IN jack holding both the camcorder and the DC plug. Be sure that the v mark on the DC plug is fully charged. z Tips &#... cord (Mains lead) 4 /CHG (charge) lamp You can operate your camcorder connected to your camcorder. b Notes • You cannot attach any "InfoLITHIUM" battery pack other than the H series to your...
... starts. The /CHG (charge) lamp turns off when the battery is facing to the v mark on your camcorder. 4 Connect the power cord (mains lead) to the DC IN jack of the arrow until it to a power source ... shown in this case. b Notes • Disconnect the AC Adaptor from the DC IN jack holding both the camcorder and the DC plug. Be sure that the v mark on the DC plug is fully charged. z Tips &#... cord (Mains lead) 4 /CHG (charge) lamp You can operate your camcorder connected to your camcorder. b Notes • You cannot attach any "InfoLITHIUM" battery pack other than the H series to your...
Operating Guide
Page 15
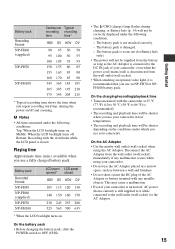
...available when you use a fully charged battery pack. On the AC Adaptor • Use the nearby wall outlet (wall socket) when using your camcorder is still supplied to it is recommended). • The recording and playback time will be correctly displayed under the following conditions: Top: When ...between a wall and furniture. • Do not short-circuit the DC plug of your camcorder in a narrow space, such as the AC Adaptor is connected to 86 °F) is recommended that you use your camcorder, even when the power cord (mains lead) is disconnected from the wall outlet (wall...
...available when you use a fully charged battery pack. On the AC Adaptor • Use the nearby wall outlet (wall socket) when using your camcorder is still supplied to it is recommended). • The recording and playback time will be correctly displayed under the following conditions: Top: When ...between a wall and furniture. • Do not short-circuit the DC plug of your camcorder in a narrow space, such as the AC Adaptor is connected to 86 °F) is recommended that you use your camcorder, even when the power cord (mains lead) is disconnected from the wall outlet (wall...
Operating Guide
Page 31
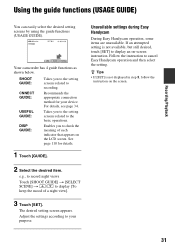
...SHOOT GUIDE: CNNECT GUIDE: USEFUL GUIDE: DISP GUIDE: Takes you to the setting screens related to display an on the LCD screen. Recommends the appropriate connection method for details. 1 Touch [GUIDE]. 2 Select the desired item. e.g., to record night views Touch [SHOOT GUIDE] t [SELECT SCENE] t...USAGE GUIDE). 60min STBY GUIDE P-MENU Your camcorder has 4 guide functions as shown below. Enables you to the setting screens related to check the meaning of a night view]. 3 Touch [SET]. Follow the instruction to cancel Easy Handycam operation and then select the setting. For ...
...SHOOT GUIDE: CNNECT GUIDE: USEFUL GUIDE: DISP GUIDE: Takes you to the setting screens related to display an on the LCD screen. Recommends the appropriate connection method for details. 1 Touch [GUIDE]. 2 Select the desired item. e.g., to record night views Touch [SHOOT GUIDE] t [SELECT SCENE] t...USAGE GUIDE). 60min STBY GUIDE P-MENU Your camcorder has 4 guide functions as shown below. Enables you to the setting screens related to check the meaning of a night view]. 3 Touch [SET]. Follow the instruction to cancel Easy Handycam operation and then select the setting. For ...

Operating Guide
Page 34
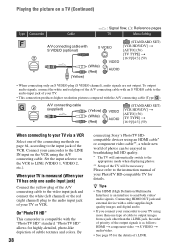
Use the supplied AC Adaptor as SD (standard definition) images regardless of the connection. • When recording, set automatically. 1 Touch [GUIDE]. 2 Touch [CNNECT GUIDE]. 3 Connect your camcorder and TV according to play back on an x.v.Color-compliant TV (p. 49). b Notes •...rotate in the direction of the arrow and connect the cable. Selecting the appropriate connection method (CNNECT GUIDE) Your camcorder helps you select the appropriate connection for your camcorder before connecting. Touch [HINT] and refer also to be connected. Refer also to the instruction manuals supplied...
Use the supplied AC Adaptor as SD (standard definition) images regardless of the connection. • When recording, set automatically. 1 Touch [GUIDE]. 2 Touch [CNNECT GUIDE]. 3 Connect your camcorder and TV according to play back on an x.v.Color-compliant TV (p. 49). b Notes •...rotate in the direction of the arrow and connect the cable. Selecting the appropriate connection method (CNNECT GUIDE) Your camcorder helps you select the appropriate connection for your camcorder before connecting. Touch [HINT] and refer also to be connected. Refer also to the instruction manuals supplied...
Operating Guide
Page 35
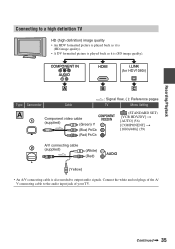
... and red plugs of the A/ V connecting cable to output audio signals. Recording/Playback Connecting to a high definition TV HD (high definition) image quality • An HDV formatted picture is played back as it is...for HDV1080i) A B C Type Camcorder Cable A 1 Component video cable (supplied) (Green) Y (Blue) PB/CB (Red) PR/CR : Signal flow, ( ): Reference pages TV Menu Setting (STANDARD SET) [VCR HDV/DV] t [AUTO] (56) [COMPONENT] t [1080i/480i] (59) 2 A/V connecting cable (supplied) (White) (Red) (Yellow) • An A/V connecting cable is (SD image quality). ...
... and red plugs of the A/ V connecting cable to output audio signals. Recording/Playback Connecting to a high definition TV HD (high definition) image quality • An HDV formatted picture is played back as it is...for HDV1080i) A B C Type Camcorder Cable A 1 Component video cable (supplied) (Green) Y (Blue) PB/CB (Red) PR/CR : Signal flow, ( ): Reference pages TV Menu Setting (STANDARD SET) [VCR HDV/DV] t [AUTO] (56) [COMPONENT] t [1080i/480i] (59) 2 A/V connecting cable (supplied) (White) (Red) (Yellow) • An A/V connecting cable is (SD image quality). ...
Operating Guide
Page 36
...• If your TV is not compatible with HDV1080i specification, connect your camcorder and TV with the supplied component video cable and A/V connecting cable as it recognizes that the camcorder is (SD image quality). Do not connect the HDMI OUT jack of an external device with the HDMI cable... back. • A DV formatted picture is played back as illustrated in the pictures. • DV format pictures input to the camcorder via i.LINK cable (p. 67) cannot be set so that it is connected. C 4 i.LINK cable (supplied) (STANDARD SET) [VCR HDV/DV] t [AUTO] (56) [i.LINK CONV] t [OFF]...
...• If your TV is not compatible with HDV1080i specification, connect your camcorder and TV with the supplied component video cable and A/V connecting cable as it recognizes that the camcorder is (SD image quality). Do not connect the HDMI OUT jack of an external device with the HDMI cable... back. • A DV formatted picture is played back as illustrated in the pictures. • DV format pictures input to the camcorder via i.LINK cable (p. 67) cannot be set so that it is connected. C 4 i.LINK cable (supplied) (STANDARD SET) [VCR HDV/DV] t [AUTO] (56) [i.LINK CONV] t [OFF]...
Operating Guide
Page 37
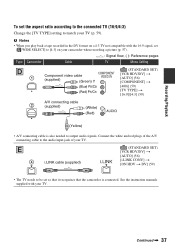
Recording/Playback To set so that it recognizes that the camcorder is connected. Continued , 37 See the instruction manuals supplied with the 16:9 signal, set [ WIDE SELECT] to [4:3] on your camcorder when recording a picture (p. 57). : Signal flow, ( ): Reference pages Type Camcorder Cable TV Menu Setting D 1 Component video cable (supplied) (Green) Y (Blue) PB/CB (Red) PR...
Recording/Playback To set so that it recognizes that the camcorder is connected. Continued , 37 See the instruction manuals supplied with the 16:9 signal, set [ WIDE SELECT] to [4:3] on your camcorder when recording a picture (p. 57). : Signal flow, ( ): Reference pages Type Camcorder Cable TV Menu Setting D 1 Component video cable (supplied) (Green) Y (Blue) PB/CB (Red) PR...
Operating Guide
Page 38
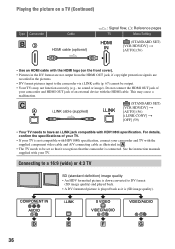
Set the input selector on page 64, according to send both video/ audio signals. By 38 connecting Sony's PhotoTV HDcompatible devices using an HDMI cable* or component video cable**, a whole new world of photos can be enjoyed in breathtaking full HD quality. * The ... video t S VIDEO t audio/video. • See page 95 for highly-detailed, photo-like depiction of cable to the LINE IN input on a TV (Continued) Type Camcorder Cable A/V connecting cable with the "PhotoTV HD" standard. "PhotoTV HD" allows for the details of the VCR. Playing the picture on the VCR using the...
Set the input selector on page 64, according to send both video/ audio signals. By 38 connecting Sony's PhotoTV HDcompatible devices using an HDMI cable* or component video cable**, a whole new world of photos can be enjoyed in breathtaking full HD quality. * The ... video t S VIDEO t audio/video. • See page 95 for highly-detailed, photo-like depiction of cable to the LINE IN input on a TV (Continued) Type Camcorder Cable A/V connecting cable with the "PhotoTV HD" standard. "PhotoTV HD" allows for the details of the VCR. Playing the picture on the VCR using the...
Operating Guide
Page 53
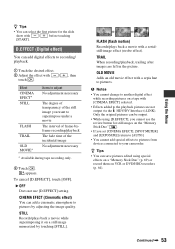
.../playback, trailing after images are not output via the HDV/DV Interface (i.LINK). FLASH (flash motion) Records/plays back a movie with a sepia hue to your camcorder. OLD MOVIE Adds an old movie effect with a serialstill-image effect (strobe effect). Only the original pictures can save pictures edited using [D.EFFECT], you set...
.../playback, trailing after images are not output via the HDV/DV Interface (i.LINK). FLASH (flash motion) Records/plays back a movie with a sepia hue to your camcorder. OLD MOVIE Adds an old movie effect with a serialstill-image effect (strobe effect). Only the original pictures can save pictures edited using [D.EFFECT], you set...
Operating Guide
Page 54
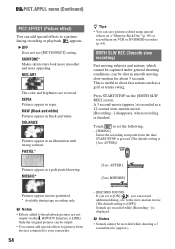
... and brightness are not output via the HDV/DV Interface (i.LINK). Touch to set the following. - [TIMING] Select the recording start point from devices connected to your camcorder. 54 - [RECORD SOUND] If you set to [ON] ( ), you can add special effects to a picture during tape recording only. b Notes • Effects added to...
... and brightness are not output via the HDV/DV Interface (i.LINK). Touch to set the following. - [TIMING] Select the recording start point from devices connected to your camcorder. 54 - [RECORD SOUND] If you set to [ON] ( ), you can add special effects to a picture during tape recording only. b Notes • Effects added to...

Operating Guide
Page 55
...Step Guide" on the supplied CD-ROM for details on selecting menu items. VAR.SPD PB (Various speed playback) You can also connect the camcorder to a PictBridge compatible printer using this to view pictures on a "Memory Stick Duo" on the CAMERA-TAPE lamp. You can...HDV/DV Interface (i.LINK) cannot be suspended in various modes while viewing movies. 1 Touch the following buttons during playback. When you connect the camcorder to a PictBridge compatible printer to view the demonstration about 10 minutes). - You may appear distorted during the demonstration (The demonstration starts...
...Step Guide" on the supplied CD-ROM for details on selecting menu items. VAR.SPD PB (Various speed playback) You can also connect the camcorder to a PictBridge compatible printer using this to view pictures on a "Memory Stick Duo" on the CAMERA-TAPE lamp. You can...HDV/DV Interface (i.LINK) cannot be suspended in various modes while viewing movies. 1 Touch the following buttons during playback. When you connect the camcorder to a PictBridge compatible printer to view the demonstration about 10 minutes). - You may appear distorted during the demonstration (The demonstration starts...
Operating Guide
Page 56
...only the portions recorded in parentheses appear when the items are not available in HDV format. When your camcorder is recorded or played back. You can also select this when connecting the camcorder to the reverse direction are selected. END SEARCH EXEC The most recently recorded picture is played back ... the signals between HDV and DV format automatically when playing back a tape. You can also select this when connecting the camcorder to input/output from the HDV/DV Interface (i.LINK). EDIT/PLAY menu (Continued) - Reverse playback • Playing back slowly to the reverse...
...only the portions recorded in parentheses appear when the items are not available in HDV format. When your camcorder is recorded or played back. You can also select this when connecting the camcorder to the reverse direction are selected. END SEARCH EXEC The most recently recorded picture is played back ... the signals between HDV and DV format automatically when playing back a tape. You can also select this when connecting the camcorder to input/output from the HDV/DV Interface (i.LINK). EDIT/PLAY menu (Continued) - Reverse playback • Playing back slowly to the reverse...

Operating Guide
Page 57
... a DV signal is ; Refer also to the DV format and output; b Notes • When recording in the 16-bit mode (1 stereo sound with your camcorder. • When [AUTO] is automatically recorded in the full screen for playback (p. 59). a DV signal is output as it is output as follows: - ...at [AUTO], an HDV signal is converted to the TV connected when recording. Otherwise, the connected device, such as a VCR, may not be able to recognize the video signal from your TV. Using the Menu b Notes • ...
... a DV signal is ; Refer also to the DV format and output; b Notes • When recording in the 16-bit mode (1 stereo sound with your camcorder. • When [AUTO] is automatically recorded in the full screen for playback (p. 59). a DV signal is output as it is output as follows: - ...at [AUTO], an HDV signal is converted to the TV connected when recording. Otherwise, the connected device, such as a VCR, may not be able to recognize the video signal from your TV. Using the Menu b Notes • ...

Operating Guide
Page 58
...right. The recording sound level increases as the bar goes to adjust the balance of the viewfinder. b Notes • When you connect your camcorder to outside power sources, [BRIGHT] is automatically selected for the setting. • When you select [BRIGHT], battery life is slightly...appears when the recording sound level is output at the default setting. BRIGHT Brightens the viewfinder screen. b Notes • When you connect your camcorder to outside power sources, [BRIGHT] is automatically selected for the setting. • When you select [BRIGHT], battery life is ...
...right. The recording sound level increases as the bar goes to adjust the balance of the viewfinder. b Notes • When you connect your camcorder to outside power sources, [BRIGHT] is automatically selected for the setting. • When you select [BRIGHT], battery life is slightly...appears when the recording sound level is output at the default setting. BRIGHT Brightens the viewfinder screen. b Notes • When you connect your camcorder to outside power sources, [BRIGHT] is automatically selected for the setting. • When you select [BRIGHT], battery life is ...


