Operating Guide
Page 1
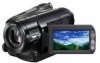
3-278-987-12(1) Digital HD Video Camera Recorder Operating Guide HDR-HC9 Enjoying pictures with 10 high definition quality Getting Started 12 Recording/ Playback 21 Using the Menu 39 Dubbing/Editing 64 Using a Computer 73 Troubleshooting 78 Additional Information 90 Quick Reference 103 Spanish Quick Guide/ Guía rápida en español 115 © 2008 Sony Corporation
3-278-987-12(1) Digital HD Video Camera Recorder Operating Guide HDR-HC9 Enjoying pictures with 10 high definition quality Getting Started 12 Recording/ Playback 21 Using the Menu 39 Dubbing/Editing 64 Using a Computer 73 Troubleshooting 78 Additional Information 90 Quick Reference 103 Spanish Quick Guide/ Guía rápida en español 115 © 2008 Sony Corporation
Operating Guide
Page 7
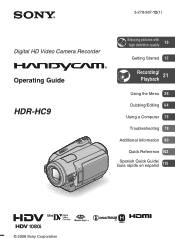
... other materials may be copyrighted. Check the contents of a Carl Zeiss lens. About the Carl Zeiss lens Your camcorder is T -coated to playing them back on this manual for video cameras and offers a quality typical of tapes by Carl Zeiss, in the HDV format on DV format video... on other devices. Also, the lens for your camcorder is equipped with a Carl Zeiss lens, which was developed jointly by playing them back on other devices You cannot play back a tape recorded in Germany, and Sony Corporation, and produces superior images. It adopts the MTF measurement system for...
... other materials may be copyrighted. Check the contents of a Carl Zeiss lens. About the Carl Zeiss lens Your camcorder is T -coated to playing them back on this manual for video cameras and offers a quality typical of tapes by Carl Zeiss, in the HDV format on DV format video... on other devices. Also, the lens for your camcorder is equipped with a Carl Zeiss lens, which was developed jointly by playing them back on other devices You cannot play back a tape recorded in Germany, and Sony Corporation, and produces superior images. It adopts the MTF measurement system for...
Operating Guide
Page 8
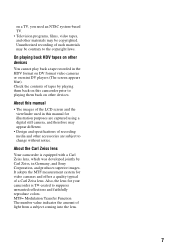
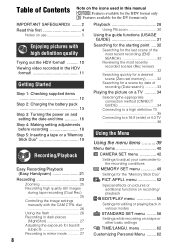
...4: Making setting adjustments before recording 18 Step 5: Inserting a tape or a "Memory Stick Duo 19 Recording/Playback Easy Recording/Playback (Easy Handycam 21 Recording 23 Zooming 25 Recording high quality still images during tape recording (Dual Rec 25 Controlling the image settings manually with the CAM CTRL... to a 16:9 (wide) or 4:3 TV 36 Using the Menu Using the menu items ..........39 Menu items 40 CAMERA SET menu 42 Settings to adjust your camcorder to the recording conditions MEMORY SET menu 49 Settings for editing or playing back in various modes STANDARD SET menu ........ ...
...4: Making setting adjustments before recording 18 Step 5: Inserting a tape or a "Memory Stick Duo 19 Recording/Playback Easy Recording/Playback (Easy Handycam 21 Recording 23 Zooming 25 Recording high quality still images during tape recording (Dual Rec 25 Controlling the image settings manually with the CAM CTRL... to a 16:9 (wide) or 4:3 TV 36 Using the Menu Using the menu items ..........39 Menu items 40 CAMERA SET menu 42 Settings to adjust your camcorder to the recording conditions MEMORY SET menu 49 Settings for editing or playing back in various modes STANDARD SET menu ........ ...
Operating Guide
Page 16
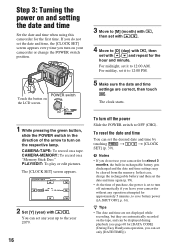
... switch in rechargeable battery gets discharged and the date and time settings may be displayed during playback (see page 60 for [DATA CODE] (During Easy Handycam operation, you do not set only [DATE/TIME])). The [CLOCK SET] screen appears. CLOCK SET -:--:-- POWER switch Touch the button on the LCD ... (p. 39). Step 3: Turning the power on and setting the date and time Set the date and time when using this camcorder for the hour and minute. You can be cleared from the memory. CAMERA-MEMORY: To record on a tape. b Notes • If you can set with / . 4 Move to 12:00...
... switch in rechargeable battery gets discharged and the date and time settings may be displayed during playback (see page 60 for [DATA CODE] (During Easy Handycam operation, you do not set only [DATE/TIME])). The [CLOCK SET] screen appears. CLOCK SET -:--:-- POWER switch Touch the button on the LCD ... (p. 39). Step 3: Turning the power on and setting the date and time Set the date and time when using this camcorder for the hour and minute. You can be cleared from the memory. CAMERA-MEMORY: To record on a tape. b Notes • If you can set with / . 4 Move to 12:00...

Operating Guide
Page 17
• The lens cover opens automatically when the POWER switch is set to show messages in a specified language. Changing the language setting You can change the on-screen displays to CAMERA-TAPE or CAMERA-MEMORY. • If the buttons on the touch panel do not work correctly, adjust the touch panel (CALIBRATION) (p. 98). Touch t [MENU] t (TIME/ LANGU.) t [LANGUAGE], then select the desired language. Getting Started 17
• The lens cover opens automatically when the POWER switch is set to show messages in a specified language. Changing the language setting You can change the on-screen displays to CAMERA-TAPE or CAMERA-MEMORY. • If the buttons on the touch panel do not work correctly, adjust the touch panel (CALIBRATION) (p. 98). Touch t [MENU] t (TIME/ LANGU.) t [LANGUAGE], then select the desired language. Getting Started 17

Operating Guide
Page 21
to turn on the CAMERA-TAPE lamp. 2 Press EASY C. EASY appears on the screen A. 3 Press START/STOP F or B to record. Still images 1 Slide the POWER switch E to adjust the focus. * ... C. D F B C Movies 1 Slide the POWER switch E to OFF (CHG), slide it while A pressing the green button. Recording/Playback Recording/Playback Easy Recording/Playback (Easy Handycam) With this Easy Handycam operation, most of the camera settings are recorded in [FINE] quality on a "Memory Stick Duo." Continued , 21 The screen font size increases for easy viewing.
to turn on the CAMERA-TAPE lamp. 2 Press EASY C. EASY appears on the screen A. 3 Press START/STOP F or B to record. Still images 1 Slide the POWER switch E to adjust the focus. * ... C. D F B C Movies 1 Slide the POWER switch E to OFF (CHG), slide it while A pressing the green button. Recording/Playback Recording/Playback Easy Recording/Playback (Easy Handycam) With this Easy Handycam operation, most of the camera settings are recorded in [FINE] quality on a "Memory Stick Duo." Continued , 21 The screen font size increases for easy viewing.

Operating Guide
Page 23
... 60min REC 60min GUIDE P-MENU GUIDE P-MENU [STBY] [REC] To stop recording, press START/STOP A (or B) again. z Tips • The pictures are recorded on the CAMERA-TAPE lamp. To record high quality still images during tape recording (Dual Rec) See page 25 for details. PHOTO POWER switch START/STOP B START/STOP...
... 60min REC 60min GUIDE P-MENU GUIDE P-MENU [STBY] [REC] To stop recording, press START/STOP A (or B) again. z Tips • The pictures are recorded on the CAMERA-TAPE lamp. To record high quality still images during tape recording (Dual Rec) See page 25 for details. PHOTO POWER switch START/STOP B START/STOP...

Operating Guide
Page 24
... "Memory Stick Duo." z Tips • See page 49 for the image quality, image size and the number of the arrow repeatedly to turn on the CAMERA-MEMORY lamp. Recording (Continued) Recording still images Still images are recorded on a "Memory Stick Duo" Touch . To delete the picture, touch t [YES]. Slide the POWER...
... "Memory Stick Duo." z Tips • See page 49 for the image quality, image size and the number of the arrow repeatedly to turn on the CAMERA-MEMORY lamp. Recording (Continued) Recording still images Still images are recorded on a "Memory Stick Duo" Touch . To delete the picture, touch t [YES]. Slide the POWER...
Operating Guide
Page 25
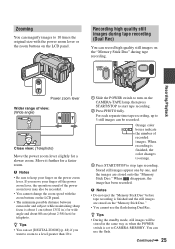
... telephoto. If you want to zoom to a level greater than 10 ×. 1 Slide the POWER switch to CAMERA-MEMORY. Stored still images appear one by one, and the images are stored on the CAMERA-TAPE lamp, then press START/STOP to keep your finger off the power zoom lever, the operation sound... to orange. 3 Press START/STOP to 10 times the original size with the zoom buttons on the LCD panel. • The minimum possible distance between camcorder and subject while maintaining sharp focus is about 1 cm (about 2 5/8 feet) for a slower zoom.
... telephoto. If you want to zoom to a level greater than 10 ×. 1 Slide the POWER switch to CAMERA-MEMORY. Stored still images appear one by one, and the images are stored on the CAMERA-TAPE lamp, then press START/STOP to keep your finger off the power zoom lever, the operation sound... to orange. 3 Press START/STOP to 10 times the original size with the zoom buttons on the LCD panel. • The minimum possible distance between camcorder and subject while maintaining sharp focus is about 1 cm (about 2 5/8 feet) for a slower zoom.
Operating Guide
Page 27
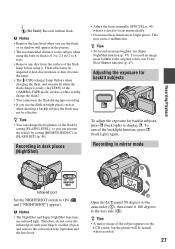
...• Adjust the focus manually ([FOCUS], p. 45) when it is 0.3 to 2.5 m (1 to 8 feet). • Remove any dust from the surface of the CAMERA-TAPE mode, it 180 degrees to the original colors, use infrared light. To record an image more faithful to the lens side (2). To cancel the...-image of the flash by setting [FLASH LEVEL], or you use the flash in [FLASH SET] (p. 46). Open the LCD panel 90 degrees to the camcorder (1), then rotate it takes a while to focus automatically. • Do not use Super NightShot function (p. 47). Recording/Playback r (No flash): Records without ...
...• Adjust the focus manually ([FOCUS], p. 45) when it is 0.3 to 2.5 m (1 to 8 feet). • Remove any dust from the surface of the CAMERA-TAPE mode, it 180 degrees to the original colors, use infrared light. To record an image more faithful to the lens side (2). To cancel the...-image of the flash by setting [FLASH LEVEL], or you use the flash in [FLASH SET] (p. 46). Open the LCD panel 90 degrees to the camcorder (1), then rotate it takes a while to focus automatically. • Do not use Super NightShot function (p. 47). Recording/Playback r (No flash): Records without ...

Operating Guide
Page 32
... for about 2 seconds of the most recently recorded scenes (Rec review) You can also select [END SEARCH] from the menu. Then, your camcorder is a blank section between recorded sections on the PLAY/EDIT lamp, then operate the Remote Commander (p. 28). mREW PLAY STOP DISPLAY ZERO SET MEMORY... 32 Make sure that the CAMERA-TAPE lamp lights up , select the [END SEARCH] short-cut in Personal Menu (p. 39). b Notes • END SEARCH will not work...
... for about 2 seconds of the most recently recorded scenes (Rec review) You can also select [END SEARCH] from the menu. Then, your camcorder is a blank section between recorded sections on the PLAY/EDIT lamp, then operate the Remote Commander (p. 28). mREW PLAY STOP DISPLAY ZERO SET MEMORY... 32 Make sure that the CAMERA-TAPE lamp lights up , select the [END SEARCH] short-cut in Personal Menu (p. 39). b Notes • END SEARCH will not work...

Operating Guide
Page 39
x To use menu items during Easy Handycam operation is the same as that are added. Touch / to the previous screen. If you like (p. 62). 1 Touch . 6 0 min STBY 0:00:00 MENU DISP GUIDE 1/3 ... to return to select the item, then touch (The process in step 3 is not displayed during Easy Handycam operation. Touch [MENU] to Personal Menu. 1 Touch t [MENU]. 2 Select the desired menu. CAMERA-TAPE lamp: settings on a tape CAMERA-MEMORY lamp: Duo" settings on the screen, touch / until the item is not displayed on a "Memory...
x To use menu items during Easy Handycam operation is the same as that are added. Touch / to the previous screen. If you like (p. 62). 1 Touch . 6 0 min STBY 0:00:00 MENU DISP GUIDE 1/3 ... to return to select the item, then touch (The process in step 3 is not displayed during Easy Handycam operation. Touch [MENU] to Personal Menu. 1 Touch t [MENU]. 2 Select the desired menu. CAMERA-TAPE lamp: settings on a tape CAMERA-MEMORY lamp: Duo" settings on the screen, touch / until the item is not displayed on a "Memory...
Operating Guide
Page 40
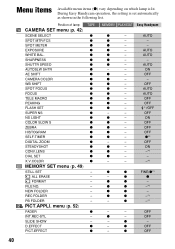
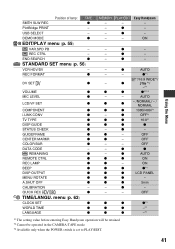
... OFF ON -*1 - -*1 z z FINE/z*1 - z z -*1 - menu (p. 52) FADER INT.REC-STL SLIDE SHOW D.EFFECT PICT.EFFECT TAPE z z z z z z z z z z z z z z z z z z z z z z z z z z z z - - z - z - z - z - - - z - z z -*1 z z - z - z - z OFF OFF - z z MEMORY PLAY/EDIT Easy Handycam z - z - AUTO AUTO - z - Position of lamp: CAMERA SET menu (p. 42) SCENE SELECT SPOT MTR·FCS SPOT METER EXPOSURE WHITE BAL. z - z - - - z - - - z -*1 - - z - z - Menu items Available menu items (z) vary depending...
... OFF ON -*1 - -*1 z z FINE/z*1 - z z -*1 - menu (p. 52) FADER INT.REC-STL SLIDE SHOW D.EFFECT PICT.EFFECT TAPE z z z z z z z z z z z z z z z z z z z z z z z z z z z z - - z - z - z - z - - - z - z z -*1 z z - z - z - z OFF OFF - z z MEMORY PLAY/EDIT Easy Handycam z - z - AUTO AUTO - z - Position of lamp: CAMERA SET menu (p. 42) SCENE SELECT SPOT MTR·FCS SPOT METER EXPOSURE WHITE BAL. z - z - - - z - - - z -*1 - - z - z - Menu items Available menu items (z) vary depending...
Operating Guide
Page 41
...AUTO - - AUTO z z - /NORMAL/ - / NORMAL z z 1080i/480i*1 - z z - OFF z z z*1 z z -*1 z z -*1 *1 The setting value before entering Easy Handycam operation will be retained. *2 Cannot be operated in the CAMERA-TAPE mode. *3 Available only when the POWER switch is set to PLAY/... AUTO z z ON z - z z 5min - z - - - DEMO MODE z EDIT/PLAY menu (p. 55) VAR.SPD PB - Easy Handycam - - - z - - OFF z - USB SELECT - menu (p. 62) CLOCK SET z WORLD TIME z LANGUAGE z MEMORY - - - - z z - z OFF*1 z z 16:9*1 z z z - z - OFF -...
...AUTO - - AUTO z z - /NORMAL/ - / NORMAL z z 1080i/480i*1 - z z - OFF z z z*1 z z -*1 z z -*1 *1 The setting value before entering Easy Handycam operation will be retained. *2 Cannot be operated in the CAMERA-TAPE mode. *3 Available only when the POWER switch is set to PLAY/... AUTO z z ON z - z z 5min - z - - - DEMO MODE z EDIT/PLAY menu (p. 55) VAR.SPD PB - Easy Handycam - - - z - - OFF z - USB SELECT - menu (p. 62) CLOCK SET z WORLD TIME z LANGUAGE z MEMORY - - - - z z - z OFF*1 z z 16:9*1 z z z - z - OFF -...

Operating Guide
Page 42
...on selecting menu items. SCENE SELECT You can record pictures effectively in parentheses appear when the items are selected. CAMERA SET menu Settings to adjust your camcorder from focusing on glass or metal mesh in very bright, white conditions, such as at a beach in twilight... are lit by strong light. CANDLE ( ) Select to shoot distant subjects clearly. SNOW** ( ) Select this when shooting in windows between the camcorder and the subject. LANDSCAPE* ( ) Select to maintain the dim atmosphere of fireworks. TWILIGHT* ( ) Select to prevent people's faces from appearing ...
...on selecting menu items. SCENE SELECT You can record pictures effectively in parentheses appear when the items are selected. CAMERA SET menu Settings to adjust your camcorder from focusing on glass or metal mesh in very bright, white conditions, such as at a beach in twilight... are lit by strong light. CANDLE ( ) Select to shoot distant subjects clearly. SNOW** ( ) Select this when shooting in windows between the camcorder and the subject. LANDSCAPE* ( ) Select to maintain the dim atmosphere of fireworks. TWILIGHT* ( ) Select to prevent people's faces from appearing ...

Operating Guide
Page 44
... selected, if keeps flashing after touching , set [WHITE BAL.] to [AUTO]. • If you set [WHITE BAL.], [SCENE SELECT] returns to CAMERA-TAPE, and between 1/4 and 1/500 second when the POWER switch is appropriately adjusted for the following recording conditions: - Outdoors - Indoors - Depending on ...set. • When [ONE PUSH] was selected, or taken your camcorder outdoors after inside use (or vice versa), select [AUTO] and aim your camcorder at a nearby white object for about 10 seconds for your camcorder outdoors from inside the house, or vice versa, you select [ONE ...
... selected, if keeps flashing after touching , set [WHITE BAL.] to [AUTO]. • If you set [WHITE BAL.], [SCENE SELECT] returns to CAMERA-TAPE, and between 1/4 and 1/500 second when the POWER switch is appropriately adjusted for the following recording conditions: - Outdoors - Indoors - Depending on ...set. • When [ONE PUSH] was selected, or taken your camcorder outdoors after inside use (or vice versa), select [AUTO] and aim your camcorder at a nearby white object for about 10 seconds for your camcorder outdoors from inside the house, or vice versa, you select [ONE ...

Operating Guide
Page 45
... can also adjust the setting manually using (dark)/ (bright). AUTOSLW SHTR (Auto slow shutter) When you want to the desired setting using / . CAMERA COLOR You can adjust the focus manually. z Tips • When the white balance is set to a lower value, pictures appear bluish, and when... set to 1/30 second in dark places. appears when [CAMERA COLOR] is anything other than the default setting. Decreases color intensity Increases color intensity WB SHIFT (White Balance Shift) You can adjust the ...
... can also adjust the setting manually using (dark)/ (bright). AUTOSLW SHTR (Auto slow shutter) When you want to the desired setting using / . CAMERA COLOR You can adjust the focus manually. z Tips • When the white balance is set to a lower value, pictures appear bluish, and when... set to 1/30 second in dark places. appears when [CAMERA COLOR] is anything other than the default setting. Decreases color intensity Increases color intensity WB SHIFT (White Balance Shift) You can adjust the ...
Operating Guide
Page 46
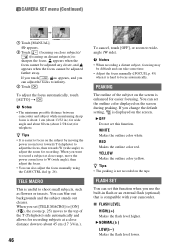
...You can set this function when you can take some time. • Adjust the focus manually ([FOCUS], p. 45) when it is compatible with your camcorder. x FLASH LEVEL HIGH( ) Makes the flash level higher. b Notes • When recording a distant subject, focusing may be adjusted farther away. ... B NORMAL( ) LOW( ) Makes the flash level lower. z Tips • The peaking is useful to shoot small subjects, such as flowers or insects. CAMERA SET menu (Continued) 1 Touch [MANUAL]. 9 appears. 2 Touch (focusing on close distance down to about 45 cm (17 3/4 in.). 46 To cancel, ...
...You can set this function when you can take some time. • Adjust the focus manually ([FOCUS], p. 45) when it is compatible with your camcorder. x FLASH LEVEL HIGH( ) Makes the flash level higher. b Notes • When recording a distant subject, focusing may be adjusted farther away. ... B NORMAL( ) LOW( ) Makes the flash level lower. z Tips • The peaking is useful to shoot small subjects, such as flowers or insects. CAMERA SET menu (Continued) 1 Touch [MANUAL]. 9 appears. 2 Touch (focusing on close distance down to about 45 cm (17 3/4 in.). 46 To cancel, ...

Operating Guide
Page 48
..., touch [RESET]. Note that , up to 20 × zoom is performed digitally. STEADYSHOT You can adjust the [EXPOSURE] or [AE SHIFT] checking the [HISTOGRAM] window. CAMERA SET menu (Continued) 100 The zebra pattern appears at a screen brightness level of the screen where brightness is about 100 IRE or higher may appear...
..., touch [RESET]. Note that , up to 20 × zoom is performed digitally. STEADYSHOT You can adjust the [EXPOSURE] or [AE SHIFT] checking the [HISTOGRAM] window. CAMERA SET menu (Continued) 100 The zebra pattern appears at a screen brightness level of the screen where brightness is about 100 IRE or higher may appear...

Operating Guide
Page 49
...Color-compliant TV. • If the movie recorded with B. DIAL SET You can select a menu item to assign to [FINE] during Easy Handycam operation. The indicators in parentheses appear when the items are marked with this function [ON] is played back on selecting menu items. STILL SET ... A movie is being recorded. Using the Menu CONV.LENS When using an optional conversion lens, use this function to record using the optimum compensation for camera shake for the "Memory Stick Duo" The default settings are selected. TELE CONV. ( ) Select this to [ON] when: - X.V.COLOR When ...
...Color-compliant TV. • If the movie recorded with B. DIAL SET You can select a menu item to assign to [FINE] during Easy Handycam operation. The indicators in parentheses appear when the items are marked with this function [ON] is played back on selecting menu items. STILL SET ... A movie is being recorded. Using the Menu CONV.LENS When using an optional conversion lens, use this function to record using the optimum compensation for camera shake for the "Memory Stick Duo" The default settings are selected. TELE CONV. ( ) Select this to [ON] when: - X.V.COLOR When ...


