Operating Guide
Page 2
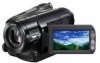
.... This is intended to alert the user to them. Overloading Do not overload wall outlets, extension cords or convenience receptacles beyond their capacity, since this manual for future reference. This symbol is intended to alert the user to persons. If you are not sure of the type of the polarized plug...
.... This is intended to alert the user to them. Overloading Do not overload wall outlets, extension cords or convenience receptacles beyond their capacity, since this manual for future reference. This symbol is intended to alert the user to persons. If you are not sure of the type of the polarized plug...
Operating Guide
Page 4
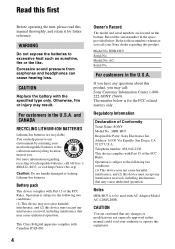
... matters only. This Class B digital apparatus complies with Part 15 of Conformity Trade Name: SONY Model No.: HDR-HC9 Responsible Party: Sony Electronics Inc. Address: 16530 Via Esprillo, San Diego, CA 92127 U.S.A. For customers in this manual could void your Sony dealer regarding recycling of the FCC Rules. Read this first Before operating the unit, please...
... matters only. This Class B digital apparatus complies with Part 15 of Conformity Trade Name: SONY Model No.: HDR-HC9 Responsible Party: Sony Electronics Inc. Address: 16530 Via Esprillo, San Diego, CA 92127 U.S.A. For customers in this manual could void your Sony dealer regarding recycling of the FCC Rules. Read this first Before operating the unit, please...
Operating Guide
Page 5
...experienced radio/TV technician for a Class B digital device, pursuant to Part 15 of the FCC Rules. "Operating Guide" (This manual) - "First Step Guide" for a digital device pursuant to provide reasonable protection against harmful interference in a residential installation. This equipment...ca.gov/hazardouswaste/perchlorate Perchlorate Material: Lithium battery contains perchlorate. special handling may cause harmful interference to which can use Your camcorder is not compatible with "Memory Stick PRO" compatible equipment. Continued , 5 However, there is encouraged to try to ...
...experienced radio/TV technician for a Class B digital device, pursuant to Part 15 of the FCC Rules. "Operating Guide" (This manual) - "First Step Guide" for a digital device pursuant to provide reasonable protection against harmful interference in a residential installation. This equipment...ca.gov/hazardouswaste/perchlorate Perchlorate Material: Lithium battery contains perchlorate. special handling may cause harmful interference to which can use Your camcorder is not compatible with "Memory Stick PRO" compatible equipment. Continued , 5 However, there is encouraged to try to ...
Operating Guide
Page 7
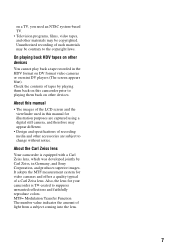
MTF= Modulation Transfer Function The number value indicates the amount of tapes by Carl Zeiss, in Germany, and Sony Corporation, and produces superior images. on a TV, you need an NTSC system-based TV. • Television programs, films, video tapes, and other materials ... On playing back HDV tapes on mini DV players (The screen appears blue). About the Carl Zeiss lens Your camcorder is T -coated to playing them back on other devices. About this manual for illustration purposes are subject to change without notice. Also, the lens for video cameras and offers a quality typical...
MTF= Modulation Transfer Function The number value indicates the amount of tapes by Carl Zeiss, in Germany, and Sony Corporation, and produces superior images. on a TV, you need an NTSC system-based TV. • Television programs, films, video tapes, and other materials ... On playing back HDV tapes on mini DV players (The screen appears blue). About the Carl Zeiss lens Your camcorder is T -coated to playing them back on other devices. About this manual for illustration purposes are subject to change without notice. Also, the lens for video cameras and offers a quality typical...
Operating Guide
Page 8
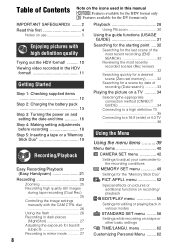
... a tape or a "Memory Stick Duo 19 Recording/Playback Easy Recording/Playback (Easy Handycam 21 Recording 23 Zooming 25 Recording high quality still images during tape recording (Dual Rec 25 Controlling the image settings manually with the CAM CTRL dial 26 Using the flash 26 Recording in dark places (NightShot...:9 (wide) or 4:3 TV 36 Using the Menu Using the menu items ..........39 Menu items 40 CAMERA SET menu 42 Settings to adjust your camcorder to the recording conditions MEMORY SET menu 49 Settings for a scene by date of recording (Date search 33 Playing the picture on a tape or...
... a tape or a "Memory Stick Duo 19 Recording/Playback Easy Recording/Playback (Easy Handycam 21 Recording 23 Zooming 25 Recording high quality still images during tape recording (Dual Rec 25 Controlling the image settings manually with the CAM CTRL dial 26 Using the flash 26 Recording in dark places (NightShot...:9 (wide) or 4:3 TV 36 Using the Menu Using the menu items ..........39 Menu items 40 CAMERA SET menu 42 Settings to adjust your camcorder to the recording conditions MEMORY SET menu 49 Settings for a scene by date of recording (Date search 33 Playing the picture on a tape or...
Operating Guide
Page 12
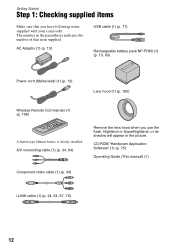
CD-ROM "Handycam Application Software" (1) (p. 75) Operating Guide (This manual) (1) Component video cable (1) (p. 34) i.LINK cable (1) (p. 34, 64, 67, 75) 12 Getting Started Step 1: Checking supplied items Make sure that item supplied. A/V connecting... the flash, Nightshot or SuperNightshot, or its shadow will appear in the parentheses indicates the number of that you have following items supplied with your camcorder. AC Adaptor (1) (p. 13) USB cable (1) (p. 71) Rechargeable battery pack NP-FH60 (1) (p. 13, 93) Power cord (Mains lead) (1) (p. 13) Lens hood (1) (p. 105) Wireless...
CD-ROM "Handycam Application Software" (1) (p. 75) Operating Guide (This manual) (1) Component video cable (1) (p. 34) i.LINK cable (1) (p. 34, 64, 67, 75) 12 Getting Started Step 1: Checking supplied items Make sure that item supplied. A/V connecting... the flash, Nightshot or SuperNightshot, or its shadow will appear in the parentheses indicates the number of that you have following items supplied with your camcorder. AC Adaptor (1) (p. 13) USB cable (1) (p. 71) Rechargeable battery pack NP-FH60 (1) (p. 13, 93) Power cord (Mains lead) (1) (p. 13) Lens hood (1) (p. 105) Wireless...

Operating Guide
Page 22
... to the images. A C Still images Touch t / to start playback. x Adjustable menu settings during Easy Handycam are attempted. • . (back light) button (p. 27) • Pressing and holding DISPLAY/BATT INFO button (p. 18) • CAM CTRL dial (p. 26) • MANUAL button (p. 26) 22 See page 39 for details on the PLAY/EDIT lamp. Movies...
... to the images. A C Still images Touch t / to start playback. x Adjustable menu settings during Easy Handycam are attempted. • . (back light) button (p. 27) • Pressing and holding DISPLAY/BATT INFO button (p. 18) • CAM CTRL dial (p. 26) • MANUAL button (p. 26) 22 See page 39 for details on the PLAY/EDIT lamp. Movies...
Operating Guide
Page 26
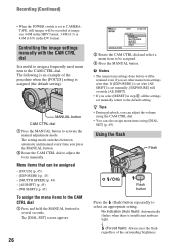
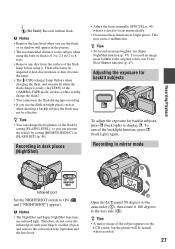
... items using [DIAL SET] (p. 49). No indication (Auto flash): Automatically flashes when there is assigned (the default setting). Controlling the image settings manually with the CAM CTRL dial It is useful to assign a frequently used menu item to CAMERATAPE, still images will override [AE SHIFT]. • ...If you can adjust the volume using the CAM CTRL dial. • You can be assigned. 3 Press the MANUAL button. Recording (Continued) • When the POWER switch is set to the CAM CTRL dial. The [DIAL SET] screen appears. 26 6 0 min ...
... items using [DIAL SET] (p. 49). No indication (Auto flash): Automatically flashes when there is assigned (the default setting). Controlling the image settings manually with the CAM CTRL dial It is useful to assign a frequently used menu item to CAMERATAPE, still images will override [AE SHIFT]. • ...If you can adjust the volume using the CAM CTRL dial. • You can be assigned. 3 Press the MANUAL button. Recording (Continued) • When the POWER switch is set to the CAM CTRL dial. The [DIAL SET] screen appears. 26 6 0 min ...
Operating Guide
Page 27
... cannot use the flash during tape recording. • If you use these functions in dark places (NightShot) • Adjust the focus manually ([FOCUS], p. 45) when it takes a while to the camcorder (1), then rotate it . z Tips • To record an image brighter, use infrared light. b Notes • The NightShot and Super NightShot functions...
... cannot use the flash during tape recording. • If you use these functions in dark places (NightShot) • Adjust the focus manually ([FOCUS], p. 45) when it takes a while to the camcorder (1), then rotate it . z Tips • To record an image brighter, use infrared light. b Notes • The NightShot and Super NightShot functions...
Operating Guide
Page 28
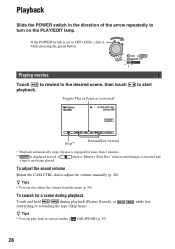
... CAM CTRL dial to OFF (CHG), slide it while pressing the green button. To search for more than 3 minutes. ** is set to adjust the volume manually (p. 26). Playback Slide the POWER switch in various modes ([ VAR.SPD PB], p. 55). 28 If the POWER switch is displayed instead of the arrow repeatedly...
... CAM CTRL dial to OFF (CHG), slide it while pressing the green button. To search for more than 3 minutes. ** is set to adjust the volume manually (p. 26). Playback Slide the POWER switch in various modes ([ VAR.SPD PB], p. 55). 28 If the POWER switch is displayed instead of the arrow repeatedly...

Operating Guide
Page 34
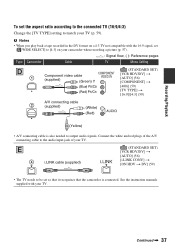
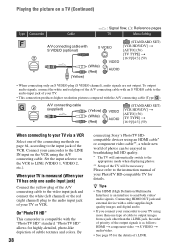
...definition) images regardless of the connection. • When recording, set automatically. 1 Touch [GUIDE]. 2 Touch [CNNECT GUIDE]. 3 Connect your camcorder were connected with an i.LINK cable. • Pictures recorded in the direction of the arrow and connect the cable. The TV may need to ... of TV is connected and connectors used. Refer also to the instruction manuals supplied with / , then touch . 3 Check the output setting details, then touch . 4 Connect your camcorder is changed after the TV and your camcorder and TV according to the picture on an x.v.Color-compliant TV (p. 49...
...definition) images regardless of the connection. • When recording, set automatically. 1 Touch [GUIDE]. 2 Touch [CNNECT GUIDE]. 3 Connect your camcorder were connected with an i.LINK cable. • Pictures recorded in the direction of the arrow and connect the cable. The TV may need to ... of TV is connected and connectors used. Refer also to the instruction manuals supplied with / , then touch . 3 Check the output setting details, then touch . 4 Connect your camcorder is changed after the TV and your camcorder and TV according to the picture on an x.v.Color-compliant TV (p. 49...
Operating Guide
Page 36
... format (SD image quality) and played back. • A DV formatted picture is connected. See the instruction manuals supplied with HDV1080i specification. Do not connect the HDMI OUT jack of your camcorder and HDMI OUT jack of your TV. • If your TV is (SD image quality). C 4 i....) (STANDARD SET) [VCR HDV/DV] t [AUTO] (56) [i.LINK CONV] t [OFF] (59) • Your TV needs to the camcorder via i.LINK cable (p. 67) cannot be set so that the camcorder is played back as illustrated in the pictures. • DV format pictures input to have an i.LINK jack compatible with...
... format (SD image quality) and played back. • A DV formatted picture is connected. See the instruction manuals supplied with HDV1080i specification. Do not connect the HDMI OUT jack of your camcorder and HDMI OUT jack of your TV. • If your TV is (SD image quality). C 4 i....) (STANDARD SET) [VCR HDV/DV] t [AUTO] (56) [i.LINK CONV] t [OFF] (59) • Your TV needs to the camcorder via i.LINK cable (p. 67) cannot be set so that the camcorder is played back as illustrated in the pictures. • DV format pictures input to have an i.LINK jack compatible with...
Operating Guide
Page 37
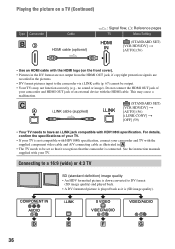
...) • A/V connecting cable is connected. See the instruction manuals supplied with the 16:9 signal, set [ WIDE SELECT] to the audio input jack of the A/V connecting cable to [4:3] on a 4:3 TV not compatible with your TV. Recording/Playback To set so that it recognizes that the camcorder is also needed to match your TV.
...) • A/V connecting cable is connected. See the instruction manuals supplied with the 16:9 signal, set [ WIDE SELECT] to the audio input jack of the A/V connecting cable to [4:3] on a 4:3 TV not compatible with your TV. Recording/Playback To set so that it recognizes that the camcorder is also needed to match your TV.
Operating Guide
Page 38
...the input jack of the VCR. Please refer to the instruction manual of your PhotoTV HD-compatible TV for highly-detailed, photo-like depiction of subtle textures and colors. On"PhotoTV HD" This camcorder is monaural (When your TV has only one audio input jack... to the audio input jack of your TV. • This connection produces higher resolution pictures compared with the "PhotoTV HD" standard. By 38 connecting Sony's PhotoTV HDcompatible devices using the A/V connecting cable. z Tips • The HDMI (High Definition Multimedia Interface) is as follows: HDMI t component video...
...the input jack of the VCR. Please refer to the instruction manual of your PhotoTV HD-compatible TV for highly-detailed, photo-like depiction of subtle textures and colors. On"PhotoTV HD" This camcorder is monaural (When your TV has only one audio input jack... to the audio input jack of your TV. • This connection produces higher resolution pictures compared with the "PhotoTV HD" standard. By 38 connecting Sony's PhotoTV HDcompatible devices using the A/V connecting cable. z Tips • The HDMI (High Definition Multimedia Interface) is as follows: HDMI t component video...
Operating Guide
Page 43
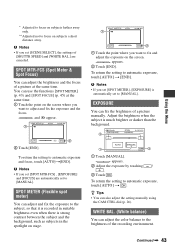
...to automatic exposure, touch [AUTO] t [END]. Adjust the brightness when the subject is much brighter or darker than the background. 2 1 3 1 Touch [MANUAL]. b Notes • If you want to fix and adjust the exposure on stage. 1 2 1 Touch the point where you set to automatic exposure, touch ... to automatic exposure and focus, touch [AUTO]t[END]. appears. 2 Adjust the exposure by touching / . 3 Touch . To return the setting to [MANUAL]. z Tips • You can adjust the brightness and the focus of [SHUTTR SPEED] and [WHITE BAL.] are automatically set [SCENE SELECT], the ...
...to automatic exposure, touch [AUTO] t [END]. Adjust the brightness when the subject is much brighter or darker than the background. 2 1 3 1 Touch [MANUAL]. b Notes • If you want to fix and adjust the exposure on stage. 1 2 1 Touch the point where you set to automatic exposure, touch ... to automatic exposure and focus, touch [AUTO]t[END]. appears. 2 Adjust the exposure by touching / . 3 Touch . To return the setting to [MANUAL]. z Tips • You can adjust the brightness and the focus of [SHUTTR SPEED] and [WHITE BAL.] are automatically set [SCENE SELECT], the ...

Operating Guide
Page 44
... the shutter speed using / . You can manually adjust and fix the shutter speed for better color balance adjustment. • When the white balance has been set . • When [ONE PUSH] was selected, or taken your camcorder at a nearby white object for about 10 seconds for your convenience... sunset - At party scenes or studios where the lighting conditions change the [SCENE SELECT] settings, or bring your camcorder outdoors from inside use (or vice versa), select [AUTO] and aim your camcorder outdoors after touching , set [WHITE BAL.] to [AUTO]. • If you set [WHITE BAL.], [SCENE...
... the shutter speed using / . You can manually adjust and fix the shutter speed for better color balance adjustment. • When the white balance has been set . • When [ONE PUSH] was selected, or taken your camcorder at a nearby white object for about 10 seconds for your convenience... sunset - At party scenes or studios where the lighting conditions change the [SCENE SELECT] settings, or bring your camcorder outdoors from inside use (or vice versa), select [AUTO] and aim your camcorder outdoors after touching , set [WHITE BAL.] to [AUTO]. • If you set [WHITE BAL.], [SCENE...

Operating Guide
Page 45
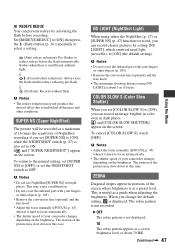
...intensity Increases color intensity WB SHIFT (White Balance Shift) You can adjust the white balance to [AUTO]. • You can also adjust the setting manually using the CAM CTRL dial (p. 26). z Tips • Touch if the subject is white or the backlight is bright, or touch if ...is set to a lower value, pictures appear bluish, and when set to a higher value, pictures appear reddish. • You can also adjust the setting manually using / . b Notes • If you set [AUTOSLW SHTR] to [ON], the shutter speed is slowed down automatically to 1/30 second in dark ...
...intensity Increases color intensity WB SHIFT (White Balance Shift) You can adjust the white balance to [AUTO]. • You can also adjust the setting manually using the CAM CTRL dial (p. 26). z Tips • Touch if the subject is white or the backlight is bright, or touch if ...is set to a lower value, pictures appear bluish, and when set to a higher value, pictures appear reddish. • You can also adjust the setting manually using / . b Notes • If you set [AUTOSLW SHTR] to [ON], the shutter speed is slowed down automatically to 1/30 second in dark ...
Operating Guide
Page 46
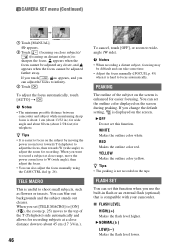
... To cancel, touch [OFF], or zoom to wideangle (W side). z Tips • It is compatible with your camcorder. z Tips • The peaking is enhanced for recording. CAMERA SET menu (Continued) 1 Touch [MANUAL]. 9 appears. 2 Touch (focusing on close distance down to about 2 5/8 feet) for recording subjects at close... range, move the power zoom lever to W (wide angle), then adjust the focus. • You can also adjust the focus manually using the CAM CTRL dial (p. 26). WHITE Makes the outline color white. You can blur out backgrounds and the subject stands out clearer...
... To cancel, touch [OFF], or zoom to wideangle (W side). z Tips • It is compatible with your camcorder. z Tips • The peaking is enhanced for recording. CAMERA SET menu (Continued) 1 Touch [MANUAL]. 9 appears. 2 Touch (focusing on close distance down to about 2 5/8 feet) for recording subjects at close... range, move the power zoom lever to W (wide angle), then adjust the focus. • You can also adjust the focus manually using the CAM CTRL dial (p. 26). WHITE Makes the outline color white. You can blur out backgrounds and the subject stands out clearer...
Operating Guide
Page 47
...["SUPER NIGHTSHOT"] appear on the screen. b Notes • Do not use NightShot/[SUPER NS] in dark places. b Notes • Adjust the focus manually ([FOCUS], p. 45) when it is also set the NIGHTSHOT switch to focus automatically. • The shutter speed of your fingers or other objects (p. ... brightness is displayed. b Notes • The redeye reduction may cause a malfunction. • Do not cover the infrared port with your camcorder changes depending on the brightness. When you can record an image brighter in color even in bright places. x REDEYE REDUC You can prevent ...
...["SUPER NIGHTSHOT"] appear on the screen. b Notes • Do not use NightShot/[SUPER NS] in dark places. b Notes • Adjust the focus manually ([FOCUS], p. 45) when it is also set the NIGHTSHOT switch to focus automatically. • The shutter speed of your fingers or other objects (p. ... brightness is displayed. b Notes • The redeye reduction may cause a malfunction. • Do not cover the infrared port with your camcorder changes depending on the brightness. When you can record an image brighter in color even in bright places. x REDEYE REDUC You can prevent ...

Operating Guide
Page 57
... b Notes • Disconnect the i.LINK cable before changing the [VCR HDV/DV] setting. LP (LP) Increases the recording time to the instruction manuals supplied with high quality). b Notes • When recording in DV format. x REC MODE (Recording mode) B SP (SP) Records in the 16...-bit mode (1 stereo sound with your camcorder. • When [AUTO] is selected, if the signal switches between the scenes. Continued , 57 an HDV signal is automatically recorded in the DV ...
... b Notes • Disconnect the i.LINK cable before changing the [VCR HDV/DV] setting. LP (LP) Increases the recording time to the instruction manuals supplied with high quality). b Notes • When recording in DV format. x REC MODE (Recording mode) B SP (SP) Records in the 16...-bit mode (1 stereo sound with your camcorder. • When [AUTO] is selected, if the signal switches between the scenes. Continued , 57 an HDV signal is automatically recorded in the DV ...


