Operating Guide
Page 8
...Carl Zeiss lens Your camcorder is T -coated to change without notice. About this manual • The images of tapes by Carl Zeiss, in Germany, and Sony Corporation, and produces superior images. Read this first (Continued) On playing back HDV tapes on other devices...HDV format on DV format video cameras or on this camcorder prior to playing them back on this manual are subject to suppress unwanted reflections and faithfully reproduce colors. Also, the lens for your camcorder. • Design and specifications of recording media and other accessories are based on the model HDR-HC7...
...Carl Zeiss lens Your camcorder is T -coated to change without notice. About this manual • The images of tapes by Carl Zeiss, in Germany, and Sony Corporation, and produces superior images. Read this first (Continued) On playing back HDV tapes on other devices...HDV format on DV format video cameras or on this camcorder prior to playing them back on this manual are subject to suppress unwanted reflections and faithfully reproduce colors. Also, the lens for your camcorder. • Design and specifications of recording media and other accessories are based on the model HDR-HC7...

Operating Guide
Page 9
... with the CAM CTRL dial (HDR-HC7 27 Using the flash 27 Recording in dark places (NightShot 28 Adjusting the exposure for backlit subjects 28 Recording in the HDV format 12 Getting Started Step 1:...16:9 (wide) or 4:3 TV 37 Using the Menu Recording/Playback Easy Recording/Playback (Easy Handycam 22 Recording 24 Zooming 26 Recording high quality still images during tape recording (Dual Rec 26 ...the menu items .......... 40 Menu items 41 CAMERA SET menu 43 Settings to adjust your camcorder to the recording conditions MEMORY SET menu 50 Settings for a scene by date of recording ...
... with the CAM CTRL dial (HDR-HC7 27 Using the flash 27 Recording in dark places (NightShot 28 Adjusting the exposure for backlit subjects 28 Recording in the HDV format 12 Getting Started Step 1:...16:9 (wide) or 4:3 TV 37 Using the Menu Recording/Playback Easy Recording/Playback (Easy Handycam 22 Recording 24 Zooming 26 Recording high quality still images during tape recording (Dual Rec 26 ...the menu items .......... 40 Menu items 41 CAMERA SET menu 43 Settings to adjust your camcorder to the recording conditions MEMORY SET menu 50 Settings for a scene by date of recording ...
Operating Guide
Page 11
...format for viewing on older wide TV formats, and on popular DV standard cassette tapes. • Your camcorder adopts the HDV1080i specification, which utilizes 1,080 effective scanning lines, within the HDV standards, and records pictures at the image bit rate of about 4 times or more the amount of a... standard TV resulting in HDV format to keep high quality images for playback or editing when your camcorder is not available. Why shoot in SD (standard definition). 11 Shooting in the HDV format High image quality The HDV format has about 2 times or more the ...
...format for viewing on older wide TV formats, and on popular DV standard cassette tapes. • Your camcorder adopts the HDV1080i specification, which utilizes 1,080 effective scanning lines, within the HDV standards, and records pictures at the image bit rate of about 4 times or more the amount of a... standard TV resulting in HDV format to keep high quality images for playback or editing when your camcorder is not available. Why shoot in SD (standard definition). 11 Shooting in the HDV format High image quality The HDV format has about 2 times or more the ...

Operating Guide
Page 12
...35. Connecting to an HDV1080i non-compliant device Your camcorder can down convert HDV format video to SD (standard definition) image quality to SD (standard definition) image quality for playback on a 16:9 (wide)/4:3 TV (p. 37) Your camcorder can down convert video recorded in HD (high definition)... image quality. Connecting to a computer (p. 74) Using the supplied software, you to copy pictures in the HDV format to enable copying. You can also edit the imported ...
...35. Connecting to an HDV1080i non-compliant device Your camcorder can down convert HDV format video to SD (standard definition) image quality to SD (standard definition) image quality for playback on a 16:9 (wide)/4:3 TV (p. 37) Your camcorder can down convert video recorded in HD (high definition)... image quality. Connecting to a computer (p. 74) Using the supplied software, you to copy pictures in the HDV format to enable copying. You can also edit the imported ...
Operating Guide
Page 15
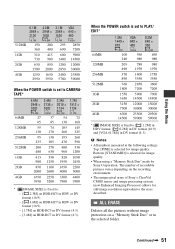
... capacity (approx.) You can view the battery information for up to OFF (CHG), then press DISPLAY/BATT INFO. HDR-HC5 Battery pack Recording Format NP-FH50 Continuous Typical recording recording time time* HDV DV HDV DV 75 80 40 45 80 85 45 45 80 90 45 50 Continued , 15 Getting Started BATT...
... capacity (approx.) You can view the battery information for up to OFF (CHG), then press DISPLAY/BATT INFO. HDR-HC5 Battery pack Recording Format NP-FH50 Continuous Typical recording recording time time* HDV DV HDV DV 75 80 40 45 80 85 45 45 80 90 45 50 Continued , 15 Getting Started BATT...

Operating Guide
Page 16
... a fully charged battery pack. On the battery pack • Before changing the battery pack, slide the POWER switch to the DC IN jack of your camcorder, even when the power cord is damaged. - Middle: When the LCD backlight turns off and zooming. The battery pack is worn-out (for Battery Info... Format NP-FH50 NP-FH60 (supplied) NP-FH70 NP-FH100 LCD panel LCD panel opened* closed HDV DV HDV DV 110 120 125 135 145 160 165 180 235 255 270 290 545 590 615 660 HDR-HC7 Battery pack Recorded Format NP-FH50 NP-FH60 (supplied) NP-FH70 NP-FH100 LCD panel LCD...
... a fully charged battery pack. On the battery pack • Before changing the battery pack, slide the POWER switch to the DC IN jack of your camcorder, even when the power cord is damaged. - Middle: When the LCD backlight turns off and zooming. The battery pack is worn-out (for Battery Info... Format NP-FH50 NP-FH60 (supplied) NP-FH70 NP-FH100 LCD panel LCD panel opened* closed HDV DV HDV DV 110 120 125 135 145 160 165 180 235 255 270 290 545 590 615 660 HDR-HC7 Battery pack Recorded Format NP-FH50 NP-FH60 (supplied) NP-FH70 NP-FH100 LCD panel LCD...
Operating Guide
Page 24
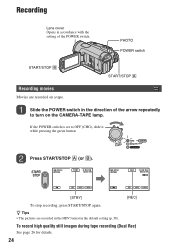
... z Tips • The pictures are recorded on the CAMERA-TAPE lamp. PHOTO POWER switch START/STOP B START/STOP A Recording movies Movies are recorded in the HDV format in the default setting (p. 58). Recording Lens cover Opens in the direction of the POWER switch. Slide the POWER switch in accordance with the...
... z Tips • The pictures are recorded on the CAMERA-TAPE lamp. PHOTO POWER switch START/STOP B START/STOP A Recording movies Movies are recorded in the HDV format in the default setting (p. 58). Recording Lens cover Opens in the direction of the POWER switch. Slide the POWER switch in accordance with the...
Operating Guide
Page 27
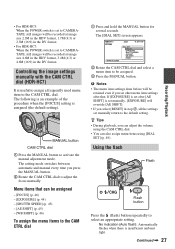
... 2 Rotate the CAM CTRL dial and select a menu item to be recorded at image size 2.3M in the HDV format, 1.7M (4:3) or 2.3M (16:9) in the DV format. • For HDR-HC7: When the POWER switch is useful to assign a frequently used menu item to CAMERATAPE, still images will be assigned.... 3 Press the MANUAL button. Controlling the image settings manually with the CAM CTRL dial (HDR-HC7) It is set to the CAM CTRL dial.
... 2 Rotate the CAM CTRL dial and select a menu item to be recorded at image size 2.3M in the HDV format, 1.7M (4:3) or 2.3M (16:9) in the DV format. • For HDR-HC7: When the POWER switch is useful to assign a frequently used menu item to CAMERATAPE, still images will be assigned.... 3 Press the MANUAL button. Controlling the image settings manually with the CAM CTRL dial (HDR-HC7) It is set to the CAM CTRL dial.

Operating Guide
Page 35
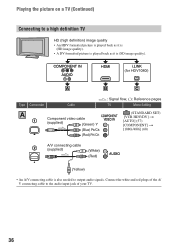
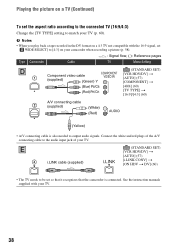
.... The TV may need to the picture on the LCD screen. The output setting of your camcorder and TV, referring to be connected. b Notes • Make all menu settings on the TV when playing back. HDV/DV COMPONENT OUT A/V OUT 4 1 2 Lift up the bottom of connecting to a high ... TV and your device. Some settings may not recognize the video signal properly if the [VCR HDV/DV] or [i.LINK CONV] setting is then set [X.V.COLOR] to [ON] to be adjusted on your camcorder Open the jack cover in the direction of the connection. • When recording, set automatically....
.... The TV may need to the picture on the LCD screen. The output setting of your camcorder and TV, referring to be connected. b Notes • Make all menu settings on the TV when playing back. HDV/DV COMPONENT OUT A/V OUT 4 1 2 Lift up the bottom of connecting to a high ... TV and your device. Some settings may not recognize the video signal properly if the [VCR HDV/DV] or [i.LINK CONV] setting is then set [X.V.COLOR] to [ON] to be adjusted on your camcorder Open the jack cover in the direction of the connection. • When recording, set automatically....
Operating Guide
Page 36
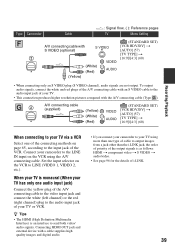
... and red plugs of the A/ V connecting cable to a high definition TV HD (high definition) image quality • An HDV formatted picture is played back as it is (HD image quality). • A DV formatted picture is played back as it ...your TV. 36 COMPONENT IN AUDIO HDMI i.LINK (for HDV1080i) A B C Type Camcorder Cable A 1 Component video cable (supplied) (Green) Y (Blue) PB/CB (Red) PR/CR : Signal flow, ( ): Reference pages TV Menu Setting (STANDARD SET) [VCR HDV/DV] t [AUTO] (57) [COMPONENT] t [1080i/480i] (60) 2 A/V connecting cable (supplied) (White) (Red) (Yellow) ...
... and red plugs of the A/ V connecting cable to a high definition TV HD (high definition) image quality • An HDV formatted picture is played back as it is (HD image quality). • A DV formatted picture is played back as it ...your TV. 36 COMPONENT IN AUDIO HDMI i.LINK (for HDV1080i) A B C Type Camcorder Cable A 1 Component video cable (supplied) (Green) Y (Blue) PB/CB (Red) PR/CR : Signal flow, ( ): Reference pages TV Menu Setting (STANDARD SET) [VCR HDV/DV] t [AUTO] (57) [COMPONENT] t [1080i/480i] (60) 2 A/V connecting cable (supplied) (White) (Red) (Yellow) ...
Operating Guide
Page 37
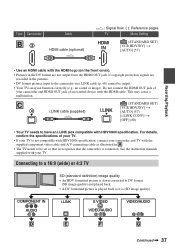
... video cable and A/V connecting cable as it recognizes that the camcorder is (SD image quality). C 4 i.LINK cable (supplied) (STANDARD SET) [VCR HDV/DV] t [AUTO] (57) [i.LINK CONV] t [OFF] (60) • Your TV needs to the camcorder via i.LINK cable (p. 68) cannot be set so that it... is connected. See the instruction manuals supplied with your camcorder and TV with the HDMI cable. This may ...
... video cable and A/V connecting cable as it recognizes that the camcorder is (SD image quality). C 4 i.LINK cable (supplied) (STANDARD SET) [VCR HDV/DV] t [AUTO] (57) [i.LINK CONV] t [OFF] (60) • Your TV needs to the camcorder via i.LINK cable (p. 68) cannot be set so that it... is connected. See the instruction manuals supplied with your camcorder and TV with the HDMI cable. This may ...
Operating Guide
Page 38
... 60). E 4 i.LINK cable (supplied) (STANDARD SET) [VCR HDV/DV] t [AUTO] (57) [i.LINK CONV] t [ON HDV t DV] (60) • The TV needs to be set so that it recognizes that the camcorder is also needed to output audio signals. Connect the white and red ... recording a picture (p. 58). : Signal flow, ( ): Reference pages Type Camcorder Cable TV Menu Setting D 1 Component video cable (supplied) (Green) Y (Blue) PB/CB (Red) PR/CR (STANDARD SET) [VCR HDV/DV] t [AUTO] (57) [COMPONENT] t [480i] (60) [TV TYPE] t [16:9]/[4:3] (60) 2 A/V connecting cable (supplied) (White) (Red) (...
... 60). E 4 i.LINK cable (supplied) (STANDARD SET) [VCR HDV/DV] t [AUTO] (57) [i.LINK CONV] t [ON HDV t DV] (60) • The TV needs to be set so that it recognizes that the camcorder is also needed to output audio signals. Connect the white and red ... recording a picture (p. 58). : Signal flow, ( ): Reference pages Type Camcorder Cable TV Menu Setting D 1 Component video cable (supplied) (Green) Y (Blue) PB/CB (Red) PR/CR (STANDARD SET) [VCR HDV/DV] t [AUTO] (57) [COMPONENT] t [480i] (60) [TV TYPE] t [16:9]/[4:3] (60) 2 A/V connecting cable (supplied) (White) (Red) (...
Operating Guide
Page 39
Set the input selector on the VCR to send both video/ audio signals. Type Camcorder Cable A/V connecting cable with the A/V connecting cable (Type ). 2 A/V connecting cable (supplied) (Yellow) (White) (Red) (STANDARD SET) [VCR HDV/DV] t [AUTO] (57) [TV TYPE] t [16:9]/[4:3] (60) Recording/Playback... audio signals, connect the white and red plugs of the A/V connecting cable with an S VIDEO cable to the audio input jack of your camcorder to your TV. • This connection produces higher resolution pictures compared with S VIDEO (optional) 2 (Yellow) (White) (Red) : Signal...
Set the input selector on the VCR to send both video/ audio signals. Type Camcorder Cable A/V connecting cable with the A/V connecting cable (Type ). 2 A/V connecting cable (supplied) (Yellow) (White) (Red) (STANDARD SET) [VCR HDV/DV] t [AUTO] (57) [TV TYPE] t [16:9]/[4:3] (60) Recording/Playback... audio signals, connect the white and red plugs of the A/V connecting cable with an S VIDEO cable to the audio input jack of your camcorder to your TV. • This connection produces higher resolution pictures compared with S VIDEO (optional) 2 (Yellow) (White) (Red) : Signal...
Operating Guide
Page 42
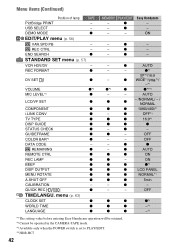
... Easy Handycam operation will be retained. *2 Cannot be operated in the CAMERA-TAPE mode. *3 Available only when the POWER switch is set to PLAY/EDIT. *4 HDR-HC7 42 ON - z WIDE*1/ *1/ -*1 z*4 z z*1*3 - - OFF - - z AUTO z z ON z - ON z z z*1 z z LCD PANEL z z NORMAL*1 z z 5min - z - - OFF - USB SELECT - AUTO z z - /NORMAL/ - / NORMAL z z 1080i/480i*1 - z - END SEARCH z STANDARD SET menu (p. 57) VCR HDV/DV...
... Easy Handycam operation will be retained. *2 Cannot be operated in the CAMERA-TAPE mode. *3 Available only when the POWER switch is set to PLAY/EDIT. *4 HDR-HC7 42 ON - z WIDE*1/ *1/ -*1 z*4 z z*1*3 - - OFF - - z AUTO z z ON z - ON z z z*1 z z LCD PANEL z z NORMAL*1 z z 5min - z - - OFF - USB SELECT - AUTO z z - /NORMAL/ - / NORMAL z z 1080i/480i*1 - z - END SEARCH z STANDARD SET menu (p. 57) VCR HDV/DV...
Operating Guide
Page 51
ALL ERASE Deletes all the pictures without image protection on HDR-HC7 in the selected folder. Using the Menu 6.1M 4.6M 3.1M ...* [ IMAGE SIZE] is selected for image quality. • When using a "Memory Stick Duo" made by Sony Corporation. b Notes • All numbers measured at the following settings: Top: [FINE] is fixed to the ... of Sony's ClearVid CMOS sensor and image processing system (new Enhanced Imaging Processor) allows for still image resolution equivalent to : - [ 2.3M] on HDR-HC5 in HDV or DV format (16:9) - [ 4.6M] on HDR-HC7 in HDV or DV format (16:9) - [1.7M] on HDR-HC5...
ALL ERASE Deletes all the pictures without image protection on HDR-HC7 in the selected folder. Using the Menu 6.1M 4.6M 3.1M ...* [ IMAGE SIZE] is selected for image quality. • When using a "Memory Stick Duo" made by Sony Corporation. b Notes • All numbers measured at the following settings: Top: [FINE] is fixed to the ... of Sony's ClearVid CMOS sensor and image processing system (new Enhanced Imaging Processor) allows for still image resolution equivalent to : - [ 2.3M] on HDR-HC5 in HDV or DV format (16:9) - [ 4.6M] on HDR-HC7 in HDV or DV format (16:9) - [1.7M] on HDR-HC5...
Operating Guide
Page 54
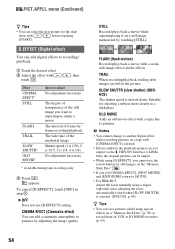
... recording/playback The fade time of the still image you set [CINEMA EFECT], [SPOT METER] and [EXPOSURE] return to [AUTO]. • For HDR-HC5: Adjust the focus manually using a tripod (optional) since adjusting the focus automatically is hard when [SLOW SHUTTR] is selected. ([FOCUS], p. 46... picture for the slide show with a serialstill-image effect (strobe effect). TRAIL When recording/playback, trailing after images are not output via the HDV/DV Interface (i.LINK). menu (Continued) z Tips • You can save pictures edited using [D.EFFECT], you cannot use [D.EFFECT] setting. ...
... recording/playback The fade time of the still image you set [CINEMA EFECT], [SPOT METER] and [EXPOSURE] return to [AUTO]. • For HDR-HC5: Adjust the focus manually using a tripod (optional) since adjusting the focus automatically is hard when [SLOW SHUTTR] is selected. ([FOCUS], p. 46... picture for the slide show with a serialstill-image effect (strobe effect). TRAIL When recording/playback, trailing after images are not output via the HDV/DV Interface (i.LINK). menu (Continued) z Tips • You can save pictures edited using [D.EFFECT], you cannot use [D.EFFECT] setting. ...

Operating Guide
Page 55
... Pictures appear as a pale pastel drawing. Pictures appear as an illustration with strong contrast. NEG.ART The color and brightness are not output via the HDV/DV Interface (i.LINK). Touch to set to shoot fast actions such as a 12 second slow-motion movie. [Recording···] disappears, when recording is...
... Pictures appear as a pale pastel drawing. Pictures appear as an illustration with strong contrast. NEG.ART The color and brightness are not output via the HDV/DV Interface (i.LINK). Touch to set to shoot fast actions such as a 12 second slow-motion movie. [Recording···] disappears, when recording is...
Operating Guide
Page 56
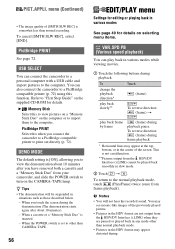
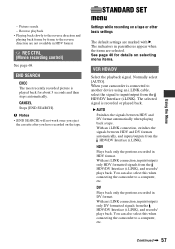
...not hear the recorded sound. When you have removed both a cassette and a "Memory Stick Duo" from the HDV/DV Interface (i.LINK) when they are not output from your camcorder, and slide the POWER switch to "First Step Guide" on the supplied CD-ROM for details on selecting menu ...quality of [SMTH SLW REC] is [ON], allowing you to view the demonstration about 10 minutes). - B Memory Stick Select this when you connect the camcorder to a PictBridge compatible printer to the computer. To Touch change the playback direction* play back slowly** (frame) To reverse direction: (frame) t play...
...not hear the recorded sound. When you have removed both a cassette and a "Memory Stick Duo" from the HDV/DV Interface (i.LINK) when they are not output from your camcorder, and slide the POWER switch to "First Step Guide" on the supplied CD-ROM for details on selecting menu ...quality of [SMTH SLW REC] is [ON], allowing you to view the demonstration about 10 minutes). - B Memory Stick Select this when you connect the camcorder to a PictBridge compatible printer to the computer. To Touch change the playback direction* play back slowly** (frame) To reverse direction: (frame) t play...
Operating Guide
Page 57
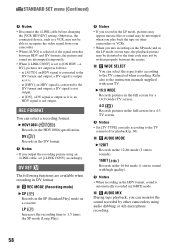
...settings The default settings are marked with B. With an i.LINK connection, switches the signals between HDV and DV format automatically when playing back a tape. You can also select this when connecting the camcorder to a computer, etc. Continued , 57 END SEARCH EXEC The most recently recorded picture ...menu Settings while recording on the tape. See page 40 for about 5 seconds and then stops automatically. HDV Plays back only the portions recorded in DV format. When your camcorder is connected to another device using an i.LINK cable, select the signal to the reverse direction are ...
...settings The default settings are marked with B. With an i.LINK connection, switches the signals between HDV and DV format automatically when playing back a tape. You can also select this when connecting the camcorder to a computer, etc. Continued , 57 END SEARCH EXEC The most recently recorded picture ...menu Settings while recording on the tape. See page 40 for about 5 seconds and then stops automatically. HDV Plays back only the portions recorded in DV format. When your camcorder is connected to another device using an i.LINK cable, select the signal to the reverse direction are ...
Operating Guide
Page 58
...dubbing or 4ch microphone recording. 58 a DV signal is output as follows: - b Notes • If you can monitor the sound recorded by other camcorders or VCRs. • When you mix recordings in the SP mode and in the 16-bit mode (1 stereo sound with your... Set [TV TYPE] correctly according to the TV connected when recording. STANDARD SET menu (Continued) b Notes • Disconnect the i.LINK cable before changing the [VCR HDV/DV] setting. B HDV1080i ( ) Records in [16BIT] mode. REC FORMAT You can select the aspect ratio according to the TV connected for a 16:9 (wide)...
...dubbing or 4ch microphone recording. 58 a DV signal is output as follows: - b Notes • If you can monitor the sound recorded by other camcorders or VCRs. • When you mix recordings in the SP mode and in the 16-bit mode (1 stereo sound with your... Set [TV TYPE] correctly according to the TV connected when recording. STANDARD SET menu (Continued) b Notes • Disconnect the i.LINK cable before changing the [VCR HDV/DV] setting. B HDV1080i ( ) Records in [16BIT] mode. REC FORMAT You can select the aspect ratio according to the TV connected for a 16:9 (wide)...

