
Operating Instructions
Page 3
... operational for a digital device pursuant to an outlet on a circuit different from that into which utilizes 1080 effective scanning lines, within the HDV standards, and records pictures at the image bit rate of time may cause malfunctions. Connect the equipment to Subpart B of Part 15 of... to correct the interference by one or more of the FCC Rules. Reorient or relocate the receiving antenna. - z Tip • Your camcorder adopts the HDV1080i specification, which the receiver is encouraged to try to radio communications. To view your authority to Part 15 of the following ...
... operational for a digital device pursuant to an outlet on a circuit different from that into which utilizes 1080 effective scanning lines, within the HDV standards, and records pictures at the image bit rate of time may cause malfunctions. Connect the equipment to Subpart B of Part 15 of... to correct the interference by one or more of the FCC Rules. Reorient or relocate the receiving antenna. - z Tip • Your camcorder adopts the HDV1080i specification, which the receiver is encouraged to try to radio communications. To view your authority to Part 15 of the following ...
Operating Instructions
Page 4
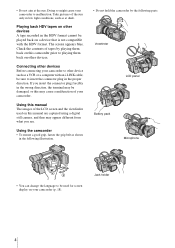
... direction. • Do not aim at dusk. Doing so might cause your camcorder to malfunction. Connecting other devices Before connecting your camcorder to other device such as a VCR or a computer with the HDV format. If you see. Take pictures of the sun only in low light conditions... a malfunction of the LCD screen and the viewfinder used for screen display on other devices. The screen appears blue. Playing back HDV tapes on your camcorder. Jack holder 4 Using this manual are captured using a digital still camera, and thus may be used on this manual The...
... direction. • Do not aim at dusk. Doing so might cause your camcorder to malfunction. Connecting other devices Before connecting your camcorder to other device such as a VCR or a computer with the HDV format. If you see. Take pictures of the sun only in low light conditions... a malfunction of the LCD screen and the viewfinder used for screen display on other devices. The screen appears blue. Playing back HDV tapes on your camcorder. Jack holder 4 Using this manual are captured using a digital still camera, and thus may be used on this manual The...
Operating Instructions
Page 7
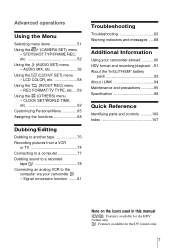
...74 Connecting to a computer 77 Dubbing sound to a recorded tape 78 Connecting an analog VCR to the computer via your camcorder abroad 90 HDV format and recording/playback ..91 About the "InfoLITHIUM" battery pack 92 About i.LINK 94 Maintenance and precautions 95 Specification 98... Quick Reference Identifying parts and controls ...........100 Index 107 Note on the icons used in this manual : Features available for the HDV format only. : Features available for the DV format only. 7 Signal conversion function ........81 Troubleshooting Troubleshooting 83 Warning indicators and ...
...74 Connecting to a computer 77 Dubbing sound to a recorded tape 78 Connecting an analog VCR to the computer via your camcorder abroad 90 HDV format and recording/playback ..91 About the "InfoLITHIUM" battery pack 92 About i.LINK 94 Maintenance and precautions 95 Specification 98... Quick Reference Identifying parts and controls ...........100 Index 107 Note on the icons used in this manual : Features available for the HDV format only. : Features available for the DV format only. 7 Signal conversion function ........81 Troubleshooting Troubleshooting 83 Warning indicators and ...
Operating Instructions
Page 13
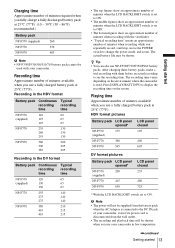
... you use a fully charged battery pack at 25°C (77°F). z Tip • You can also use your camcorder. Press DISPLAY/BATT INFO to display the recording time on the environment where the camcorder is disconnected from the battery pack when the AC Adaptor is connected to the DC IN jack of... BACKLIGHT switch is set to ON. • The middle figures show an approximate number of minutes when the LCD BACKLIGHT switch is set to ON. HDV format pictures Battery pack LCD panel opened* NP-F570 175 (supplied) NP-F770 360 NP-F970 545 LCD panel closed 195 400 605 DV format...
... you use a fully charged battery pack at 25°C (77°F). z Tip • You can also use your camcorder. Press DISPLAY/BATT INFO to display the recording time on the environment where the camcorder is disconnected from the battery pack when the AC Adaptor is connected to the DC IN jack of... BACKLIGHT switch is set to ON. • The middle figures show an approximate number of minutes when the LCD BACKLIGHT switch is set to ON. HDV format pictures Battery pack LCD panel opened* NP-F570 175 (supplied) NP-F770 360 NP-F970 545 LCD panel closed 195 400 605 DV format...
Operating Instructions
Page 20
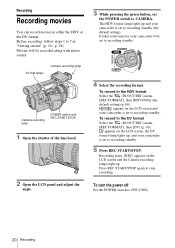
p. 18). Movies will be set to recording standby. 4 Select the recording format. The HDV format lamp lights up , and your camcorder is set the POWER switch to stop recording. To record in "Getting started" (p. 10 - Format lamps Camera recording lamp Camera recording lamp POWER switch ...the (IN/OUT REC) menu, [REC FORMAT], then [HDV1080i] (the default setting)(p. 60). To record in either the HDV or the DV format. Recording starts. [REC] appears on the LCD screen and your camcorder is set to recording standby. appears on the LCD screen, the DV format lamp lights up and your...
p. 18). Movies will be set to recording standby. 4 Select the recording format. The HDV format lamp lights up , and your camcorder is set the POWER switch to stop recording. To record in "Getting started" (p. 10 - Format lamps Camera recording lamp Camera recording lamp POWER switch ...the (IN/OUT REC) menu, [REC FORMAT], then [HDV1080i] (the default setting)(p. 60). To record in either the HDV or the DV format. Recording starts. [REC] appears on the LCD screen and your camcorder is set to recording standby. appears on the LCD screen, the DV format lamp lights up and your...
Operating Instructions
Page 21
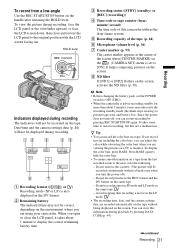
...E Recording capacity of the tape (p. 64) F Microphone volume level (p. 36) G Center marker (p. 55) The center marker appears at the center of this camcorder utilizes the drop-frame system. Since the power does not turn off, you turn the power off). - HOLD lever Indicators displayed during playback by pressing...code of the screen when [CENTER MARKR] on the screen. It helps composing pictures on the (CAMERA SET) menu is also displayed in the HDV format and the DV format on a tape from a low-angle Use the REC START/STOP button on a TV or monitor. You can ...
...E Recording capacity of the tape (p. 64) F Microphone volume level (p. 36) G Center marker (p. 55) The center marker appears at the center of this camcorder utilizes the drop-frame system. Since the power does not turn off, you turn the power off). - HOLD lever Indicators displayed during playback by pressing...code of the screen when [CENTER MARKR] on the screen. It helps composing pictures on the (CAMERA SET) menu is also displayed in the HDV format and the DV format on a tape from a low-angle Use the REC START/STOP button on a TV or monitor. You can ...
Operating Instructions
Page 22
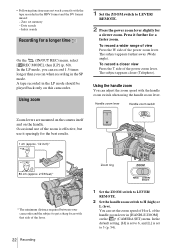
.... 1 cm (approx. 1/2 inch)* 80 cm (approx. 2 5/8 feet)* Zoom ring * The minimum distance required between your camcorder and the subject to get a sharp focus with that side of the handle zoom lever in the HDV format and the DV format mixed: - The subject appears farther away (Wide angle). A tape recorded in the... In the LP mode, you can record 1.5 times longer than you can when recording in the LP mode should be played back only on this camcorder. To record a closer view Press the T side of the power zoom lever. Handle zoom lever Handle zoom switch Zoom levers are mounted on the...
.... 1 cm (approx. 1/2 inch)* 80 cm (approx. 2 5/8 feet)* Zoom ring * The minimum distance required between your camcorder and the subject to get a sharp focus with that side of the handle zoom lever in the HDV format and the DV format mixed: - The subject appears farther away (Wide angle). A tape recorded in the... In the LP mode, you can record 1.5 times longer than you can when recording in the LP mode should be played back only on this camcorder. To record a closer view Press the T side of the power zoom lever. Handle zoom lever Handle zoom switch Zoom levers are mounted on the...

Operating Instructions
Page 34
...are registered with picture quality settings for the following recording conditions. Picture profile Recording condition number PP1 Appropriate setting to record in the HDV format PP2 Appropriate setting to record in the DV format PP3 Appropriate setting to record people PP4 Appropriate setting to record film-like ... quality by adjusting the color intensity, brightness, white balance, etc. PICTURE PROFILE You can change the above default settings at your camcorder to 15 (clearer) 34 Recording Customizing the picture quality or sound Customizing the picture quality -
...are registered with picture quality settings for the following recording conditions. Picture profile Recording condition number PP1 Appropriate setting to record in the HDV format PP2 Appropriate setting to record in the DV format PP3 Appropriate setting to record people PP4 Appropriate setting to record film-like ... quality by adjusting the color intensity, brightness, white balance, etc. PICTURE PROFILE You can change the above default settings at your camcorder to 15 (clearer) 34 Recording Customizing the picture quality or sound Customizing the picture quality -
Operating Instructions
Page 42
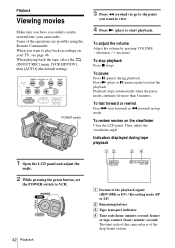
...or rewind Press M (fast forward) or m (rewind) in stop ). When playing back the tape, select the (IN/OUT REC) menu, [VCR HDV/DV], then [AUTO] (the default setting). Playback stops automatically when the pause mode continues for more than 5 minutes. When you want to play ) ...Remaining battery C Tape transport indicator D Time code (hour: minute: second: frame) or tape counter (hour: minute: second) The time code of this camcorder is of the operations are possible using the Remote Commander. Indicators displayed during playback. POWER switch 3 Press m (rewind) to go to the point you ...
...or rewind Press M (fast forward) or m (rewind) in stop ). When playing back the tape, select the (IN/OUT REC) menu, [VCR HDV/DV], then [AUTO] (the default setting). Playback stops automatically when the pause mode continues for more than 5 minutes. When you want to play ) ...Remaining battery C Tape transport indicator D Time code (hour: minute: second: frame) or tape counter (hour: minute: second) The time code of this camcorder is of the operations are possible using the Remote Commander. Indicators displayed during playback. POWER switch 3 Press m (rewind) to go to the point you ...
Operating Instructions
Page 44
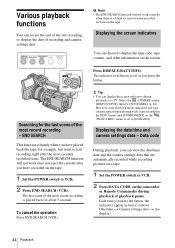
...back a tape recorded in turn as you can choose to VCR. 2 Press DATA CODE on the camcorder or Remote Commander during playback on a TV. Data code During playback, you press the button. Various...scene of the most recent recording is handy when you press the button, the indicators appear in the HDV format, and [COMPONENT] on the (IN/OUT REC) menu is a blank section between recorded ...other information on the tape. END SEARCH This function is played back for example, but want to [1080i/480i]. b Note • The END SEARCH function will not work correctly when there is set to...
...back a tape recorded in turn as you can choose to VCR. 2 Press DATA CODE on the camcorder or Remote Commander during playback on a TV. Data code During playback, you press the button. Various...scene of the most recent recording is handy when you press the button, the indicators appear in the HDV format, and [COMPONENT] on the (IN/OUT REC) menu is a blank section between recorded ...other information on the tape. END SEARCH This function is played back for example, but want to [1080i/480i]. b Note • The END SEARCH function will not work correctly when there is set to...
Operating Instructions
Page 46
... (supplied) Green i.LINK cable (optional) Blue Red Signal flow Connect your camcorder and your TV is connected. When the picture recorded in the HDV format, set so that it recognizes that the camcorder is compatible with HDV/DV and has an i.LINK jack. • Before connecting the i.LINK cable..., select the (IN/OUT REC) menu, [VCR HDV/DV], then [AUTO] (the default setting). &#...
... (supplied) Green i.LINK cable (optional) Blue Red Signal flow Connect your camcorder and your TV is connected. When the picture recorded in the HDV format, set so that it recognizes that the camcorder is compatible with HDV/DV and has an i.LINK jack. • Before connecting the i.LINK cable..., select the (IN/OUT REC) menu, [VCR HDV/DV], then [AUTO] (the default setting). &#...
Operating Instructions
Page 47
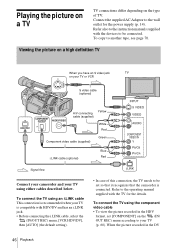
... audio input jack of the A/V connecting cable (supplied). Playback 47 Playback This connection produces pictures more than one type of cables to your camcorder to output the pictures in analog signal, the output signals have priority in the following order: COMPONENT OUTPUT jack t S video jack t AUDIO...the TV connected. Otherwise, the TV might not be output when you set [VCR HDV/DV] before connecting the i.LINK cable. format is played back, an equivalent signal with [480i] is output, even if [1080i/480i] is selected. • Only video signals are output from the COMPONENT OUT...
... audio input jack of the A/V connecting cable (supplied). Playback 47 Playback This connection produces pictures more than one type of cables to your camcorder to output the pictures in analog signal, the output signals have priority in the following order: COMPONENT OUTPUT jack t S video jack t AUDIO...the TV connected. Otherwise, the TV might not be output when you set [VCR HDV/DV] before connecting the i.LINK cable. format is played back, an equivalent signal with [480i] is output, even if [1080i/480i] is selected. • Only video signals are output from the COMPONENT OUT...
Operating Instructions
Page 48
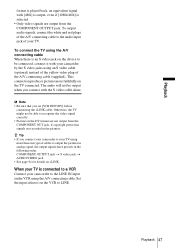
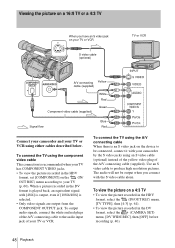
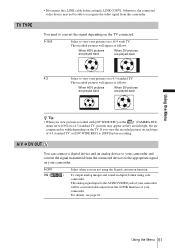
...). To connect the TV using the component video cable This connection is an S video jack on a 4:3 TV • To view the picture recorded in the HDV format, select the (IN/OUT REC) menu, [TV TYPE], then [4:3] (p. 61). • To view the picture recorded in the... (supplied) Component video cable (supplied) White Red Green Signal flow Blue Red Connect your camcorder and your TV or VCR. Viewing the picture on a 16:9 TV or a 4:3 TV When you connect with [480i] is output, even if [1080i/480i] is played back, an equivalent signal with the S video cable alone. To connect...
...). To connect the TV using the component video cable This connection is an S video jack on a 4:3 TV • To view the picture recorded in the HDV format, select the (IN/OUT REC) menu, [TV TYPE], then [4:3] (p. 61). • To view the picture recorded in the... (supplied) Component video cable (supplied) White Red Green Signal flow Blue Red Connect your camcorder and your TV or VCR. Viewing the picture on a 16:9 TV or a 4:3 TV When you connect with [480i] is output, even if [1080i/480i] is played back, an equivalent signal with the S video cable alone. To connect...
Operating Instructions
Page 56
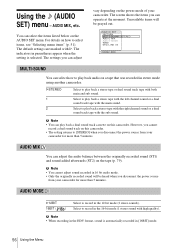
... to record in the 12-bit mode (2 stereo sounds). ) Select to play back audio on a tape that was recorded in stereo mode using another camcorder. The default settings are marked with high quality). The screen shows the items you cannot record a dual sound track on the tape (p. 79). AUD... back a dual sound track cassette on how to select items, see "Selecting menu items" (p. 51). b Note • When recording in the HDV format, sound is automatically recorded in parentheses appear when the setting is selected. GSTEREO 1 2 Select to play back a stereo tape with the right channel...
... to record in the 12-bit mode (2 stereo sounds). ) Select to play back audio on a tape that was recorded in stereo mode using another camcorder. The default settings are marked with high quality). The screen shows the items you cannot record a dual sound track on the tape (p. 79). AUD... back a dual sound track cassette on how to select items, see "Selecting menu items" (p. 51). b Note • When recording in the HDV format, sound is automatically recorded in parentheses appear when the setting is selected. GSTEREO 1 2 Select to play back a stereo tape with the right channel...

Operating Instructions
Page 59
...can select the items listed below on how to record/play back the signals in the HDV format only. When the camcorder is converted to be input/output from the HDV/DV jack. Select this when connecting the camcorder to a computer, etc. (p. 77). • Select this to play back the...DV automatically. • Select this to play back the input/ output signals in the HDV format only. • For an i.LINK connection, select this camcorder. • When [AUTO] is selected and the signal switches between HDV and DV automatically. • For an i.LINK connection, select this to record/play ...
...can select the items listed below on how to record/play back the signals in the HDV format only. When the camcorder is converted to be input/output from the HDV/DV jack. Select this when connecting the camcorder to a computer, etc. (p. 77). • Select this to play back the...DV automatically. • Select this to play back the input/ output signals in the HDV format only. • For an i.LINK connection, select this camcorder. • When [AUTO] is selected and the signal switches between HDV and DV automatically. • For an i.LINK connection, select this to record/play ...
Operating Instructions
Page 60
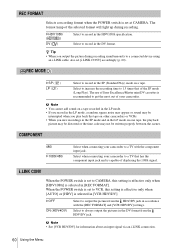
...LP ) Select to record in the HDV1080i specification. COMPONENT 480i G1080i/480i Select when connecting your camcorder. GOFF ON (HDVcDV) Select to output the pictures from the HDV/DV jack. b Note • See [VCR HDV/DV] for information about an input signal via an i.LINK connection. 60 Using the Menu z...input jack and is recommended to get the most out of displaying the 1080i signal. The use of Sony Excellence/Master mini DV cassettes is capable of your camcorder to a TV with the [REC FORMAT] and [VCR HDV/DV] settings. REC FORMAT Selects a recording format when the POWER ...
...LP ) Select to record in the HDV1080i specification. COMPONENT 480i G1080i/480i Select when connecting your camcorder. GOFF ON (HDVcDV) Select to output the pictures from the HDV/DV jack. b Note • See [VCR HDV/DV] for information about an input signal via an i.LINK connection. 60 Using the Menu z...input jack and is recommended to get the most out of displaying the 1080i signal. The use of Sony Excellence/Master mini DV cassettes is capable of your camcorder to a TV with the [REC FORMAT] and [VCR HDV/DV] settings. REC FORMAT Selects a recording format when the POWER ...
Operating Instructions
Page 61
...of 4:3 standard TV, set to recognize the video signal from the i.LINK Interface of your camcorder. The analog signal input to view your camcorder. The recorded pictures will appear as follows: When HDV pictures are played back When DV pictures are played back 4:3 Select to the AUDIO/VIDEO ... TV. Otherwise, the connected video device may not be converted and output from this camcorder. The recorded pictures will be able to [ON] on a 4:3 standard TV, pictures may appear as follows: When HDV pictures are played back When DV pictures are played back z Tip • When ...
...of 4:3 standard TV, set to recognize the video signal from the i.LINK Interface of your camcorder. The analog signal input to view your camcorder. The recorded pictures will appear as follows: When HDV pictures are played back When DV pictures are played back 4:3 Select to the AUDIO/VIDEO ... TV. Otherwise, the connected video device may not be converted and output from this camcorder. The recorded pictures will be able to [ON] on a 4:3 standard TV, pictures may appear as follows: When HDV pictures are played back When DV pictures are played back z Tip • When ...

Operating Instructions
Page 63
... of the iris dial to open or close the iris and decrease the light volume. IRIS DIAL You can select the rotation direction of your camcorder during playback. GNORMAL OPPOSITE Select to rotate clockwise when looked at double the normal height. ,continued Using the Menu 63 Select to display the... date and time, or the camera settings data during recording. Select this setting in [VCR HDV/ DV] lights up during playback. The lamp of the recording lamp. The i.LINK lamp also does not light up according to the format of ...
... of the iris dial to open or close the iris and decrease the light volume. IRIS DIAL You can select the rotation direction of your camcorder during playback. GNORMAL OPPOSITE Select to rotate clockwise when looked at double the normal height. ,continued Using the Menu 63 Select to display the... date and time, or the camera settings data during recording. Select this setting in [VCR HDV/ DV] lights up during playback. The lamp of the recording lamp. The i.LINK lamp also does not light up according to the format of ...
Operating Instructions
Page 70
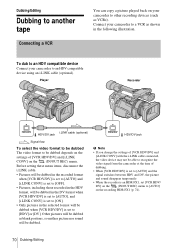
... to be dubbed when [VCR HDV/DV] is an HDR-FX1, set to [HDV] or [DV]. Other pictures will be dubbed as blank portions, so neither picture nor sound will be dubbed depends on the settings of [VCR HDV/DV] and [i.LINK CONV] on your camcorder to other recording devices (such ... on the recording HDR-FX1 (p. 74). 70 Dubbing/Editing Dubbing/Editing Dubbing to another tape Connecting a VCR You can copy a picture played back on the (IN/OUT REC) menu. Connect your camcorder to a VCR as VCRs). To dub to an HDV compatible device Connect your camcorder to an HDV compatible device using an...
... to be dubbed when [VCR HDV/DV] is an HDR-FX1, set to [HDV] or [DV]. Other pictures will be dubbed as blank portions, so neither picture nor sound will be dubbed depends on the settings of [VCR HDV/DV] and [i.LINK CONV] on your camcorder to other recording devices (such ... on the recording HDR-FX1 (p. 74). 70 Dubbing/Editing Dubbing/Editing Dubbing to another tape Connecting a VCR You can copy a picture played back on the (IN/OUT REC) menu. Connect your camcorder to a VCR as VCRs). To dub to an HDV compatible device Connect your camcorder to an HDV compatible device using an...

Operating Instructions
Page 71
...flow To select the video format to be dubbed The video format to recognize the video signal from the camcorder at the time of [VCR HDV/DV] (p. 59) and [i.LINK CONV] (p. 60) in the HDV format, will be dubbed as blank portions, so neither picture nor sound will be recorded. • When... using an i.LINK cable (optional). To dub to a DV device Connect your camcorder to [AUTO] and the signal switches between HDV and DV, the picture and sound disappear temporarily. b Note • If you change the settings of [VCR HDV/DV] and [i.LINK CONV] with the i.LINK cable connected, the video device ...
...flow To select the video format to be dubbed The video format to recognize the video signal from the camcorder at the time of [VCR HDV/DV] (p. 59) and [i.LINK CONV] (p. 60) in the HDV format, will be dubbed as blank portions, so neither picture nor sound will be recorded. • When... using an i.LINK cable (optional). To dub to a DV device Connect your camcorder to [AUTO] and the signal switches between HDV and DV, the picture and sound disappear temporarily. b Note • If you change the settings of [VCR HDV/DV] and [i.LINK CONV] with the i.LINK cable connected, the video device ...


